


介绍
RecyclerView的开发中,我们通常会遇到一行显示不下内容的情况,产品会要求我们的item是可以滚动的,并且头部是固定的。特别在股票行情类相关的app上,这样的场景是非常多的,所以封装了如下的自定义组件。
效果图
首先上效果图,可以看到可以横向滚动,头部固定不动,并且支持侧滑拖出彩蛋“hello”,这里的实现效果是模仿的同花顺的自选股池
 |
|
| — | — |
如何实现
1、架构图
最外层使用RecyclerView,item使用LinearLayout布局,左边是一个固定的头部,我这里使用的是TextView,右边是一个自定义的ScrollView布局。 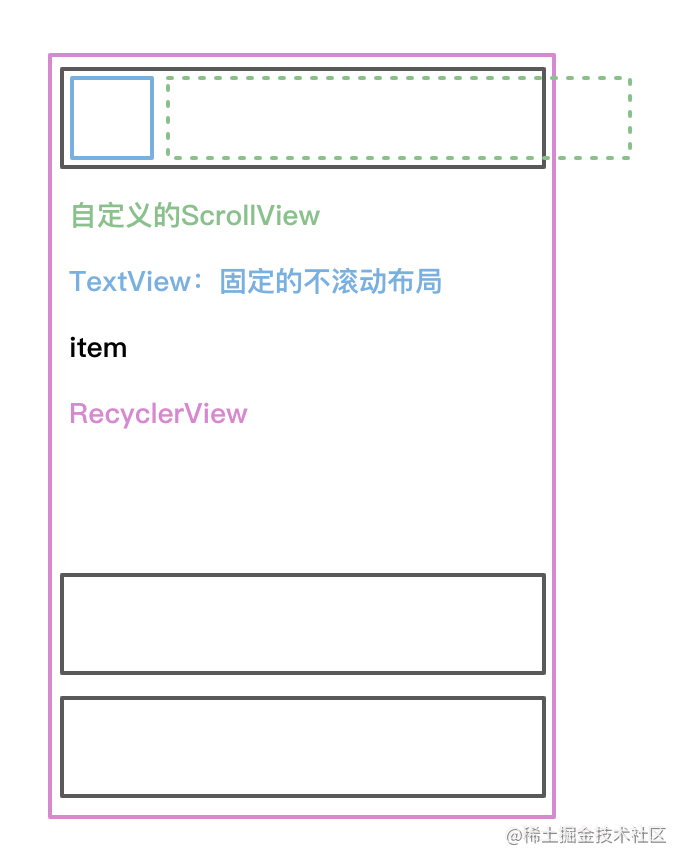
2、自定义SwipeHorizontalScrollView
实现onMeasure
首先MeasureSpec.getSize(widthMeasureSpec)用来测量当前控件在屏幕内的可显示宽度viewWidth,即屏幕宽度减去头布局的宽度。
接下来遍历子view,通过measureChildWithMargins测量出每个子view的宽高,这里需要重写generateLayoutParams()。然后累加子view的宽度,得到整个控件的总宽度contentWidth。contentHeight需要比较子view的高度,因为每个子view的高度可能不一样,进行比较取得子view最大高度为控件的高度。
override fun generateLayoutParams(attrs: AttributeSet?): LayoutParams {
    return MarginLayoutParams(context, attrs)
}

override fun onMeasure(widthMeasureSpec: Int, heightMeasureSpec: Int) {
    super.onMeasure(widthMeasureSpec, heightMeasureSpec)
    if (viewWidth == 0)
        viewWidth = MeasureSpec.getSize(widthMeasureSpec)
    var contentWidth = 0
    var contentHeight = 0
    for (i in 0 until childCount) {
        val childView = getChildAt(i)
        if (childView.visibility != View.GONE) {
            measureChildWithMargins(childView, 0, 0, heightMeasureSpec, 0)
            contentWidth += childView.measuredWidth
            contentHeight = max(contentHeight, childView.measuredHeight)
        }
    }
    setMeasuredDimension(contentWidth + paddingStart + paddingEnd, contentHeight + paddingTop + paddingBottom)
}
实现onLayout
遍历子view从左往右布局。这里如果设置了开启隐藏左边view的配置并且是第一个元素的时候,layoutLeft = -childViewWidth,向左偏移view进行隐藏。
override fun onLayout(changed: Boolean, l: Int, t: Int, r: Int, b: Int) {
    var layoutLeft = 0
    for (i in 0 until childCount) {
        val childView = getChildAt(i)
        val childViewWidth = childView.measuredWidth
        val childViewHeight = childView.measuredHeight
        // 需要隐藏左边第一个view&&是第一个元素的时候
        if (isNeedHideLeftView && i == 0) {
            layoutLeft = -childViewWidth
        }
        childView.layout(layoutLeft, paddingTop, layoutLeft + childViewWidth, paddingTop + childViewHeight)
        layoutLeft += childViewWidth
    }
}
监听所有的scrollview
在自定义的RecyclerView中定义一个scrollViews用来记录屏幕内可见的scrollView,同步滚动状态。原因是如果在SwipeHorizontalScrollView中定义的话,那么每个控件都维护一个集合效率会很低。通过set方法将自定义的RecyclerView传进来。isNeedHideLeftView用来控制是否需要隐藏最左边的view。isNeedShowShadow用来控制是否需要展示阴影。
重写onAttachedToWindow与onDetachedFromWindow,更新mScrollViews中的scrollView。当其在屏幕内可见的时候添加进集合,并且将其滚动到所记录的recordX,即x方向的偏移量。当其移出屏幕外时,将它移出集合。
fun setRecyclerView(recyclerView: HorizontalRecyclerView, isNeedHideLeftView: Boolean = false, isNeedShowShadow: Boolean = true) {
    this.recyclerView = recyclerView
    this.isNeedHideLeftView = isNeedHideLeftView
    this.isNeedShowShadow = isNeedShowShadow
}

private fun monitorScrollViews(): MutableList<SwipeHorizontalScrollView> {
    return recyclerView?.scrollViews ?: mScrollViews
}

override fun onAttachedToWindow() {
    super.onAttachedToWindow()
    if (!monitorScrollViews().contains(this))
        monitorScrollViews().add(this)
    scrollTo(getRecordX(), 0)
    setShadow(getRecordX())
}

override fun onDetachedFromWindow() {
    super.onDetachedFromWindow()
    monitorScrollViews().remove(this)
}
重写dispatchTouchEvent
ACTION_DOWN事件记录x,y的位置,按下的时候需要把scroller的动画停止掉,并且记录当前的scrollX。
ACTION_MOVE比较x与y的偏移量,当水平方向的偏移大于垂直方向的偏移量时,判定用户的行为是水平滑动。调用parent.requestDisallowInterceptTouchEvent(true)取消外部拦截。调用cancelLongPress()用来取消用户点下屏幕水平滑动但是手指未抬起时的长按事件。 
needNotify用来通知RecyclerView的界面元素是否需要更新,例如股票的涨幅的信息是实时更新的,我们希望当用户拖拽的时候不更新界面的元素,减少频繁绘制。
override fun dispatchTouchEvent(ev: MotionEvent?): Boolean {
    when (ev?.action) {
        MotionEvent.ACTION_DOWN -> {
            downPoint.set(ev.x, ev.y)
            moveX = ev.x
            monitorScrollViews().forEach {
                if (!it.mScroller.isFinished) {
                    it.mScroller.abortAnimation()
                }
            }
            setRecordX(scrollX)
            recyclerView?.needNotify = false
        }
        MotionEvent.ACTION_MOVE -> {
            if (abs(downPoint.x - ev.x) > abs(downPoint.y - ev.y)) {
                parent.requestDisallowInterceptTouchEvent(true)
            }
            if (abs(downPoint.x - ev.x) >= touchSlop || abs(downPoint.y - ev.y) >= touchSlop) {
                (tag as? View)?.cancelLongPress()
            }
        }
        MotionEvent.ACTION_UP -> {
            recyclerView?.needNotify = true
        }
        MotionEvent.ACTION_CANCEL -> {
            (tag as? View)?.cancelLongPress()
        }
    }
    return super.dispatchTouchEvent(ev)
}
重写onInterceptTouchEvent
override fun onInterceptTouchEvent(ev: MotionEvent?): Boolean {
    if (ev?.action == MotionEvent.ACTION_MOVE && abs(downPoint.x - ev.x) > abs(downPoint.y - ev.y)) {
        return true
    }
    return super.onInterceptTouchEvent(ev)
}
重写onTouchEvent
首先我们需要熟悉[Scroller及滑动机制]
(tag as? View)?.onTouchEvent(event)将touch事件传递给设置的tag,tag我们设置的是RecyclerView的itemView,方便的设置itemView的点击以及长按事件。
| 场景 | 描述 |
|---|---|
需要隐藏左边的view:首先获取隐藏view的宽度,判定afterScrollX >= -firstViewWidth && afterScrollX <= measuredWidth - viewWidth - firstViewWidth(滚动后的距离在该控件可滚动的范围区间内)。当滚动区间在firstViewWidth的区间内拖拽或者当firstView处于隐藏状态并且向右拖拽时,deltaX / 2模拟粘性效果。 | 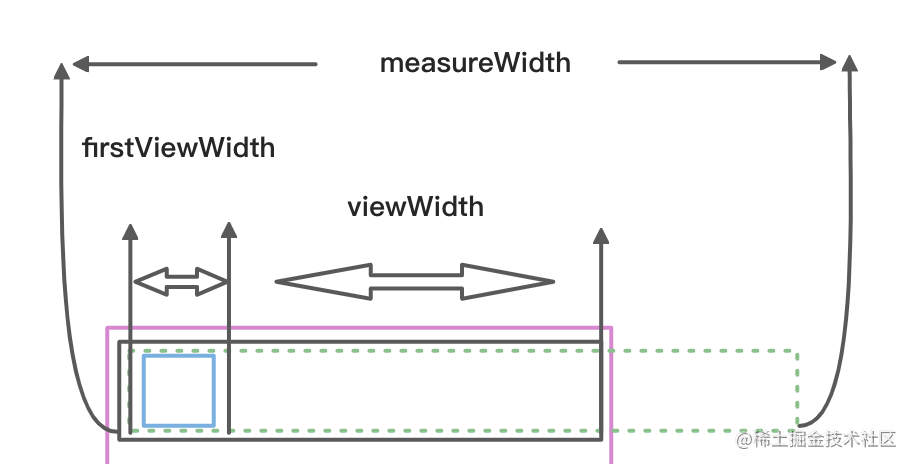 |
不需要隐藏左边的view,处于可滚动范围内直接调用scrollBy(deltaX, 0)即可 | |
if (isShowLeft) {fixScrollX()},当隐藏的view被展开的时候,快速水平方向滑动的时候不希望飞快的滚动,只希望隐藏firstView并且滚动到scrollX=0的位置上。 |  |
fistView被隐藏时,scrollX处于0时并且向右滑动时,调用fixScrollX()。否则将fling事件传递给每个scrollView。minX = -(firstViewWidth * 0.2).toInt()处理隐藏firstView并且scrollX不为0的情况下,向右快速滚动不会完整的展开firstView,最多只会展示firstView的20% | 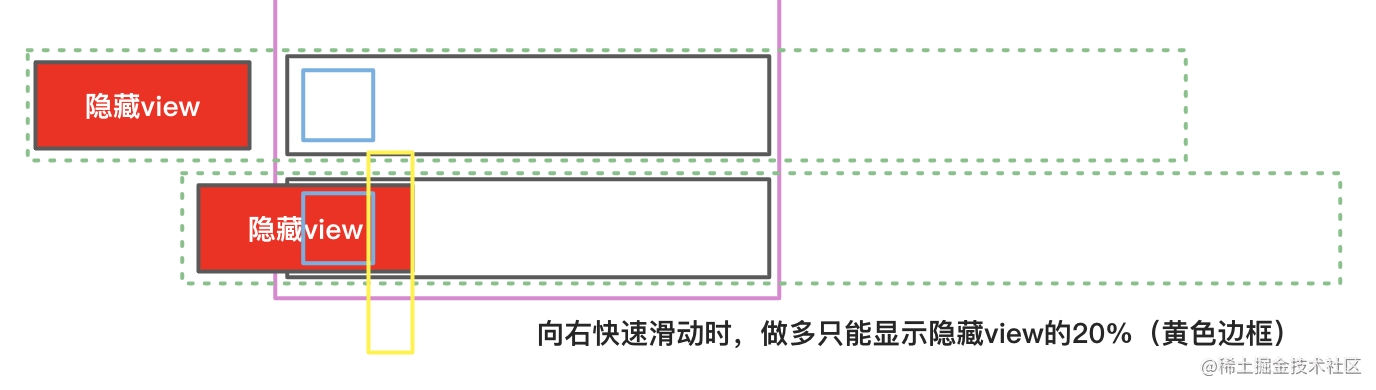 |
MotionEvent.ACTION_MOVE -> {
    (tag as? View)?.onTouchEvent(event)
    val deltaX = (moveX - event.x).toInt()
    mDirection = if (deltaX > 0) {
        Direction.DIRECTION_LEFT // 手指从右向左滑动,内容向左滚动
    } else {
        Direction.DIRECTION_RIGHT
    }
    val afterScrollX = scrollX + deltaX

    if (isNeedHideLeftView) {
        val firstViewWidth = getChildAt(0).measuredWidth
        if (afterScrollX >= -firstViewWidth && afterScrollX <= measuredWidth - viewWidth - firstViewWidth) {
            if ((afterScrollX >= -firstViewWidth && afterScrollX < 0) || afterScrollX == 0 && deltaX < 0) {
                scrollBy(deltaX / 2, 0)
            } else {
                scrollBy(deltaX, 0)
            }
        }
    } else {
        if (afterScrollX >= 0 && afterScrollX <= measuredWidth - viewWidth) {
            scrollBy(deltaX, 0)
        }
    }
}

MotionEvent.ACTION_UP -> {
    if (abs(downPoint.x - event.x) < touchSlop && abs(downPoint.y - event.y) < touchSlop) {
        (tag as? View)?.onTouchEvent(event)
    }
    // 释放
    velocityTracker?.run {
        computeCurrentVelocity(1000)
        val firstViewWidth = getChildAt(0).measuredWidth
        if (abs(xVelocity) > mMinimumVelocity) {
            needFix = true
            if (isShowLeft) {
                fixScrollX()
            } else {
                if (mDirection == Direction.DIRECTION_RIGHT && scrollX < 0) {
                    fixScrollX()
                } else {
                    val maxX = if (measuredWidth < viewWidth) 0 else measuredWidth - viewWidth
                    if (isNeedHideLeftView) {
                        monitorScrollViews().forEach {
                            it.mScroller.fling(scrollX, 0, (-xVelocity.toInt() * 1.5).toInt(), 0, -(firstViewWidth * 0.2).toInt(), maxX - firstViewWidth, 0, 0)
                        }
                    } else {
                        monitorScrollViews().forEach {
                            it.mScroller.fling(scrollX, 0, (-xVelocity.toInt() * 1.5).toInt(), 0, 0, maxX, 0, 0)
                        }
                    }
                }
            }
        } else {
            if (isNeedHideLeftView) {
                fixScrollX()
            }
        }
        postInvalidate()
        recycle()
        velocityTracker = null
    }
}
展开与折叠状态
滚动后的scrollX在-firstViewWidth~-firstViewWidth+threshold的区间内,即firstView的显示超出70%的时候,展开firstView;scrollX大于-firstViewWidth + threshold,即firstView显示小于30%的时候,折叠firstView。展开与折叠调用Scroller的startScroll()方法
/**
 * 修正x位置
 */
private fun fixScrollX() {
    needFix = false
    if (isNeedHideLeftView) {
        val firstViewWidth = getChildAt(0).measuredWidth
        val threshold = firstViewWidth * 0.3 // [-firstViewWidth  -firstViewWidth+threshold    -threshold  0]
        if (isShowLeft) { // 展开状态
            if (scrollX >= -firstViewWidth && scrollX <= -firstViewWidth + threshold) {
                extend()
            } else if (scrollX > -firstViewWidth + threshold) {
                fold()
            }
        } else { // 收起状态
            if (scrollX <= -threshold) {
                extend()
            } else if (scrollX > -threshold && scrollX <= 0) {
                fold()
            }
        }
    }
}

/**
 * 展开view
 */
private fun extend() {
    val left = getChildAt(0).measuredWidth
    monitorScrollViews().forEach {
        it.mScroller.startScroll(scrollX, 0, -left - scrollX, 0, 300)
    }
    isShowLeft = true
}

/**
 * 折叠view
 */
private fun fold() {
    monitorScrollViews().forEach {
        it.mScroller.startScroll(scrollX, 0, -scrollX, 0, 300)
    }
    isShowLeft = false
}
3、自定义HorizontalRecyclerView
重写addView
在ids.xml中配置滚动view与阴影view的全局id,从child中找到滚动view,调用setRecyclerView()将HorizontalRecyclerView的引用传递给SwipeHorizontalScrollView,调用decorateScrollView()装饰SwipeHorizontalScrollView,给其添加阴影。
<resources>
    <item name="swipeHorizontalView" type="id" />
    <item name="swipeHorizontalShadowView" type="id" />
</resources>
override fun addView(child: View?, index: Int, params: ViewGroup.LayoutParams?) {
    val rightScroll = child?.findViewById<SwipeHorizontalScrollView>(R.id.swipeHorizontalView)
    rightScroll?.setRecyclerView(this, isNeedHideLeftView = needHideLeft, isNeedShowShadow = needShadow)
    rightScroll?.tag = child

    decorateScrollView(rightScroll)

    super.addView(child, index, params)
    rightScroll?.scrollTo(recordX, 0)
}

private fun decorateScrollView(scrollView: View?): FrameLayout {
    val frameLayout = FrameLayout(context).apply {
        layoutParams = ViewGroup.LayoutParams(ViewGroup.LayoutParams.MATCH_PARENT, ViewGroup.LayoutParams.MATCH_PARENT)
    }
    val shadowView = getShadowView()
    val parent = scrollView?.parent as? ViewGroup?
    parent?.removeView(scrollView)
    scrollView?.let {
        frameLayout.addView(it)
    }
    frameLayout.addView(shadowView)
    parent?.addView(frameLayout)
    return frameLayout
}

private fun getShadowView(): View {
    return View(context).apply {
        id = R.id.swipeHorizontalShadowView
        setBackgroundResource(R.drawable.view_shadow)
        layoutParams = MarginLayoutParams(36, ViewGroup.LayoutParams.MATCH_PARENT)
        visibility = GONE
    }
}
将recyclerview与headScrollView进行绑定
fun bindHeadScrollView(view: View) {
    val rightScroll = view.findViewById<SwipeHorizontalScrollView>(R.id.swipeHorizontalView)
    rightScroll.setRecyclerView(this, isNeedHideLeftView = needHideLeft, isNeedShowShadow = needShadow)
    rightScroll?.tag = decorateScrollView(rightScroll)
    if (scrollViews.contains(rightScroll)) scrollViews.remove(rightScroll)
    scrollViews.add(rightScroll)
}
如何使用
1、编写xml布局
SwipeHorizontalScrollView添加id@+id/swipeHorizontalView app:needHideLeft="true" app:needShadow="true"左边可隐藏并且需要展示阴影。 如若不需要隐藏第一个view或者不需要阴影可以设置为false
<LinearLayout xmlns:android="http://schemas.android.com/apk/res/android"
    xmlns:app="http://schemas.android.com/apk/res-auto"
    xmlns:tools="http://schemas.android.com/tools"
    android:layout_width="match_parent"
    android:layout_height="match_parent"
    android:orientation="vertical">

    <LinearLayout
        android:layout_width="match_parent"
        android:layout_height="60dp"
        android:gravity="center_vertical"
        android:orientation="horizontal">

        <头部view />

        <com.loren.component.view.widget.SwipeHorizontalScrollView
            android:id="@+id/swipeHorizontalView"
            android:layout_width="match_parent"
            android:layout_height="match_parent">

            <隐藏的view />

            <可滚动的view />

        </com.loren.component.view.widget.SwipeHorizontalScrollView>

    </LinearLayout>

    <com.loren.component.view.widget.HorizontalRecyclerView
        android:id="@+id/rvStock"
        android:layout_width="match_parent"
        android:layout_height="wrap_content"
        app:needHideLeft="true"
        app:needShadow="true"
        tools:listitem="@layout/item_stock" />

</LinearLayout>
2、创建Adapter
item.xml使用如上的布局
<LinearLayout xmlns:android="http://schemas.android.com/apk/res/android"
    android:layout_width="match_parent"
    android:layout_height="60dp"
    android:gravity="center_vertical"
    android:orientation="horizontal">

    <TextView
        android:id="@+id/tvName"
        android:layout_width="100dp"
        android:layout_height="match_parent"
        android:gravity="center"
        android:padding="8dp"
        android:textColor="@color/black"
        android:textSize="18sp" />

    <com.loren.component.view.widget.SwipeHorizontalScrollView
        android:id="@+id/swipeHorizontalView"
        android:layout_width="match_parent"
        android:layout_height="match_parent">
        ...
    </com.loren.component.view.widget.SwipeHorizontalScrollView>

</LinearLayout>
3、将头布局与recyclerview绑定
mBinding.rvStock.bindHeadScrollView(mBinding.swipeHorizontalView)
文末
要想成为架构师,那就不要局限在编码,业务,要会选型、扩展,提升编程思维。此外,良好的职业规划也很重要,学习的习惯很重要,但是最重要的还是要能持之以恒,任何不能坚持落实的计划都是空谈。
如果你没有方向,这里给大家分享一套由阿里高级架构师编写的《Android八大模块进阶笔记》,帮大家将杂乱、零散、碎片化的知识进行体系化的整理,让大家系统而高效地掌握Android开发的各个知识点。

相对于我们平时看的碎片化内容,这份笔记的知识点更系统化,更容易理解和记忆,是严格按照知识体系编排的。
一、架构师筑基必备技能
1、深入理解Java泛型
2、注解深入浅出
3、并发编程
4、数据传输与序列化
5、Java虚拟机原理
6、高效IO
……

二、Android百大框架源码解析
1.Retrofit 2.0源码解析
2.Okhttp3源码解析
3.ButterKnife源码解析
4.MPAndroidChart 源码解析
5.Glide源码解析
6.Leakcanary 源码解析
7.Universal-lmage-Loader源码解析
8.EventBus 3.0源码解析
9.zxing源码分析
10.Picasso源码解析
11.LottieAndroid使用详解及源码解析
12.Fresco 源码分析——图片加载流程

三、Android性能优化实战解析
- 腾讯Bugly:对字符串匹配算法的一点理解
- 爱奇艺:安卓APP崩溃捕获方案——xCrash
- 字节跳动:深入理解Gradle框架之一:Plugin, Extension, buildSrc
- 百度APP技术:Android H5首屏优化实践
- 支付宝客户端架构解析:Android 客户端启动速度优化之「垃圾回收」
- 携程:从智行 Android 项目看组件化架构实践
- 网易新闻构建优化:如何让你的构建速度“势如闪电”?
- …

四、高级kotlin强化实战
1、Kotlin入门教程
2、Kotlin 实战避坑指南
3、项目实战《Kotlin Jetpack 实战》
-
从一个膜拜大神的 Demo 开始
-
Kotlin 写 Gradle 脚本是一种什么体验?
-
Kotlin 编程的三重境界
-
Kotlin 高阶函数
-
Kotlin 泛型
-
Kotlin 扩展
-
Kotlin 委托
-
协程“不为人知”的调试技巧
-
图解协程:suspend

五、Android高级UI开源框架进阶解密
1.SmartRefreshLayout的使用
2.Android之PullToRefresh控件源码解析
3.Android-PullToRefresh下拉刷新库基本用法
4.LoadSir-高效易用的加载反馈页管理框架
5.Android通用LoadingView加载框架详解
6.MPAndroidChart实现LineChart(折线图)
7.hellocharts-android使用指南
8.SmartTable使用指南
9.开源项目android-uitableview介绍
10.ExcelPanel 使用指南
11.Android开源项目SlidingMenu深切解析
12.MaterialDrawer使用指南

六、NDK模块开发
1、NDK 模块开发
2、JNI 模块
3、Native 开发工具
4、Linux 编程
5、底层图片处理
6、音视频开发
7、机器学习

七、Flutter技术进阶
1、Flutter跨平台开发概述
2、Windows中Flutter开发环境搭建
3、编写你的第一个Flutter APP
4、Flutter开发环境搭建和调试
5、Dart语法篇之基础语法(一)
6、Dart语法篇之集合的使用与源码解析(二)
7、Dart语法篇之集合操作符函数与源码分析(三)
…

八、微信小程序开发
1、小程序概述及入门
2、小程序UI开发
3、API操作
4、购物商场项目实战……

全套视频资料:
一、面试合集

二、源码解析合集

三、开源框架合集

欢迎大家一键三连支持,若需要文中资料,直接点击文末CSDN官方认证微信卡片免费领取【保证100%免费】↓↓↓


 4008
4008

 被折叠的 条评论
为什么被折叠?
被折叠的 条评论
为什么被折叠?
 到【灌水乐园】发言


