


 本文详细解读了Spring Security过滤器链的工作原理,重点介绍了HeaderWriterFilter、CsrfFilter、LogoutFilter等关键过滤器,并深度剖析了自定义UsernamePasswordAuthenticationFilter的定制流程,包括自定义验证逻辑和ProviderManager的配置。
1 SpringSecurity过滤器链说明
SpringSecurity 采用的是责任链的设计模式,它有一条很长的过滤器链。 因为是过滤器链的工作形式,所以Security的工作流程是环环相扣的。下面对各个过滤器进行说明:
- HeaderWriterFilter:用于将头信息加入响应中。
- CsrfFilter:用于处理跨站请求伪造。
- LogoutFilter:用于处理退出登录。
- UsernamePasswordAuthenticationFilter:用于处理基于表单的登录请求,从表单中获取用户名和密码。默认情况下处理来自 /login 的请求。从表单中获取用户名和密码时,默认使用的表单 name 值为 username 和 password,这两个值可以通过设置这个过滤器的usernameParameter 和 passwordParameter 两个参数的值进行修改。更多的是对UsernamePasswordAuthenticationFilter进行定制化,下面就是定制化的演示
- DefaultLoginPageGeneratingFilter:如果没有配置登录页面,那系统初始化时就会配置这个过滤器,并且用于在需要进行登录时生成一个登录表单页面。
- BasicAuthenticationFilter:检测和处理 http basic 认证。
- RequestCacheAwareFilter:用来处理请求的缓存。
- SecurityContextHolderAwareRequestFilter:主要是包装请求对象request。
- AnonymousAuthenticationFilter:检测 SecurityContextHolder 中是否存在 Authentication 对象,如果不存在为其提供一个匿名 Authentication。
- SessionManagementFilter:管理 session 的过滤器
- ExceptionTranslationFilter:处理 AccessDeniedException 和 AuthenticationException 异常。
- FilterSecurityInterceptor:可以看做过滤器链的出口。
- RememberMeAuthenticationFilter:当用户没有登录而直接访问资源时, 从 cookie 里找出用户的信息, 如果 Spring Security 能够识别出用户提供的remember me cookie, 用户将不必填写用户名和密码, 而是直接登录进入系统,该过滤器默认不开启。
2 自定义UsernamePasswordAuthenticationFilter过滤器
流程有点长又枯燥,耐心看。
项目中大部分都需要对Security框架的类包含过滤器进行自定义,下面是UsernamePasswordAuthenticationFilter的定制化,来满足我们项目中的业务需要。
认证的方法流程是:attemptAuthentication() ——> authenticate() ——> retrieveUser() ——> loadUserByUsername() ——> additionalAuthenticationChecks () ——> onAuthenticationSuccess()/onAuthenticationFailure()
用一张图来关联:
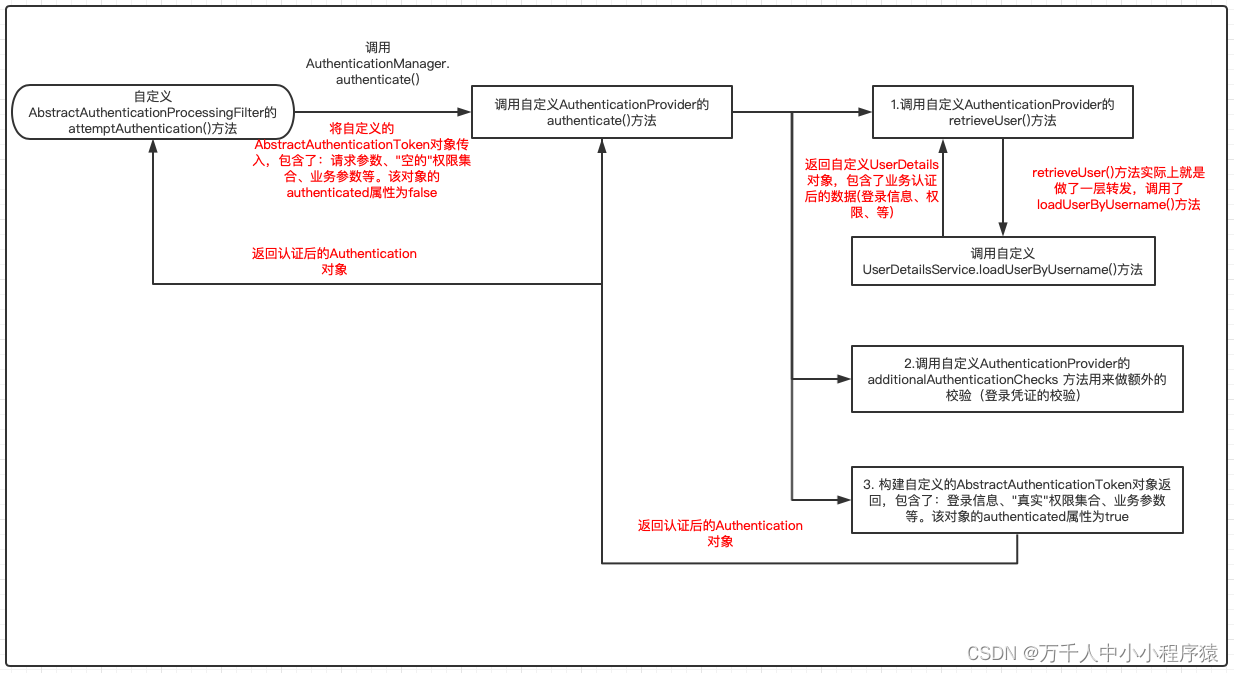
自定义UsernamePasswordAuthenticationFilter过滤器
首先会经过第一个过滤器AbstractAuthenticationProcessingFilter它是UsernamePasswordAuthenticationFilter的父类,所以我们的自定义CustomAuthenticationFilter过滤器继承AbstractAuthenticationProcessingFilter类 就可以了,重写attemptAuthentication()方法,通常这里会在这里对验证码,请求方法类型等进行合法性校验,最后的返回值是Authentication类型的对象。
这里需要注意返回值是Authentication类型对象流程是:
-
认证是通过AuthenticationManager的authenticate()函数实现的。
-
也就是通过AuthenticationManager的实现类ProviderManager的authenticate()函数认证。
-
ProviderManager的authenticate()函数会轮询ProviderManager的
List<AuthenticationProvider> providers成员变量。下面会讲述如何把自定义AuthenticationProvider加入到ProviderManager的providers属性中:加入自定义AuthenticationProvider。 -
如果该providers中如果有一个AuthenticationProvider的supports函数返回true,那么就会调用该AuthenticationProvider的authenticate函数认证,认证成功则整个认证过程结束。
-
如果不成功,则继续使用下一个合适的AuthenticationProvider进行认证,只要有一个认证成功则为认证成功。
这里我们自定义了一个AuthenticationProvider类型对象(就是下面第二个自定义的CustomAuthenticationProvider),使用默认的AuthenticationManager对象调用authenticate(authToken)方法就会通过轮询的方式进入我们自定义的AuthenticationProvider对象(就是下面第二个自定义的CustomAuthenticationProvider)的authenticate()方法
注意点:注意这里的redissonClient的注入是以BeanFactoryUtil工厂对象创建的,这里不能直接在filter中使用@Autowired或者@Resource的方式进行注入,因为这里会在bean对象创建之前进行加载,所以bean对象注入会失败。
 @Override
    public Authentication attemptAuthentication(HttpServletRequest request,
                                                HttpServletResponse response) throws AuthenticationException {
        if (!request.getMethod().equals("POST")) {
            throw new AuthenticationServiceException(
                    "Authentication method not supported: " + request.getMethod());
        }

        CustomAuthenticationToken authToken = null;
        if (request.getContentType().contains(MediaType.APPLICATION_JSON_VALUE)) {
            try (InputStream is = request.getInputStream()) {
                AdminLoginRequest adminLoginRequest = JsonUtil.toObj(StreamUtils.copyToString(is, StandardCharsets.UTF_8), AdminLoginRequest.class);

                String loginName = adminLoginRequest.getLoginName().trim();
                String password = adminLoginRequest.getPassword().trim();
                String captcha = adminLoginRequest.getCaptcha().trim();

                String expectCaptcha = (String) BeanFactoryUtil.getBean(RedissonClient.class).getBucket(StrUtil.format("auth:captcha:admin:{}", uuid))
                        .getAndDelete();

                if (!captcha.equalsIgnoreCase(expectCaptcha)) {
                    response.setStatus(HttpStatus.UNAUTHORIZED.value());
                    HttpContextUtil.write(response, Rest.error( "验证码错误"));
                    return null;
                }
                // 自定义的token会有一个属性: Boolean  Authenticated; 刚开始走到这里会创建一个token对象并将这个属性设为false,因为还没有经过认证方法authenticate()
                authToken = new CustomAuthenticationToken(loginName, password);

                setDetails(request, authToken);

                Authentication authenticate = this.getAuthenticationManager().authenticate(authToken);
                return authenticate;
            } catch (IOException e) {
                throw ServiceExceptionUtil.error(BUSY, e, e.getMessage());
            }
        } else {
            throw ServiceExceptionUtil.fail(AuthenticationErrorCodeEnum.FORM_LOGIN_NOT_SUPPORT, "json");
        }

    }
自定义CustomAuthenticationProvider代理
自定义CustomAuthenticationProvider继承AuthenticationProvider类,重写authenticate()方法,这里通常用来校验所请求参数是否存在,随后调用retrieveUser()方法,该方法其实就是做了一层转发调用UserDetailsService().loadUserByUsername()做账号密码的校验,然后通过additionalAuthenticationChecks()方法用来做额外的校验,最后返回认证后的Authentication对象(就是authenticated属性为true的自定义AbstractAuthenticationToken对象)
注意点:
- 这里需要注意,因为在解密的时候使用的是默认的密码校验器,所以在用户注册时的密码加密必须要使用passwordEncoder.encode()方法。当然也可以对密码校验器做自定义化,自定义的密码校验器记得要在配置AuthenticationProvider的时候作为构造参数传入。
- authenticate()方法会也会返回一个token对象这个与上一次filter返回的对象不同的是,这里面指定了认证属性为true,并且包含authorities权限集合的属性;
- 最后Security会将token转为Authentication对象(自定义的目的:父类引用指向子类对象)存储起来,后面校验权限的时候调用的就是token的authorities属性;
定制化的provider是通过实现AuthenticationProvider接口的supports方法适配具体处理哪个定制化的Authentication对象,源码如下:
    @Override
    public boolean supports(Class<?> authentication) {
    	// ProviderManager轮询provider时调用该方法,查询当前定制化的Authentication对象是该provider是想要处理的定制化authentication类
        return (CustomUsernamePasswordAuthenticationToken.class.isAssignableFrom(authentication));
    }
 @Override
    public Authentication authenticate(Authentication authentication)
            throws AuthenticationException {
        Assert.isInstanceOf(CustomAuthenticationToken.class, authentication,
                () -> messages.getMessage(
                        "AbstractUserDetailsAuthenticationProvider.onlySupports",
                        "Only CustomAuthenticationToken is supported"))
        UserDetails user = this.userCache.getUserFromCache(authJson);

        if (user == null) {
            try {
            	// 调用retrieveUser 就是做了一层转发 这里会抓取抛出的异常,对异常进行重新抛出,目的是对应失败处理器的异常类型
                user = retrieveUser(authJson, (CustomAuthenticationToken) authentication);
            } catch (UsernameNotFoundException notFound) {
                logger.debug("Identity '" + loginName + "' not found");

                if (hideUserNotFoundExceptions) {
                    throw new BadCredentialsException(messages.getMessage(
                            "AbstractUserDetailsAuthenticationProvider.badCredentials",
                            "Bad credentials"));
                } else {
                    throw notFound;
                }
            }

            Assert.notNull(user,
                    "retrieveUser returned null - a violation of the interface contract");
        }

        try {
            preAuthenticationChecks.check(user);
            additionalAuthenticationChecks(user, (CustomAuthenticationToken) authentication);
        } catch (Exception exception) {
            if (cacheWasUsed) {
                // There was a problem, so try again after checking
                // we're using latest data (i.e. not from the cache)
                  // 查询到用户
                user = retrieveUser(authJson, (CustomAuthenticationToken) authentication);
                preAuthenticationChecks.check(user);
                // 查询到用户后 检测存储的密码和提交的密码是否相同,否则抛出异常
                additionalAuthenticationChecks(user, (CustomAuthenticationToken) authentication);
             } else {
                throw exception;
            }
        }
        // 这里是返回了一个认证过的自定义token
        // 自定义的token会有一个属性: Boolean  Authenticated; 走到这里会创建一个token对象并将这个属性设为true
        return CustomAuthenticationToken(platform, organId, principalToReturn, authentication, user);
    }

	// 这里需要注意,在用户注册时的密码加密必须要使用passwordEncoder.encode()方法
	@Override
    @SuppressWarnings("deprecation")
    protected void additionalAuthenticationChecks(UserDetails userDetails,
                                                  CustomAdminUsernamePasswordAuthenticationToken authentication)
            throws AuthenticationException {
        if (authentication.getCredentials() == null) {
            logger.debug("Authentication failed: no credentials provided");

            throw new BadCredentialsException(messages.getMessage(
                    "AbstractUserDetailsAuthenticationProvider.badCredentials",
                    "Bad credentials"));
        }

        String presentedPassword = authentication.getCredentials().toString();

        if (!passwordEncoder.matches(presentedPassword, userDetails.getPassword())) {
            logger.debug("Authentication failed: password does not match stored value");

            throw new BadCredentialsException(messages.getMessage(
                    "AbstractUserDetailsAuthenticationProvider.badCredentials",
                    "Bad credentials"));
        }
    }


 @Override
    protected final UserDetails retrieveUser(String authJson,
                                             CustomHealthUsernamePasswordAuthenticationToken authentication)
            throws AuthenticationException {
        prepareTimingAttackProtection();
        try {
            UserDetails loadedUser = this.getUserDetailsService().loadUserByUsername(authJson);
            if (loadedUser == null) {
                throw new InternalAuthenticationServiceException(
                        "UserDetailsService returned null, which is an interface contract violation");
            }
            return loadedUser;
        }
        catch (UsernameNotFoundException ex) {
            mitigateAgainstTimingAttack(authentication);
            throw ex;
        }
        catch (InternalAuthenticationServiceException ex) {
            throw ex;
        }
        catch (Exception ex) {
            throw new InternalAuthenticationServiceException(ex.getMessage(), ex);
        }
    }
自定义UserDetailsService和UserDetails类
这里需要对CustomDetailsService继承UserDetailsService和CustomDetails继承UserDetails进行自定义,service里面主要是重写loadUserByUsername()方法,对账号做校验,登录成功返回CustomDetails对象。CustomDetails里面根据业务需要存放一些登录信息,权限、账号体系、菜单集合等;
    @Override
    public UserDetails loadUserByUsername(String authJson) throws UsernameNotFoundException {

        HealthLoginRequest healthLoginRequest = JsonUtil.toObj(authJson, HealthLoginRequest.class);

        Identity identity = identityService.selectOneByProperty(Identity::getLoginName, healthLoginRequest.getLoginName());
        if (Objects.nonNull(identity)) {
            Long organId = identity.getOrganId();

            return new CustomDetails(organId, identity);
        } else {
            // 员工不存在
            throw new UsernameNotFoundException("员工名不存在");
        }
    }
自定义AbstractAuthenticationToken类
自定义第二个类CustomAuthenticationToken继承AbstractAuthenticationToken类,这里我们定义了一些认证属性:请求参数、权限集合、业务参数等
public class CustomAuthenticationToken extends AbstractAuthenticationToken {

    private static final long serialVersionUID = SpringSecurityCoreVersion.SERIAL_VERSION_UID;

    private Long organId;

    private final Object principal;

    private Object credentials;

     public CustomAuthenticationToken(Long organId, Object principal, Object credentials) {
        super(null);
        this.organId = organId;
        this.principal = principal;
        this.credentials = credentials;
        setAuthenticated(false);
    }

    public CustomAuthenticationToken(Long organId, Object principal, Object credentials,
                                                           Collection<? extends GrantedAuthority> authorities) {
        super(authorities);
        this.organId = organId;
        this.principal = principal;
        this.credentials = credentials;
        super.setAuthenticated(true);
    }
自定义WebSecurityConfigurerAdapter配置类
自定义后怎样启用则是需要WebSecurityConfigurerAdapter这个类来进行管理和配置
1.首先是自定义配置类 CustomWebSecurityConfig继承WebSecurityConfigurerAdapter 这个类里面可以完成上述流程图的所有配置。随后需要重写configure()方法,在里面配置我们的自定义登录。
 		http
 				// 表示对该路径下的所有接口进行认证管理,可以使用通配符*
 				.antMatcher("/custom/**")
 				// 需要登录请求检验
                .authorizeRequests()
                /* 这里是对一些路径进行放开,比如静态资源、登录和登出、验证码获取接口 不定长参数 */
                .antMatchers("/custom/login", "/health/logout")
                // 对所有请求校验权限
                .permitAll()
                // 需要进行认证
                .authenticated()
                // 对所有请求生效
                .anyRequest()
                // 权限鉴定方法指定
                .access("@customSecurityExpressionRoot.hasPermission(request, authentication)");
然后继续配置我们自定义的过滤器UsernamePasswordAuthenticationFilter,其中传入了一个AuthenticationManager对象的方法authenticationManagerBean(),这里使用的是父类的方法,没有对其作出自定义,authenticationDetailsSource对象也是Security框架中的bean对象,没有做自定义处理。
// 获取自定义认证过滤器对象 该方法在下面代码展示
UsernamePasswordAuthenticationFilter authenticationProcessingFilter = authenticationProcessingFilter();
//
authenticationProcessingFilter.setAuthenticationManager(authenticationManagerBean());
authenticationProcessingFilter.setAuthenticationDetailsSource(authenticationDetailsSource);
authenticationProcessingFilter.setFilterProcessesUrl("/custom/login");

// session 管理
ConcurrentSessionControlAuthenticationStrategy sessionControlAuthenticationStrategy = new ConcurrentSessionControlAuthenticationStrategy(sessionRegistry);
// 最大同时在线设备数为 1
sessionControlAuthenticationStrategy.setMaximumSessions(2);
// 登录时如果超过最大同时在线数则阻止本次登录
sessionControlAuthenticationStrategy.setExceptionIfMaximumExceeded(false);
authenticationProcessingFilter.setSessionAuthenticationStrategy(sessionControlAuthenticationStrategy);
// 将自定义的登录过滤器放在过滤器链中,和UsernamePasswordAuthenticationFilter的类型一样的位置,并不会覆盖传入的过滤器类
http.addFilterAt(authenticationProcessingFilter, UsernamePasswordAuthenticationFilter.class);
authenticationProcessingFilter() 代码
public UsernamePasswordAuthenticationFilter authenticationProcessingFilter() throws Exception {
        UsernamePasswordAuthenticationFilter authenticationFilter = new UsernamePasswordAuthenticationFilter("", HttpMethod.POST.name());
        // 指定登录成功处理器 这里自定义了登录成功处理器
        authenticationFilter.setAuthenticationSuccessHandler(successHandler);
        // 指定登录失败处理器 这里自定义了登录失败处理器
        authenticationFilter.setAuthenticationFailureHandler(failureHandler);
        return authenticationFilter;
    }
配置ProviderManager的providers属性, 加入自定义AuthenticationProvider方法:
    @Override
    protected void configure(AuthenticationManagerBuilder builder) throws Exception {
    	// 这里启用我们自定义的authenticationProvider
        builder.authenticationProvider(authenticationProvider());
    }
    public AuthenticationProvider authenticationProvider() {
        CustomAuthenticationProvider provider = new CustomAuthenticationProvider();
        provider.setHideUserNotFoundExceptions(false);
        // 传入我们自定义的userDetailsService对象
        provider.setUserDetailsService(userDetailsService);
        // 传入默认的密码校验器 如果做了自定义,这里传入的是自定义的密码校验器对象
        provider.setPasswordEncoder(passwordEncoder);
        return provider;
    }
认证成功处理器
@Component
public class CustomAuthenticationSuccessHandler implements AuthenticationSuccessHandler {

    @Override
    public void onAuthenticationSuccess(HttpServletRequest request, HttpServletResponse response, Authentication authentication) throws IOException, ServletException {
        Object principal = authentication.getPrincipal();

        CustomHealthUserDetails userDetails;
        LoginResponse loginResponse = new LoginResponse();
        if (principal instanceof CustomHealthUserDetails) {
            loginResponse.setLoginName(userDetails.getUsername())
                    .setOrganId(userDetails.currentOrganId())

        HttpContextUtil.write(response, JsonUtil.defaultObjectMapper()
                .createObjectNode()
                .put("code", "00000")
                .put("msg", "认证成功")
                .putPOJO("data", loginResponse));
    }
}
认证失败处理器,返回对应异常类型的错误信息
@Component
@Primary
public class CustomAuthenticationFailureHandler implements AuthenticationFailureHandler {

    @Override
    public void onAuthenticationFailure(HttpServletRequest request, HttpServletResponse response, AuthenticationException exception) throws IOException, ServletException {
        response.setStatus(HttpStatus.UNAUTHORIZED.value());
        Rest<BaseResponse> rest = Rest.error(AuthenticationErrorCodeEnum.FAILURE);
        if (exception instanceof LockedException) {
            rest = Rest.error(SysManageErrorCodeEnum.CURRENT_ACCOUNT_IS_LOCKED);
        }else if (exception instanceof UsernameNotFoundException) {
            rest = Rest.error(AuthenticationErrorCodeEnum.USERNAME_NOT_FOUND);
        }else if (exception instanceof SmsCodeNotFoundException) {
            rest = Rest.error(SysManageErrorCodeEnum.SMS_CODE_NOT_FOUND);
        }else if (exception instanceof UserInfoNotFoundException) {
            rest = Rest.error(SysManageErrorCodeEnum.USER_INFO_NOT_FOUND);
        } else if (exception instanceof BadCredentialsException) {
            rest = Rest.error(AuthenticationErrorCodeEnum.BAD_CREDENTIALS);
        } else if (exception instanceof SessionAuthenticationException) {
            rest = Rest.error(AuthenticationErrorCodeEnum.LOGIN_ON_ANOTHER_DEVICE, "本次登录失败");
        }
        HttpContextUtil.write(response, rest);
    }
}


 被折叠的 条评论
为什么被折叠?
被折叠的 条评论
为什么被折叠?
 到【灌水乐园】发言


