


Android有四种常用的布局LinearLayout(线性布局),RelativeLayout(相对布局),FrameLayout(幡帧布局),TableLayout(表格布局)。
1:LinearLayout又称作线性布局,是一种非常常用的布局。正如他的名字一样,这个布局会将她的控件在线性方向上依次排列;
xml源代码:
<?xml version="1.0" encoding="utf-8"?>
<LinearLayout xmlns:android="http://schemas.android.com/apk/res/android"
    android:layout_width="match_parent"
    android:layout_height="match_parent"
    android:orientation="horizontal" >
    <Button
        android:id="@+id/btn11"
        android:layout_width="wrap_content"
        android:layout_height="wrap_content"
        android:text="button1"
        android:layout_gravity="top"
        />
    <Button
        android:id="@+id/btn12"
        android:layout_width="wrap_content"
        android:layout_height="wrap_content"
        android:text="button2"
        android:layout_gravity="center_vertical"
        />
    <Button
        android:id="@+id/btn13"
        android:layout_width="wrap_content"
        android:layout_height="wrap_content"
        android:text="button3"
        android:layout_gravity="bottom"
        />

</LinearLayout>
效果是这样的:
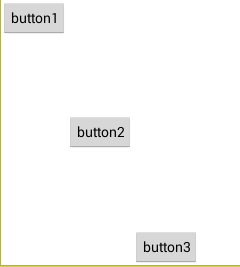
通过android:orirntation属性制定了排列方向,如果指定了排列方向是vertical,则是在垂直方向上依次排列,指定horizontal方向则是再水平方向上排列。注意android:layout_gravity属性,他是来指定排列方式的;
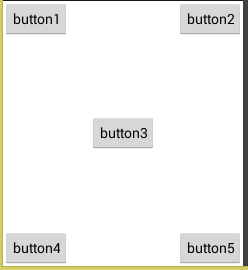
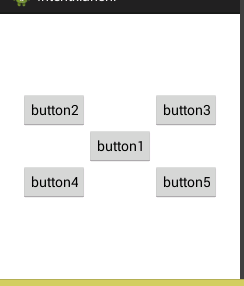
2:RelativeLayout又称作相对布局,也是一种非常常用的布局。和LinearLayout的排列则不同,RelativeLayout显得更加随意一些,他可以通过相对定位的方式让控件出现在布局的任何位置上,他的属性非常多,也非常的常用,不过这些都是有规律可循的,很容易理解和记忆的;
<?xml version="1.0" encoding="utf-8"?>
<RelativeLayout xmlns:android="http://schemas.android.com/apk/res/android"
    android:layout_width="match_parent"
    android:layout_height="match_parent" >
    <Button
        android:layout_width="wrap_content"
        android:layout_height="wrap_content"
        android:text="button1"
        android:layout_alignParentTop="true"
        android:layout_alignParentLeft="true"
        />
    <Button
        android:layout_width="wrap_content"
        android:layout_height="wrap_content"
        android:text="button2"
        android:layout_alignParentTop="true"
        android:layout_alignParentRight="true"
        />
    <Button
        android:layout_width="wrap_content"
        android:layout_height="wrap_content"
        android:text="button3"
        android:layout_centerInParent="true"
        />
    <Button
        android:layout_width="wrap_content"
        android:layout_height="wrap_content"
        android:text="button4"
        android:layout_alignParentBottom="true"
        android:layout_alignParentLeft="true"
        />
    <Button
        android:layout_width="wrap_content"
        android:layout_height="wrap_content"
        android:text="button5"
        android:layout_alignParentBottom="true"
        android:layout_alignParentRight="true"
        />
</RelativeLayout>
<?xml version="1.0" encoding="utf-8"?>
<RelativeLayout xmlns:android="http://schemas.android.com/apk/res/android"
    android:layout_width="match_parent"
    android:layout_height="match_parent" >

    <Button
        android:id="@+id/bt31"
        android:layout_width="wrap_content"
        android:layout_height="wrap_content"
        android:text="button1"
        android:layout_centerInParent="true"
        />
    <Button
        android:id="@+id/btn32"
        android:layout_width="wrap_content"
        android:layout_height="wrap_content"
        android:text="button2"
        android:layout_above="@id/bt31"
        android:layout_toLeftOf="@id/bt31"
        />
    <Button
        android:id="@+id/bt33"
        android:layout_width="wrap_content"
        android:layout_height="wrap_content"
        android:text="button3"
        android:layout_above="@id/bt31"
        android:layout_toRightOf="@id/bt31"
        />
    <Button
        android:id="@+id/bt34"
        android:layout_width="wrap_content"
        android:layout_height="wrap_content"
        android:text="button4"
        android:layout_below="@id/bt31"
        android:layout_toLeftOf="@id/bt31"
        />
    <Button
        android:id="@+id/bt35"
        android:layout_width="wrap_content"
        android:layout_height="wrap_content"
        android:text="button5"
        android:layout_below="@id/bt31"
        android:layout_toRightOf="@id/bt31"
        />

</RelativeLayout>
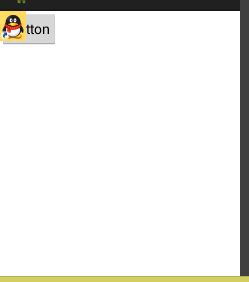
3:FrameLayout相比于前面两种布局就简单太多了,因此他的应用场景也少了很多。这种布局没有任何的定位方式,所有的控件都会摆放在布局的左上角。
<?xml version="1.0" encoding="utf-8"?>
<FrameLayout xmlns:android="http://schemas.android.com/apk/res/android"
    android:layout_width="match_parent"
    android:layout_height="match_parent" >
    <Button
        android:id="@+id/btn41"
        android:layout_width="wrap_content"
        android:layout_height="wrap_content"
        android:text="button"
        />
    <ImageView
        android:id="@+id/iv"
        android:layout_width="wrap_content"
        android:layout_height="wrap_content"
        android:src="@drawable/qqjietu"
        />
</FrameLayout>
4:TableLayout允许我们使用表格的方式来排列控件,这种布局也不是很常用,你只需要了解一下它的基本用法就可以了。既然是表格,那就一定会有行和列,在设计表格时我们尽量应该让每一行都拥有相同的列数,这样的表格也是简单的。不过有时候事情并非总会顺从我们的心意,当表格的某一行一定要要求不相等的列数时,就需要通过合并单元格的方式来应对;
<?xml version="1.0" encoding="utf-8"?>
<TableLayout xmlns:android="http://schemas.android.com/apk/res/android"
    android:layout_width="match_parent"
    android:layout_height="match_parent"
    android:orientation="vertical"
    android:stretchColumns="1">

    <TableRow>
      <TextView
          android:layout_width="wrap_content"
          android:layout_height="wrap_content"
          android:text="账号:"/>
      <EditText
          android:layout_width="wrap_content"
          android:layout_height="wrap_content"
          android:hint="请输入账号"/>
    </TableRow>
    <TableRow>
        <TextView
          android:layout_width="wrap_content"
          android:layout_height="wrap_content"
          android:text="密码:"/>
      <EditText
          android:layout_width="wrap_content"
          android:layout_height="wrap_content"
          android:hint="请输入密码"/>
    </TableRow>
    <TableRow>
        <Button
            android:layout_width="wrap_content"
            android:layout_height="wrap_content"
            android:layout_span="2"
            android:text="登陆"/>
    </TableRow>
</TableLayout>
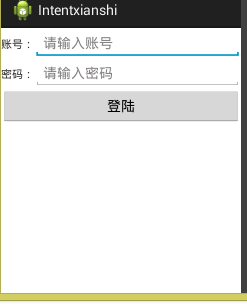
注意tablelayout里面无法指定控件的宽度,这个时候可以用android:stretchColumns的值就可以;例:android:stretchColumns=”1”,是当控件不能完全充满屏幕宽度的时候能把第二个控件宽度拉伸充满屏幕宽度。


 2074
2074

 被折叠的 条评论
为什么被折叠?
被折叠的 条评论
为什么被折叠?
 到【灌水乐园】发言


