


(一)概述
LinearLayout的weight(权重)属性,等比例划分屏幕空间,对解决屏幕适配的问题还是很重要的,可是当你需要构建比较复杂的UI时会产生大量的嵌套,就像前面的计算器UI一样,会减低UI Render(渲染速度)的效率,而如果是listview或者GridView上的item效率会更低,另外嵌套多层LinearLayout会占用大量的系统资源,还有可能引发系统stackoverflow;
但我们使用RelativeLayout的话,仅仅一层就够了,以”父容器或者兄弟组件参考+margin+padding“的模式就可以灵活设置组件的显示位置,是比较方便的,当然也不是一定的,具体情况还需要具体分析;
总之,一句话—-“尽量使用RelativeLayout+LinearLayout的weight属性搭配使用“.
(二)核心属性:
No.1 —— 基本属性
gravity : 设置容器内组件的对齐方式;
ignoreGravity:设置了该属性为true的属性的组件,将不受gravity的影响;
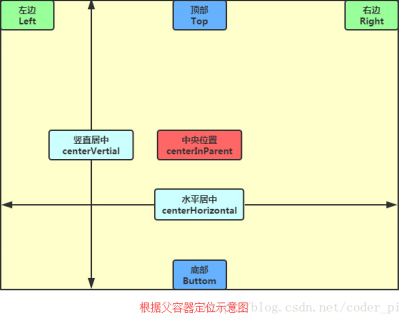
No.2——-根据父容器定位
layout_alignParentLeft : 左对齐
layout_alignParentRight : 右对齐
layout_alignParentTop : 顶部对齐
layout_alignParentButtom : 底部对齐
layout_centerHorizontal : 水平居中
layout_centerVertical :垂直居中
layout_centerInParent : 中间位置
No.3 ——根据兄弟组件定位
layout_below : 参考组件的下方;
layout_above : 参考组件色上方;
layout_toLeftOf : 参考组件的左边;
layout_toRightOf :参考组件的右边;
layout_alignLeft :对齐参考组件的左边界;
layout_alignRight :对齐参考组件的右边界;
layout_alignTop:对齐参考组件的上边界;
layout_alignBottom :对齐参考组件的下边界;
No.4——-根据margin(偏移)定位(偏移:设置组件与父容器的边距)
No.5——-根据padding(填充)(padding:设置组件内部元素之间的边距(比如:TextView里的字体位置)
(三)根据父容器定位示意图:
(四)根据兄弟组件定位示意图:
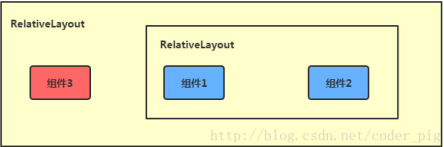
组件1跟组件2就是兄弟组件,而跟组件3不是兄弟组件,所以一定不可以使用组件1跟2来定位组件3,比如:layout_toleftof=“组件1”就一定会报错,关于兄弟组件定位的最经典例子就是“梅花布局”,实现代码如下:
运行结果:
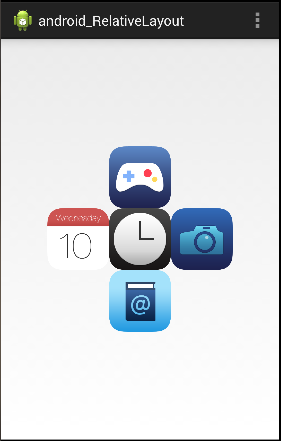
实现代码:
<RelativeLayout xmlns:android="http://schemas.android.com/apk/res/android"
    xmlns:tools="http://schemas.android.com/tools"
    android:id="@+id/mRelativeLayout"
    android:layout_width="match_parent"
    android:layout_height="match_parent"
    tools:context="com.example.android_relativelayout.MainActivity" >

    <!-- 这个是容器的中央 -->

    <ImageView
        android:id="@+id/img1"
        android:layout_width="80dp"
        android:layout_height="80dp"
        android:layout_centerInParent="true"
        android:src="@drawable/clock" />

    <!-- 在中间图片的左边 -->

    <ImageView
        android:id="@+id/img2"
        android:layout_width="80dp"
        android:layout_height="80dp"
        android:layout_centerVertical="true"
        android:layout_toLeftOf="@id/img1"
        android:src="@drawable/calendar" />

    <!-- 在中间图片的右边 -->

    <ImageView
        android:id="@+id/img3"
        android:layout_width="80dp"
        android:layout_height="80dp"
        android:layout_centerVertical="true"
        android:layout_toRightOf="@id/img1"
        android:src="@drawable/camera" />

    <!-- 在中间图片的上边 -->

    <ImageView
        android:id="@+id/img4"
        android:layout_width="80dp"
        android:layout_height="80dp"
        android:layout_centerHorizontal="true"
        android:layout_above="@id/img1"
        android:src="@drawable/games_control" />

    <!-- 在中间图片的下边 -->

    <ImageView
        android:id="@+id/img5"
        android:layout_width="80dp"
        android:layout_height="80dp"
        android:layout_centerHorizontal="true"
        android:layout_below="@id/img1"
        android:src="@drawable/address_book" />
</RelativeLayout>
(五)俩张图告诉你margin与padding的区别:
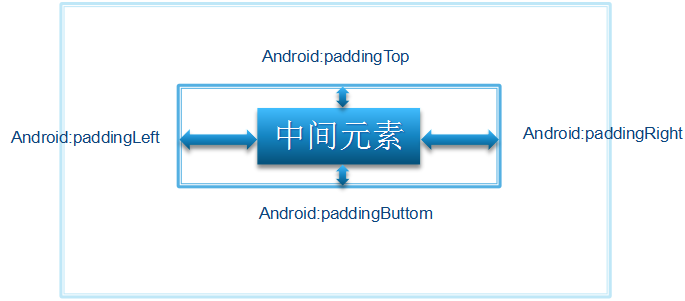
No.1 ———-概述
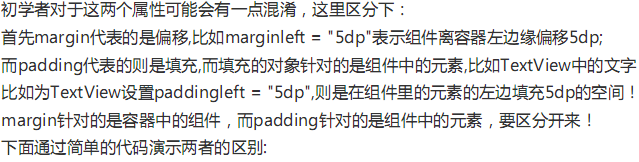
No.2 ——— 一言不合就上图
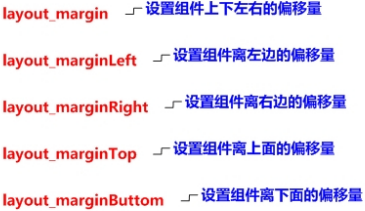
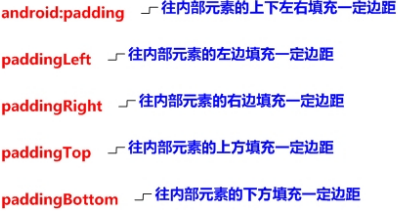
我就是margin,如下图:
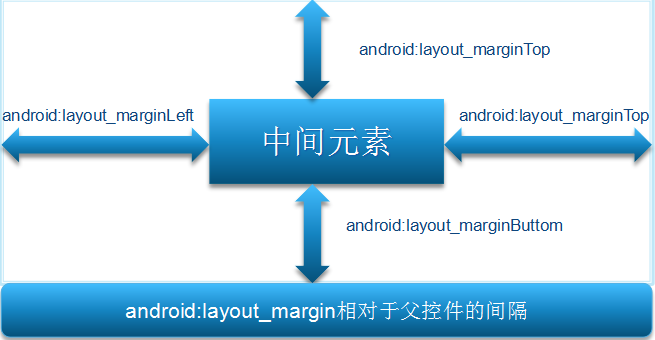
我就是padding,如下图:
(六)实战案例
运行结果:
实现代码:
<?xml version="1.0" encoding="utf-8"?>
<RelativeLayout xmlns:android="http://schemas.android.com/apk/res/android"
    android:layout_width="match_parent"
    android:layout_height="match_parent" >
    <!-- 我是margin,相对控件容器RelativeLayout向下偏移123dp,向左偏移32dp -->
    <Button
        android:id="@+id/button1"
        android:layout_width="wrap_content"
        android:layout_height="wrap_content"
        android:layout_alignParentBottom="true"
        android:layout_alignParentLeft="true"
        android:layout_marginBottom="123dp"
        android:layout_marginLeft="32dp"
        android:text="margin" />

    <!-- 我是padding,相对控件容器RelativeLayout向上偏移111dp,相对于文本(padding)的左边距paddingLeft为180dp -->
    <Button
        android:id="@+id/button2"
        android:layout_width="wrap_content"
        android:layout_height="wrap_content"
        android:layout_alignParentRight="true"
        android:layout_alignParentTop="true"
        android:layout_marginTop="111dp"
        android:paddingLeft="180dp"
        android:text="padding" />

</RelativeLayout>
(七)margin其实我可以为负数—-打开app后弹出广告效果
运行效果图:
实现代码:
activity_main.xml中只有一个TextView就不贴代码了;
弹出广告的xml如下:
<RelativeLayout xmlns:android="http://schemas.android.com/apk/res/android"
    xmlns:tools="http://schemas.android.com/tools"
    android:layout_width="match_parent"
    android:layout_height="match_parent"
    tools:context="com.jay.example.relativelayoutdemo.MainActivity"
    android:background="#00CCCCFF">

    <ImageView
        android:id="@+id/imgBack"
        android:layout_width="200dp"
        android:layout_height="200dp"
        android:layout_centerInParent="true"
        android:background="@drawable/whd" />

    <ImageView
        android:id="@+id/imgCancle"
        android:layout_width="28dp"
        android:layout_height="28dp"
        android:layout_alignRight="@id/imgBack"
        android:layout_alignTop="@id/imgBack"
        android:background="@drawable/cancel"
        android:layout_marginTop="-15dp"
        android:layout_marginRight="-10dp" />

</RelativeLayout>
MainActivity.java
package com.example.android_relativelayout;

import android.app.Activity;
import android.content.Intent;
import android.os.Bundle;

public class MainActivity extends Activity {

    @Override
    protected void onCreate(Bundle savedInstanceState) {
        super.onCreate(savedInstanceState);
        setContentView(R.layout.activity_main);
        final Intent it = new Intent(MainActivity.this,MainActivity2.class);
        Thread thread = new Thread() {
            @Override
            public void run() {
                try {
                    sleep(2000);
                    startActivity(it);
                } catch (InterruptedException e) {
                    e.printStackTrace();
                }
            }
        };
        thread.start();

    }
}
MainActivity2.java
package com.example.android_relativelayout;

import android.app.Activity;
import android.os.Bundle;
import android.view.View;
import android.view.View.OnClickListener;
import android.widget.ImageView;


public class MainActivity2 extends Activity {

    private ImageView imgCancle;
    @Override
    protected void onCreate(Bundle savedInstanceState) {
        super.onCreate(savedInstanceState);
        setContentView(R.layout.activity_ad);
        imgCancle = (ImageView) findViewById(R.id.imgCancle);
        imgCancle.setOnClickListener(new OnClickListener() {
            @Override
            public void onClick(View v) {
                finish();
            }
        });
    }
}
完毕~~~


 2069
2069

 被折叠的 条评论
为什么被折叠?
被折叠的 条评论
为什么被折叠?
 到【灌水乐园】发言


