


介绍
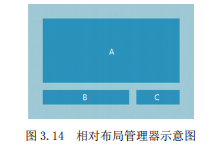
相对布局管理器是通过相对定位的方式让组件出现在布局的任何位置的。例如如图 3.14 所示的界面就是采用相对布局管理器来进行布局的,其中先放置组件 A,然后放置组件 B,让其位于组件 A 的下方,再放置组件 C,让其位于组件 A 的下方,并且位于组件 B 的右侧。
在Android中,无论是创建哪一种布局管理器都有两种方法:
- 一种是在XML布局文件中定义
- 另一种是使用Java代码来创建
在下面的语法中,<RelativeLayout> 为起始标记,</RelativeLayout> 为结束标记。在起始标记中的 xmlns:android 为设置 XML 命名空间的属性,其属性值为固定写法。
<RelativeLayout xmlns:android=”http://schemas.android.com/apk/res/android”
属性列表
>
</RelativeLayout>
支持的XML属性
在相对布局管理器中,只有gravity和ignoreGravity两个属性是不够的,为了更好地控制该布局管理器中各子组件的布局分布,RelativeLayout 提供了一个内部类 RelativeLayout.LayoutParams,通过该类提供的大量 XML 属性,可以很好地控制相对布局管理器中各组件的分布方式。RelativeLayout.LayoutParams 支持的 XML 属性如表所示。
|
XML属性描述
|
描 述
|
|
android:gravity
|
用于设置布局管理器中各子组件的对齐方式
|
|
android:ignoreGravity
|
用于指定哪个组件不受
gravity
属性的影响
|
|
android:layout_alignBottom / Left
/ Right / Top
| 其属性值为其他 UI 组件的 id 属性,用于指定该组件与哪个组件的下 / 左 / 右 / 上边界对齐 |
|
android:layout_alignParentBottom
/ Left / Right / Top
|
其属性值为
boolean
值,用于指定该组件是否与布局管理器底端 / 左端 / 右端 / 顶端 对齐
|
|
android:layout_above / below /
toLeftOf / toRightOf
|
其属性值为其他
UI
组件的
id
属性,用于指定该组件位于哪个组件的上方 / 下方 / 左侧 / 右侧
|
|
android:layout_centerInParent
|
其属性值为
boolean
值,用于指定该组件是否位于布局管理器的中央位置
|
|
android:layout_centerHorizontal
|
其属性值为
boolean
值,用于指定该组件是否位于布局管理器水平居中的位置
|
|
android:layout_centerVertical
|
其属性值为
boolean
值,用于指定该组件是否位于布局管理器垂直居中的位置
|
例子
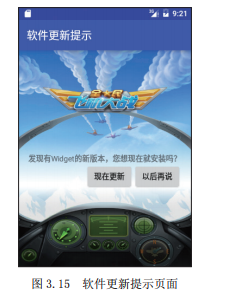
软件更新提示界面
xml文件代码如下:将提示文本组件textView1设置为在屏幕中央显示,然后设置“以后再说”按钮button2在textView1的下方居右边界对齐,最后设置“现在更新”按钮button1在“以后再说”按钮的左侧显示。
<RelativeLayout xmlns:android="http://schemas.android.com/apk/res/android"
    xmlns:tools="http://schemas.android.com/tools"
    android:layout_width="match_parent"
    android:layout_height="match_parent"
    android:background="@mipmap/bg">

    <!-- 添加一个居中显示的文本视图textView1 -->
    <TextView android:text="发现有Widget的新版本,您想现在就安装吗?"
        android:id="@+id/textView1"
        android:layout_height="wrap_content"
        android:layout_width="wrap_content"
        android:layout_centerInParent="true"
        />
    <!-- 添加一个按钮button2,该按钮与textView1的右边界对齐 -->
    <Button
        android:text="以后再说"
        android:id="@+id/button2"
        android:layout_height="wrap_content"
        android:layout_width="wrap_content"
        android:layout_alignRight="@id/textView1"
        android:layout_below="@id/textView1"
        />
    <!-- 添加一个在button2左侧显示的按钮button1 -->
    <Button
        android:text="现在更新"
        android:id="@+id/button1"
        android:layout_height="wrap_content"
        android:layout_width="wrap_content"
        android:layout_below="@id/textView1"
        android:layout_toLeftOf="@id/button2"
        />
</RelativeLayout>
效果图如下:
相对定位属性应用
<RelativeLayout xmlns:android="http://schemas.android.com/apk/res/android"
    android:layout_width="match_parent"
    android:layout_height="match_parent">


    <Button
        android:id="@+id/button1"
        android:layout_width="wrap_content"
        android:layout_height="wrap_content"
        android:layout_alignParentLeft="true"
        android:layout_alignParentTop="true"
        android:text="Button01"
        android:textAllCaps="false" />

    <Button
        android:id="@+id/button2"
        android:layout_width="wrap_content"
        android:layout_height="wrap_content"
        android:layout_alignParentRight="true"
        android:layout_alignParentTop="true"
        android:text="Button02"
        android:textAllCaps="false" />

    <Button
        android:id="@+id/button3"
        android:layout_width="wrap_content"
        android:layout_height="wrap_content"
        android:layout_centerInParent="true"
        android:text="Button03"
        android:textAllCaps="false" />

    <Button
        android:id="@+id/button4"
        android:layout_width="wrap_content"
        android:layout_height="wrap_content"
        android:layout_alignParentLeft="true"
        android:layout_alignParentBottom="true"
        android:text="Button04"
        android:textAllCaps="false" />

    <Button
        android:id="@+id/button5"
        android:layout_width="wrap_content"
        android:layout_height="wrap_content"
        android:layout_alignParentRight="true"
        android:layout_alignParentBottom="true"
        android:text="Button05"
        android:textAllCaps="false" />

</RelativeLayout>
相对于控件进行定位:
<RelativeLayout xmlns:android="http://schemas.android.com/apk/res/android"
    android:layout_width="match_parent"
    android:layout_height="match_parent">


    <Button
        android:id="@+id/button3"
        android:layout_width="wrap_content"
        android:layout_height="wrap_content"
        android:layout_centerInParent="true"
        android:text="Button03"
        android:textAllCaps="false" />

    <Button
        android:id="@+id/button1"
        android:layout_width="wrap_content"
        android:layout_height="wrap_content"
        android:layout_above="@+id/button3"
        android:layout_toLeftOf="@+id/button3"
        android:text="Button01"
        android:textAllCaps="false" />

    <Button
        android:id="@+id/button2"
        android:layout_width="wrap_content"
        android:layout_height="wrap_content"
        android:layout_above="@+id/button3"
        android:layout_toRightOf="@+id/button3"
        android:text="Button02"
        android:textAllCaps="false" />


    <Button
        android:id="@+id/button4"
        android:layout_width="wrap_content"
        android:layout_height="wrap_content"
        android:layout_below="@+id/button3"
        android:layout_toLeftOf="@+id/button3"
        android:text="Button04"
        android:textAllCaps="false" />

    <Button
        android:id="@+id/button5"
        android:layout_width="wrap_content"
        android:layout_height="wrap_content"
        android:layout_below="@+id/button3"
        android:layout_toRightOf="@+id/button3"
        android:text="Button05"
        android:textAllCaps="false" />

</RelativeLayout>


 275
275


 被折叠的 条评论
为什么被折叠?
被折叠的 条评论
为什么被折叠?
 到【灌水乐园】发言


