


最近在学习数据持久化,总体来讲,说繁琐是因为他突然出现了很多我们没有见到过的类型,简单的是 他的逻辑很单一,基本每次用的步骤都是一样的,这两天练习数据持久化,并结合FRC做了一个简单的通讯录。与其在以后的复习博客中提及,不如在当下边写边复习。
在之前我们不管是从plist中取数据,还是从本地文件中获取数据都是通过先定义一个全局数据的数组来接收,并通过下标来一个一个的取值来显示在tableView中,这样做也是可以的,但是注意的是,我们每次这么做完,都需要记住两点不要忘记:
1、修改上下文对象 NSManagedObjectConext(之前看到学长写的一篇博客,简单的就可以理解为类似 java-web的 session 属性,用来长期保存数据的,也可以理解为一个环境,所有的操作都是在这个环境下进行的)
2、更新tableView.loadView(如果不刷新tableView,那么只能在下次打开的时候才能显示修改过的数据)
FRC是什么呢,我简单的理解就是UIFetchedResultsController, 它的作用就是在 coredata 文件和 tableView 的中间架起来一个桥梁,就是随时从 环境中(NSManagedObjectContext)中获取数据,并通过回调方法,来实现对tableView的动态更新。
当然布局的工作依旧交给storyboard来解决,起始位置是一个UINavigationController(导航视图,以后会在复习博客中说到),结构如下
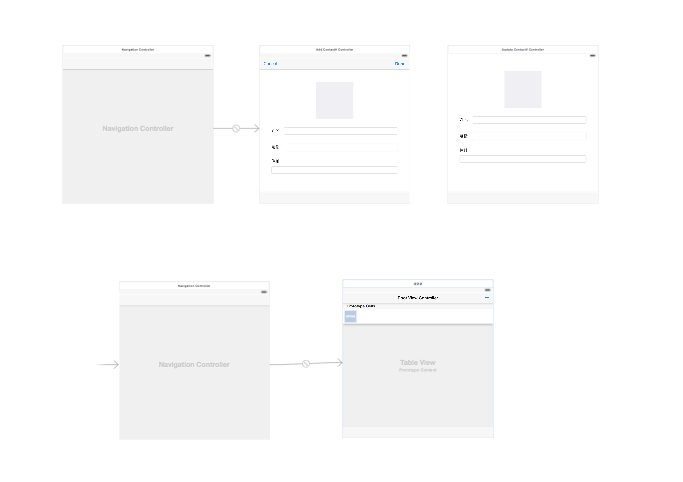
接下来是coreData的文件,新建方法也在上一篇文章中细说过了:
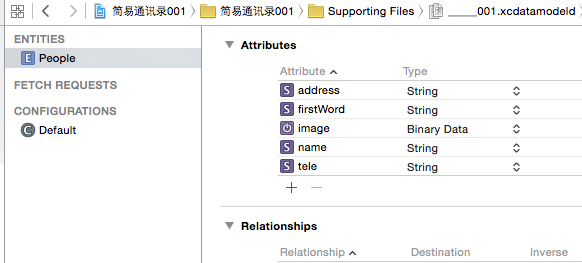
然后是 自动创建的实体类,(如何创建,上一文章中已经提及了)
//
//  People.h
//  简易通讯录001
//
//  Created by YueWen on 15/9/11.
//  Copyright (c) 2015年 YueWen. All rights reserved.
//

#import <Foundation/Foundation.h>
#import <CoreData/CoreData.h>


@interface People : NSManagedObject

@property (nonatomic, retain) NSString * address;
@property (nonatomic, retain) NSData * image;
@property (nonatomic, retain) NSString * name;
@property (nonatomic, retain) NSString * tele;
@property (nonatomic, retain) NSString * firstWord;

@end
//
// People.m
// 简易通讯录001
//
// Created by YueWen on 15/9/11.
// Copyright (c) 2015年 YueWen. All rights reserved.
//
#import "People.h"
#import "Pinyin.h"
@implementation People
@dynamic address;
@dynamic image;
@dynamic name;
@dynamic tele;
@dynamic firstWord;
@end
语言很是苍白无力,先留一下运行效果,后面附上代码
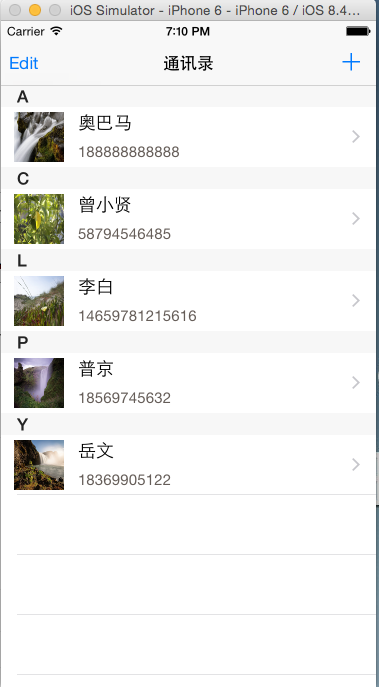
上面提到了,首先是一个UINavigationController(导航栏),导航栏的根视图是自带的一个UITableViewController,并用的自定义cell,因为原始的风格实在是太难看了,以下是这个页面的代码:(因为头文件中没有任何的东西,所以只给出实现文件)
//
//  ContactsTVController.m
//  简易通讯录
//
//  Created by YueWen on 15/9/10.
//  Copyright (c) 2015年 YueWen. All rights reserved.
//

#import "ContactsTVController.h"
#import "AddContactVController.h"
#import <CoreData/CoreData.h>
#import "People.h"
#import "UpdataContactVController.h"
#import "MyCell.h"

@interface ContactsTVController ()<NSFetchedResultsControllerDelegate>

@property (nonatomic, strong) NSManagedObjectContext * mangaedOjectContext;//上下文对象
@property (nonatomic, strong) NSFetchedResultsController * fetchResultsController;

@end

@implementation ContactsTVController


#pragma mark - 配置数据
-(void)loadMyFetchResultsController
{
    /***************配置fetchResultsController************/

    //创建请求
    NSFetchRequest * request = [[NSFetchRequest alloc]initWithEntityName:NSStringFromClass([People class])];

    //创建一个排序描述
    NSSortDescriptor * sortDescriptor = [NSSortDescriptor sortDescriptorWithKey:@"firstWord" ascending:YES];

    //加在排序
    [request setSortDescriptors:@[sortDescriptor]];

    //创建fetchResultsController
    self.fetchResultsController = [[NSFetchedResultsController alloc]initWithFetchRequest:request managedObjectContext:self.mangaedOjectContext sectionNameKeyPath:@"firstWord" cacheName:nil];


    //执行fetchResultsController
    NSError * error;
    if (![self.fetchResultsController performFetch:&error])
    {
        NSLog(@"%@",[error localizedDescription]);
    }

    //设置fetchResultsController的代理
    self.fetchResultsController.delegate = self;
}


#pragma mark - 添加联系人的目标动作回调
- (IBAction)addContact:(UIBarButtonItem *)sender
{
    //获取storyboard
    UIStoryboard * storyboard = [UIStoryboard storyboardWithName:@"Main" bundle:[NSBundle mainBundle]];

    //从storyboard中获得添加联系人的页面
    UINavigationController * addContactNVController = [storyboard instantiateViewControllerWithIdentifier:@"addContactNVController"];

    //以模态的形式跳出
    [self presentViewController:addContactNVController animated:YES completion:nil];

}


#pragma mark - 默认的加载方法
- (void)viewDidLoad {
    [super viewDidLoad];

    //设置标题
    self.navigationItem.title = @"通讯录";

    //设置左上角的编辑 bar button item
    self.navigationItem.leftBarButtonItem = self.editButtonItem;

    //获取该应用的上下文对象
    self.mangaedOjectContext = [self applicationManagedObjectContext];

    //配置fetchResultsController数据
    [self loadMyFetchResultsController];


}

- (void)didReceiveMemoryWarning {
    [super didReceiveMemoryWarning];
    // Dispose of any resources that can be recreated.
}
当然,作为要使用tableView,那么我们必须要给他数据源,以下是实现tableView data source 的方法
#pragma mark - Table view data source

//返回的是tableView的分组数
- (NSInteger)numberOfSectionsInTableView:(UITableView *)tableView {

    //获取fetchResultsController的所有组
    NSArray * sections = [self.fetchResultsController sections];

    return sections.count;
}

//返回的是每组 的行数
- (NSInteger)tableView:(UITableView *)tableView numberOfRowsInSection:(NSInteger)section {

    //获取fetchResultsController的所有的组
    NSArray * sections = [self.fetchResultsController sections];

    //获取每组的信息
    id <NSFetchedResultsSectionInfo> section0 = sections[section];

    return [section0 numberOfObjects];
}


//返回的是每个cell的显示的内容
- (UITableViewCell *)tableView:(UITableView *)tableView cellForRowAtIndexPath:(NSIndexPath *)indexPath {

    static NSString * indenfifier = @"MyCell";

    //获取模型对象
    People * people = [self.fetchResultsController objectAtIndexPath:indexPath];

    //创建MyCell,是自定义的cell
    MyCell *cell = [tableView dequeueReusableCellWithIdentifier:indenfifier forIndexPath:indexPath];

    //设置cell右侧的小箭头
    [cell setAccessoryType:UITableViewCellAccessoryDisclosureIndicator];

    //为cell赋值
    cell.titleImage.image = [UIImage imageWithData:people.image];
    cell.nameLabel.text = people.name;
    cell.teleLabel.text = people.tele;

    return cell;
}

//设置头标
-(NSString *)tableView:(UITableView *)tableView titleForHeaderInSection:(NSInteger)section
{
    //获得所有的sections
    NSArray * sections = [self.fetchResultsController sections];

    //返回title
    return [sections[section] name];
}
那么FRC是如何感知自己的改变,从而改变tableView的呢,首先是要遵守他的协议<NSFetchedResultsControllerDelegate>,方法呢,就是按住Option键进入帮助文档,复制粘贴,稍作修改即可
#pragma mark - 实现 NSFetchResultsControllerDelegate 的方法

- (void)controllerWillChangeContent:(NSFetchedResultsController *)controller
{
    //tableView开始更新
    [self.tableView beginUpdates];
}


- (void)controller:(NSFetchedResultsController *)controller didChangeSection:(id <NSFetchedResultsSectionInfo>)sectionInfo
           atIndex:(NSUInteger)sectionIndex forChangeType:(NSFetchedResultsChangeType)type
{

    switch(type) {
        //如果是加入了新的组
        case NSFetchedResultsChangeInsert:
            //tableView插入新的组
            [self.tableView insertSections:[NSIndexSet indexSetWithIndex:sectionIndex]
                          withRowAnimation:UITableViewRowAnimationFade];
            break;

        //如果是删除了组
        case NSFetchedResultsChangeDelete:
            //tableView删除新的组
            [self.tableView deleteSections:[NSIndexSet indexSetWithIndex:sectionIndex]
                          withRowAnimation:UITableViewRowAnimationFade];
            break;
    }
}


- (void)controller:(NSFetchedResultsController *)controller didChangeObject:(id)anObject
       atIndexPath:(NSIndexPath *)indexPath forChangeType:(NSFetchedResultsChangeType)type
      newIndexPath:(NSIndexPath *)newIndexPath
{

    UITableView *tableView = self.tableView;

    switch(type) {
        //如果是组中加入新的对象
        case NSFetchedResultsChangeInsert:
            [tableView insertRowsAtIndexPaths:[NSArray arrayWithObject:newIndexPath]
                             withRowAnimation:UITableViewRowAnimationFade];
            break;
        //如果是组中删除了对象
        case NSFetchedResultsChangeDelete:
            [tableView deleteRowsAtIndexPaths:[NSArray arrayWithObject:indexPath]
                             withRowAnimation:UITableViewRowAnimationFade];
            break;
        //如果是组中的对象发生了变化
        case NSFetchedResultsChangeUpdate:
            //**********我们需要修改的地方**********
            [tableView reloadRowsAtIndexPaths:@[indexPath] withRowAnimation:UITableViewRowAnimationFade];
            break;
        //如果是组中的对象位置发生了变化
        case NSFetchedResultsChangeMove:
            [tableView deleteRowsAtIndexPaths:[NSArray arrayWithObject:indexPath]
                             withRowAnimation:UITableViewRowAnimationFade];
            [tableView insertRowsAtIndexPaths:[NSArray arrayWithObject:newIndexPath]
                             withRowAnimation:UITableViewRowAnimationFade];
            break;
    }
}

- (void)controllerDidChangeContent:(NSFetchedResultsController *)controller
{
    //用自己算好的最有算法,进行排列更新
    [self.tableView endUpdates];
}
当然自定义表格的高 都 为60,那么我们就通过一个方法来统一实现设置cell的高度
#pragma maek - 实现 UITableViewConrollerDelegate 方法
- (CGFloat)tableView:(UITableView *)tableView heightForRowAtIndexPath:(NSIndexPath *)indexPath
{
    return 60;
}
如果想通过点击该行进入修改页面呢,就实现以下方法
//点击tableView中的元素执行的方法
- (void)tableView:(UITableView *)tableView didSelectRowAtIndexPath:(NSIndexPath *)indexPath
{
    //获取模型对象
    People * people = [self.fetchResultsController objectAtIndexPath:indexPath];

    //获取stroyboard
    UIStoryboard * storyboard = [UIStoryboard storyboardWithName:@"Main" bundle:[NSBundle mainBundle]];

    //创建一个 UpdataContactVController 准备跳转
    UpdataContactVController *  updataContactVController = [storyboard instantiateViewControllerWithIdentifier:NSStringFromClass([UpdataContactVController class])];

    //将模型对象赋值给 跳转页面的属性
    [updataContactVController setPeople:people];

    //设置标题
    updataContactVController.navigationItem.title = @"更新联系人";

    //页面跳转
    [self.navigationController pushViewController:updataContactVController animated:YES];

}
如果按住该行,往左一划,会出现删除界面,如何完成删除呢
首先要设置这个tableView能够进行编辑
// Override to support conditional editing of the table view.
- (BOOL)tableView:(UITableView *)tableView canEditRowAtIndexPath:(NSIndexPath *)indexPath {
    // Return NO if you do not want the specified item to be editable.
    return YES;
}然后是删除的操作
// Override to support editing the table view.
- (void)tableView:(UITableView *)tableView commitEditingStyle:(UITableViewCellEditingStyle)editingStyle forRowAtIndexPath:(NSIndexPath *)indexPath
{

    if (editingStyle == UITableViewCellEditingStyleDelete) {

        //从上下文中获得该模型
        People * people = [self.fetchResultsController objectAtIndexPath:indexPath];

        //从上下文中删除该模型
        [self.mangaedOjectContext deleteObject:people];

        //上下文保存
        NSError * error;
        if (![self.mangaedOjectContext save:&error])
        {
            NSLog(@"%@",[error localizedDescription]);
        }

        //跳转至根视图
        [self.navigationController popViewControllerAnimated:YES];

    } else if (editingStyle == UITableViewCellEditingStyleInsert) {
        // Create a new instance of the appropriate class, insert it into the array, and add a new row to the table view
    }
}
以下是联系人添加的页面
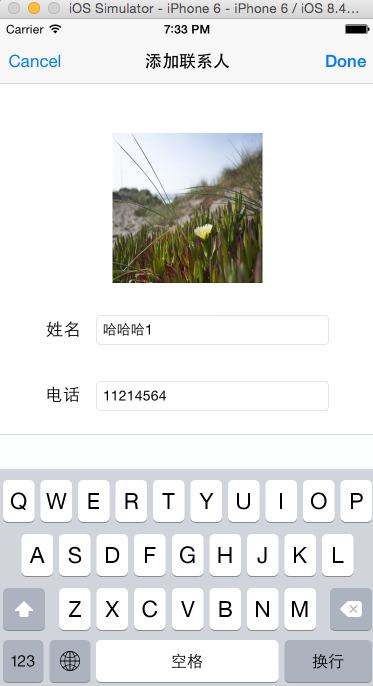
其中点击图片是可以变照片的,当然选择照片也是用了苹果自带的一个工具,叫做UIImagePikcerController
就是这个属性
@property (strong, nonatomic) UIImagePickerController * imagePickerController;回调的方法呢:
#pragma mark - 实现 imagePickerControllerDelegate 方法
//回调图片选择取消
- (void)imagePickerControllerDidCancel:(UIImagePickerController *)picker
{
    //返回原来的界面
    [self dismissViewControllerAnimated:YES completion:nil];
}

-(void)imagePickerController:(UIImagePickerController *)picker didFinishPickingMediaWithInfo:(NSDictionary *)info
{

    //获取到编辑好的图片
    UIImage * image = info[UIImagePickerControllerEditedImage];

    //把获取的图片设置成用户的头像
    [self.titleImageButton setImage:image forState:UIControlStateNormal];

    //返回原来的view
    [self dismissViewControllerAnimated:YES completion:nil];
}
添加页面的其他代码:
//
//  AddContactVController.m
//  简易通讯录
//
//  Created by YueWen on 15/9/10.
//  Copyright (c) 2015年 YueWen. All rights reserved.
//

#import "AddContactVController.h"
#import <CoreData/CoreData.h>
#import "People.h"
#import "Pinyin.h"
@interface AddContactVController ()<UIImagePickerControllerDelegate,UINavigationControllerDelegate>

//姓名的nameText
@property (strong, nonatomic) IBOutlet UITextField *nameText;
//电话的teleText
@property (strong, nonatomic) IBOutlet UITextField *teleText;
//地址的addressText
@property (strong, nonatomic) IBOutlet UITextField *addressText;
//上下文对象
@property (strong, nonatomic) NSManagedObjectContext * mamagedObjectContext;
//图片选择器
@property (strong, nonatomic) UIImagePickerController * imagePickerController;
//显示头像的按钮
@property (strong, nonatomic) IBOutlet UIButton *titleImageButton;

@end

@implementation AddContactVController

#pragma mark - 点击图片按钮,换图片的 目标动作回调
- (IBAction)changeTitleImage:(UIButton *)sender
{
    [self presentViewController:self.imagePickerController animated:YES completion:nil];
}

#pragma mark - 右上角 Done 的 bar button item 动作回调
- (IBAction)doneAddContact:(UIBarButtonItem *)sender
{
    //获取一个实体托管对象 people
    People * people = [NSEntityDescription insertNewObjectForEntityForName:NSStringFromClass([People class]) inManagedObjectContext:self.mamagedObjectContext];

    //为托管对象设置属性
    people.name = self.nameText.text;
    people.tele = self.teleText.text;
    people.address = self.addressText.text;

    //设置图片属性
    UIImage * image = self.titleImageButton.imageView.image;
    people.image = UIImagePNGRepresentation(image);

    //设置首字母
    people.firstWord = [NSString stringWithFormat:@"%c",pinyinFirstLetter([people.name characterAtIndex:0]) - 32];

    //上下文对象保存
    NSError * error;
    if (![self.mamagedObjectContext save:&error])
    {
        NSLog(@"%@",[error localizedDescription]);
    }

    //跳到模态
    [self dismissViewControllerAnimated:YES completion:nil];

}

#pragma mark - 左上角 Cancle 的 bar button item 动作回调
- (IBAction)cancleAddContact:(UIBarButtonItem *)sender
{
    //跳出模态状态
    [self dismissViewControllerAnimated:YES completion:nil];
}


- (void)viewDidLoad {
    [super viewDidLoad];

    //设置title
    self.navigationItem.title = @"添加联系人";

    //获取应用的上下文
    self.mamagedObjectContext = [self applicationManagedObjectContext];

    //初始化imagePickerController并配置
    self.imagePickerController = [[UIImagePickerController alloc]init];

    //是否可以编辑
    self.imagePickerController.allowsEditing = YES;

    //注册回调
    self.imagePickerController.delegate = self;

}

- (void)didReceiveMemoryWarning {
    [super didReceiveMemoryWarning];
    // Dispose of any resources that can be recreated.
}

#pragma mark - 获取本应用的上下文对象
-(NSManagedObjectContext *)applicationManagedObjectContext
{
    //获取应用的单例对象<pre name="code" class="objc">#pragma mark - view加载方法
- (void)viewDidLoad
{
******************************************补充(2015 10 03) ************************************
上面的写法运行的时候会出现卡顿现象,是因为imagePickerView加载是需要很多时间的,所以会出现卡顿,如果想要避免这种情况,就要用到多线程了,当初写的时候不会有多线程,现在回来补上,详情请去后面的博客iOS学习-------多线程编程了解,这样就不回卡顿了
#pragma mark - view加载方法
- (void)viewDidLoad
{
    [super viewDidLoad];

    //初始化上下文对象
    self.managedObjectContext = [self applicationManagedObjectContext];

    //设置面板
    [self loadPeopleContext];

    //创建图片选择器,用子线程加载,不然会出现卡顿现象
    dispatch_async(dispatch_get_global_queue(0, 0), ^{

        //异步加载相册
        self.imagePickerController = [[UIImagePickerController alloc]init];

        //用主线程来修改属性
        dispatch_async(dispatch_get_main_queue(), ^{

            //可以编辑
            self.imagePickerController.allowsEditing = YES;

            //注册回调
            self.imagePickerController.delegate = self;
        });

    });

}
这个时候需要注意,就是说,当点进去修改界面的时候,imagePickerView还不一定能够加载好,所以跳入的时候需要一个判断,不然可能会崩溃
/**
 *  titleImageButton target action
 *
 *  @param sender 头像按钮
 */
- (IBAction)changeTitleImage:(UIButton *)sender
{
    //当图片选择器必须加载完毕后,才能跳
    if (self.imagePickerController != nil)
    {
        //跳至图片选择界面
        [self presentViewController:self.imagePickerController animated:YES completion:nil];
    }

}
******************************************补充(2015 10 03) ************************************
点击某行,可以对该行的信息进行修改,并保存
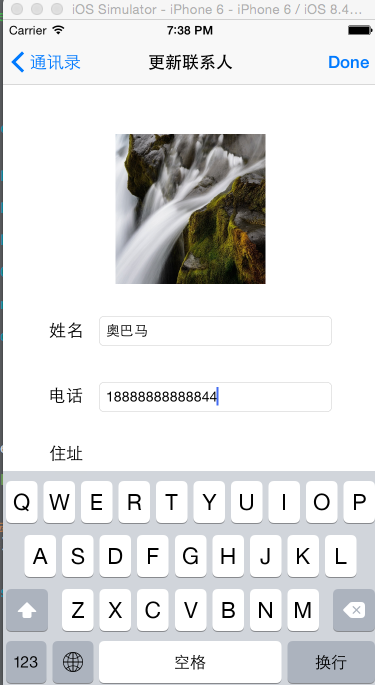
代码与添加很像,就不再做过多的解释了,直接贴代码吧,感觉一般写程序写注释的习惯也是帮了我不少的忙
//
//  AddContactVController.m
//  简易通讯录
//
//  Created by YueWen on 15/9/10.
//  Copyright (c) 2015年 YueWen. All rights reserved.
//

#import "AddContactVController.h"
#import <CoreData/CoreData.h>
#import "People.h"
#import "Pinyin.h"
@interface AddContactVController ()<UIImagePickerControllerDelegate,UINavigationControllerDelegate>

//姓名的nameText
@property (strong, nonatomic) IBOutlet UITextField *nameText;
//电话的teleText
@property (strong, nonatomic) IBOutlet UITextField *teleText;
//地址的addressText
@property (strong, nonatomic) IBOutlet UITextField *addressText;
//上下文对象
@property (strong, nonatomic) NSManagedObjectContext * mamagedObjectContext;
//图片选择器
@property (strong, nonatomic) UIImagePickerController * imagePickerController;
//显示头像的按钮
@property (strong, nonatomic) IBOutlet UIButton *titleImageButton;

@end

@implementation AddContactVController

#pragma mark - 点击图片按钮,换图片的 目标动作回调
- (IBAction)changeTitleImage:(UIButton *)sender
{
    [self presentViewController:self.imagePickerController animated:YES completion:nil];
}

#pragma mark - 右上角 Done 的 bar button item 动作回调
- (IBAction)doneAddContact:(UIBarButtonItem *)sender
{
    //获取一个实体托管对象 people
    People * people = [NSEntityDescription insertNewObjectForEntityForName:NSStringFromClass([People class]) inManagedObjectContext:self.mamagedObjectContext];

    //为托管对象设置属性
    people.name = self.nameText.text;
    people.tele = self.teleText.text;
    people.address = self.addressText.text;

    //设置图片属性
    UIImage * image = self.titleImageButton.imageView.image;
    people.image = UIImagePNGRepresentation(image);

    //设置首字母
    people.firstWord = [NSString stringWithFormat:@"%c",pinyinFirstLetter([people.name characterAtIndex:0]) - 32];

    //上下文对象保存
    NSError * error;
    if (![self.mamagedObjectContext save:&error])
    {
        NSLog(@"%@",[error localizedDescription]);
    }

    //跳到模态
    [self dismissViewControllerAnimated:YES completion:nil];

}

#pragma mark - 左上角 Cancle 的 bar button item 动作回调
- (IBAction)cancleAddContact:(UIBarButtonItem *)sender
{
    //跳出模态状态
    [self dismissViewControllerAnimated:YES completion:nil];
}


- (void)viewDidLoad {
    [super viewDidLoad];

    //设置title
    self.navigationItem.title = @"添加联系人";

    //获取应用的上下文
    self.mamagedObjectContext = [self applicationManagedObjectContext];

    //初始化imagePickerController并配置
    self.imagePickerController = [[UIImagePickerController alloc]init];

    //是否可以编辑
    self.imagePickerController.allowsEditing = YES;

    //注册回调
    self.imagePickerController.delegate = self;

}

- (void)didReceiveMemoryWarning {
    [super didReceiveMemoryWarning];
    // Dispose of any resources that can be recreated.
}

#pragma mark - 获取本应用的上下文对象
-(NSManagedObjectContext *)applicationManagedObjectContext
{
    //获取应用的单例对象
    UIApplication * application = [UIApplication sharedApplication];
    id delegate = application.delegate;

    //返回应用的上下文对象
    return [delegate managedObjectContext];
}


#pragma mark - 实现 imagePickerControllerDelegate 方法
//回调图片选择取消
- (void)imagePickerControllerDidCancel:(UIImagePickerController *)picker
{
    //返回原来的界面
    [self dismissViewControllerAnimated:YES completion:nil];
}

-(void)imagePickerController:(UIImagePickerController *)picker didFinishPickingMediaWithInfo:(NSDictionary *)info
{

    //获取到编辑好的图片
    UIImage * image = info[UIImagePickerControllerEditedImage];

    //把获取的图片设置成用户的头像
    [self.titleImageButton setImage:image forState:UIControlStateNormal];

    //返回原来的view
    [self dismissViewControllerAnimated:YES completion:nil];
}


@end
重要的代码差不多也就是这些了,本人新手一枚,如果有什么错误,感谢能够指正,不要误解更多的人.


 3407
3407

 被折叠的 条评论
为什么被折叠?
被折叠的 条评论
为什么被折叠?
 到【灌水乐园】发言


