


查看帮助
bin/solr -help 可以看到solr有哪些子命令,如
start, stop, restart, status, healthcheck, create, create_core, create_collection, delete, version启动start
bin/solr start  -help    查看start帮助
bin/solr start        启动单机版
bin/solr start -f           前台启动
bin/solr start -p 8984        指定端口启动
bin/solr start -cloud        启动分布式版本
bin/solr start -e cloud -noprompt         -e表示要启动一个现有的例子,例子名称是cloud,cloud这个例子是以SolrCloud方式启动的
bin/solr restart          重启项目
create
如果是单机版要创建core,如果是分布式的要创建collection
bin/solr create -help     查看create帮助
bin/solr create -c abcabc是core或collection的名字,取决于solr是单机版还是cloud版本;刷新http://localhost:8983/solr ,可以看到core selector中多了一个abc
abc目录的位置创建在solr.solr.home(默认是solr的server/solr目录)目录下
post提交数据生成索引
bin/post -c abc docs/向名为abc的core或collection提交数据,数据源在docs/目录中
删除
bin/solr delete -c abc 删除一个core或collection删除索引
bin/post -c abc -d "<delete><id>/home/matthewi/software/solr-5.4.1/docs/solr-morphlines-core/allclasses-noframe.html</id></delete>"重新执行上面的搜索可以看到搜索结果的数量少了一条:numFound列
bin/post -c abc -d "<delete><query>*:*</query></delete>"删除所有数据
停止solr
bin/solr stop -all停止指定端口的solr服务:./solr stop -p 端口号
状态
bin/solr statusshell命令
导入文档:
sh bin/post -c gettingstarted docs/index.html删除全部文档:
sh bin/post -c gettingstarted -d "<delete><query>*:*</query></delete>"删除示例:
bin/solr stop -all ; rm -Rf example/cloud/启动指定Node:
sh bin/solr start -c -s example/cloud/node1/solr/ -p 8983

sh bin/solr start -c -s example/cloud/node2/solr/ -p 7574
上传配置文件到zk:
sh zkcli.sh -cmd upconfig -zkhost 127.0.0.1:2181 -confname default-configset -confdir /root/program-files/solr-5.1.0/configs上传文件到zk:
sh zkcli.sh -zkhost localhost:2181 -cmd putfile /solr.xml /path/to/solr.xml创建collection:
curl 'http://127.0.0.1:8983/solr/admin/collections?action=CREATE&name=default-collection&instanceDir=default-collection&dataDir=data&config=solrconfig.xml&schema=schema.xml&numShards=2&collection.configName=default-configset&replicationFactor=2'删除collection:
curl 'http://localhost:8983/solr/admin/collections?action=delete&name=default-collection'重新加载collection(可以让zk上修改后的配置文件生效):
curl 'http://localhost:8983/solr/admin/collections?action=RELOAD&name=default-collection'创建core:
curl 'http://localhost:8983/solr/admin/cores?name=default-collection_shard1_replica2&action=create&collection=default-collection&shard=shard1'删除core:
curl 'http://localhost:8983/solr/admin/cores?action=UNLOAD&core=default-collection_shard2_replica1' (命令不会删除core的实际文件夹,需要手动删除)删除shard:
curl 'http://localhost:8983/solr/admin/collections?action=DELETESHARD&shard=shard1&collection=default-collection'根据指定server目录启动一个实例:
sh bin/solr start -c -p 7574 -d server2 -z 127.0.0.1:2181http命令
创建collection
http://10.125.2.44:8001/solr/admin/collections?wt=xml&indexInfo=false&action=CREATE&name=meixin_group&instanceDir=meixin_group&dataDir=data&config=solrconfig.xml&schema=schema.xml&collection=meixin_group&numShards=1&collection.configName=meixin_group&replicationFactor=2 删除collection
http://10.125.2.44:8001/solr/admin/collections?wt=xml&indexInfo=false&action=DELETE&name=meixin_topicreload collection
http://10.125.2.44:8001/solr/admin/collections?wt=xml&indexInfo=false&action=RELOAD&name=meixin_group 删除所有数据
http://10.125.2.44:8001/solr/meixin_group/update/?stream.body=<delete><query>*:*</query></delete>&stream.contentType=text/xml;charset=utf-8&commit=true 查看实时schema(用zk更新配置文件后,如果没有reload,用该命令看到的schema是旧的,可以用来检测reload是否成功)
http://10.125.2.44:8001/solr/meixin_product/schema?wt=xml刷新collection(修改了zk上的collection配置文件后,用来使配置文件生效)
http://10.125.2.44:8001/solr/admin/collections?action=RELOAD&name=meixin_product前提条件:
安装solr版本:4.8.0
部署solr路径:/data/solr-4.8.0
1. 通过zookeeper上传一些配置信息:
通过zk命令将配置信息上传到zk环境中:
/data/solr-4.8.0/node/scripts/cloud-scripts/zkcli.sh -zkhost solr1 -cmd upconfig -confdir /data/solr-conf/article_recent -confname article_recent- solr1:表示当前host名为solr1,在/etc/hosts文件中有配置,代表的服务器ip地址。
- /data/solr-conf/article_recent:代表你要上传的配置信息文件路径地址
- article_recent:这个名称代表后续你创建集群需要的配置文件名称
2. 创建集群
curl "http://192.168.11.70:8983/solr/admin/collections?action=CREATE&name=article_201701&numShards=2&replicationFactor=2&maxShardsPerNode=2
    &collection.configName=article_recent&router.field=fingerprint&createNodeSet=192.168.11.70:8983_solr,192.168.11.90:8983_solr"
3. 删除集群
curl "http://192.168.11.70:8983/solr/admin/collections?action=DELETE&name=article_201701"4. 重新更新集群
curl "http://192.168.11.70:8983/solr/admin/collections?action=RELOAD&name=article_201701"5. 修改别名(alias)
curl "http://192.168.11.70:8983/solr/admin/collections?action=CREATEALIAS&name=union_article_newest&collections=article_201701,article_201612"6. 删除别名(alias)
curl "http://192.168.11.70:8983/solr/admin/collections?action=DELETEALIAS&name=union_article_newest"7. 增加replica
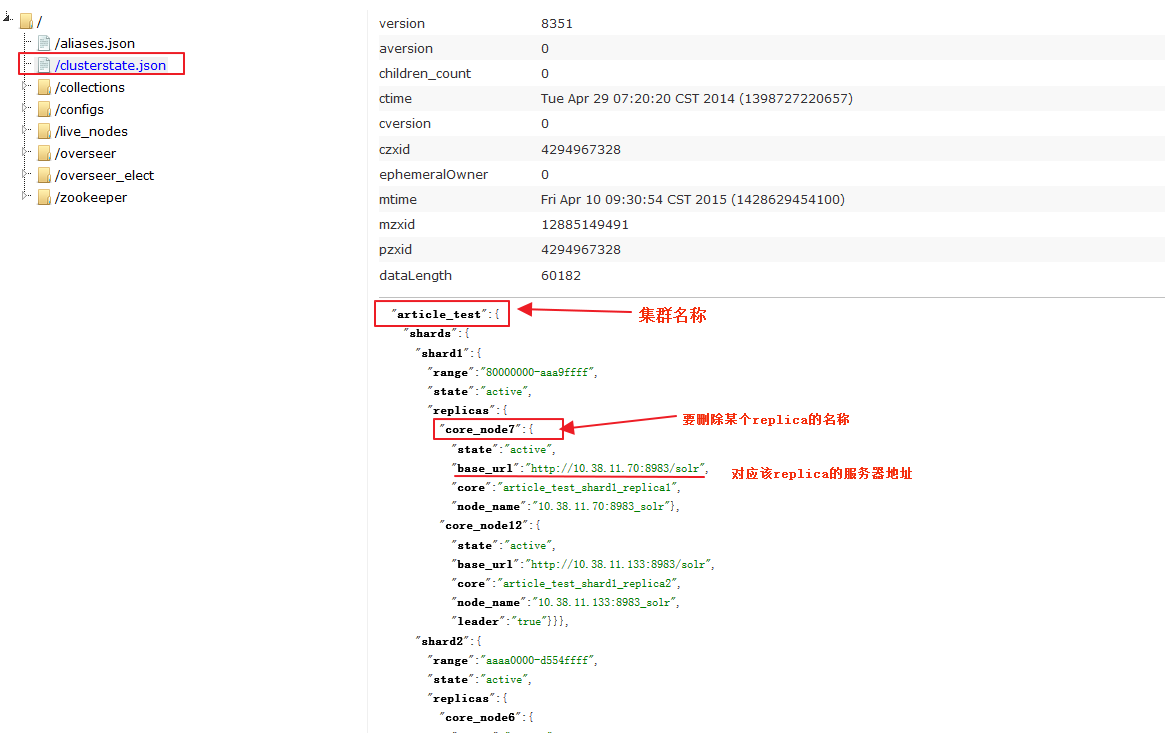
curl "http://192.168.11.70:8983/solr/admin/collections?action=ADDREPLICA&collection=article_201701&shard=shard2&node=192.168.11.130:7574_solr"8. 删除replica
curl "http://192.168.11.70:8983/solr/admin/collections?action=DELETEREPLICA&collection=article_201701&shard=shard2&replica=core_node4"上面命令中的 replica=core_node4 是从 tree 中的 /clusterstate.json 中找到,具体如下图所示:


 518
518

 被折叠的 条评论
为什么被折叠?
被折叠的 条评论
为什么被折叠?
 到【灌水乐园】发言


