在这次作业中,我们将实现1个简单的用户级线程包。
Switching threads
下载uthread.c和uthread_switch.S到xv6目录,在Makefile文件的_forktest规则之后添加如下规则:
_uthread: uthread.o uthread_switch.o
    $(LD) $(LDFLAGS) -N -e main -Ttext 0 -o _uthread uthread.o uthread_switch.o $(ULIB)
    $(OBJDUMP) -S _uthread > uthread.asm
在UPROGS目标下添加uthread依赖项。
当你完成uthread_switch.S时,你将获得如下的输出:
~/classes/6828/xv6$ make CPUS=1 qemu-nox
dd if=/dev/zero of=xv6.img count=10000
10000+0 records in
10000+0 records out
5120000 bytes transferred in 0.037167 secs (137756344 bytes/sec)
dd if=bootblock of=xv6.img conv=notrunc
1+0 records in
1+0 records out
512 bytes transferred in 0.000026 secs (19701685 bytes/sec)
dd if=kernel of=xv6.img seek=1 conv=notrunc
307+1 records in
307+1 records out
157319 bytes transferred in 0.003590 secs (43820143 bytes/sec)
qemu -nographic -hdb fs.img xv6.img -smp 1 -m 512
Could not open option rom 'sgabios.bin': No such file or directory
xv6...
cpu0: starting
init: starting sh
$ uthread
my thread running
my thread 0x2A30
my thread running
my thread 0x4A40
my thread 0x2A30
my thread 0x4A40
my thread 0x2A30
my thread 0x4A40
....
uthread创建2个线程,然后互相交替执行。每个线程打印”my thread …”,然后退让给其他线程机会去执行。
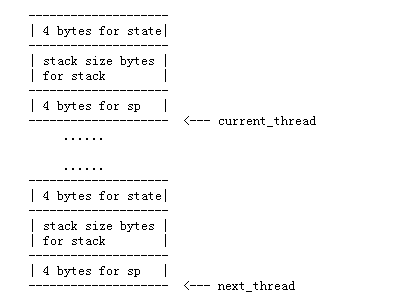
首先必须熟悉一下uthread.c文件中的内容。uthread.c中有2个全局变量current_thread和next_thread,是指向thread结构体的指针。而thread结构体的定义如下:
struct thread {
  int        sp;             /* curent stack pointer */
  char stack[STACK_SIZE];    /* the thread's stack */
  int        state;          /* running, runnable, waiting */
};
每个thread都有1个stack和指向stack的指针sp,在内存中的布局如下:

在main函数中,首先进行线程初始化,然后创建2个线程,并开始调度。其中main也是1个线程,但是只在第1次调度时,被涉及,后面调度时,由于一直是running状态,所以不会被调度。
int
main(int argc, char *argv[])
{
  thread_init();
  thread_create(mythread);
  thread_create(mythread);
  thread_schedule();
  return 0;
}
thread_schedule函数实现从线程链表中寻找1个可运行的线程,然后进行切换运行。类似于进程调度,最后用thread_switch进行上下文保存和替换工作。
static void
thread_schedule(void)
{
  thread_p t;

  /* Find another runnable thread. */
  for (t = all_thread; t < all_thread + MAX_THREAD; t++) {
    if (t->state == RUNNABLE && t != current_thread) {
      next_thread = t;
      break;
    }
  }

  if (t >= all_thread + MAX_THREAD && current_thread->state == RUNNABLE) {
    /* The current thread is the only runnable thread; run it. */
    next_thread = current_thread;
  }

  if (next_thread == 0) {
    printf(2, "thread_schedule: no runnable threads; deadlock\n");
    exit();
  }

  if (current_thread != next_thread) {         /* switch threads?  */
    next_thread->state = RUNNING;
    thread_switch();
  } else
    next_thread = 0;
}
thread_switch函数就是我们要实现的内容,它的任务是保存当前运行的线程状态到current_thread指针指向的thread结构体,然后从next_thread指针指向的结构体中恢复将要运行的线程状态,同时将current_thread指向next_thread指向的结构体,将next_thread的值清零。
thread_switch:
        /* YOUR CODE HERE */
        pushal
        movl current_thread, %eax
        movl %esp, (%eax)

        movl next_thread, %ebx
        movl %ebx, current_thread
        movl (%ebx), %esp
        popal

        movl $0x0, next_thread
        ret                /* pop return address from stack */
首先将通用寄存器压入堆栈,保存sp到current_thread指针指向额结构体,然后从next_thread指针指向的结构体中恢复堆栈指针和通用寄存器,改变2个指针的值。


 774
774


 被折叠的 条评论
为什么被折叠?


