


对于如何扫描图像的方法实在是太多了,在浏览一些资料的时候也找到了一些好的方法,到最后把这些方法的链接都贴出来,大家有兴趣的可以参考一下,看看哪种方法适合自己,在这里我还是根据OpenCV提供的范例进行分析。
1、建立查找表
颜色缩减方法:如果矩阵元素存储的是单通道像素,使用C或C++的无符号字符类型,那么像素可有256个不同值。但若是三通道图像,这种存储格式的颜色数就太多了(确切地说,有一千六百多万种)。用如此之多的颜色可能会对我们的算法性能造成严重影响。其实有时候,仅用这些颜色的一小部分,就足以达到同样效果。所以其做法是:将现有颜色空间值除以某个输入值,以获得较少的颜色数。例如,颜色值0到9可取为新值0,10到19可取为10,以此类推。其公式为:
即输入的颜色值为:0-9 输出为:0
10-19 10
20-29 20
…… ……
这样的话,简单的颜色空间缩减算法就可由下面两步组成:一、遍历图像矩阵的每一个像素;二、对像素应用上述公式。
由此可知,对于较大的图像,有效的方法是预先计算所有可能的值,然后需要这些值的时候,利用查找表直接赋值即可。查找表是一维或多维数组,存储了不同输入值所对应的输出值,其优势在于只需读取、无需计算。
计算查找表代码为:
int divideWith; // convert our input string to number - C++ style
    stringstream s;
    s << argv[2];
    s >> divideWith;
    if (!s)
    {
        cout << "Invalid number entered for dividing. " << endl;
        return -1;
    }

    uchar table[256];
    for (int i = 0; i < 256; ++i)
table[i] = divideWith* (i/divideWith);2、计算运行时间
OpenCV提供了两个简便的可用于计时的函数 getTickCount() 和 getTickFrequency() 。第一个函数返回你的CPU自某个事件(如启动电脑)以来走过的时钟周期数,第二个函数返回你的CPU一秒钟所走的时钟周期数。这样,我们就能轻松地以秒为单位对某运算计时:
double t = (double)getTickCount();
// 做点什么 ...
t = ((double)getTickCount() - t)/getTickFrequency();
cout << "Times passed in seconds: " << t << endl;
3、四种方式扫描图像
代码在范例的基础上做了一些小修改
#include "stdafx.h"

#include <opencv2/core/core.hpp>
#include <opencv2/highgui/highgui.hpp>
#include <iostream>
#include <sstream>

using namespace std;
using namespace cv;

static void help()
{
	cout
		<< "\n--------------------------------------------------------------------------" << endl
		<< "This program shows how to scan image objects in OpenCV (cv::Mat). As use case"
		<< " we take an input image and divide the native color palette (255) with the "  << endl
		<< "input. Shows C operator[] method, iterators and at function for on-the-fly item address calculation."<< endl
		<< "Usage:"                                                                       << endl
		<< "./howToScanImages imageNameToUse divideWith [G]"                              << endl
		<< "if you add a G parameter the image is processed in gray scale"                << endl
		<< "--------------------------------------------------------------------------"   << endl
		<< endl;
}

Mat& ScanImageAndReduceC(Mat& I, const uchar* table);//通过高效的C风格运算符[](指针)
Mat& ScanImageAndReduceIterator(Mat& I, const uchar* table);//通过安全的迭代法
Mat& ScanImageAndReduceRandomAccess(Mat& I, const uchar * table);//通过相关返回值的On-the-fly地址计算

int main( int argc, char* argv[])
{
	help();
	namedWindow("The original picture",1);//命名显示原图像窗口
	namedWindow("The change picture", 1);//命名显示改变图像窗口
	//选择显示彩色or灰色
	char ch=NULL;
	printf("GRAYSCALE OR COLOR?please enter G/C");
	scanf("%c",&ch);
	Mat I, J;
	if( ch== 'G' )
		//读取灰色图片
		I = imread("F:\\QTproject\\how_to_scan_images\\Lena.jpg", CV_LOAD_IMAGE_GRAYSCALE);
	else
		//读取彩色图片
		I = imread("F:\\QTproject\\how_to_scan_images\\Lena.jpg", CV_LOAD_IMAGE_COLOR);

	if (!I.data)
	{
		cout << "The image could not be loaded." << endl;
		return -1;
	}

	int divideWith = 0;
	// 把输入的字符串转为整数
	stringstream s;
	s << "50";
	s >> divideWith;
	if (!s || !divideWith)
	{
		cout << "Invalid number entered for dividing. " << endl;
		return -1;
	}
	//根据颜色空间缩减,建立查找表
	uchar table[256];
	for (int i = 0; i < 256; ++i)
		table[i] = (uchar)(divideWith * (i/divideWith));
	//执行次数为100次
	const int times = 100;
	double t;

	t = (double)getTickCount();

	for (int i = 0; i < times; ++i)
	{
		cv::Mat clone_i = I.clone();
		J = ScanImageAndReduceC(clone_i, table);
	}
	//计算100次的平均时间
	t = 1000*((double)getTickCount() - t)/getTickFrequency();
	t /= times;
	//显示原图片和改变图片
	imshow("The original picture",I);
	imshow("The change picture",J);
	waitKey(0);
	cout << "Time of reducing with the C operator [] (averaged for "
		<< times << " runs): " << t << " milliseconds."<< endl;


	t = (double)getTickCount();

	for (int i = 0; i < times; ++i)
	{
		cv::Mat clone_i = I.clone();
		J = ScanImageAndReduceIterator(clone_i, table);
	}

	t = 1000*((double)getTickCount() - t)/getTickFrequency();
	t /= times;

	cout << "Time of reducing with the iterator (averaged for "
		<< times << " runs): " << t << " milliseconds."<< endl;

	t = (double)getTickCount();

	for (int i = 0; i < times; ++i)
	{
		cv::Mat clone_i = I.clone();
		ScanImageAndReduceRandomAccess(clone_i, table);
	}

	t = 1000*((double)getTickCount() - t)/getTickFrequency();
	t /= times;

	cout << "Time of reducing with the on-the-fly address generation - at function (averaged for "
		<< times << " runs): " << t << " milliseconds."<< endl;

	//通过核心函数LUT
	Mat lookUpTable(1, 256, CV_8U);
	uchar* p = lookUpTable.data;
	for( int i = 0; i < 256; ++i)
		p[i] = table[i];

	t = (double)getTickCount();

	for (int i = 0; i < times; ++i)
		LUT(I, lookUpTable, J);

	t = 1000*((double)getTickCount() - t)/getTickFrequency();
	t /= times;

	cout << "Time of reducing with the LUT function (averaged for "
		<< times << " runs): " << t << " milliseconds."<< endl;
	char ch1=NULL;
	scanf("%c",&ch1);
	while (ch1!='c')
	{
		ch1=getchar();
	}
	return 0;
}

Mat& ScanImageAndReduceC(Mat& I, const uchar* const table)
{
	// accept only char type matrices
	CV_Assert(I.depth() != sizeof(uchar));

	int channels = I.channels();//得到通道数

	int nRows = I.rows;//获得行数
	int nCols = I.cols * channels;//行数*通道数=一行中有多少个数值
	//如果图像矩阵存储空间是连续的
	if (I.isContinuous())
	{
		nCols *= nRows;//得到存储矩阵的大小
		nRows = 1;
	}

	int i,j;
	uchar* p;
	for( i = 0; i < nRows; ++i)
	{
		p = I.ptr<uchar>(i);//得到存储矩阵的起始地址
		for ( j = 0; j < nCols; ++j)
		{
			p[j] = table[p[j]];//赋值
		}
	}
	//整个过程起始是将矩阵看出是一个一行nCols列的矩阵,由p指针指向矩阵,再进行赋值。
	return I;
}

Mat& ScanImageAndReduceIterator(Mat& I, const uchar* const table)
{
	// accept only char type matrices
	CV_Assert(I.depth() != sizeof(uchar));

	const int channels = I.channels();
	switch(channels)
	{
	case 1:
		{
			MatIterator_<uchar> it, end;//定义uchar的迭代器
			for( it = I.begin<uchar>(), end = I.end<uchar>(); it != end; ++it)
				*it = table[*it];
			break;
		}
	case 3:
		{
			MatIterator_<Vec3b> it, end;//定义Vec3b的迭代器
			for( it = I.begin<Vec3b>(), end = I.end<Vec3b>(); it != end; ++it)
			{
				(*it)[0] = table[(*it)[0]];
				(*it)[1] = table[(*it)[1]];
				(*it)[2] = table[(*it)[2]];
			}
		}
	}

	return I;
}

Mat& ScanImageAndReduceRandomAccess(Mat& I, const uchar* const table)
{
	// accept only char type matrices
	CV_Assert(I.depth() != sizeof(uchar));

	const int channels = I.channels();
	switch(channels)
	{
	case 1:
		{
			for( int i = 0; i < I.rows; ++i)
				for( int j = 0; j < I.cols; ++j )
					I.at<uchar>(i,j) = table[I.at<uchar>(i,j)];//对行列循环对每个数据点进行赋值
			break;
		}
	case 3:
		{
			Mat_<Vec3b> _I = I;//使用Mat_类进行运算,较为方便

			for( int i = 0; i < I.rows; ++i)
				for( int j = 0; j < I.cols; ++j )
				{
					_I(i,j)[0] = table[_I(i,j)[0]];
					_I(i,j)[1] = table[_I(i,j)[1]];
					_I(i,j)[2] = table[_I(i,j)[2]];
				}
				I = _I;
				break;
		}
	}

	return I;
}
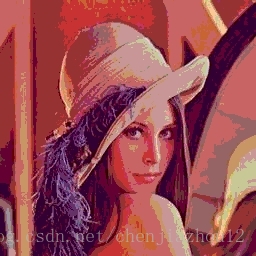
4、运行图片结果为:

图1、原图片 图2、颜色缩减图片
时间对比如下:
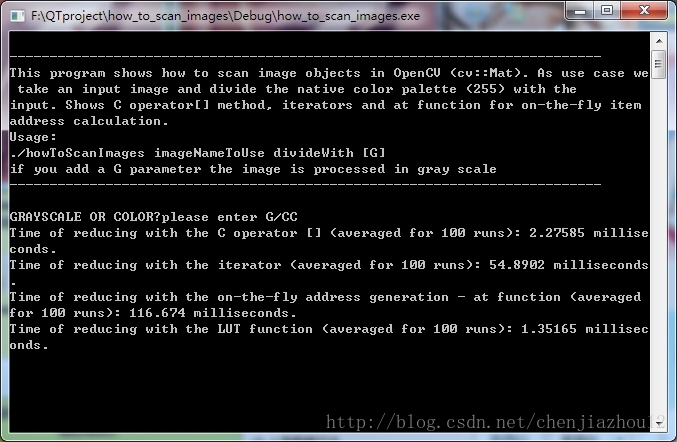
5、结论:
| Efficient Way | 2.27585 milliseconds |
| Iterator | 54.8902 milliseconds |
| On-The-Fly RA | 116.674 milliseconds |
| LUT function | 1.35165 milliseconds |
②从安全性角度来考虑,迭代法是更佳的选择,但是效率不是很明显
③On-The-Fly RA方法扫描全图是一个最浪费资源的方法
④Efficient Way方法是比较有效的方法,使用起来也方便,推荐使用
下面网址是其他博客收集或者自己编写的代码,大家可以参考一下
【OpenCV】访问Mat图像中每个像素的值
【OpenCV】访问Mat中每个像素的值(新)
OpenCV学习笔记(四十二)——Mat数据操作之普通青年、文艺青年、暴力青年
6、用到的类:
Mat_类:
这个类来源于Mat类,数据结构为:
template<typename _Tp> class Mat_ : public Mat
{
public:
    // ... some specific methods
    //         and
    // no new extra fields
};
// create a 100x100 8-bit matrix
Mat M(100,100,CV_8U);
// this will be compiled fine. no any data conversion will be done.
Mat_<float>& M1 = (Mat_<float>&)M;通过vec作为参数,可以使用Mat_多通道矩阵,如:
// allocate a 320x240 color image and fill it with green (in RGB space)
Mat_<Vec3b> img(240, 320, Vec3b(0,255,0));
// now draw a diagonal white line
for(int i = 0; i < 100; i++)
    img(i,i)=Vec3b(255,255,255);
// and now scramble the 2nd (red) channel of each pixel
for(int i = 0; i < img.rows; i++)
    for(int j = 0; j < img.cols; j++)
        img(i,j)[2] = 255;
LUT函数:
数据结构:
void LUT(InputArray src, InputArray lut, OutputArray dst)lut:256个元素的查找表
dst:输出矩阵,和src有着同样的size和同样的channel,和lut有着同样的depth
功能是为目标矩阵填充查找表数据,原理是如下:


将src的数据加上d再通过查找表查找数据,最后赋值给dst。


 869
869


 被折叠的 条评论
为什么被折叠?
被折叠的 条评论
为什么被折叠?
 到【灌水乐园】发言


