


原创作品,转载请注明:
http://blog.csdn.net/fervor_heart/article/details/8984547
本文作为学习自己写驱动的基础贴,重在总结写驱动程序从看开发板硬件使用手册,到开发板data sheet, 原理图,再到coding 的整个流程。
以Tiny6410 开发板实现led 驱动为例:
1. 看Tiny6410 硬件使用手册关于 LED 的介绍部分(要实现LED 驱动当然先要看下开发板上的LED 资源情况,有几个LED 之类的)【 01- Tiny6410硬件手册.pdf 】

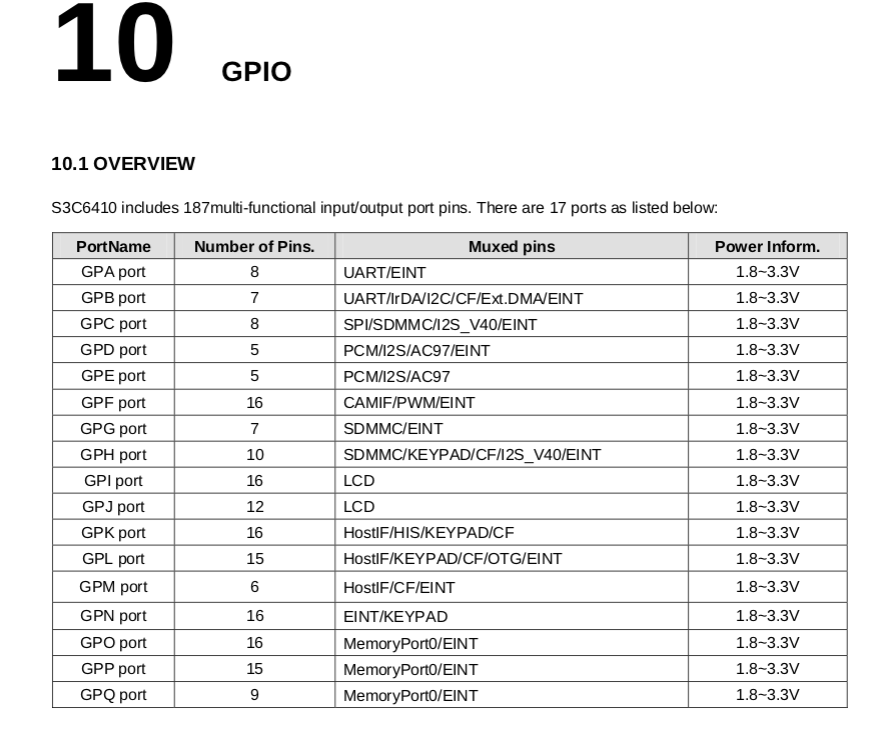
硬件使用手册说明了Tiny6410开发板上面配备了4 个led,并演示了4个led 与 GPIO 的连接情况,使用GPK4~ GPK7 4个GPIO 口。
更详细的硬件电路图可以在 【 原理图PCB和封装库/Tiny6410-1107.pdf 】 中,

2. 了解了硬件连接情况之后,就需要看一下 Tiny6410 开发板的 GPIO 介绍,重点是 GPK4~ GPK7 这四个 GPIO 口。
在 USER manual 【S3C6410X.pdf 】中,第 10章关于GPIO 的讲解:
首先看 GPIO 的总体概述:
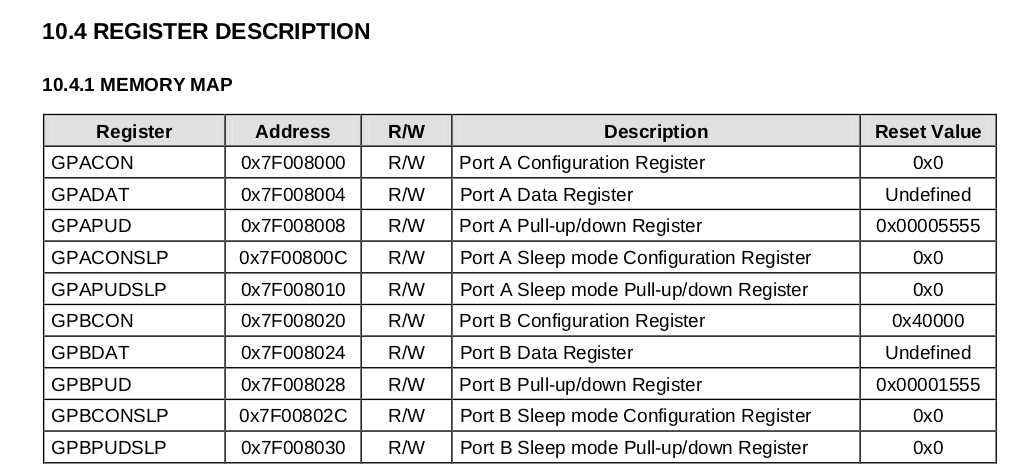
GPK Port GPIO 的memory map:

接下来看下 Port K GPIO 的讲解, 也就是 知道了一个 Port GPK 之后,如何使用 这个 port 中的所有 GPIO 口。


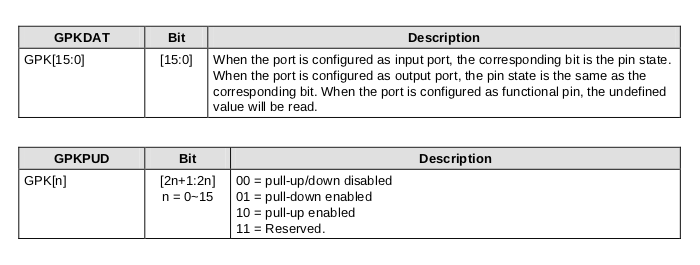
GPK Port 中一共 16 个 GPIO 口,具体使用方法就是, GPK Port 有四个控制寄存器,通过写这四个控制寄存器达到 使用每个 GPIO 的效果:
GPKCON0 GPKCON1 两个 32bits 寄存器用作配置 GPK 中 GPIO 口 用作输入还是输出之类的,要想配置 GPK Port 中 某个Pin 的用途,无非就是通过写这两个配置寄存器相应的bit 位 来实现,因为每一个 bit 位都对应着一个 GPIO Pin 口。
明白了这些硬件相关的原理就一下明白驱动代码中为啥经常看到 1 << n ,将 1 左移 n 位 的做法了。
配置好 GPIO Pin 口的输入输出用途之后,如果是输出口的话,就需要往GPKDAT 数据寄存器写数值了,即 输出的数值是多少。
上面的硬件准备工作做好之后用代码表达出来就简单了,下面开始驱动软件实现部分:
还是先讲解 准备知识部分,一些知识是绕不过去的,而且绕过去了也没啥好处,这些知识点本身往往才是最有价值的。
1. I/O 操作 函数, 上面已经知道了具体的寄存器,怎么操作I/O 地址呢, linux 提供了一组函数:
#include <linux/io.h> 或
#include <asm/io.h>
#define readb(c)		({ u8  __v = readb_relaxed(c); __iormb(); __v; })
#define readw(c)		({ u16 __v = readw_relaxed(c); __iormb(); __v; })
#define readl(c)		({ u32 __v = readl_relaxed(c); __iormb(); __v; })

#define writeb(v,c)		({ __iowmb(); writeb_relaxed(v,c); })
#define writew(v,c)		({ __iowmb(); writew_relaxed(v,c); })
#define writel(v,c)		({ __iowmb(); writel_relaxed(v,c); })
readb/writeb 就是操作 8 bit 寄存器,
readw/writew 操作 16 bit 寄存器,
readl/writel 操作32 bit 寄存器。
2. GPK Port 四个寄存器的地址
linux-2.6.36-android/arch/arm/mach-s3c64xx/include/mach
这个路径下面是具体到一个machine 也就是 Tiny 6410 开发板的相关代码。
找这种 GPIO 寄存器地址之类的话当然到相应开发板目录下面找相关的文件。
debug-macro.S gpio-bank-c.h gpio-bank-h.h gpio-bank-n.h hardware.h pll.h regs-fimc.h regs-lcd.h regs-srom.h s3c6400.h timex.h
dma.h gpio-bank-d.h gpio-bank-i.h gpio-bank-o.h io.h pm-core.h regs-g2d.h regs-mfc.h regs-syscon-power.h s3c6410.h ts.h
entry-macro.S gpio-bank-e.h gpio-bank-j.h gpio-bank-p.h irqs.h pwm-clock.h regs-gpio.h regs-modem.h regs-sys.h spi-clocks.h uncompress.h
gpio-bank-a.h gpio-bank-f.h gpio-bank-k.h gpio-bank-q.h map.h regs-clock.h regs-gpio-memport.h regs-pp.h regs-tvenc.h system.h vmalloc.h
gpio-bank-b.h gpio-bank-g.h gpio-bank-l.h gpio.h memory.h regs-fb.h regs-irq.h regs-rotator.h regs-tvscaler.h tick.h
可以看到 gpio 各个bank 的头文件,看下gpio-bank-k.h
/* linux/arch/arm/mach-s3c64xx/include/mach/gpio-bank-k.h
 *
 * Copyright 2008 Openmoko, Inc.
 * Copyright 2008 Simtec Electronics
 * 	Ben Dooks <ben@simtec.co.uk>
 * 	http://armlinux.simtec.co.uk/
 *
 * GPIO Bank K register and configuration definitions
 *
 * This program is free software; you can redistribute it and/or modify
 * it under the terms of the GNU General Public License version 2 as
 * published by the Free Software Foundation.
*/

#define S3C64XX_GPKCON			(S3C64XX_GPK_BASE + 0x00)
#define S3C64XX_GPKCON1			(S3C64XX_GPK_BASE + 0x04)
#define S3C64XX_GPKDAT			(S3C64XX_GPK_BASE + 0x08)
#define S3C64XX_GPKPUD			(S3C64XX_GPK_BASE + 0x0c)

#define S3C64XX_GPK_CONMASK(__gpio)	(0x3 << ((__gpio) * 2))
#define S3C64XX_GPK_INPUT(__gpio)	(0x0 << ((__gpio) * 2))
#define S3C64XX_GPK_OUTPUT(__gpio)	(0x1 << ((__gpio) * 2))
Good, 这下找到了要操作的寄存器宏 !
接下来就可以根据 cscope 跳转include 相应的头文件:
#include <mach/map.h>
#include <mach/regs-gpio.h>
#include <mach/gpio-bank-k.h>
准备工作都做好之后coding 就简单了:
LED 设备驱动:
/*
 * s3c6410-led.c file implement Tiny6410 DEV board LED driver.
 * Author: chenqiang0721@gmail.com
 */

#include <linux/module.h>
#include <linux/init.h>
#include <linux/device.h>
#include <linux/fs.h>
#include <linux/io.h>

/* Tiny6410 board related header files */
#include <mach/map.h>
#include <mach/regs-gpio.h>
#include <mach/gpio-bank-k.h>

#include <asm/uaccess.h>

#define TINY6410_LED_CHAR_MAJOR   243


static int tiny6410_led_open(struct inode *inode, struct file *file)
{
	int ret = 0;
	uint32_t temp = 0;

	temp = readl(S3C64XX_GPKCON);

	/* Tiny6410 board has 4 leds, which connect to the GPIO, GPK Port, GPK4 ~ GPK7 GPIO Pins.
	   Config the GPKCON0 register high 16bits to output(0001) , according to s3c6410x USER MANUAL. */
	temp = (temp & 0x0000ffff) | 0x1111ffff;
	writel(temp, S3C64XX_GPKCON);

	return ret;
}

static ssize_t tiny6410_led_read(struct file *file, char __user *buf, size_t count,loff_t *ppos)
{
	size_t retlen = 0;

	/* Actually we don't need read func currently, empty func. */
	retlen = count;

	return retlen;
}

static ssize_t tiny6410_led_write(struct file *file, const char __user *buf, size_t count,loff_t *ppos)
{
	char led_number = 0;
	unsigned temp;
	size_t retlen;

   	if(copy_from_user(&led_number,buf,count))
		return -EFAULT;

	/* led_number stores the led number, which we will turn on.
	   We can use below expression to turn on specified LED,
	   make sure you don't touch any GPIO except GPK4~GPK7 LEDs GPIO Pins.
	   eg, temp &= ~(1 << (led_number + 4))
	 */
	printk("led_number = %d \n", led_number);
	temp  = readl(S3C64XX_GPKDAT);
	printk("temp = %x \n", temp);
	temp |= 0xf0;
	temp &= ~(1 << (led_number + 4));
	writel(temp, S3C64XX_GPKDAT);

	return (retlen = 1) ;
}

static int tiny6410_led_close(struct inode *inode, struct file *filp)
{
	return 0;
}

static const struct file_operations tiny6410_led_fops = {
	.owner		= THIS_MODULE,
	.read		= tiny6410_led_read,
	.write		= tiny6410_led_write,
#ifdef CONFIG_TINY6410_LED_IOCTL
	.unlocked_ioctl		= tiny6410_led_ioctl,
#endif
	.open		= tiny6410_led_open,
	.release	= tiny6410_led_close,
#ifdef CONFIG_TINY6410_LED_MMAP
	.mmap		= tiny6410_led_mmap,
#endif
};

static int __init tiny6410_led_init(void)
{
	int status;

	status = register_chrdev(TINY6410_LED_CHAR_MAJOR , "Tiny6410_leds", &tiny6410_led_fops);
	if (status < 0) {
		printk(KERN_NOTICE "Can't allocate major number %d for Tiny6410 leds Devices.\n",
		       TINY6410_LED_CHAR_MAJOR);
	}

	return status;
}

static void __exit tiny6410_led_exit(void)
{
	unregister_chrdev(TINY6410_LED_CHAR_MAJOR , "Tiny6410_leds");
}

module_init(tiny6410_led_init);
module_exit(tiny6410_led_exit);

MODULE_ALIAS_CHARDEV_MAJOR(TINY6410_LED_CHAR_MAJOR);

MODULE_LICENSE("GPL");
MODULE_AUTHOR("Chen Qiang <chenqiang0721@gmail.com>");
MODULE_DESCRIPTION("Char-device access to Tiny6410 board LEDs.");
用户态测试程序:
/*
 * s3c6410-leds_test.c file implement Tiny6410 DEV board userspace simple test program.
 * Author: chenqiang0721@gmail.com
 */

#include <stdio.h>
#include <stdlib.h>
#include <fcntl.h>

#define MAX_TINY6410_LEDS_NUMBER 3

int main(int argc, char* argv[])
{
	char led_number = 0;
	int fd;
	int ret = 0;

	fd = open("/dev/Tiny6410_leds", O_RDWR);
	if(fd < 0)
	{
		printf("Tiny6410_leds device open error ! Remember to create device node by '#mknod /dev/Tiny6410_leds c 243 0' \n ");
		return (ret = -1);
	}

	for(;;)
	{
		if(led_number > MAX_TINY6410_LEDS_NUMBER)
			led_number = 0;

		/* led_number is the led which we will turn on. */
		write(fd, &led_number, 1);
		sleep(1);
		led_number ++ ;
	}

	return ret;
}
友善提供的 使用misc device 实现的LED 驱动,使用misc_register 的好处就是,/sys/class/misc/ 类文件已经生成,自动调用device_create 创建leds 的设备。同时 /dev下面也会自动生成 leds 设备文件。
#include <linux/miscdevice.h>
#include <linux/delay.h>
#include <asm/irq.h>
//#include <mach/regs-gpio.h>
#include <mach/hardware.h>
#include <linux/kernel.h>
#include <linux/module.h>
#include <linux/init.h>
#include <linux/mm.h>
#include <linux/fs.h>
#include <linux/types.h>
#include <linux/delay.h>
#include <linux/moduleparam.h>
#include <linux/slab.h>
#include <linux/errno.h>
#include <linux/ioctl.h>
#include <linux/cdev.h>
#include <linux/string.h>
#include <linux/list.h>
#include <linux/pci.h>
#include <asm/uaccess.h>
#include <asm/atomic.h>
#include <asm/unistd.h>

#include <mach/map.h>
#include <mach/regs-clock.h>
#include <mach/regs-gpio.h>

#include <plat/gpio-cfg.h>
#include <mach/gpio-bank-e.h>
#include <mach/gpio-bank-k.h>

#define DEVICE_NAME "leds"

static long sbc2440_leds_ioctl(struct file *filp, unsigned int cmd, unsigned long arg)
{
	switch(cmd) {
		unsigned tmp;
	case 0:
	case 1:
		if (arg > 4) {
			return -EINVAL;
		}
		tmp = readl(S3C64XX_GPKDAT);
		tmp &= ~(1 << (4 + arg));
		tmp |= ( (!cmd) << (4 + arg) );
		writel(tmp, S3C64XX_GPKDAT);
		//printk (DEVICE_NAME": %d %d\n", arg, cmd);
		return 0;
	default:
		return -EINVAL;
	}
}

static struct file_operations dev_fops = {
	.owner			= THIS_MODULE,
	.unlocked_ioctl	= sbc2440_leds_ioctl,
};

static struct miscdevice misc = {
	.minor = MISC_DYNAMIC_MINOR,
	.name = DEVICE_NAME,
	.fops = &dev_fops,
};

static int __init dev_init(void)
{
	int ret;

	{
		unsigned tmp;
		tmp = readl(S3C64XX_GPKCON);

		/* Set S3C64XX_GPKCON high 16bits to 0x0001: output. */
		tmp = (tmp & ~(0xffffU<<16))|(0x1111U<<16);
		writel(tmp, S3C64XX_GPKCON);

		/* Set GPK4 ~ GPK7 Pins to 1, that is to say, 4 leds all off state. */
		tmp = readl(S3C64XX_GPKDAT);
		tmp |= (0xF << 4);
		writel(tmp, S3C64XX_GPKDAT);
	}

	ret = misc_register(&misc);

	printk (DEVICE_NAME"\tinitialized\n");

	return ret;
}

static void __exit dev_exit(void)
{
	misc_deregister(&misc);
}

module_init(dev_init);
module_exit(dev_exit);
MODULE_LICENSE("GPL");
MODULE_AUTHOR("FriendlyARM Inc.");
用户态测试程序:
#include <stdio.h>
#include <stdlib.h>
#include <unistd.h>
#include <sys/ioctl.h>
#include <sys/types.h>
#include <sys/stat.h>
#include <fcntl.h>
#include <sys/select.h>
#include <sys/time.h>
#include <string.h>

static int led_fd;
static int type = 1;

static void push_leds(void)
{
	static unsigned step;
	unsigned led_bitmap;
	int i;

	switch(type) {
	case 0:
		if (step >= 6) {
			step = 0;
		}
		if (step < 3) {
			led_bitmap = 1 << step;
		} else {
			led_bitmap = 1 << (6 - step);
		}
		break;
	case 1:
		if (step > 255) {
			step = 0;
		}
		led_bitmap = step;
		break;
	default:
		led_bitmap = 0;
	}
	step++;
	for (i = 0; i < 4; i++) {
		ioctl(led_fd, led_bitmap & 1, i);
		led_bitmap >>= 1;
	}
}

int main(void)
{
	int led_control_pipe;
	int null_writer_fd; // for read endpoint not blocking when control process exit

	double period = 0.5;

	led_fd = open("/dev/leds0", 0);
	if (led_fd < 0) {
		led_fd = open("/dev/leds", 0);
	}
	if (led_fd < 0) {
		perror("open device leds");
		exit(1);
	}
	unlink("/tmp/led-control");
	mkfifo("/tmp/led-control", 0666);

	led_control_pipe = open("/tmp/led-control", O_RDONLY | O_NONBLOCK);
	if (led_control_pipe < 0) {
		perror("open control pipe for read");
		exit(1);
	}
	null_writer_fd = open("/tmp/led-control", O_WRONLY | O_NONBLOCK);
	if (null_writer_fd < 0) {
		perror("open control pipe for write");
		exit(1);
	}

	for (;;) {
		fd_set rds;
		struct timeval step;
		int ret;

		FD_ZERO(&rds);
		FD_SET(led_control_pipe, &rds);
		step.tv_sec  = period;
		step.tv_usec = (period - step.tv_sec) * 1000000L;

		ret = select(led_control_pipe + 1, &rds, NULL, NULL, &step);
		if (ret < 0) {
			perror("select");
			exit(1);
		}
		if (ret == 0) {
			push_leds();
		} else if (FD_ISSET(led_control_pipe, &rds)) {
			static char buffer[200];
			for (;;) {
				char c;
				int len = strlen(buffer);
				if (len >= sizeof buffer - 1) {
					memset(buffer, 0, sizeof buffer);
					break;
				}
				if (read(led_control_pipe, &c, 1) != 1) {
					break;
				}
				if (c == '\r') {
					continue;
				}
				if (c == '\n') {
					int tmp_type;
					double tmp_period;
					if (sscanf(buffer,"%d%lf", &tmp_type, &tmp_period) == 2) {
						type = tmp_type;
						period = tmp_period;
					}
					fprintf(stderr, "type is %d, period is %lf\n", type, period);
					memset(buffer, 0, sizeof buffer);
					break;
				}
				buffer[len] = c;
			}
		}
	}

	close(led_fd);
	return 0;
}
还有一种方法是在 linux/driver/leds 下面已经有现成的 led class 了,使用 platform device 写LED 驱动,这个改天学习一下。
写驱动的时候经常需要操作一个bit 位,一个32bits 的寄存器如果每一位都控制这个GPIO 口的话,如何将其中的一位写0/1 呢:
unsigned int temp;
temp = readl(REG_TO_CONTROL);
temp &= ~(1 << N); // N is the bit you want to change
// 这一步的目的是保证N 位以外的bit 位不变, N bit 位清0, 清0之后就好操作了,对应那一位位或就行了。
temp |= (1 << N); // N bit 位 置1 操作
//如果想置0,可以不操作,因为上面已经清0过了。
// 当然,如果想做的灵活一点可以
temp |= ((cmd) << N) ; // cmd 如果是0 的话相当与 位或0, 还是原先的数值。


 530
530

 被折叠的 条评论
为什么被折叠?
被折叠的 条评论
为什么被折叠?
 到【灌水乐园】发言


