


 本文是Android开发的初级教程,介绍了如何设置TextView的文本颜色,显示图片,创建表格布局,添加按钮以及使用进度条。内容包括理解layout_width和layout_height,设置textColor,管理图片资源,使用TableLayout和LinearLayout,以及添加ProgressBar。
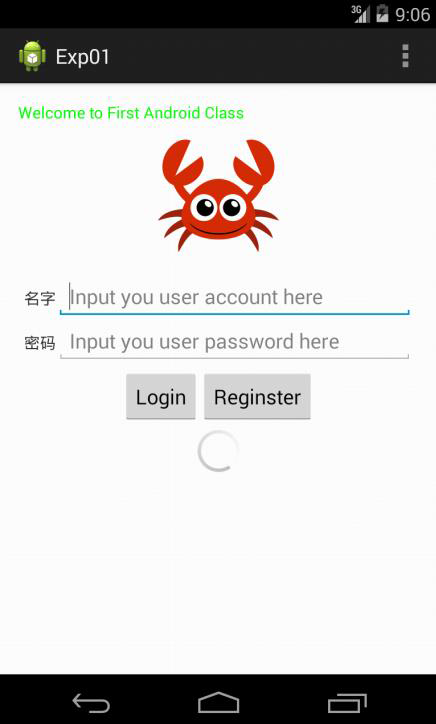
在界面显示文字,自定义文字的颜色,显示图片,按钮,编辑框,进度条进度条等。完成如下图的demo。
第一步:创建一个工程,修改布局。
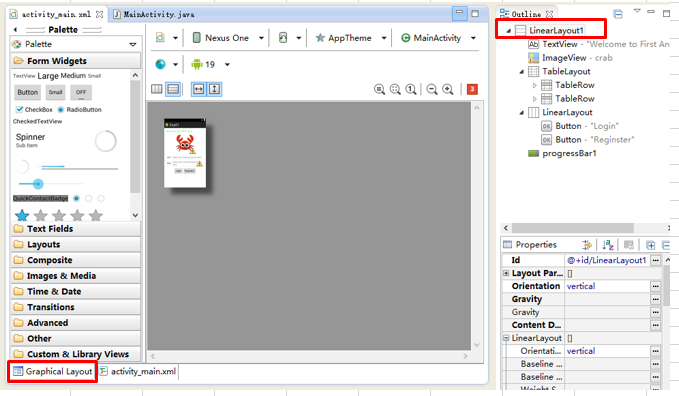
默认是相对布局,显示“HelloWord!”。打开项目下的layout文件夹,里面会有一个xml文件,这个就是界面文件。这次的实验主要是对这个xml文件的修改。这个节目有两种打开方式,一种是xml文件打开,里面是以代码的方式显示;另外一种是GraphicalLayout方式打开,是以界面的可视化(实际效果)显示。根据这次的实验要求,先把绝对布局更改成线性布局(对布局不了解的先不要纠结,以后会讲解)。首先点击GraphicalLayout通过视图方式打开界面文件,如图,在最外层视图的地方右键-->ChangeLayout会打开一个ChangeLayout的节目,点击下拉框可以选择布局方式。这里我们选择LinerLayout(线性布局)。布局已经改好了,第一步完成。
第二步:显示Text(Welcome to First Android Class)
通过xml文件打开界面文件,在代码下通过代码添加控件。
先在布局下添加TextView。具体代码如下:
<TextView
        android:layout_width="wrap_content"
        android:layout_height="wrap_content"
        android:text="Welcome to First Android Class" />
layout_width和layout_height是布局方式,这里先不管。android:xx是定义的一种方式,例如第一行表示TextView对象的layout_width属性是“wrap_content”,同理text属性是“Welcome to First Android Class”,text属性就是要显示的东西。这时运行项目会在屏幕第一行显示黑色的“Welcome to First Android Class”。可是要求是要显示绿色。
<TextView
        android:layout_width="wrap_content"
        android:layout_height="wrap_content"
        android:text="Welcome to First Android Class"
        android:textColor="#00ff00"/>
添加了一行android:textColor=”#00ff00”,顾名思义,也就是给该TextView对象的textColor赋”#00ff00”(RGB颜色,对这个不了解的去问度娘RGB值)整个xml代码如下:
<LinearLayout xmlns:android="http://schemas.android.com/apk/res/android"
    xmlns:tools="http://schemas.android.com/tools"
    android:id="@+id/LinearLayout1"
    android:layout_width="match_parent"
    android:layout_height="match_parent"
    android:paddingBottom="@dimen/activity_vertical_margin"
    android:paddingLeft="@dimen/activity_horizontal_margin"
    android:paddingRight="@dimen/activity_horizontal_margin"
    android:paddingTop="@dimen/activity_vertical_margin"
    tools:context=".MainActivity" >

    <TextView
        android:layout_width="wrap_content"
        android:layout_height="wrap_content"
        android:text="Welcome to First Android Class"
        android:textColor="#00ff00" />

</LinearLayout>
已经完成text的实现。
第三步:显示图片
要想显示图片,首先我们要把图片资源放到项目中,然后再通过代码把图片加载到界面上。我们把图片“crab.png”放到res文件夹下drawble-hdpi,drawble-ldpi,drawble-mdpi,drawble-xhdpi,drawble-xxhdpi。这五个文件夹分别存放的是高分辨率资源,低分辨率资源,中分辨率资源,更高分别率资源,超高分辨率资源。这个是在不同分辨率的收集下,代码回自动选择使用的分辨率图片。因为我们只有一种分辨率,而且每个人打开的模拟器的分辨率不一样,所以这里我们在五个文件夹下都添加了该图像资源。添加完资源后,我们打开gen文件夹下的R.java文件,会有如下代码(0x7f020000值会不一样,这个是值是随机生成的,我们不用管)
public static final class drawable {
 public static final int crab=0x7f020000;
 }
R.java文件是自动生成的,我们不要修改里面的任何代码,否则会出错。这里介绍R文件,只是为了弄明白R文件是管理各种资源,变量等。下面开始在xml文件中添加图片。
<ImageView
 android:layout_width="wrap_content"
 android:layout_height="wrap_content"
 android:layout_gravity="center"
 android:src="@drawable/crab" />
android:layout_gravity=”center”是为了让图片剧中。android:src=”@drawable/crab” 是通过路径添加图片src是表示通过路径获取图片。@可以通过按alt+/键自动补全,然后选择drawable如后,如果不知道要显示图片的名字,可以通过alt+/键自动补全的方式查找。
<LinearLayout xmlns:android="http://schemas.android.com/apk/res/android"
    xmlns:tools="http://schemas.android.com/tools"
    android:id="@+id/LinearLayout1"
    android:layout_width="match_parent"
    android:layout_height="match_parent"
    android:paddingBottom="@dimen/activity_vertical_margin"
    android:paddingLeft="@dimen/activity_horizontal_margin"
    android:paddingRight="@dimen/activity_horizontal_margin"
    android:paddingTop="@dimen/activity_vertical_margin"
    tools:context=".MainActivity" >

    <TextView
        android:layout_width="wrap_content"
        android:layout_height="wrap_content"
        android:text="Welcome to First Android Class"
        android:textColor="#00ff00" />

    <ImageView
        android:layout_width="wrap_content"
        android:layout_height="wrap_content"
        android:layout_gravity="center"
        android:src="@drawable/crab" />

</LinearLayout>
运行项目吧ÿ
 最低0.47元/天 解锁文章


 2万+
2万+

 被折叠的 条评论
为什么被折叠?
被折叠的 条评论
为什么被折叠?
 到【灌水乐园】发言


