


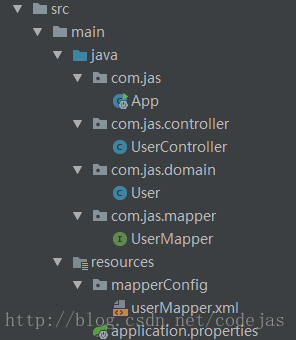
*对应的目录结构
一、添加依赖
    <!-- 添加对 mybatis 的依赖 -->
        <dependency>
            <groupId>org.mybatis.spring.boot</groupId>
            <artifactId>mybatis-spring-boot-starter</artifactId>
            <version>1.1.1</version>
        </dependency>

        <!-- 添加对 JDBC 的支持 -->
        <dependency>
            <groupId>org.springframework.boot</groupId>
            <artifactId>spring-boot-starter-jdbc</artifactId>
        </dependency>

        <!-- 添加数据库驱动 -->
        <dependency>
            <groupId>mysql</groupId>
            <artifactId>mysql-connector-java</artifactId>
        </dependency>

        <!-- 添加 c3p0 数据源 -->
        <dependency>
            <groupId>c3p0</groupId>
            <artifactId>c3p0</artifactId>
            <version>0.9.1.2</version>
        </dependency>
二、 配置数据源与 SqlSessionFactory
1.通过 application.properties 配置文件进行配置
# 设置数据库相关
spring.datasource.driver-class-name=com.mysql.jdbc.Driver
spring.datasource.url=jdbc:mysql://localhost:3306/springboot
spring.datasource.username=root
spring.datasource.password=1234

# 设置 c3p0 数据源
spring.datasource.type=com.mchange.v2.c3p0.ComboPooledDataSource

# 设置 MyBatis mapper 的别名所在的包
mybatis.type-aliases-package=com.jas.mapper
# 设置 mapper 接口对应 XMl 配置文件的路径
mybatis.mapper-locations=classpath:mapperConfig/*.xml
2.通过配置类进行配置
application.properties 配置文件设置相关变量
# 设置数据库相关属性
spring.datasource.driver-class-name=com.mysql.jdbc.Driver
spring.datasource.url=jdbc:mysql://localhost:3306/springboot
spring.datasource.username=root
spring.datasource.password=1234

# 设置,mapper 接口路径,mapper 接口对应的 xml 配置文件
mapper.package.path=com.jas.mapper
mapper.xml.config.path=/mapperConfig/*.xml
DataSourceConfiguration 类配置 c3p0 数据源
@SpringBootConfiguration
public class DataSourceConfiguration {

    @Value("${spring.datasource.driver-class-name}")
    private String jdbcDriver;
    @Value("${spring.datasource.url}")
    private String jdbcUrl;
    @Value("${spring.datasource.username}")
    private String jdbcUser;
    @Value("${spring.datasource.password}")
    private String jdbcPassword;

    @Bean
    public DataSource createDataSource() throws PropertyVetoException {
        ComboPooledDataSource dataSource = new ComboPooledDataSource();

        dataSource.setDriverClass(jdbcDriver);
        dataSource.setJdbcUrl(jdbcUrl);
        dataSource.setUser(jdbcUser);
        dataSource.setPassword(jdbcPassword);
        // 关闭连接后不自动提交
        dataSource.setAutoCommitOnClose(false);

        return dataSource;
    }
}
SqlSessionFactoryBean 类配置 SqlSessionFactory
@SpringBootConfiguration
public class SessionFactoryConfiguration {

    @Value("${mapper.xml.config.path}")
    private String mapperXMLConfigPath;
    @Value("${mapper.package.path}")
    private String mapperPackagePath;
    @Autowired
    private DataSource dataSource;

    @Bean
    public SqlSessionFactoryBean createSqlSessionFactory() throws IOException {
        SqlSessionFactoryBean sqlSessionFactoryBean = new SqlSessionFactoryBean();
        PathMatchingResourcePatternResolver resolver = new PathMatchingResourcePatternResolver();
        String packageXMLConfigPath = PathMatchingResourcePatternResolver.CLASSPATH_ALL_URL_PREFIX + mapperXMLConfigPath;

        // 设置 mapper 对应的 XML 文件的路径
        sqlSessionFactoryBean.setMapperLocations(resolver.getResources(packageXMLConfigPath));
        // 设置数据源
        sqlSessionFactoryBean.setDataSource(dataSource);
        // 设置 mapper 接口所在的包
        sqlSessionFactoryBean.setTypeAliasesPackage(mapperPackagePath);

        return sqlSessionFactoryBean;
    }
}
三、编写代码
User 类
public class User {

    private Integer userId;
    private String username;
    private Integer age;
    private char gender;

    /** 省略 get 与 set 方法*/
}
UserMapper 接口
/** 只定义了一个简单的测试方法*/
@Mapper
public interface UserMapper {

    User getUser(Integer id);
}
userMapper.xml配置文件
<?xml version="1.0" encoding="UTF-8"?>
<!DOCTYPE mapper PUBLIC "-//mybatis.org//DTD Mapper 3.0//EN" "http://mybatis.org/dtd/mybatis-3-mapper.dtd">
<mapper namespace="com.jas.mapper.UserMapper">
    <select id="getUser" resultType="com.jas.domain.User">
        SELECT * FROM user WHERE userId = #{userId}
    </select>
</mapper>
四、 编写测试的 Controller
@RestController
public class UserController {

    @Autowired
    private UserMapper userMapper;

    @GetMapping("/user/{userId}")
    public User getUser(@PathVariable Integer userId){
        User user = userMapper.getUser(userId);
        return user;
    }
}
五、入口类代码 (验证 c3p0 数据源是否生效)
/** 注意:入口类要能扫描到对应的 Bean*/
@SpringBootApplication
public class App {

    public static void main(String[] args) {

        ConfigurableApplicationContext context = SpringApplication.run(App.class, args);
        DataSource dataSource = context.getBean(DataSource.class);

        System.out.println(dataSource.getClass());
    }
}
六、测试结果
控制台输出:可以看出 c3p0 数据源已经生效

浏览器访问测试的 Controller
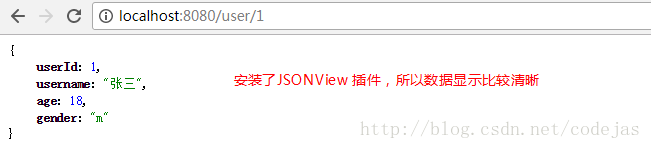
这篇博文记录基于 XML 配置文件的 MyBatis 使用步骤。如果是基于注解的话,直接在对应的 mapper 接口方法上加上对应的注解即可。
PS :打印 SQL 日志
只需要在application.properties 配置文件中设置logging.level.包名=debug即可
# com.jas.mapper 是 mapper 接口所在的包
logging.level.com.jas.mapper=debug
当访问测试 Controller 时,控制台会输出 SQL 语句

重写了一下 Spring Boot 整合 MyBatis 的 demo,基于注解与配置文件两种形式,使用的是 druid 数据源,并配置了 druid 监控中心。点我查看源码~


 938
938


 被折叠的 条评论
为什么被折叠?
被折叠的 条评论
为什么被折叠?
 到【灌水乐园】发言


