


1.整体流程
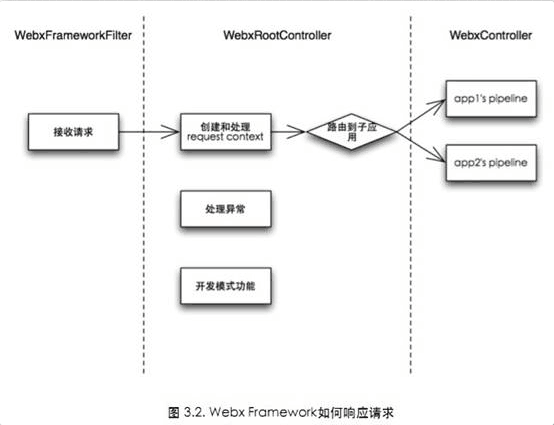
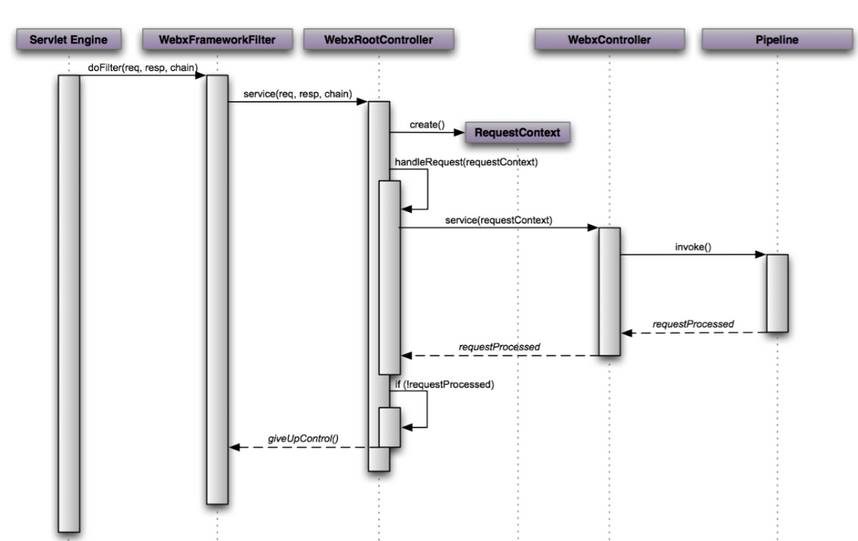
更为具体的流程为:
在web.xml中可以看到如下配置
<?xml version="1.0" encoding="UTF-8" ?>
<web-app version="2.4" xmlns="http://java.sun.com/xml/ns/j2ee"
    xmlns:xsi="http://www.w3.org/2001/XMLSchema-instance"
    xsi:schemaLocation="
        http://java.sun.com/xml/ns/j2ee  http://java.sun.com/xml/ns/j2ee/web-app_2_4.xsd
    ">

    <!-- 初始化日志系统 -->
    <listener>
        <listener-class>com.alibaba.citrus.logconfig.LogConfiguratorListener</listener-class>
    </listener>

    <!-- 装载/WEB-INF/webx.xml, /WEB-INF/webx-*.xml -->
    <listener>
        <listener-class>com.alibaba.citrus.webx.context.WebxContextLoaderListener</listener-class>
    </listener>

    <filter>
        <filter-name>mdc</filter-name>
        <filter-class>com.alibaba.citrus.webx.servlet.SetLoggingContextFilter</filter-class>
    </filter>

    <filter>
        <filter-name>webx</filter-name>
        <filter-class>com.alibaba.citrus.webx.servlet.WebxFrameworkFilter</filter-class>
        <init-param>
            <param-name>excludes</param-name>
            <param-value><!-- 需要被“排除”的URL路径,以逗号分隔,如/static, *.jpg。适合于映射静态页面、图片。 --></param-value>
        </init-param>
        <init-param>
            <param-name>passthru</param-name>
            <param-value><!-- 需要被“略过”的URL路径,以逗号分隔,如/myservlet, *.jsp。适用于映射servlet、filter。
                对于passthru请求,webx的request-contexts服务、错误处理、开发模式等服务仍然可用。 --></param-value>
        </init-param>
    </filter>

    <filter-mapping>
        <filter-name>mdc</filter-name>
        <url-pattern>/*</url-pattern>
    </filter-mapping>

    <filter-mapping>
        <filter-name>webx</filter-name>
        <url-pattern>/*</url-pattern>
    </filter-mapping>

</web-app>
2.WebxContextLoaderListener
从上面的webx.ml可以看到里面配置了Listener,所以 先看一下WebxContextLoaderListener
public class WebxContextLoaderListener extends ContextLoaderListener {
    @Override
    protected final ContextLoader createContextLoader() {
        return new WebxComponentsLoader() {

            @Override
            protected Class<? extends WebxComponentsContext> getDefaultContextClass() {
                Class<? extends WebxComponentsContext> defaultContextClass = WebxContextLoaderListener.this
                        .getDefaultContextClass();

                if (defaultContextClass == null) {
                    defaultContextClass = super.getDefaultContextClass();
                }

                return defaultContextClass;
            }
        };
}public class ContextLoaderListener extends ContextLoader implements ServletContextListener {
private ContextLoader contextLoader;
public void contextInitialized(ServletContextEvent event) {
this.contextLoader = createContextLoader();
if (this.contextLoader == null) {
this.contextLoader = this;
}
this.contextLoader.initWebApplicationContext(event.getServletContext());
}
@Deprecated
protected ContextLoader createContextLoader() {
return null;
}
.......
}1) ContextLoaderListener实现了ServletContextListener接口,并且实现了其中的contextInitialized方法,所以当 ServletContext被创建的时候该方法就会被调用
2)WebxContextLoaderListener重写了createContextLoader方法,生成了WebxComponentsLoader,所以在 ServletContext被创建的时候会调用这个实例的initWebApplicationContext方法
WebxComponentsLoader实际上就是读取bean的配置文件,并实例化相关的bean。(这里由webx框架给我们实例化ApplicationContext,就不用自己再实例化了)
3.WebxFrameworkFilter
webx.ml中配置了这个filter,它的url-mapping对应的是/*,表示任何request都会进入该filter,看下这个filter
    @Override
    protected void doFilter(HttpServletRequest request, HttpServletResponse response, FilterChain chain)
            throws IOException, ServletException {
        // 如果指定了excludes,并且当前requestURI匹配任何一个exclude pattern,
        // 则立即放弃控制,将控制还给servlet engine。
        if (excludeFilter != null && excludeFilter.matches(request)) {
            chain.doFilter(request, response);
            return;
        }

        try {
            getWebxComponents().getWebxRootController().service(request, response, chain);
        } catch (IOException e) {
            throw e;
        } catch (ServletException e) {
            throw e;
        } catch (Exception e) {
            throw new ServletException(e);
        }
} 如果当前请求的uri正好匹配,filter就不用处理这个请求那么就直接跳过这个filter(也就是不经过webx了),把控制权交给servlet 引擎
如果当前filter需要处理这个请求,就进入WebxRootController的service方法
4.WebxRootController
    public final void service(HttpServletRequest request, HttpServletResponse response, FilterChain chain)
            throws Exception {
        RequestContext requestContext = null;

        try {
            requestContext = assertNotNull(getRequestContext(request, response), "could not get requestContext");

            if (checkRequest(requestContext)) {
                request = requestContext.getRequest();
                response = requestContext.getResponse();

                RequestHandlerContext ctx = internalHandlerMapping.getRequestHandler(request, response);

                if (ctx == null) {
                    // 如果定义了passthru filter,则判断request是否被passthru,
                    // 对于需要被passthru的request不执行handleRequest,而直接返回。
                    // 该功能适用于仅将webx视作普通的filter,而filter chain的接下来的部分将可使用webx所提供的request contexts。
                    boolean requestProcessed = false;

                    if (passthruFilter == null || !passthruFilter.matches(request)) {
                        requestProcessed = handleRequest(requestContext);
                    }

                    if (!requestProcessed) {
                        giveUpControl(requestContext, chain);
                    }
                } else {
                    ctx.getRequestHandler().handleRequest(ctx);
                }
            }
        }
.....
}requestContext = assertNotNull(getRequestContext(request, response), "could not get requestContext"); if (passthruFilter == null || !passthruFilter.matches(request)) {
requestProcessed = handleRequest(requestContext);
} 看一下这个方法:
    protected boolean handleRequest(RequestContext requestContext) throws Exception {
        HttpServletRequest request = requestContext.getRequest();

        String path = ServletUtil.getResourcePath(request);

        // 根据path查找component
        WebxComponent component = getComponents().findMatchedComponent(path);
        boolean served = false;

        if (component != null) {
            try {
                WebxUtil.setCurrentComponent(request, component);
                served = component.getWebxController().service(requestContext);
            } finally {
                WebxUtil.setCurrentComponent(request, null);
            }
        }

        return served;
    }
}5.WebxController
    public boolean service(RequestContext requestContext) throws Exception {
        PipelineInvocationHandle handle = pipeline.newInvocation();

        handle.invoke();

        // 假如pipeline被中断,则视作请求未被处理。filter将转入chain中继续处理请求。
        return !handle.isBroken();
    }
6.Pipeline(PipelineImpl)
public class PipelineImpl extends AbstractService<Pipeline> implements Pipeline {
    private Valve[] valves;
    private String label;

    public PipelineInvocationHandle newInvocation() {
        return new PipelineContextImpl(null);
    }


    @Override
    public String toString() {
        return new ToStringBuilder().append(getBeanDescription()).append(valves).toString();
    }

    /**
     * 实现<code>PipelineContext</code>。
     */
    private final class PipelineContextImpl implements PipelineContext, PipelineInvocationHandle {

        private int executedIndex = -1;
        private int executingIndex = -1;
        private boolean broken;

        public void invokeNext() {
            assertInitialized();

            if (broken) {
                return;
            }

            try {
                executingIndex++;

                if (executingIndex <= executedIndex) {
                    throw new IllegalStateException(descCurrentValve() + " has already been invoked: "
                            + valves[executingIndex]);
                }

                executedIndex++;

                if (executingIndex < valves.length) {
                    Valve valve = valves[executingIndex];

                    try {
                        if (log.isTraceEnabled()) {
                            log.trace("Entering {}: {}", descCurrentValve(), valve);
                        }

                        valve.invoke(this);
                    } catch (PipelineException e) {
                        throw e;
                    } catch (Exception e) {
                        throw new PipelineException("Failed to invoke " + descCurrentValve() + ": " + valve, e);
                    } finally {
                        if (log.isTraceEnabled()) {
                            log.trace("...Exited {}: {}", descCurrentValve(), valve);
                        }
                    }

                    if (executedIndex < valves.length && executedIndex == executingIndex) {
                        if (log.isTraceEnabled()) {
                            log.trace("{} execution was interrupted by {}: {}", new Object[] { descCurrentPipeline(),
                                    descCurrentValve(), valve });
                        }
                    }
                } else {
                    if (log.isTraceEnabled()) {
                        log.trace("{} reaches its end.", descCurrentPipeline());
                    }
                }
            } finally {
                executingIndex--;
            }
} private final class PipelineContextImpl implements PipelineContext, PipelineInvocationHandle这里看一下我们如何在代码中调用Pipeline的
@Autowired
private Pipeline myPipeline;

public void invokePipeline() {
    PipelineInvocationHandle invocation = myPipeline.newInvocation();

    invocation.invoke();

    System.out.println(invocation.isFinished());
    System.out.println(invocation.isBroken());
} public void invoke() throws IllegalStateException {
assertTrue(!isBroken(), ILLEGAL_STATE, "cannot reinvoke a broken pipeline");
executingIndex = executedIndex = -1;
invokeNext();
} valve.invoke(this);现在有一个问题:一个valve执行完之后,如何执行下一个valve呢?
可以看一个自定的valve怎么实现:
public class MyValve implements Valve {
    public void invoke(PipelineContext pipelineContext) throws Exception {
        System.out.println("valve started.");

        pipelineContext.invokeNext(); // 调用后序valves

        System.out.println("valve ended.");
    }
}注:
1)PipelineInvocationHandler 表示的是一个valve的执行
2)PipelineImpl 维护了一个valve数组,保存了所有的valve
3)PipelineContext 就是PipelineContextImpl的实现接口之一,代表的是一个valve的执行情况
7.几个重要的Pipeline
(1) 由子应用根据自己的pipeline配置文件(如果有的话,没有就用common子文件夹中的)对请求进行处理
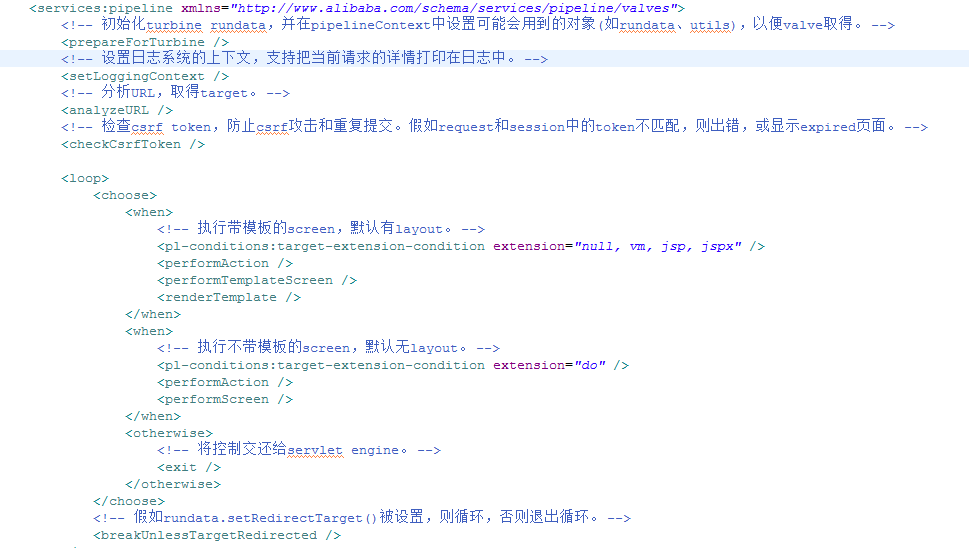
上面是WEB-INF\common目录下的pipeline.xml目录中的pipeline定义。
其中每一个valve都有具体的类与之对应,核心是他们的invoke方法
(2)PrepareForTuibineValve
对应的元素是prepareForTuibine。它用于预备turbine运行时所需要的一些内容,根据request创建并初始化turbine 润达他,并放入pipelineContext,以便valve获得
/**
 * 预备turbine运行所需要的一些内容。
 */
public class PrepareForTurbineValve extends AbstractValve {
    @Autowired
    private HttpServletRequest request;

    public void invoke(PipelineContext pipelineContext) throws Exception {
        TurbineRunData rundata = getTurbineRunData(request, true);
        boolean contextSaved = false;

        try {
            pipelineContext.setAttribute("rundata", rundata);

            for (Map.Entry<String, Object> entry : Utils.getUtils().entrySet()) {
                pipelineContext.setAttribute(entry.getKey(), entry.getValue());
            }

            pipelineContext.invokeNext();
        } catch (Throwable e) {
            saveTurbineRunDataContext(rundata);
            contextSaved = true;

            if (e instanceof Exception) {
                throw (Exception) e;
            } else if (e instanceof Error) {
                throw (Error) e;
            }
        } finally {
            cleanupTurbineRunData(request, !contextSaved);
        }
    }

    public static class DefinitionParser extends AbstractValveDefinitionParser<PrepareForTurbineValve> {
    }
}可以看到这里Valve实现类中的invoke方法中有一个参数PipelineContext,这是在PipelineContextImpl中的invokeNext方法中调用valve.invoke(this)传入的
valve.invoke(this); (3)AnalyzeURLValve
作用是对请求url和参数进行分析,为接下来的screen和action提供基础数据target等
/**
 * 根据URL的内容来设置rundata。根据以下规则:
 * <ol>
 * <li>取得servletPath + pathInfo - componentPath作为target。</li>
 * <li>使用MappingRuleService,将target的后缀转换成统一的内部后缀。例如:将jhtml转换成jsp。</li>
 * </ol>
 */
public class AnalyzeURLValve extends AbstractValve {
    private static final String DEFAULT_ACTION_PARAM_NAME = "action";


    public void invoke(PipelineContext pipelineContext) throws Exception {
        TurbineRunDataInternal rundata = (TurbineRunDataInternal) getTurbineRunData(request);
        String target = null;

        // 取得target,并转换成统一的内部后缀名。
        String pathInfo = ServletUtil.getResourcePath(rundata.getRequest()).substring(
                component.getComponentPath().length());

        if ("/".equals(pathInfo)) {
            pathInfo = getHomepage();
        }

        // 注意,必须将pathInfo转换成camelCase。
        int lastSlashIndex = pathInfo.lastIndexOf("/");

        if (lastSlashIndex >= 0) {
            pathInfo = pathInfo.substring(0, lastSlashIndex) + "/"
                    + StringUtil.toCamelCase(pathInfo.substring(lastSlashIndex + 1));
        } else {
            pathInfo = StringUtil.toCamelCase(pathInfo);
        }

        target = mappingRuleService.getMappedName(EXTENSION_INPUT, pathInfo);

        rundata.setTarget(target);

        // 取得action
        String action = StringUtil.toCamelCase(trimToNull(rundata.getParameters().getString(actionParam)));

        action = mappingRuleService.getMappedName(ACTION_MODULE, action);
        rundata.setAction(action);

        // 取得actionEvent
        String actionEvent = ActionEventUtil.getEventName(rundata.getRequest());
        rundata.setActionEvent(actionEvent);

        pipelineContext.invokeNext();
    }

    public static class DefinitionParser extends AbstractValveDefinitionParser<AnalyzeURLValve> {
        @Override
        protected void doParse(Element element, ParserContext parserContext, BeanDefinitionBuilder builder) {
            attributesToProperties(element, builder, "homepage", "actionParam");
        }
    }
}在这之后AnalyURLValve做了3件事
1)rundata.setTarget(target):向rundata中设置target,target作为screen的选择依据
2)rundata.setAction(action):向rundata中设置action,action标识了表单提交的处理类
3)rundata.setActionEvent(actionEvent):向rundata中设置actionEvent,actionEvent标识了表单处理类的方法名称
target和action的确定是mappingRuleService根据mappingRule从url和请求参数中获取并对应得到的。事实上,这些都是配置好的,mappingRuleService是webx内置的AbstractService,名称查找规则的配置通过SpringExt加载。
看一个配置webx-componet-and-root.xml:
    <!-- 名称查找规则。 -->
    <services:mapping-rules>

        <!-- External target name => Internal target name -->
        <mapping-rules:extension-rule id="extension.input">
            <!-- 默认后缀 -->
            <mapping extension="" to="" />

            <!-- JSP -->
            <mapping extension="jhtml" to="" />
            <mapping extension="jsp" to="" />
            <mapping extension="jspx" to="" />
            <mapping extension="php" to="" />

            <!-- Velocity -->
            <mapping extension="htm" to="" />
            <mapping extension="vhtml" to="" />
            <mapping extension="vm" to="" />
        </mapping-rules:extension-rule>

        <!-- Internal target name => External target name -->
        <mapping-rules:extension-rule id="extension.output">
            <!-- 默认后缀 -->
            <mapping extension="" to="htm" />

            <!-- JSP -->
            <mapping extension="jhtml" to="jhtml" />
            <mapping extension="jsp" to="jhtml" />
            <mapping extension="jspx" to="jhtml" />
            <mapping extension="php" to="jhtml" />

            <!-- Velocity -->
            <mapping extension="htm" to="htm" />
            <mapping extension="vhtml" to="htm" />
            <mapping extension="vm" to="htm" />
        </mapping-rules:extension-rule>

        <!-- Target name => Action module name -->
        <mapping-rules:direct-module-rule id="action" />

        <!-- Target name => Screen module name (*.do) -->
        <mapping-rules:direct-module-rule id="screen.notemplate" />

        <!-- Target name => Screen module name (*.jsp, *.vm) -->
        <mapping-rules:fallback-module-rule id="screen" moduleType="screen" />

        <!-- Target name => Screen template name -->
        <mapping-rules:direct-template-rule id="screen.template" templatePrefix="screen" />

        <!-- Target name => Layout template name -->
        <mapping-rules:fallback-template-rule id="layout.template" templatePrefix="layout" />

        <!-- Target name => Control module name (setControl method) -->
        <mapping-rules:direct-module-rule id="control.notemplate" />

        <!-- Target name => Control module name (setTemplate method) -->
        <mapping-rules:fallback-module-rule id="control" moduleType="control" />

        <!-- Target name => Control template name -->
        <mapping-rules:direct-template-rule id="control.template" templatePrefix="control" />

</services:mapping-rules> <direct-module-rule>标签对应的处理类是DirectModuleMappingRule,规则是对传入的String中的"/"替换为".",并且将action的名称规范化。例如传入supplier/supplierAuditAction,返回supplier.SupplierAuditAction
actionEvent的提取在ActionEventUtil.getEventName(HttpServletRequest)工具类中是吸纳,它会对event_submit_do开头的请求参数进行截断,取出后面的字符串作为actionEvent。例如请求参数中有event_submit_do_first_audit,那么返回的actionEvent是FirstAudit
(4)CheckCsrfTokenValve
用于检查csrf token,防止csrf攻击和重复提交。假如request和session中的token不匹配,则出错,或显示expired页面
(5)LoopValve
用于反复执行同一个Pipeline。LoopValve是一个带有子流程的valve(持有一个Pipeline引用),并且内部的valve可以循环调用。只要调用过程中没有中断handle.isBroken()判断,就会一直调用直到超过最大循环次数:10,抛出异常
/**
 * 用来反复执行同一个子pipeline。
 *
 * @author Michael Zhou
 */
public class LoopValve extends AbstractValve {
    private final static int DEFAULT_MAX_LOOP = 10;
    private final static String DEFAULT_LOOP_COUNTER_NAME = "loopCount";
    private Pipeline loopBody;
    private Integer maxLoopCount;
    private String loopCounterName;

    public void invoke(PipelineContext pipelineContext) throws Exception {
        assertInitialized();

        PipelineInvocationHandle handle = initLoop(pipelineContext);

        do {
            invokeBody(handle);
        } while (!handle.isBroken());

        pipelineContext.invokeNext();
    }

    protected void invokeBody(PipelineInvocationHandle handle) {
        String loopCounterName = getLoopCounterName();
        int loopCount = (Integer) handle.getAttribute(loopCounterName);
        int maxLoopCount = getMaxLoopCount();

        // maxLoopCount<=0,意味着没有循环次数的限制。
        if (maxLoopCount > 0 && loopCount >= maxLoopCount) {
            throw new TooManyLoopsException("Too many loops: exceeds the maximum count: " + maxLoopCount);
        }

        handle.invoke();
        handle.setAttribute(loopCounterName, ++loopCount);
    }
}
(6)BreakUnlessTargetRedirectedValve
这是LoopValve中最后一个valve,用于在内部重定向页面时是否退出循环
public class BreakUnlessTargetRedirectedValve extends BreakValve {
    @Autowired
    private HttpServletRequest request;

    @Override
    public void invoke(PipelineContext pipelineContext) throws Exception {
        TurbineRunDataInternal rundata = (TurbineRunDataInternal) getTurbineRunData(request);
        String target = rundata.getTarget();
        String redirectTarget = rundata.getRedirectTarget();

        if (!isEmpty(redirectTarget) && !isEquals(target, redirectTarget)) {
            rundata.setTarget(redirectTarget);
            rundata.setRedirectTarget(null);

            pipelineContext.invokeNext();
        } else {
            super.invoke(pipelineContext);
        }
    }
} (7)PerformActionValve
执行action modult,通常用来处理用户提交的表单
public class PerformActionValve extends AbstractValve {
    @Autowired
    private HttpServletRequest request;

    @Autowired
    private ModuleLoaderService moduleLoaderService;

    public void invoke(PipelineContext pipelineContext) throws Exception {
        TurbineRunData rundata = getTurbineRunData(request);

        // 检查重定向标志,如果是重定向,则不需要将页面输出。
        if (!rundata.isRedirected()) {
            String action = rundata.getAction();

            // 如果找到action,则执行之。
            if (!StringUtil.isEmpty(action)) {
                String actionKey = "_action_" + action;

                // 防止重复执行同一个action。
                if (rundata.getRequest().getAttribute(actionKey) == null) {
                    rundata.getRequest().setAttribute(actionKey, "executed");

                    try {
                        moduleLoaderService.getModule(ACTION_MODULE, action).execute();
                    } catch (ModuleLoaderException e) {
                        throw new PipelineException("Could not load action module: " + action, e);
                    } catch (Exception e) {
                        throw new PipelineException("Failed to execute action module", e);
                    }
                }
            }
        }

        pipelineContext.invokeNext();
    }
}ModuleLoaderServiceImpl通过ModuleFactory来实际加载module,而ModuleFactory是通过spring初始化时注入的各个模块,所以我们需要在webx.xml中配置模块的路径
ModuleLoaderServiceImpl对web层的action/screen/control等包进行扫描,自动加载到ioc中。要搜索的包名(可以用*通配符)在xml中配置。然后建立module key和module之间的关系。
(8)PerformTemplateScreenValve
用于执行screen的渲染类。invoke()的实现在其父类PerformScreenValve中。先取出rundata,如果重定向了,则不执行screen类,否则设置content-type为text/html,通过randata获取target,getScreenModule()通过target找到对应的screen module,调用execute()执行它


 被折叠的 条评论
为什么被折叠?
被折叠的 条评论
为什么被折叠?
 到【灌水乐园】发言


