1.maven的resource标签资源过滤
一般情况下,可以通过build中的resource和filter标签配合使用,将filter中的属性值动态写入resource中,基本配置如下:
<build>

        <!-- 主资源目录 -->
        <resources>
            <resource>
                <!-- 设定主资源目录  -->
                <directory>src/main/resources</directory>

<!-- maven default生命周期,process-resources阶段执行maven-resources-plugin插件的resources目标处理主资源目下的资源文件时,只处理如下配置中包含的资源类型 <pre name="code" class="html">--><excludes> <exclude>*.xml</exclude> </excludes> <!-- maven default生命周期,process-resources阶段执行maven-resources-plugin插件的resources目标处理主资源目下的资源文件时,指定处理后的资源文件输出目录,默认是${build.outputDirectory}指定的目录 -->
<targetPath>d:/</targetPath> <!-- maven default生命周期,process-resources阶段执行maven-resources-plugin插件的resources目标处理主资源目下的资源文件时,是否对主资源目录开启资源过滤 --> <filtering>true</filtering> </resource> </resources> </build> 一般情况下这是都适用的,但是如果开发环境和生产环境的配置文件结构差别很大时,这么写就没有办法了。如:使用不同的数据源时
开发环境(oracle数据源):
<bean id="dataSource" class="org.apache.commons.dbcp.BasicDataSource" destroy-method="close">
    <property name="driverClassName" value="oracle.jdbc.driver.OracleDriver" />
    <property name="url" value="jdbc:oracle:thin:@localhost:1521:gbst" /> <!-- 开发库 -->
    <property name="username" value="admin" />
    <property name="password" value="admin" />
    <property name="initialSize" value="1"/>
    <property name="maxActive" value="2"/>
</bean><bean id="dataSource" class="org.springframework.jndi.JndiObjectFactoryBean">
<property name="jndiName">
<value>PrdDS</value>
</property>
<property name="resourceRef">
<value>false</value>
</property>
</bean>像这种情况,靠<build><resource>的资源过滤功能已经不太实用了,这时可以采用resources插件的copy-resources进行目标资源复制,来达到分别配置开发环境与生产环境的数据库连接信息及其他的一些配置。
2.使用方法
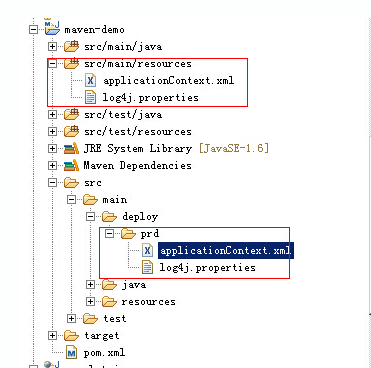
(1)专门创建一个文件夹deploy/prd,用来存储生产环境的配置文件;src/main/resources下存储开发环境的配置文件
(2)编写不同的配置文件
开发环境中的applicationContext.xml内容为:
<?xml version="1.0" encoding="UTF-8"?>
<!-- <beans xmlns:xsi="http://www.w3.org/2001/XMLSchema-instance"
    xmlns="http://www.springframework.org/schema/beans"
    xsi:schemaLocation="http://www.springframework.org/schema/beans
    http://www.springframework.org/schema/beans/spring-beans-3.0.xsd"> -->
<beans xmlns="http://www.springframework.org/schema/beans"
    xmlns:xsi="http://www.w3.org/2001/XMLSchema-instance"
    xmlns:context="http://www.springframework.org/schema/context"
     xmlns:tx="http://www.springframework.org/schema/tx"
    xsi:schemaLocation="
          http://www.springframework.org/schema/beans
          http://www.springframework.org/schema/beans/spring-beans-3.0.xsd
          http://www.springframework.org/schema/context
          http://www.springframework.org/schema/context/spring-context-3.0.xsd
                     http://www.springframework.org/schema/tx
                     http://www.springframework.org/schema/tx/spring-tx.xsd
    >
  <!-- 开发环境采用tomcat应用服务器,dbcp数据源管理 -->
  <bean id="dataSource" class="org.apache.commons.dbcp.BasicDataSource">
    <property name="url" value="jdbc:oracle:thin:@localhost:1521:shell"/>
    <property name="driverClassName" value="oracle.jdbc.driver.OracleDriver"/>
    <property name="username" value="scott"/>
    <property name="password" value="admin123"/>
    <property name="initialSize" value="1"/>
    <property name="maxActive" value="2"/>
  </bean>
</beans>
生产环境中的applicationContext.xml内容为:
<?xml version="1.0" encoding="UTF-8"?>
<!-- <beans xmlns:xsi="http://www.w3.org/2001/XMLSchema-instance"
    xmlns="http://www.springframework.org/schema/beans"
    xsi:schemaLocation="http://www.springframework.org/schema/beans
    http://www.springframework.org/schema/beans/spring-beans-3.0.xsd"> -->
<beans xmlns="http://www.springframework.org/schema/beans"
    xmlns:xsi="http://www.w3.org/2001/XMLSchema-instance"
    xmlns:context="http://www.springframework.org/schema/context"
     xmlns:tx="http://www.springframework.org/schema/tx"
    xsi:schemaLocation="
          http://www.springframework.org/schema/beans
          http://www.springframework.org/schema/beans/spring-beans-3.0.xsd
          http://www.springframework.org/schema/context
          http://www.springframework.org/schema/context/spring-context-3.0.xsd
                     http://www.springframework.org/schema/tx
                     http://www.springframework.org/schema/tx/spring-tx.xsd
    >
  <bean id="dataSource" class="org.springframework.jndi.JndiObjectFactoryBean">
    <property name="jndiName">
      <value>prdDS</value>
    </property>
    <property name="resourceRef">
      <value>false</value>
    </property>
  </bean>
</beans>
(3)配置maven-resource-plugin
<build>
   <finalName>muti-web</finalName>
   <plugins>
      <plugin>
         <groupId>org.apache.maven.plugins</groupId>
         <artifactId>maven-resources-plugin</artifactId>
         <version>2.6</version>
         <executions>
           <execution>
              <id>copy-resources</id>
              <!-- 在default生命周期的 validate阶段就执行resources插件的copy-resources目标 -->
              <phase>validate</phase>
              <goals>
                <goal>copy-resources</goal>
              </goals>
              <configuration>
              <!-- 指定resources插件处理资源文件到哪个目录下 -->
                 <outputDirectory>${project.build.outputDirectory}</outputDirectory>
                  <!-- 也可以用下面这样的方式(指定相对url的方式指定outputDirectory) <outputDirectory>target/classes</outputDirectory> -->
                  <!-- 待处理的资源定义 -->
                  <resources>
                     <resource>
                        <!-- 指定resources插件处理哪个目录下的资源文件 -->
                        <directory>src/main/${deploy.env}/applicationContext.xml</directory>
                        <!-- 指定不需要处理的资源 <excludes> <exclude>WEB-INF/*.*</exclude> </excludes> -->
                        <!-- 是否对待处理的资源开启过滤模式 (resources插件的copy-resources目标也有资源过滤的功能,这里配置的
                        这个功能的效果跟<build><resources><resource>下配置的资源过滤是一样的,只不过可能执行的阶段不一样, 这里执行的阶段是插件指定的validate阶段,<build><resources><resource>下的配置将是在resources插件的resources目标执行时起作用(在process-resources阶段)) -->
                        <filtering>false</filtering>
                     </resource>
                  </resources>
              </configuration>
              <inherited></inherited>
           </execution>
         </executions>

         </plugin>
      </plugins>
</build>
(3)运行
如果使用开发环境,则使用:mvn install
如果使用生产环境,则使用:mvn install -P prd


 本文介绍如何利用Maven的资源过滤功能及maven-resources-plugin插件的copy-resources目标,实现开发环境与生产环境的不同配置文件加载。通过具体实例展示了配置步骤与执行命令。


 382
382

 被折叠的 条评论
为什么被折叠?


