


 本教程介绍如何使用NSURLSession API实现播客客户端的基本功能,包括查询iTunes播客列表、选择并下载播客。教程详细讲解了创建数据任务和下载任务的方法,以及如何在进程中进行上传和下载。
In the previous tutorials, we explored the fundamentals of the NSURLSession API. There is one other feature of the NSURLSession API that we haven't look into yet, that is, out-of-process uploads and downloads. In the next two tutorials, I will show you how to create a very simple podcast client that enables background downloads.
在前面的教程中,我们已经探索了 NSURLSession API 的基础部分。关于 NSURLSession API 还有一个特性没有被提及,就是在进程之外进行上传和下载。在接下来的两篇教程中,我将会向你展示如何创建一个简单的播客客户端,其支持后台下载。
译者注:关于 podcast 播客:点击打开链接
Introduction
The podcast client that we're about to create isn't really going to be that functional. It will allow the user to query the iTunes Search API for a list of podcasts, select a podcast, and download episodes. Since we are focusing on the NSURLSession API, we won't go into playing the episodes the application downloads.
我们将要创建的播客客户端,其实并没有完全实现其功能。这将允许用户通过 iTunes 的查询接口,得到一系列的播客列表,选择一个播客,然后进行下载。由于我们关注的是 NSURLSession 的 API,所以我们不会对下载的内容进行播放。
The project, however, will teach you how to use data tasks and download tasks in a real world application. The podcast client will also enable background downloads for which we'll leverage NSURLSession's out-of-process API. We have quite a few things to do so let's not waste time and get started.
这个项目示例将会教你如何使用Data task 和 Download task,并真的在应用中下载数据。利用 NSURLSession 的 out-of-process API ,播客客户端也支持后台下载任务。我们有不少的事情要做,所以不浪费时间了介绍了,开始吧!
1. Project Setup
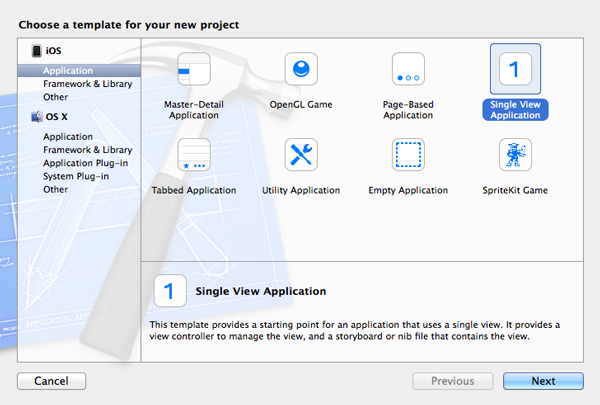
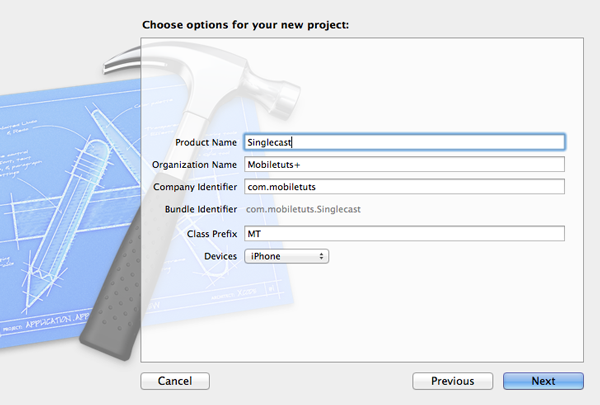
Fire up Xcode 5, select New > Project... from the File menu, and choose the Single View Application template from the list of iOS application templates. Name the application Singlecast, set the Device Family to iPhone, and tell Xcode where you'd like to save the project. Hit Create to create the project.
在Xcode中创建一个单视图项目,命名为 Singlecast。
2. Update Storyboard
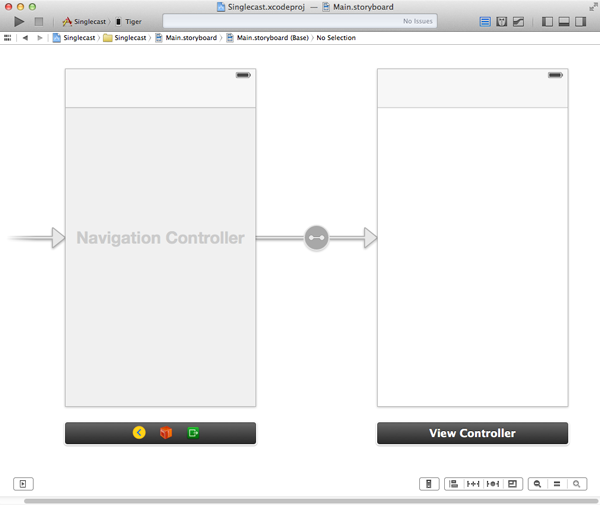
The first thing we need to do is edit the project's main storyboard. OpenMain.storyboard, select the storyboard's only view controller, and choose Embed In > Navigation Controller from the Editor menu. The reason for embedding the view controller in a navigation controller will become clear later in this tutorial.
首先需要做的是编辑storyboard。打开storyboard,选中唯一的视图,然后在 Editor 菜单中,选择 Embed In > Navigation Controller。为什么要嵌入一个导航控制器后面就知道了,不解释。
3. Search View Controller
Step 1: Create Class Files
As I mentioned in the introduction, to keep things simple, the user will only be able to subscribe to one podcast. Let's start by creating the search view controller. Select New > File... from the File menu and choose Objective-C class from the options on the right. Name the class MTSearchViewController and make it a subclass of UIViewController. Leave the check box labeled With XIB for user interface unchecked. Tell Xcode where you want to save the class files and hit Create.
如我在引言中所说,为了变得简单,用户只能订阅一个播客。让我们开始创建一个搜索视图控制器。创建一个Objective-C 类,名为 MTSearchViewController,继承自 UIViewController。注意不要勾选下面的两个选项,如下图:

Step 2: Update Class Interface
Before we create the user interface, open the view controller's header file and update the class's interface as shown below. We specify that the MTSearchViewController class conforms to the UITableViewDataSource, UITableViewDelegate, and UISearchBarDelegateprotocols, we declare two outlets, searchBar and tableView as well as an action,cancel, to dismiss the search view controller.
在编辑UI之前,先打开视图控制器的头文件,指定 MTSearchViewController 类遵循 UITableViewDataSource, UITableViewDelegate, 和 UISearchBarDelegate 三个协议,然后创建两个 outlet :searchBar 和 tableView,还有一个 cancel action,用于关闭 search view controller。
#import <UIKit/UIKit.h>

@interface MTSearchViewController: UIViewController<UITableViewDataSource,UITableViewDelegate, UISearchBarDelegate>

@property(weak,nonatomic)IBOutlet UISearchBar *searchBar;
@property(weak,nonatomic)IBOutlet UITableView *tableView;

- (IBAction)cancel:(id)sender;

@end
Step 3: Create User Interface
Revisit the project's main storyboard and drag a new view controller from the Object Library on the right. Select the new view controller, open the Identity Inspector on the right, and set the view controller's class to MTSearchViewController. With the new view controller still selected, open the Editor menu and choose Embed In > Navigation Controller. Drag a table view to the view controller's view and connect the table view'sdataSource and delegate outlets with the search view controller.
重新打开 storyboard,添加一个新的view controller,选中这个新添加的view controller,在Xcode右侧打开 Identity Inspector,设置 view controller的类为 MTSearchViewController。保持这个view controller的选中状态,打开Editor菜单,选择 Embed In > Navigation Controller。。拖动一个 table view 到这个新的 view controller 的 view 中,连接这个table view 的 dataSource 和 delegate。
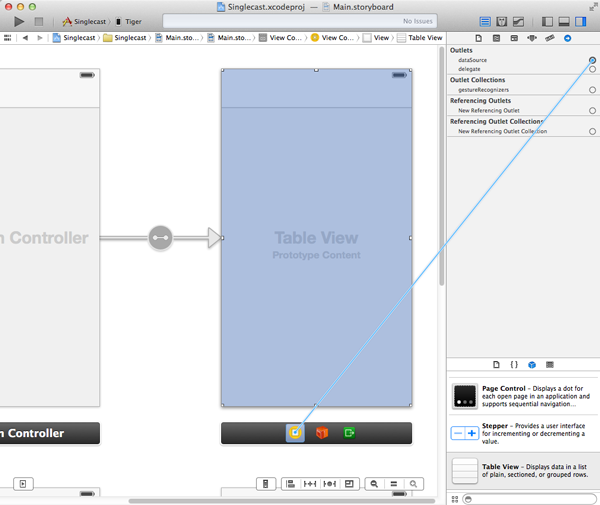
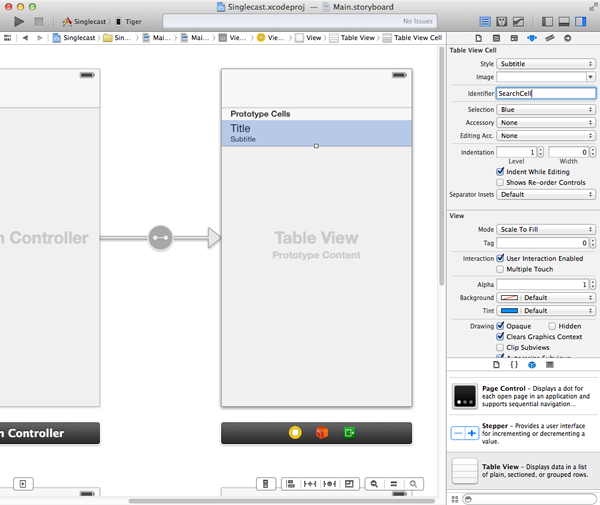
With the table view still selected, open the Attributes Inspector, and set the number of prototype cells to 1. Select the prototype cell and set its style property to Subtitle and its identifier to SearchCell.
选中table view,打开 Attributes Inspector, 选择 Table View ,设置 the number of prototype cells to 1. 然后选中 cell 并设置其 style property 为 Subtitle,其 identifier 为 SearchCell.
Drag a search bar from the Object Library and add it to the table view's header view. Select the search bar and connect its delegate outlet with the view controller.
从 Object Library 中拖动一个 search bar 到table view的头部。选中 search bar,连接其到view controller 的delegate outlet。
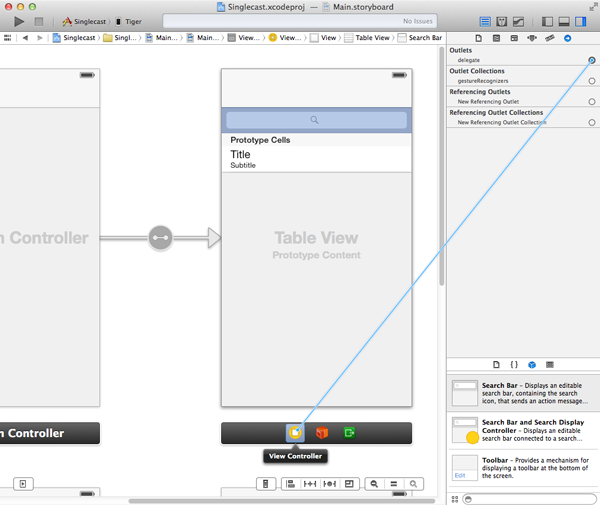
Select the view controller and connect its searchBar and tableView outlets with the search bar and table view respectively. There are a few other things that we need to do before we're done with the storyboard.
分别将 searchBar 和 tableView 的 outlet 和 view controller 中的控件连接起来。在结束storyboard的编辑之前还有一些事情要处理。
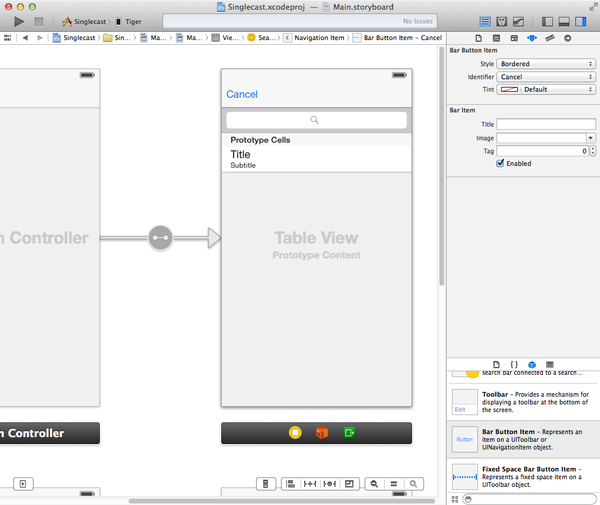
Open the Object Library and drag a bar button item to the navigation bar. Select the bar button item, connect it with the cancel: action we declared in the search view controller's interface, and change its Identifier in the Attributes Inspector to Cancel.
打开 Object Library ,拖动一个 bar button 添加到导航栏,然后将这bar button 连接到 cancel action,同时在 Attributes Inspector 中修改其 Identifier 为 Cancel。
Drag a bar button item to the navigation bar of the view controller (not the search view controller) and change its Identifier in the Attributes Inspector to Add. Control drag from the bar button item to the search view controller's navigation controller and select modal from the menu that pops up. This creates a segue from the view controller to the search view controller's navigation controller.
拖动一个bar button添加到另一个view controller(不是search view controller),在 Attributes Inspector 中置其 Identifier 为Add。按住 control 按键的同时拖动 这个 bar button 连接到 search view controller,在弹出的菜单中选择 modal。这样就在这个view controller 和 search view controller 的navigation 之间建立了一个 segue。

Step 4: Table View Implementation
Before we implement the UITableViewDataSource and UITableViewDelegate protocols in the MTSearchViewController class, we need to declare a property that stores the search results we'll get back from the iTunes Search API. Name the property podcasts as shown below. We also declare a static string that will serve as a cell reuse identifier. It corresponds to the identifier we set on the prototype cell a few moments ago.
在 MTSearchViewController 实现 UITableViewDataSource 和 UITableViewDelegate 协议之前,我们需要声明一个属性用以保存从 iTunes Search 接口查询返回的结果。这个属性命名为 podcasts。同时声明一个静态字符串常量作为 cell 表单元的复用标识符,这和之前我们设置 cell 的 identity 是一致的
#import "MTSearchViewController.h"

@interface MTSearchViewController()

@property(strong,nonatomic)NSMutableArray *podcasts;

@end
static NSString *SearchCell = @"SearchCell";The implementation of numberOfSectionsInTableView: is as easy as it gets. We return 1if self.podcasts is not nil and 0 if it is. The implementation oftableView:numberOfRowsInSection: is pretty similar as you can see below. IntableView:cellForRowAtIndexPath:, we ask the table view for a cell by passing the cell reuse identifier, which we declared earlier, and indexPath. We fetch the corresponding item from the podcasts data source and update the table view cell. BothtableView:canEditRowAtIndexPath: and tableView:canMoveRowAtIndexPath: return NO.
接着,分别对委托方法 numberOfSectionsInTableView: ,tableView:numberOfRowsInSection: ,tableView:cellForRowAtIndexPath: ,tableView:canEditRowAtIndexPath: ,tableView:canMoveRowAtIndexPath: 进行实现。
- (NSInteger)numberOfSectionsInTableView:(UITableView*)tableView {
    return self.podcasts?1:0;
}

- (NSInteger)tableView:(UITableView*)tableView numberOfRowsInSection:(NSInteger)section {
    return self.podcasts?self.podcasts.count:0;
}

- (UITableViewCell*)tableView:(UITableView*)tableView cellForRowAtIndexPath:(NSIndexPath*)indexPath {
    UITableViewCell *cell = [tableView dequeueReusableCellWithIdentifier:SearchCell forIndexPath:indexPath];

    // Fetch Podcast
    NSDictionary *podcast = [self.podcasts objectAtIndex:indexPath.row];

    // Configure Table View Cell
    [cell.textLabel setText:[podcast objectForKey:@"collectionName"]];
    [cell.detailTextLabel setText:[podcast objectForKey:@"artistName"]];

    return cell;
}

- (BOOL)tableView:(UITableView*)tableView canEditRowAtIndexPath:(NSIndexPath*)indexPath {
    return NO;
}

- (BOOL)tableView:(UITableView*)tableView canMoveRowAtIndexPath:(NSIndexPath*)indexPath {
    return NO;
}
Before running the application, implement the cancel: action in which we dismiss the search view controller.
然后再对关闭 search view controller 的 cancel action 进行实现。
- (IBAction)cancel:(id)sender {
    [self dismissViewControllerAnimated:YES completion:nil];
}
Build the project and run the application to make sure that the foundation is working as expected. It's time to start using the NSURLSession API to query the iTunes Search API.
编译运行项目确保一切正常运行,这时就可以开始使用 NSURLSession 的 API 进行查询了。
Step 5: Creating a Session
Let's begin by declaring two additional private properties in the MTSearchViewControllerclass, session and dataTask. The session variable is used to store a reference to theNSURLSession instance we'll be using for querying Apple's API. We also keep a reference to the data task that we will use for the request. This will enable us to cancel the data task if the user updates the search query before we've received a response from the API. If you have an eye for detail, you may have noticed that theMTSearchViewController class also conforms to the UIScrollViewDelegate protocol. The reason for this will become clear in a few minutes.
在 MTSearchViewController 类中添加两个私有属性 session ,用于查询 Apple 提供的接口; dataTask,用于数据请求(在接收到数据响应之前可以取消data task)。同时注意到 MTSearchViewController 遵循了 UIScrollViewDelegate 协议(原因不解释,后面就知道了)。
#import "MTSearchViewController.h"

@interface MTSearchViewController() <UIScrollViewDelegate>

@property(strong,nonatomic)NSURLSession *session;
@property(strong,nonatomic)NSURLSessionDataTask *dataTask;

@property(strong,nonatomic)NSMutableArray *podcasts;

@end
The session is created in its getter method as you can see below. Its implementation shouldn't hold any surprises if you've read the previous tutorials. We override the getter method of the session property to lazily load the session and confine the session's instantiation and configuration in its getter method. This makes for clean and elegant code.
实现如下的 session 获取方法,在前面的教程中已经见过,所以不会感到陌生。
- (NSURLSession*)session {
    if(!_session) {
        // Initialize Session Configuration
        NSURLSessionConfiguration *sessionConfiguration = [NSURLSessionConfiguration defaultSessionConfiguration];

        // Configure Session Configuration
        [sessionConfiguration setHTTPAdditionalHeaders:@{@"Accept":@"application/json"}];

        // Initialize Session
        _session = [NSURLSession sessionWithConfiguration:sessionConfiguration];
    }

    return _session;
}
- (NSURLSession*)session {
if(!_session) {
// Initialize Session Configuration
NSURLSessionConfiguration *sessionConfiguration = [NSURLSessionConfiguration defaultSessionConfiguration];
// Configure Session Configuration
[sessionConfiguration setHTTPAdditionalHeaders:@{@"Accept":@"application/json"}];
// Initialize Session
_session = [NSURLSession sessionWithConfiguration:sessionConfiguration];
}
return _session;
}Step 6: Searching
To respond to the user's input in the search bar, we implementsearchBar:textDidChange: of the UISearchBarDelegate protocol. The implementation is simple. If searchText is nil, the method returns early. If the length of searchText is less than four characters long, we reset the search by invoking resetSearch. If the query is four characters or longer, we perform a search by calling performSearch on the search view controller.
为了响应用户在搜索栏的输入,我们需要实现 UISearchBarDelegate 委托协议方法 searchBar:textDidChange: 。实现的过程是简单的,如果 searchText 为 nil,则直接返回 return;如果 searchText 的长度小于4 个字符,则调用resetSearch 方法重置;如果查询输入长度大于等于 4,则调用 performSearch 方法执行搜索。
- (void)searchBar:(UISearchBar*)searchBar textDidChange:(NSString*)searchText {
    if(!searchText) return;

    if(searchText.length<=3) {
        [self resetSearch];

    }else{
        [self performSearch];
    }
}
Before we inspect performSearch, let's take a quick look at resetSearch. All that we do in resetSearch is clearing the contents of podcasts and reloading the table view.
先看看 resetSearch 方法实现,先清除 podcasts 数组中的内容,然后刷新表视图。
- (void)resetSearch {
    // Update Data Source
    [self.podcasts removeAllObjects];

    // Update Table View
    [self.tableView reloadData];
}
The heavy lifting is done in performSearch. After storing the user's input in a variable named query, we check if dataTask is set. If it is set, we call cancel on it. This is important as we don't want to receive a response from an old request that may no longer be relevant to the user. This is also the reason why we have only one active data task at any one time. There is no advantage in sending multiple requests to the API.
繁重的工作是如何实现 performSearch 方法。先将用户的输入保存在 query 变量中,然后检查 dataTask 是否被设置,如果已经被设置,则调用 cancel 。这是因为我们不希望接收的响应是来自旧的请求,同时这也是我们每一时刻只有一个活跃的数据请求任务的原因。NSURLSession API 同时处理多个数据请求是没有优势的。
Next, we ask the session for a new data task instance by passing it an NSURL instance and a completion handler. Remember that the session is the factory that creates tasks. You should never create tasks yourself. If we get a valid data task from the session, we call resume on it as we saw in the previous tutorials.
接着,会话对象开始一个新的 data task 通过传递一个 NSURL 实例和一个完成处理程序块。记住会话对象就是创建请求任务的工厂,你不能自己创建请求任务。然后调用 resume 方法启动任务。
The logic inside the completion handler is interesting to say the least. The error object is important to us for several reasons. Not only will it tell us if something went wrong with the request, but it's also useful for determining if the data task was canceled. If we do get an error object, we check whether its error code is equal to -999. This error code indicates the data task was canceled. If we get another error code, we log the error to the console. In a real application, you'd need to improve the error handling and notify the user when an error is thrown.
完成处理程序块中的逻辑很有趣。其中 error 对象是相当重要的,它不仅告诉请求是否出错,而且对于判断请求任务是否取消也很有用。如果我们接收到一个 error 对象,而且错误代码为 -999,则说明请求任务被取消了。如果是其它的错误代码,则我们将其输出到终端。在实际的应用中,你需要提高错误的处理能力并在发送错误的时候通知用户。
If no error was passed to the completion handler, we create a dictionary from theNSData instance that was passed to the completion handler and we extract the results from it. If we have an array of results to work with, we pass it to processResults:. Did you notice we invoked processResults: in a GCD (Grand Central Dispatch) block? Why did we do that? I hope you remember, because it's a very important detail. We have no guarantee that the completion handler is invoked on the main thread. Since we need to update the table view on the main thread, we need to make sure thatprocessResults: is called on the main thread.
如果没有错误传递到完成处理程序块中,我们就将传递到完成处理程序块中的 NSData 实例创建一个 NSDictionary 对象,然后从这个字典中提取结果,如果我们获得的结果是一个数组,则传递给processResults: 方法处理。是否注意到processResults: 方法的调用是在GCD代码块中,这是一个非常重要的细节,虽然我们不能保证完成处理程序块会在主线程中调用,但由于我们需要在主线程中更新表视图,所以我们需要确保processResults: 方法一定会在主线程中调用(译者注:也即说,一旦完成处理程序块调用了,那么就一定要确保processResults: 方法被调用,以在主线程中更新表视图,而 processResults: 方法置于GCD block中处理可以做到这一点)。
- (void)performSearch {
    NSString *query = self.searchBar.text;

    if(self.dataTask) {
        [self.dataTask cancel];
    }

    self.dataTask= [self.session dataTaskWithURL:[self urlForQuery:query]completionHandler:^(NSData *data,NSURLResponse *response,NSError *error) {
        if(error) {
            if(error.code!= -999) {
                NSLog(@"%@", error);
            }

        }else{
            NSDictionary *result = [NSJSONSerialization JSONObjectWithData:data options:0 error:nil];
            NSArray *results = [result objectForKey:@"results"];

            dispatch_async(dispatch_get_main_queue(), ^{
                if(results) {
                    [self processResults:results];
                }
            });
        }
    }];

    if(self.dataTask) {
        [self.dataTask resume];
    }
}
Before we look at the implementation of processResults:, I want to quickly show you what happens in urlForQuery:, the helper method we use in performSearch. InurlForQuery:, we replace any spaces with a + sign to ensure that the iTunes Search API is happy with what we send it. We then create an NSURL instance with it and return it.
在了解如何实现 processResults: 方法之前,先看看 urlForQuery: 方法。在该方法中,我们将所有的空格都置换成 “+”确保 iTunes Search 接口使用正确,然后创建一个NSURL实例并返回,
- (NSURL*)urlForQuery:(NSString*)query {
    query = [query stringByReplacingOccurrencesOfString:@" " withString:@"+"];
    return [NSURL URLWithString:[NSString stringWithFormat:@"https://itunes.apple.com/search?media=podcast&entity=podcast&term=%@",query]];
}
In processResults:, the podcasts variable is cleared, populated with the contents ofresults, and the results are displayed in the table view.
在 processResults: 方法中,清除 podcasts 变量中的内容,填入results 变量中的内容,然后更新表视图,显示结果。
- (void)processResults:(NSArray*)results {
    if(!self.podcasts) {
        self.podcasts= [NSMutableArray array];
    }

    // Update Data Source
    [self.podcasts removeAllObjects];
    [self.podcasts addObjectsFromArray:results];

    // Update Table View
    [self.tableView reloadData];
}
- (void)processResults:(NSArray*)results {
if(!self.podcasts) {
self.podcasts= [NSMutableArray array];
}
// Update Data Source
[self.podcasts removeAllObjects];
[self.podcasts addObjectsFromArray:results];
// Update Table View
[self.tableView reloadData];
}Step 6: Selecting a Podcast
When the user taps a row in the table view to select a podcast,tableView:didSelectRowAtIndexPath: of the UITableViewDelegate protocol is invoked. Its implementation may seem odd at first so let me explain what's going on. We select the podcast that corresponds with the user's selection, store it in the application's user defaults database, and dismiss the search view controller. We don't notify anyone about this? Why we do this will become clear once we continue implementing theMTViewController class.
当用户点击表视图中的一行来选择一个播客时,UITableViewDelegate 委托协议方法tableView:didSelectRowAtIndexPath: 就会被调用。其实现过程看上去可能有点奇怪,下面稍作解释。我们将与用户选择的播客保存在用户默认的数据库中,然后关闭 search view controller。接下来继续实现MTViewController 类的时候就清楚这么处理是为什么了。
- (void)tableView:(UITableView*)tableView didSelectRowAtIndexPath:(NSIndexPath*)indexPath {
    [tableView deselectRowAtIndexPath:indexPath animated:YES];

    // Fetch Podcast
    NSDictionary *podcast = [self.podcasts objectAtIndex:indexPath.row];

    // Update User Defatuls
    NSUserDefaults *ud = [NSUserDefaults standardUserDefaults];
    [ud setObject:podcast forKey:@"MTPodcast"];
    [ud synchronize];

    // Dismiss View Controller
    [self dismissViewControllerAnimated:YES completion:nil];
}
- (void)tableView:(UITableView*)tableView didSelectRowAtIndexPath:(NSIndexPath*)indexPath {
[tableView deselectRowAtIndexPath:indexPath animated:YES];
// Fetch Podcast
NSDictionary *podcast = [self.podcasts objectAtIndex:indexPath.row];
// Update User Defatuls
NSUserDefaults *ud = [NSUserDefaults standardUserDefaults];
[ud setObject:podcast forKey:@"MTPodcast"];
[ud synchronize];
// Dismiss View Controller
[self dismissViewControllerAnimated:YES completion:nil];
}Step 7: Finishing Touches
There are two details I want to talk about before returning to the MTViewControllerclass. When the search view controller is presented to the user, it is clear that she wants to search for podcasts. It is therefore a good idea to immediately present the keyboard. We do this in viewDidAppear: as shown below.
在继续实现 MTViewController 类之前,有两个需要注意的细节。当search view controller呈现给用户的时候,显然用户此时是要进行查询播客的操作,因此此时应该立即弹出键盘,我们在viewDidAppear: 方法中:
- (void)viewDidAppear:(BOOL)animated {
    [super viewDidAppear:animated];

    // Show Keyboard
    [self.searchBar becomeFirstResponder];
}
The keyboard needs to hide the moment the user starts scrolling through the search results. To accomplish this, we implement scrollViewDidScroll: of theUIScrollViewDelegate protocol. This explains why MTSearchViewController conforms to the UIScrollViewDelegate protocol. Have a look at the implementation ofscrollViewDidScroll: shown below.
当用户浏览查询返回的结果的时候就应该将键盘隐藏,要实现这个功能,需要实现 UIScrollViewDelegate 委托协议的 scrollViewDidScroll: 方法。这就是为什么MTSearchViewController 类要遵循UIScrollViewDelegate 协议了。实现scrollViewDidScroll: 方法如下所示:
- (void)scrollViewDidScroll:(UIScrollView*)scrollView {
    if([self.searchBar isFirstResponder]) {
        [self.searchBar resignFirstResponder];
    }
}UITableView class is a subclass of UIScrollView, which is the reason the above approach works.
4. Looping Back
As we saw earlier, we store the user's selection in the application's user defaults database. We need to update the MTViewController class to make use of the user's selection in the search view controller. In the view controller's viewDidLoad method, we load the podcast from the user defaults database and we add the view controller as an observer of the user defaults database for the key path MTPodcast so that the view controller is notified when the value for MTPodcast changes.
如前所见,我们将用户的选择保存在应用程序的用户默认数据库中,接着我们就需要在 MTViewController 中使用这个保存的用户的选择。在 viewDidLoad 方法中,我们先加载用户保存在默认数据库中选中的播客,然后将 view controller 作为用户默认数据库的观察者,其key path 为MTPodcast ,这样,当MTPodcast 的值发生变化的时候,就会通知 view controller。
- (void)viewDidLoad {
    [super viewDidLoad];

    // Load Podcast
    [self loadPodcast];

    // Add Observer
    [[NSUserDefaults standardUserDefaults] addObserver:self forKeyPath:@"MTPodcast" options:NSKeyValueObservingOptionNew context:NULL];
}
All we do in loadPodcast is storing the value for MTPodcast from the user defaults database in the view controller's podcast property. This value will be nil if the user defaults database doesn't contain an entry for MTPodcast. The view controller will gracefully handle this for us. Remember that, in Objective-C, you can send messages tonil without all hell breaking loose. This has its disadvantages, but it certainly has its advantages to.
在 loadPodcast 方法中,将保存在用户默认数据库中key值为 MTPodcast 的value 保存到 view controller 的podcast 属性中,如果用户默认数据库中没有包含key为podcast 的键值对,这个值可能为 nil。
- (void)loadPodcast {
    NSUserDefaults *ud = [NSUserDefaults standardUserDefaults];
    self.podcast = [ud objectForKey:@"MTPodcast"];
}
This also means that we need to declare a property named podcast in the view controller's implementation file.
这也就说明在 view controller 中声明了一个名为podcast 的属性:
#import "MTViewController.h"

@interface MTViewController ()

@property (strong, nonatomic) NSDictionary *podcast;

@end
Let's also take a quick look at setPodcast: and updateView.
让我们看看 setPodcast: 方法和updateView 方法的实现:
- (void)setPodcast:(NSDictionary *)podcast {
    if (_podcast != podcast) {
        _podcast = podcast;

        // Update View
        [self updateView];
    }
}
- (void)updateView {
// Update View
self.title = [self.podcast objectForKey:@"collectionName"];
} When the value in the user defaults database changes for the key MTPodcast, the view controller can respond to this change inobserveValueForKeyPath:ofObject:change:context:. That's how key value observing works. All we do in this method is updating the value of the view controller's podcastproperty.
当用户默认数据库中key值为 MTPodcast 的value发送变化的时候,视图控制器可以在observeValueForKeyPath:ofObject:change:context: 方法中响应这种变化。这就是KVO。我们在这个方法中修改podcast 属性的值。
- (void)observeValueForKeyPath:(NSString *)keyPath ofObject:(id)object change:(NSDictionary *)change context:(void *)context {
    if ([keyPath isEqualToString:@"MTPodcast"]) {
        self.podcast = [object objectForKey:@"MTPodcast"];
    }
}
When working with key value observing, it is instrumental to be aware of memory management and retain cycles. In this case, it means that we need to remove the view controller as an observer when the view controller is deallocated.
当使用KVO的时候,要注意内存管理和避免出现 retain cycle。在这个例子中,意味着我们需要在 delloc 方法中解除这个观察者对象。
- (void)dealloc {
    [[NSUserDefaults standardUserDefaults] removeObserver:self forKeyPath:@"MTPodcast"];
}
5. Fetching and Parsing the Feed
Step 1: Adding Dependencies
The response we get back from the iTunes Search API includes a feedUrl attribute for each podcast. We could manually fetch the feed and parse it. However, to save some time, we'll make use of MWFeedParser, a popular library that can do this for us. You can manually download and include the library in your project, but I am going to opt for Cocoapods. I prefer Cocoapods for managing dependencies in iOS and OS X projects. You can read more about Cocoapods on its website or on Mobiletuts+.
我们从 iTunes 搜索得到的响应中,每一个播客都包含一个 feedUrl 属性。 我们可以手动提取并进行解析。不过,为了提高效率,我们可以使用 MWFeedParser 这个流行的库。你可以手动下载并添加到项目中。但是我更喜欢在iOS 和 OS X 中使用 Cocoapods ,可以在 its website 和 Mobiletuts+ 获取更详细的信息。
译者注:
CocoaPods is the dependency manager for Objective-C projects. It has thousands of libraries and can help you scale your projects elegantly.
关于使用 CocoaPods 来做包依赖管理的有关内容,可以参考如下:
OBJC依赖库管理利器cocoapods 安装及使用详细图解
https://github.com/CocoaPods/CocoaPods/wiki
Quit Xcode, navigate to the root of your Xcode project, and create a file named Podfile. Open this file in your text editor of choice and add the following three lines of code. In the first line, we specify the platform and the deployment target, which is iOS 7 in this example. The next two lines each specify a dependency of our Xcode project. The first one is the MWFeedParser library and I've also included the popular SVProgressHUD library, which will come in handy a bit later.
退出Xcode,导航定位到项目的更目录下,创建一个名为 Podfile 文件。用文本编辑器打开这个文件,添加如下的三行代码。第一行代码指定开发平台和部署目标位iOS 7.接下来的两行指定该Xcode项目的依赖库,第一个是MWFeedParser 库,还有流行的 SVProgressHUD 库。
platform :ios, '7'
pod 'MWFeedParser'
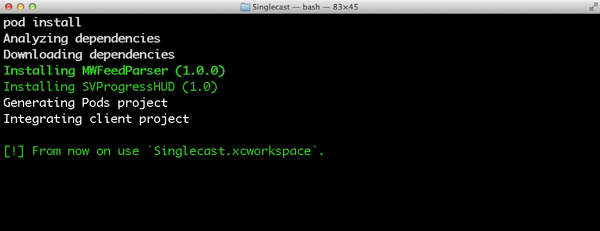
pod 'SVProgressHUD' Open a Terminal window, navigate to the root of your Xcode project, and execute the command pod install. This should install the dependencies and create an Xcode workspace. When Cocoapods is finished installing the project's dependencies, it tells you to use the workspace it created for you. This is important so don't ignore this advice. In the root of your Xcode project, you will see that Cocoapods has indeed created an Xcode workspace for you. Double-click this file and you should be ready to go.
打开终端窗口,导航到 Xcode 项目的根目录下,然后执行命令 pod install 。这将会下载项目所需要的依赖库,并创建一个Xcode 的 workspace。当 完成下载项目所需的依赖库的时候,它会提示打开这个新创建的 workspace。特别要注意这个提示。在Xcode 的项目根目录下就会看到确实新增了 Xcode 项目的 workspace。双击 workspace 文件打开。
Step 2: Fetching and Parsing the Feed
Open the implementation file of the MTViewController class, add an import statement for MWFeedParser and SVProgressHUD, and declare two properties, episodes andfeedParser. We also need to make MTViewController conform to theMWFeedParserDelegate protocol.
打开 类文件,添加 MWFeedParser 和 SVProgressHUD 的 import 导入语句,声明两个属性 episodes 和 feedParser 。同时让 MTViewController 遵循 MWFeedParserDelegate 协议。
#import "MTViewController.h"

#import "MWFeedParser.h"
#import "SVProgressHUD.h"

@interface MTViewController () <MWFeedParserDelegate>

@property (strong, nonatomic) NSDictionary *podcast;
@property (strong, nonatomic) NSMutableArray *episodes;
@property (strong, nonatomic) MWFeedParser *feedParser;

@end
Next, we update setPodcast: by invoking fetchAndParseFeed, a helper method in which we use the MWFeedParser class to fetch and parse the podcast's feed.
接着,在 setPodcast: 方法中调用 fetchAndParseFeed ,在这个方法中,使用 MWFeedParser类的方法获取并解析podcast's feed。
- (void)setPodcast:(NSDictionary *)podcast {
    if (_podcast != podcast) {
        _podcast = podcast;

        // Update View
        [self updateView];

        // Fetch and Parse Feed
        [self fetchAndParseFeed];
    }
}
In fetchAndParseFeed, we get rid of our current MWFeedParser instance if we have one and initialize a new instance with the podcast's feed URL. We set the feedParseTypeproperty to ParseTypeFull and set the view controller as the feed parser's delegate. Before we fetch the feed, we use SVProgressHUD to show a progress HUD to the user.
在 fetchAndParseFeed 方法中,为了避免使用已经存在的 MWFeedParser 类实例,根据 podcast 的 feed URL 重新创建一个新的实例对象。设置 feedParseType 属性为 ParseTypeFull ,该 view controller 为 feed 解析的委托对象。在开始获取 feed之前,使用 SVProgressHUD 显示进度。
- (void)fetchAndParseFeed {
    if (!self.podcast) return;

    NSURL *url = [NSURL URLWithString:[self.podcast objectForKey:@"feedUrl"]];
    if (!url) return;

    if (self.feedParser) {
        [self.feedParser stopParsing];
        [self.feedParser setDelegate:nil];
        [self setFeedParser:nil];
    }

    // Clear Episodes
    if (self.episodes) {
        [self setEpisodes:nil];
    }

    // Initialize Feed Parser
    self.feedParser = [[MWFeedParser alloc] initWithFeedURL:url];

    // Configure Feed Parser
    [self.feedParser setFeedParseType:ParseTypeFull];
    [self.feedParser setDelegate:self];

    // Show Progress HUD
    [SVProgressHUD showWithMaskType:SVProgressHUDMaskTypeGradient];

    // Start Parsing
    [self.feedParser parse];
}
We also need to implement two methods of the MWFeedParserDelegate protocol,feedParser:didParseFeedItem: and feedParserDidFinish:. InfeedParser:didParseFeedItem:, we initialize the episodes property if necessary and pass it the feed item that the feed parser hands to us.
需要实现 MWFeedParserDelegate 协议的两个方法:feedParser:didParseFeedItem: 和 feedParserDidFinish: 。在 feedParser:didParseFeedItem: 方法中:
- (void)feedParser:(MWFeedParser *)parser didParseFeedItem:(MWFeedItem *)item {
    if (!self.episodes) {
        self.episodes = [NSMutableArray array];
    }

    [self.episodes addObject:item];
}
In feedParserDidFinish:, we dismiss the progress HUD and update the table view. Did you say table view? That's right. We need to add a table view and implement the necessary UITableViewDataSource protocol methods.
在 feedParserDidFinish: 方法中,隐藏进度显示,同时更新 table view。这样就需要在 view controller 中添加一个 table view,同时实现 UITableViewDataSource 协议中的方法。
- (void)feedParserDidFinish:(MWFeedParser *)parser {
    // Dismiss Progress HUD
    [SVProgressHUD dismiss];

    // Update View
    [self.tableView reloadData];
}
Step 3: Displaying the Feed
Before we update the user interface, open MTViewController.h, declare an outlet for the table view, and tell the compiler the MTViewController class conforms to theUITableViewDataSource and UITableViewDelegate protocols.
在更新UI界面之前,打开 MTViewController.h ,声明一个 table view 的 outlet,并让 MTViewController 类遵循 UITableViewDataSource 和 UITableViewDelegate 协议。
#import <UIKit/UIKit.h>

@interface MTViewController : UIViewController <UITableViewDataSource, UITableViewDelegate>

@property (weak, nonatomic) IBOutlet UITableView *tableView;

@end
Open the main storyboard one more time and add a table view to the view controller's view. Connect the table view's dataSource and delegate outlets with the view controller and connect the view controller's tableView outlet with the table view. Select the table view, open the Attributes Inspector, and set the number of prototype cells to 1. Select the prototype cell, set its style to Subtitle, and give it an identifier of EpisodeCell.
再次打开 storyboard,添加一个 table view。连接 table view 的 dataSource 和 delegate ,同时连接其到文件中的 tableView outlet。选中 table view ,打开 Attributes Inspector,设置 the number of prototype cells 为 1.同时设置其类型 style 为 Subtitle,identifier 为 EpisodeCell。

Before we implement the UITableViewDataSource protocol, declare a static string named EpisodeCell in MTViewController.m. This corresponds with the identifier we set for the prototype cell in the storyboard.
实现 UITableViewDataSource 协议之前,在 MTViewController.m 中声明一个静态字符串常量 EpisodeCell 。这和之前在 storyboard 中设置 cell 的 identifier 相同。
static NSString *EpisodeCell = @"EpisodeCell"; Implementing the UITableViewDataSource protocol is simple as pie and very similar to how we implemented the protocol in the search view controller. The only difference is that the episodes variable contains instances of the MWFeedItem class instead ofNSDictionary instances.
实现 UITableViewDataSource 协议和之前在 search view controller 中实现该协议类似,只不过 episodes 变量包含的是 MWFeedItem 类实例,而非 MWFeedItem 实例。
- (NSInteger)numberOfSectionsInTableView:(UITableView *)tableView {
    return self.episodes ? 1 : 0;
}

- (NSInteger)tableView:(UITableView *)tableView numberOfRowsInSection:(NSInteger)section {
    return self.episodes ? self.episodes.count : 0;
}

- (UITableViewCell *)tableView:(UITableView *)tableView cellForRowAtIndexPath:(NSIndexPath *)indexPath {
    UITableViewCell *cell = [tableView dequeueReusableCellWithIdentifier:EpisodeCell forIndexPath:indexPath];

    // Fetch Feed Item
    MWFeedItem *feedItem = [self.episodes objectAtIndex:indexPath.row];

    // Configure Table View Cell
    [cell.textLabel setText:feedItem.title];
    [cell.detailTextLabel setText:[NSString stringWithFormat:@"%@", feedItem.date]];

    return cell;
}

- (BOOL)tableView:(UITableView *)tableView canEditRowAtIndexPath:(NSIndexPath *)indexPath {
    return NO;
}

- (BOOL)tableView:(UITableView *)tableView canMoveRowAtIndexPath:(NSIndexPath *)indexPath {
    return NO;
}
Run the application in the iOS Simulator or on a physical device and run it through its paces. You should now be able to search for podcasts, select a podcast from the list, and see its episodes.
在模拟器或真机上运行该项目程序,你应该可以 search for podcasts, select a podcast from the list, and see its episodes.
Conclusion
We've done a lot in this tutorial, but we still have quite a bit of work in front of us. In the next tutorial, we zoom in on downloading episodes from the feed and we'll discuss background or out-of-process downloads. Stay tuned.
在本篇教程中,我们做了很多,但仍有很多工作摆在我们面前。在下一篇教程中,我们深入了解下载任务,讨论有关后台下载和线程外下载的内容,敬请关注。


 1460
1460

 被折叠的 条评论
为什么被折叠?
被折叠的 条评论
为什么被折叠?
 到【灌水乐园】发言


