


最近因为项目需要,写了一个跑马灯效果的控件,过程中也学到一些东西,在这里和大家分享一下。
首先让我们来看一下效果:
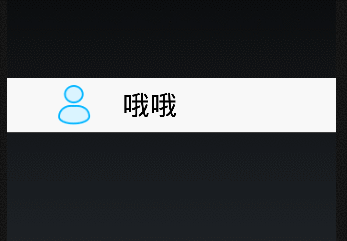
其中的图标,文字,甚至每行的整个布局都是可以自定义的,我们可以使用整个控件很方便做出自己想要的效果。
闲话少说,我们先来看在代码里面怎么使用这个控件,首先是xml文件里面,直接引用即可。
<?xml version="1.0" encoding="utf-8"?>
<LinearLayout
    xmlns:android="http://schemas.android.com/apk/res/android"
    android:orientation="vertical"
    android:layout_width="fill_parent"
    android:layout_height="fill_parent">

    <com.example.kaiyicky.myapplication.VerticalScrollView
        android:id="@+id/mscroll"
        android:scrollbars="none"
        android:layout_width="match_parent"
        android:background="#ffffff"
        android:layout_marginTop="200dp"
        android:layout_height="60dp">
    </com.example.kaiyicky.myapplication.VerticalScrollView>
</LinearLayout>然后在Activity里面这样设置:
public class MainActivity extends FragmentActivity {


    @Override
    protected void onCreate(Bundle savedInstanceState) {
        super.onCreate(savedInstanceState);
        setContentView(R.layout.activity_main);
        //获取对象
        VerticalScrollView mscroll= (VerticalScrollView) findViewById(R.id.mscroll);
        mscroll.setDirection(-1);//设置方向
        //自定义行布局和数据
        mscroll.setTabAdapter(new TabAdapter(R.layout.vertical_scroll_item,
                new String[]{"哈哈", "呵呵", "哦哦"}){

            @Override
            public void getView(View v,String text,String icon) {
                TextView t = (TextView) v.findViewById(R.id.item_text);
                t.setText(text);
            }
        });
        //开始动画
        mscroll.startAutoScroll();
    }
}
在获得控件对象以后,我们可以设置跑马灯的方向,-1代表从上到下,1代表从下到上
然后为mscroll设置adapter,这个adapter也是我们自定义的哦,不要以为是Android提供的,这里我借鉴了listview中setAdapter的思想,实现数据和布局的分离
这样我们就可以为自己的行设置想要的布局,同时可以获取布局中的控件设置需要的值,例如为textView设置文字或者icon
最后只要主动调用startAutoScroll()就可以是整个控件跑起来了
使用方式就是这么简单,接下来大家跟着我,看看整个控件是怎么写的。
我先说一下我的思路,我是通过继承ScrollView来写这个控件的,为什么选择它,因为ScrollView有一个smoothSrollTo()方法,可以使内部的布局滑动到一个特定的位置,从而实现图片里面的滑动效果。有了这个想法以后,我们要知道ScrollView里面一般只能有一个子控件,显然我们需要一个LinearLayout,然后根据数据的条数,主动渲染行布局,将生成的View逐个添加入LinearLayout就可以了。
可是还有一个问题,怎么实现无限的自动滚动呢?一开始我思路是创建一个子线程,里面有一个死循环,每隔一定时间,就调用smoothSrollTo()去移动LinearLayout的位置,这样就实现了无限循环。(注意你不能再UI线程里面写死循环啊,所以只能另起一个子线程了)。
后来觉得这样写会造成内存泄露,因为这个线程没有合适的终止条件,也就说我们跳转到另外一个Activity以后,这个线程也不会结束,这样的话内存就无法释放。
解决办法是,通过handler来实现死循环,我们知道调用handler的sendEmptyMessageDelayed()方法,可以延长一段时间以后发送一个信息。
然后在handleMessage里面会接收到这个信息,如果我们在handleMessage的最后,又再一次调用sendEmptyMessageDelayed()方法,这样就可以不断循环了。
OK,说道这里,大家可能觉得有点抽象,等下我们看代码的时候回明白。
上面解决了滑动问题和无限循环的问题,可是还有一个问题,就是我们怎么在循环过程中,例如我们循环展示的条目是{1,2,3,4,5}
怎么才能展示5之后,又回到头去展示1呢?或者说展示1以后,怎么回到尾去展示5呢?(这两个问题只是方向不同而已)
这里有一个简单的算法,我是这样做的。针对第一种情况,如图(图片是水平的,实际方向是竖直的,但原理一样):
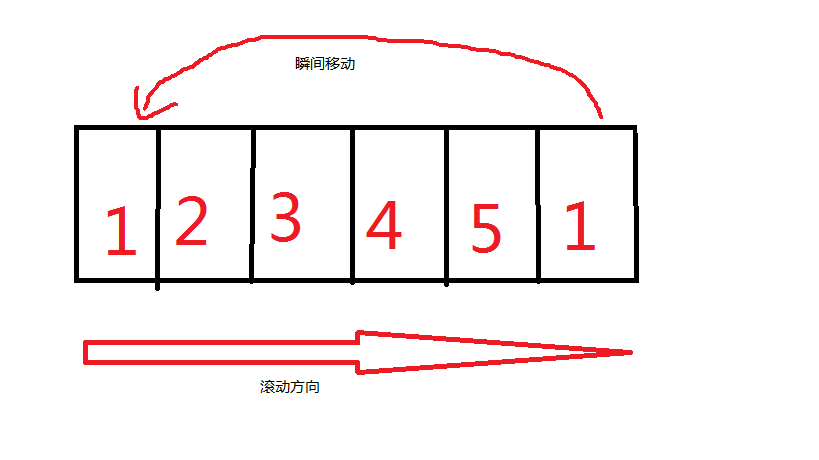
我们看到,对于1-5,我创建了一个{1,2,3,4,5,1}的数组,也就是在末尾增加了一个和头部一样的数。
假设滚动方向是从1到5,到5以后,再往下滚就是1了,再滚动1以后,我马上调用ScrollTo()方法,使整个控件回到头部
由于这个方法使瞬时的(等于cpu渲染速度),肉眼没有办法分辨出这次移动
这样我们就又回到头部了,又可以再次向下滚,重复上述过程。
可能还有朋友没有想明白,假设我们不这样做,也就是数组只有{1,2,3,4,5},当我们滚动5的时候,如果马上让5瞬间到1,这样就丢失了5到1这个滚动过程了。
OK,整个控件的思路和重点就介绍到这里,如果没有想清楚没有关系,我们上代码!
首先是属性和构造函数
/**
 * Created by kaiyi.cky on 2015/8/5.
 * 跑马灯控件
 */
public class VerticalScrollView extends ScrollView{
    private LinearLayout mLinearLayout;
    /**
     * 当前显示的序号
     */
    private int curIndex = 1;
    /**
     * 滚动方向
     * 1为向下,-1为向上
     */
    private int direction = 1;
    /**
     * 滚动间隔时间
     */
    private int spentTime = 2000;

    private final static int SCROLL_WHAT = 99;
    /**
     * 自定义Scroller来控制smoothScroll的动画时间
     */
    private CustomDurationScroller scroller = null;
    /**
     * 滚动动画时间比率,该比率乘以250ms是动画时间
     */
    private double mScrollFactor = 1d;
    MyHandler myHandler;
    /**
     * 用于数据与布局
     */
    TabAdapter mTabAdapter;

    public VerticalScrollView(Context context) {
        super(context);
        init(context);
    }

    public VerticalScrollView(Context context, AttributeSet attrs, int defStyleAttr) {
        super(context, attrs, defStyleAttr);
        init(context);
    }

    public VerticalScrollView(Context context, AttributeSet attrs) {
        super(context, attrs);
        init(context);
    }

    public void init(Context context){
        mLinearLayout = new LinearLayout(context);
        mLinearLayout.setOrientation(LinearLayout.VERTICAL);
        addView(mLinearLayout, new LinearLayout.LayoutParams(MATCH_PARENT, MATCH_PARENT));
        myHandler = new MyHandler();
        setViewPagerScroller();
    }
}然后又一个MyHandler,先看看整个对象是用来做什么的
 /**
     * 用于不断向主线程发送信息,使行状态改变
     * 在handleMessage()里面调用sendMessageDelayed()可以实现自动无限滚动
     */
    private class MyHandler extends Handler {
        @Override
        public void handleMessage(Message msg) {
            super.handleMessage(msg);
            switch (msg.what){
                case SCROLL_WHAT:
                    SetItemImeediate();
                    setCurrentItem(curIndex+direction);
                    myHandler.removeMessages(SCROLL_WHAT);
                    myHandler.sendEmptyMessageDelayed(SCROLL_WHAT, spentTime);
                    break;
            }
        }
    }
可以看到,这个handler接受到一个消息以后,做了一系列操作,其中我们先关注这两句
myHandler.removeMessages(SCROLL_WHAT);
myHandler.sendEmptyMessageDelayed(SCROLL_WHAT, spentTime);可想而知,在spendTime(我们自己定义的延时,也就是每次滚动的间隔时间)时间以后,myHanlder又会接收到这条信息
在这条信息的最后,又会给自己发一条一样的信息
这里我们就实现了自动无限循环滚动。
可是第一条信息是什么时候发生的呢?聪明的你应该知道,是在
/**
     * 开启动画,必须主动调用
     */
    public void startAutoScroll(){
        myHandler.sendEmptyMessage(SCROLL_WHAT);
    }
接着我们看真实的移动方法,注意到MyHanlder里面首先调用了SetItemImeediate()
/**
     * 瞬间设置当前行
     */
    private void SetItemImeediate(){
        if (direction==1&&curIndex == mTabAdapter.getSize()-1){
            //如果向下滚动并且滚动到最后一条,瞬间跳跃到第二条,实现循环效果
            View v = mLinearLayout.getChildAt(1);
            scrollTo((int) v.getX(), (int) v.getY());
            curIndex = 1;
        }else if (direction==-1&&curIndex == 0){
            //如果向上滚动并且滚动到第一条,瞬间跳跃到倒数第二条,实现循环效果
            View v = mLinearLayout.getChildAt(mTabAdapter.getSize()-2);
            scrollTo((int) v.getX(), (int) v.getY());
            curIndex = mTabAdapter.getSize()-2;
        }
    }
这个方法,就是思路里面提到的,瞬间跳动的方法,判断当前滚动到的条目是不是最后一条/第一条(根据滚动方向不同)
从而调用ScrollTo()方法,瞬间回到位置。
然后就是实现滚动的
/**
     * 滚动到index行
     * @param index
     */
    public void setCurrentItem(int index){
        View v = mLinearLayout.getChildAt(index);
        smoothScrollTo((int) v.getX(), (int) v.getY());
        curIndex = index;
    }
可以看到,我们只需要或等当前行对象,获取它的坐标X,Y,然后调用smoothScrollTo就可以滚动到它所在的位置了
smoothScrollTo()很方便地为我们实现了滚动动画,但是它也有缺点,就是不能定制动画时间。如果我们希望滚动快一点,慢一点都没有办法调控。
因为这个方法是ScrollView内部的,默认动画时间是250ms,后面我会讲到一个巧妙的方法去解决这个问题。
OK,滚动的实现就是这么简单,开始数据在哪里呢?行布局在哪里添加的呢?
前面说过,我借鉴了Adapter的思想实现数据分离,这里我先来看一下自定义的Adapter类
/**
 * Created by kaiyi.cky on 2015/8/6.
 * 用于使用者自定义处理VerticalScrollView的数据与布局
 */
public abstract class TabAdapter{
    final int mResId;
    private ArrayList<String> textArray = new ArrayList<String>();
    private ArrayList<String> iconArray = new ArrayList<String>();

    public TabAdapter(int resId, String[] texts){
        mResId = resId;
        setTexts(texts);
    }

    public TabAdapter(int resId,String[] texts, String[] icons){
        mResId = resId;
        setIconTexts(texts, icons);
    }

    /**
     * 返回index对应文字
     * @param index
     * @return
     */
    public String getText(int index){
        return textArray.get(index);
    }

    /**
     * 返回index对应icon地址
     * @param index
     * @return
     */
    public String getIcon(int index){
        return iconArray.isEmpty()?"":iconArray.get(index);
    }

    /**
     * 设置文字,不设置图标
     * @param texts
     * @throws Exception
     */
    private void setTexts(String[] texts){
        setIconTexts(texts, null);
    }

    /**
     * 设置文字和图标
     * 要求texts必须不为空
     * @param texts
     * @param icons
     */
    private void setIconTexts(String[] texts, String[] icons) {
        if(texts==null||texts.length<=0) return;
        if(icons!=null){
            if(icons.length<=0||texts.length!=icons.length) return;
        }

        textArray.clear();
        textArray.add(texts[texts.length - 1]);
        textArray.addAll(Arrays.asList(texts));
        textArray.add(texts[0]);

        iconArray.clear();
        if(icons!=null&&icons.length!=0) {
            iconArray.add(icons[icons.length - 1]);
            iconArray.addAll(Arrays.asList(icons));
            iconArray.add(icons[0]);
        }
    }

    /**
     * 返回数据条目总数
     * @return
     */
    public int getSize(){
        return textArray.size();
    }

    /**
     * 必须继承该方法,在该方法内可以自定义布局文字,图标等
     * @param v
     * @param text
     * @param icon
     */
    public abstract void getView(View v,String text,String icon);
}
这个类是一个抽象类,其中getView()是一个抽象方法,我们必须继承。
从构造函数我们可以看出,必须为其提供一个布局文件和一个数组作为文字数据
然后我对数据做了一些处理,其实就是添加了头尾,目的是实现循环
例如我们传入的数组是{1,2,3,4,5},在构造函数里面,我就要转换成{1,2,3,4,5,1}存储起来啊,这和前面说到的原理是一致的。
当然icon也就是图片地址,我们不一定要传,函数如下:
/**
     * 设置文字和图标
     * 要求texts必须不为空
     * @param texts
     * @param icons
     */
    private void setIconTexts(String[] texts, String[] icons) {
        if(texts==null||texts.length<=0) return;
        if(icons!=null){
            if(icons.length<=0||texts.length!=icons.length) return;
        }

        textArray.clear();
        textArray.add(texts[texts.length - 1]);//将最后一个元素加到头
        textArray.addAll(Arrays.asList(texts));
        textArray.add(texts[0]);//将第一个元素加到尾

        iconArray.clear();
        if(icons!=null&&icons.length!=0) {
            iconArray.add(icons[icons.length - 1]);
            iconArray.addAll(Arrays.asList(icons));
            iconArray.add(icons[0]);
        }
    }
OK,我们在回过头来看一下怎么使用这个Adapter,在Activity里面是这样使用的
//自定义行布局和数据
        mscroll.setTabAdapter(new TabAdapter(R.layout.vertical_scroll_item,
                new String[]{"哈哈", "呵呵", "哦哦"}){

            @Override
            public void getView(View v,String text,String icon) {
                TextView t = (TextView) v.findViewById(R.id.item_text);
                t.setText(text);
            }
});然后我们在getView()方法里面,就可以获得由行布局渲染的View对象了,有了这个View对象,使用者就可以根据需要设置文字啊,或者别的信息
关键是setAdapter()方法做了什么,怎么getView()方法可以获得这个View对象呢?
看代码:
/**
     * 该函数必须在startAutoScroll()之前调用
     * @param mTabAdapter
     */
    public void setTabAdapter(TabAdapter mTabAdapter) {
        this.mTabAdapter = mTabAdapter;
        notifyDataSetChanged();
}/**
* 逐个添加布局
*/
private void notifyDataSetChanged(){
mLinearLayout.removeAllViews();
for(int i=0;i<mTabAdapter.getSize();i++){
if(mTabAdapter!=null){
addTab(i);
}
}
requestLayout();
}/**
* 添加布局
* @param index
*/
private void addTab(int index){
View v = LayoutInflater.from(getContext()).inflate(mTabAdapter.mResId,mLinearLayout,false);
mTabAdapter.getView(v,mTabAdapter.getText(index),mTabAdapter.getIcon(index));
mLinearLayout.addView(v);
}
就是这样我们调用了getView(),所以getView()就会被执行,我们自定义的东西就会执行!
最后将view添加到LinearLayout就可以了。
到此为止,整个控件,从自动无限滚动,循环滚动,和根据数据添加布局,这几个方面都说完了。
最后,让我们一起来关注怎么控制动画速度的问题。
我们注意到,在VerticalScrollView构造函数里面,调用了setViewPagerScroller()方法,这个方法使做什么的呢?
看看:
/**
* 使用反射设置Scroller
*/
private void setViewPagerScroller() {
try {
Field scrollerField = ScrollView.class.getDeclaredField("mScroller");
scrollerField.setAccessible(true);
scroller = new CustomDurationScroller(getContext());
scroller.setScrollDurationFactor(mScrollFactor);
scrollerField.set(this, scroller);
} catch (Exception e) {
e.printStackTrace();
}
}通过反射设置Scroller,如果看过我以前的文章 http://blog.csdn.net/crazy__chen/article/details/45896961,一定指定Scroller是用来控制滑动的一个辅助类
而实际上ScrollView内部,也是通过这个类来提供滑动信息的,我们看一段ScrollView的源码:
public class ScrollView extends FrameLayout {
static final int ANIMATED_SCROLL_GAP = 250;
static final float MAX_SCROLL_FACTOR = 0.5f;
private static final String TAG = "ScrollView";
private long mLastScroll;
private final Rect mTempRect = new Rect();
private OverScroller mScroller;我们看到在ScrollView内部,有一个私有的OverScroller类型的mScroller对象,就是这个对象来控制动画速度的。
问题是这个对象是私有的啊,我们没有办法获得,除了使用反射!
我们用反射获得这个属性以后,为这个属性重新设置一个值,这个值就是我们自己定义的CustomDurationScroller啦
我看看:
/**
* 自定义Scroller来控制smoothScroll的动画时间
*/
private class CustomDurationScroller extends OverScroller{
private double scrollFactor = 1;
public CustomDurationScroller(Context context) {
super(context);
}
/**
* 设置动画时长比,默认动画时间是250ms
*/
public void setScrollDurationFactor(double scrollFactor) {
this.scrollFactor = scrollFactor;
}
@Override
public void startScroll(int startX, int startY, int dx, int dy, int duration) {
super.startScroll(startX, startY, dx, dy, (int)(duration * scrollFactor));
}
}由于它拥有OverScroller的所有功能,所以不会对原理的ScrollView造成影响。
通过反射,我们就巧妙地解决了这个问题。
最后VerticalScrollView只要提供一个set方法来让使用者可以设置scrollFactor就可以了
public void setScrollFactor(double scrollFactor){
mScrollFactor = scrollFactor>0?scrollFactor:1;
}OK,到此为止,所有的问题都迎刃而解啦,大家可以随意使用这个控件,定制自己需要的效果哦!
源码下载地址:http://download.csdn.net/detail/kangaroo835127729/8980817
转载请注明出处!http://blog.csdn.net/crazy__chen/article/details/47375419
最后贴上源码:
/**
* Created by kaiyi.cky on 2015/8/5.
* 跑马灯控件
*/
public class VerticalScrollView extends ScrollView{
private LinearLayout mLinearLayout;
/**
* 当前显示的序号
*/
private int curIndex = 1;
/**
* 滚动方向
* 1为向下,-1为向上
*/
private int direction = 1;
/**
* 滚动间隔时间
*/
private int spentTime = 2000;
private final static int SCROLL_WHAT = 99;
/**
* 自定义Scroller来控制smoothScroll的动画时间
*/
private CustomDurationScroller scroller = null;
/**
* 滚动动画时间比率,该比率乘以250ms是动画时间
*/
private double mScrollFactor = 1d;
MyHandler myHandler;
/**
* 用于数据与布局
*/
TabAdapter mTabAdapter;
public VerticalScrollView(Context context) {
super(context);
init(context);
}
public VerticalScrollView(Context context, AttributeSet attrs, int defStyleAttr) {
super(context, attrs, defStyleAttr);
init(context);
}
public VerticalScrollView(Context context, AttributeSet attrs) {
super(context, attrs);
init(context);
}
public void init(Context context){
mLinearLayout = new LinearLayout(context);
mLinearLayout.setOrientation(LinearLayout.VERTICAL);
addView(mLinearLayout, new LinearLayout.LayoutParams(MATCH_PARENT, MATCH_PARENT));
myHandler = new MyHandler();
setViewPagerScroller();
}
/**
* 使用反射设置Scroller
*/
private void setViewPagerScroller() {
try {
Field scrollerField = ScrollView.class.getDeclaredField("mScroller");
scrollerField.setAccessible(true);
scroller = new CustomDurationScroller(getContext());
scroller.setScrollDurationFactor(mScrollFactor);
scrollerField.set(this, scroller);
} catch (Exception e) {
e.printStackTrace();
}
}
/**
* 自定义Scroller来控制smoothScroll的动画时间
*/
private class CustomDurationScroller extends OverScroller{
private double scrollFactor = 1;
public CustomDurationScroller(Context context) {
super(context);
}
/**
* 设置动画时长比,默认动画时间是250ms
*/
public void setScrollDurationFactor(double scrollFactor) {
this.scrollFactor = scrollFactor;
}
@Override
public void startScroll(int startX, int startY, int dx, int dy, int duration) {
super.startScroll(startX, startY, dx, dy, (int)(duration * scrollFactor));
}
}
/**
* 用于不断向主线程发送信息,使行状态改变
* 在handleMessage()里面调用sendMessageDelayed()可以实现自动无限滚动
*/
private class MyHandler extends Handler {
@Override
public void handleMessage(Message msg) {
super.handleMessage(msg);
switch (msg.what){
case SCROLL_WHAT:
SetItemImeediate();
setCurrentItem(curIndex+direction);
myHandler.removeMessages(SCROLL_WHAT);
myHandler.sendEmptyMessageDelayed(SCROLL_WHAT, spentTime);
break;
}
}
}
/**
* 瞬间设置当前行
*/
private void SetItemImeediate(){
if (direction==1&&curIndex == mTabAdapter.getSize()-1){
//如果向下滚动并且滚动到最后一条,瞬间跳跃到第二条,实现循环效果
View v = mLinearLayout.getChildAt(1);
scrollTo((int) v.getX(), (int) v.getY());
curIndex = 1;
}else if (direction==-1&&curIndex == 0){
//如果向上滚动并且滚动到第一条,瞬间跳跃到倒数第二条,实现循环效果
View v = mLinearLayout.getChildAt(mTabAdapter.getSize()-2);
scrollTo((int) v.getX(), (int) v.getY());
curIndex = mTabAdapter.getSize()-2;
}
}
/**
* 滚动到index行
* @param index
*/
public void setCurrentItem(int index){
View v = mLinearLayout.getChildAt(index);
smoothScrollTo((int) v.getX(), (int) v.getY());
curIndex = index;
}
/**
     * 逐个添加布局
     */
    private void notifyDataSetChanged(){
        mLinearLayout.removeAllViews();
        for(int i=0;i<mTabAdapter.getSize();i++){
            if(mTabAdapter!=null){
                addTab(i);
            }
        }
        requestLayout();
    }
/**
* 开启动画,必须主动调用
*/
public void startAutoScroll(){
myHandler.sendEmptyMessage(SCROLL_WHAT);
}
/**
     * 添加布局
     * @param index
     */
    private void addTab(int index){
        View v = LayoutInflater.from(getContext()).inflate(mTabAdapter.mResId,mLinearLayout,false);
        mTabAdapter.getView(v,mTabAdapter.getText(index),mTabAdapter.getIcon(index));
        mLinearLayout.addView(v);
    }
/**
* 该函数必须在startAutoScroll()之前调用
* @param mTabAdapter
*/
public void setTabAdapter(TabAdapter mTabAdapter) {
this.mTabAdapter = mTabAdapter;
notifyDataSetChanged();
}
@Override
public boolean onTouchEvent(MotionEvent ev) {
return true;//返回true,防止手动滑动ScrollView
}
public int getSpentTime() {
return spentTime;
}
public void setSpentTime(int spentTime) {
this.spentTime = spentTime;
}
public int getDirection() {
return direction;
}
public void setDirection(int direction) {
this.direction = direction>0?1:-1;
}
public void setScrollFactor(double scrollFactor){
        mScrollFactor = scrollFactor>0?scrollFactor:1;
    }
}


 5104
5104

 被折叠的 条评论
为什么被折叠?
被折叠的 条评论
为什么被折叠?
 到【灌水乐园】发言


