


IOS6以后,若想在项目中支持横屏,我们首先需要在plist文件中添加支持横屏的设置,否则有些代码设置将会失效。
有来那个方式设置:
1、在pilist的Supported interface orientations 字段中添加
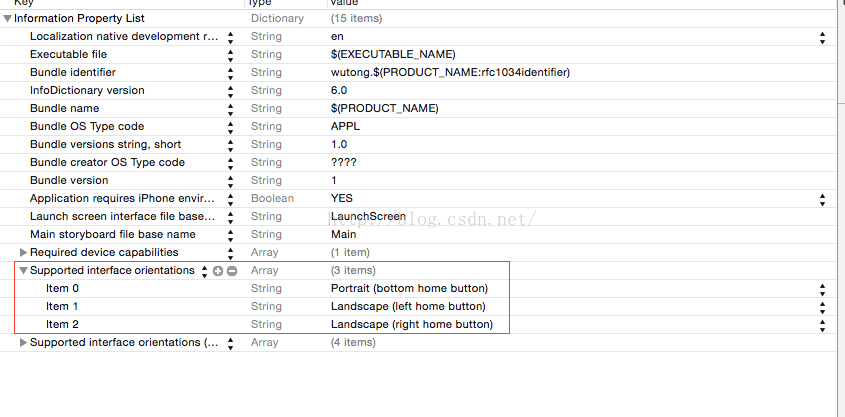
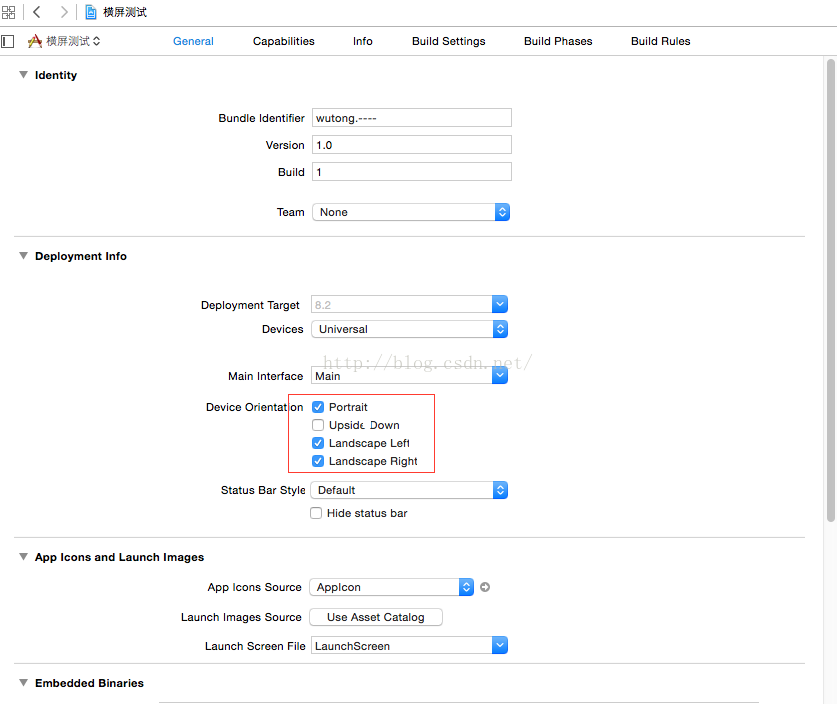
2、在Xcode的设置中勾选
上述方法目前均不需要再自己手动添加
现在我们来看决定屏幕方向的几个函数:
在IOS6之前,我们只需通过一个函数
- (BOOL) shouldAutorotateToInterfaceOrientation:(UIInterfaceOrientation)toInterfaceOrientation {
return (toInterfaceOrientation == UIInterfaceOrientationLandscapeRight);
}
就可以支持指定控制器的旋转。通过新的文档,我们可以看到这个方法在6.0后被标记为过时。
我们通过下面两个方法来代替:
//是否允许屏幕旋转
return YES;
}
//支持的方向
- (NSUInteger)supportedInterfaceOrientations {
return UIInterfaceOrientationMaskLandscapeRight;
}
注意:
如果你们项目中的RootViewController是导航,你会发现,你在Push出来的视图中添加刚才的代码并没有起作用,原因是导航,并没有进行设置,我们创建一个文件,继承于NavigationController。在里面重写刚才的方法,这么做后,屏幕确实横了过来,并且这个导航push的所有子界面都将横屏,(同理,如果根视图控制器是tabBar,则我们需要在tabBar中做操作。)但是如果用storyboard画的导航条界面该怎么办呢?如果是整个项目都是横屏,可以直接设置:
或者:
1、屏蔽AppDelegate下面的屏幕旋转方法
#pragma mark - 屏幕旋转的
//- (UIInterfaceOrientationMask)application:(UIApplication*)application supportedInterfaceOrientationsForWindow:(UIWindow*)window
//{
//    return UIInterfaceOrientationMaskPortrait;
//}
以下代码纯属复制,为自己方便,防止链接失效
---------------------------------------------------------分割线-----------------------------------------------------------------------------
2、对UINavigationController和UITabBarController写两个扩展类别,此东西不需要在具体的ViewController中引用
UINavigationController+Autorotate.h

//
//  UINavigationController+Autorotate.h
//  fitmiss
//
//  Created by bill on 15/12/16.
//  Copyright © 2015年 lear. All rights reserved.
//

#import <UIKit/UIKit.h>

@interface UINavigationController (Autorotate)

@end
UINavigationController+Autorotate.m
//
//  UINavigationController+Autorotate.m
//  fitmiss
//
//  Created by bill on 15/12/16.
//  Copyright © 2015年 lear. All rights reserved.
//

#import "UINavigationController+Autorotate.h"


@implementation UINavigationController (Autorotate)

- (BOOL)shouldAutorotate
{
    return [self.topViewController shouldAutorotate];
}

- (NSUInteger)supportedInterfaceOrientations
{
    return [self.topViewController supportedInterfaceOrientations];
}

- (UIInterfaceOrientation)preferredInterfaceOrientationForPresentation
{
    return [self.topViewController preferredInterfaceOrientationForPresentation];
}

@end
UITabBarController+Autorotate.h
//
//  UITabBarController+Autorotate.h
//  fitmiss
//
//  Created by bill on 15/12/16.
//  Copyright © 2015年 lear. All rights reserved.
//

#import <UIKit/UIKit.h>

@interface UITabBarController (Autorotate)

@end
UITabBarController+Autorotate.m
//
//  UITabBarController+Autorotate.m
//  fitmiss
//
//  Created by bill on 15/12/16.
//  Copyright © 2015年 lear. All rights reserved.
//

#import "UITabBarController+Autorotate.h"

@implementation UITabBarController (Autorotate)

- (BOOL)shouldAutorotate
{
    return [self.selectedViewController shouldAutorotate];
}

- (NSUInteger)supportedInterfaceOrientations
{
    return [self.selectedViewController supportedInterfaceOrientations];
}

- (UIInterfaceOrientation)preferredInterfaceOrientationForPresentation
{
    return [self.selectedViewController preferredInterfaceOrientationForPresentation];
}

@end
3.在使用的ViewController中的再次重写这三个方法,可以在根ViewController中重写如下方法,就能实现竖屏,子ViewController再重写实现旋转
- (BOOL)shouldAutorotate{
    //是否允许转屏
    return NO;
}

- (UIInterfaceOrientationMask)supportedInterfaceOrientations
{
    //viewController所支持的全部旋转方向
    return UIInterfaceOrientationMaskPortrait | UIInterfaceOrientationMaskLandscapeLeft | UIInterfaceOrientationMaskLandscapeRight;
}

- (UIInterfaceOrientation)preferredInterfaceOrientationForPresentation
{
    //viewController初始显示的方向
    return UIInterfaceOrientationPortrait;
}
注意:在使用的时候发现在ios9以下的版本出现一个奇怪的问题,就是编译出来的app默认是横的,解决办法是看app.plist下面Supported interface orientations里的列表中,正屏的是不是排在第一个。
摘自网上网友的回复内容,如下:
以下方法仅对deploy target大于等于iOS6的工程有效,如果题主的应用需要支持iOS5(默哀),请pass。
- 在info.plist中设置方向,包含你需要的所有方向,以题中意,UpSideDown和LandScapeLeft;
- 继承UITabBarController,override以下三个方法
 - (BOOL)shouldAutorotate
{
    return [self.selectedViewController shouldAutorotate];
}

 - (NSUInteger)supportedInterfaceOrientations
{
return [self.selectedViewController supportedInterfaceOrientations]; } - (UIInterfaceOrientation)preferredInterfaceOrientationForPresentation { return [self.selectedViewController preferredInterfaceOrientationForPresentation]; } - 继承UINavigationController,override和UITabBarController中相同的方法,将selectedViewController改为topViewController
 - (BOOL)shouldAutorotate
{
    return [self.topViewController shouldAutorotate];
}

 - (NSUInteger)supportedInterfaceOrientations
{
return [self.topViewController supportedInterfaceOrientations]; } - (UIInterfaceOrientation)preferredInterfaceOrientationForPresentation { return [self.topViewController preferredInterfaceOrientationForPresentation]; } - 在真正实现界面的ViewController里,override上面这三个方法,override规则如下:
preferredInterfaceOrientationForPresentation表示viewController初始显示时的方向;
supportedInterfaceOrientations是在该viewController中支持的所有方向;
shouldAutorotate表示是否允许旋屏。
流程说明
首先,对于任意一个viewController,iOS会以info.plist中的设置和当前viewController的preferredInterfaceOrientationForPresentation和supportedInterfaceOrientations三者支持的方法做一个交运算,若交集不为空,则以preferredInterfaceOrientationForPresentation为初始方向,交集中的所有方向均支持,但仅在shouldAutorotate返回YES时,允许从初始方向旋转至其他方向。若交集为空,进入viewController时即crash,错误信息中会提示交集为空。
其次,UINavigationController稍有些特别,难以用常规API做到同一个naviVC中的ViewController在不同方向间自如地切换。(如果去SO之类的地方搜索,会找到一个present empty viewController and then dismiss it之类的hacky trick,不太建议使用),如果要在横竖屏间切换,建议使用presentXXX方法。
再次,AppDelegate中有一个委托方法可以动态的设置应用支持的旋转方向,且此委托的返回值会覆盖info.plist中的固定设置。使用该方法的便利之处不言自明,但缺点是搞明白当前哪个ViewController即将要被显示,很可能会导致耦合增加;
最后,以上均为个人在iOS8 SDK下得到的实践结果,请题主结合工程实际参考使用。
---------------------------------------------------------分割线-----------------------------------------------------------------------------


 5718
5718


 被折叠的 条评论
为什么被折叠?
被折叠的 条评论
为什么被折叠?
 到【灌水乐园】发言


