


1 uboot编译:
打补丁:patch -p1 < ../u-boot-1.1.6_jz2440.patch //-p1忽略掉第1个斜杠之前的数据
配置:make 100ask24x0_config
编译:make
执行make 100ask24x0_config后发生了什么
uboot的目标:
1 从flash中读取内核放到ram中
2 启动内核
uboot应有的功能:
1 读flash
2 初始化ram、初始化时钟、初始化串口
3 启动内核
1.1 uboot配置:
make 100ask24x0_config //执行Makefile中的内容如下:
SRCTREE := $(CURDIR)
MKCONFIG := $(SRCTREE)/mkconfig
100ask24x0_config:unconfig
//'$@’的值是目标100ask24x0_config,所以$(@:_config=) 为100ask24x0
@$(MKCONFIG) $(@:_config=) arm arm920t 100ask24x0 NULL s3c24x0
=mkconfig 100ask24x0 arm arm920t 100ask24x0 NULL s3c24x0 //所以是执行这个脚本命令,进入mkconfig脚本执行
#mkconfig 100ask24x0 arm arm920t 100ask24x0 NULL s3c24x0 //执行的内容如下:
#mkconfig 100ask24x0 arm arm920t 100ask24x0 NULL s3c24x0

APPEND=no	# Default: Create new config file
BOARD_NAME=""	# Name to print in make output

BOARD_NAME=smdk2410


echo "Configuring for ${BOARD_NAME} board..."

#
# Create link to architecture specific headers
#
# $1 传入的第一个参数  $x 传入的第x个参数
# $# 传入的参数的个数
#./mkconfig  smdk2410 arm arm920t smdk2410 NULL s3c24x0
#$0 		     $1	      $2	 $3	    $4            $5     $6
//创建asm到 asm-$2的软连接
        cd ./include
	rm -f asm
	ln -s asm-$2 asm   //ln -s asm-arm asm

//创建asm-$2/arch到 arch-$6的软连接
        rm -f asm-$2/arch   //rm -f asm-arm/arch
	ln -s ${LNPREFIX}arch-$6 asm-$2/arch  //ln -s arch-s3c24x0 asm-arm/arch


//创建asm-$2/proc到proc-armv
	rm -f asm-$2/proc      //rm -f asm- arm/proc
	ln -s ${LNPREFIX}proc-armv asm-$2/proc  // ln -s proc-armv asm-arm/proc


#
# Create include file for Make
#
echo "ARCH   = $2" >  config.mk
echo "CPU    = $3" >> config.mk
echo "BOARD  = $4" >> config.mk
# ">"新建文件
#">>" 追加数据到文件
#内容为
#ARCH=arm
#CPU=arm920t
#BOART = 100ask24x0
#SOC=s3c24x0
//第五个参数存在且第五个参数不等于null的话,执行
[ "$5" ] && [ "$5" != "NULL" ] && echo "VENDOR = $5" >> config.mk

[ "$6" ] && [ "$6" != "NULL" ] && echo "SOC    = $6" >> config.mk

#
# Create board specific header file
#

	> config.h		# Create new config file

echo "/* Automatically generated - do not edit */" >>config.h
echo "#include <configs/smdk2410.h>" >>config.h

exit 0
uboot配置结果:
创建到平台/开发板相关的头文件连接:
ln -s asm-$2 asm //ln -s asm-arm asm
ln -s arch-$6 asm-$2/arch //ln -s arch-s3c24x0 asm-arm/arch
ln -s proc-armv asm-$2/proc // ln -s proc-armv asm-arm/proc
创建顶层Makefile包含的文件include/config.mk,内容如下:
ARCH =$2 #ARCH=arm
CPU = $3 #CPU=arm920t
BOARD = $4 #BOART = 100ask24x0
VENDOR = $5
SOC = $6 #SOC=s3c24x0
创建开发板相关的头文件include/config.h,内容如下:
#include <configs/smdk2410.h>
注:uboot通过include/config.h文件调用include/configs/smdk2410.h文件。smdk2410.h文件就是针对板子的配置文件,内核启动参数等都在其中
2 uboot源码分析
2.1 uboot第一阶段代码分析
1 硬件设备初始化2 为加载bootloader的第二阶段准备ram空间3 复杂bootloader的第二阶段代码到ram空间中4 设置好栈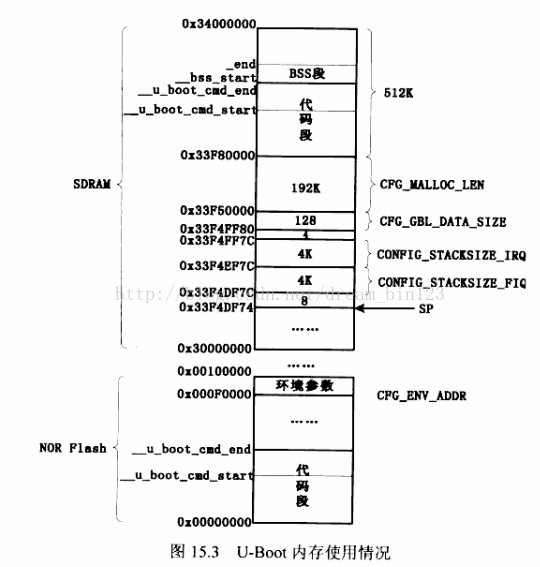
5 转到第二阶段的代码入口点
2.2 uboot第二阶段代码分析
第二阶段从lib-arm/board.c中的start_armboot函数开始:
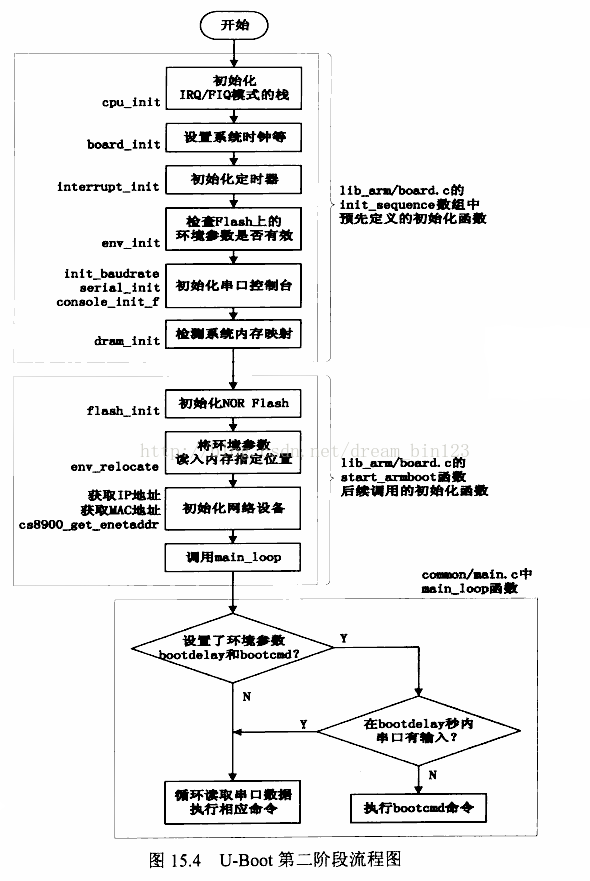
1 初始化本阶段要使用到的硬件设备2 检测系统内存映射3 uboot命令的格式也就是说我们在uboot的界面输入的命令都是传给U_BOOT_CMD(name,maxargs,repeatable,command,"usage","help")函数执行的4 为内核设置启动参数uboot也是通过 标记列表向内核传递参数的。对应arm架构的cpu,都是通过lib_arm/armlinux.c中的do_bootm_linux函数来执行内核的。这个函数中,设置标记列表,最后通过“theKernel(0,bd->bi_arch_number,bd->bi_boot_params)”调用内核。其中,theKernel指向内核存放的地址(对于arm架构的cpu,通常是0x30008000),bd->bi_arch_number就是前面board_init函数设置的机器id,而bd->bi_boot_params就是标记列表的开始地址。
3 bootcmd参数、bootargs参数是如何传入内核执行的
2.2.1 main_loop函数详解
uboot main_loop函数分析:http://www.cnblogs.com/amanlikethis/p/3555516.html
main_loop函数承接uboot启动第二阶段的结尾;摘要:main_loop()setenv ("bootcount", bcs_set);bcs = getenv ("bootlimit");if (!getenv("mtdparts"))
{
run_command("mtdparts default", 0);
}
else
{
mtdparts_init();
}s = getenv ("bootdelay");s = getenv ("bootcmd"); // 获取启动命令参数//在启动命令非0(有启动命令)的情况下,如果在启动延时时间到之前按下键终止了,abortboot返回1,否则如果一 //直没有键按下,直到启动延时时间到,那么函数返回0。所以,如果按下键了,就可以跳过启动操作系统;如果没 //按就直接启动操作系统了。
if (bootdelay >= 0 && s && !abortboot (bootdelay)){
# ifdef CONFIG_AUTOBOOT_KEYED
int prev = disable_ctrlc(1); /* disable Control C checking */
# endif
# ifndef CFG_HUSH_PARSER
{
printf("Booting Linux ...\n");
run_command (s, 0); //运行启动命令,启动操作系统 通过bootcmd参数启动内核,
}
# else
parse_string_outer(s, FLAG_PARSE_SEMICOLON |
FLAG_EXIT_FROM_LOOP);
# endif
# ifdef CONFIG_AUTOBOOT_KEYED
disable_ctrlc(prev); /* restore Control C checking */
# endif
}
注: 在 do_boot_linux 函数中会会调用“ theKernel (0, bd->bi_arch_number, bd->bi_boot_params) ”启动内核,其 theKernel 指向内核存放内存地址,这个用来实现程序跳转到内核存在的内存地址处,开始内核的执行。 bd->bi_arch_number 就是前面 board_init 函数设置的机器类型 ID ,在内核引导阶段的 __lookup_processor_type 函数已经用到。而 bd->bi_boot_params 就是标记列表的开始地址,预先存在该地址的存放一个 tag 列表, tag 列表将在 setup_arch 函数中进行初步的处理。
也就是说 bootargs参数也在表中,也是被传给setup_arch函数解析执行的。
4 修改默认参数以方便使用
为了使用uboot时,减少一些设置,现在修改配置文件 include/configs/smdk2410.h,增加默认配置参数,果然发现默认配置参数都是写在include/config.h相关路径下的,uboot下修改内核参数后的saveenv就是将新的参数写入这个文件的对应位置中了。
uboot通过theKernel(0,bd->bi_arch_number,bd->bi_boot_params)函数调用启动内核,
0,bd->bi_arch_number,bd->bi_boot_params就是uboot传给内核的参数;
theKernel指向内核存放的地址(对于arm架构的cpu,通常是0x30008000),
bd->bi_arm_number 是board_init函数设置的机器id,
bd->bi_boot_params是标记列表的开始地址。
5 标记列表
除了约定好参数存放的地址外,还要规定参数的结构。Linux 2.4.x 以后的内核都期望 以
标记列表(tagged list)的形式来传递启动参数 。标记,就是一种数据结构;标记列表,就是
挨着存放的多个标记。
标记列表以标记ATAG_CORE 开始,以标记ATAG_NONE 结束。
标记的数据结构为tag,它由一个tag_header 结构和一个联合(union)组成。
tag_header结构表示标记的类型及长度,比如是表示内存还是表示命令行参数等。
对于不同类型的标记使用不同的联合(union),比如表示内存时使用tag_mem32,表示命令行时使用tag_cmdline。
数据结构tag 和tag_header 定义在Linux 内核源码的uboot/include/asm-arm/setup.h头文件中
标记列表中存放的就是启动参数,有默认的启动参数,如果在启动时进入uboot界面设置启动参数,后再继续启动就是把新参数代替旧参数
放入标记列表中用于启动。


 3498
3498


 被折叠的 条评论
为什么被折叠?
被折叠的 条评论
为什么被折叠?
 到【灌水乐园】发言


