准备3台服务器,192.168.174.128,192.168.174.130,192.168.174.131.其中192.168.174.128作为master,其他2台作为minions.
截止2015年9月1日,CentOS 已经把 Kubernetes 加入官方源,所以现在安装Kubernetes已经方便很多。
master包含kube-apiserver kube-scheduler kube-controller-manager etcd四个组件
node包含kube-proxy kubelet flannel 3个组件
1. kube-apiserver:位于master节点,接受用户请求。
2. kube-scheduler:位于master节点,负责资源调度,即pod建在哪个node节点。
3. kube-controller-manager:位于master节点,包含ReplicationManager,Endpointscontroller,Namespacecontroller,and Nodecontroller等。
4. etcd:分布式键值存储系统,共享整个集群的资源对象信息。
5. kubelet:位于node节点,负责维护在特定主机上运行的pod。
6. kube-proxy:位于node节点,它起的作用是一个服务代理的角色
1.准备工作
在3台服务器上都执行下面的操作。
1关闭防火墙
每台机器禁用iptables 避免和docker 的iptables冲突:
#systemctl stop firewalld
#systemctl disable firewalld
2安装NTP
为了让各个服务器的时间保持一致,还需要为所有的服务器安装NTP:
# yum -y install ntp
# systemctl start ntpd
# systemctl enable ntpd
3禁用selinux
#vi /etc/selinux/config

#SELINUX=enforcing
SELINUX=disabled
2.部署master
1.安装etcd和kubernetes(这会自动安装docker)
[root@localhost etc]# yum -y install etcd kubernetes-master
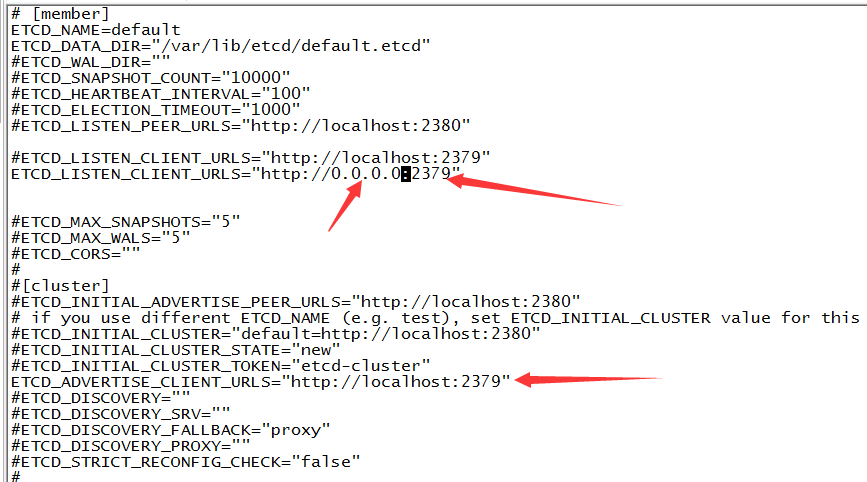
2.修改etcd.conf
[root@localhost etc]# vi /etc/etcd/etcd.conf
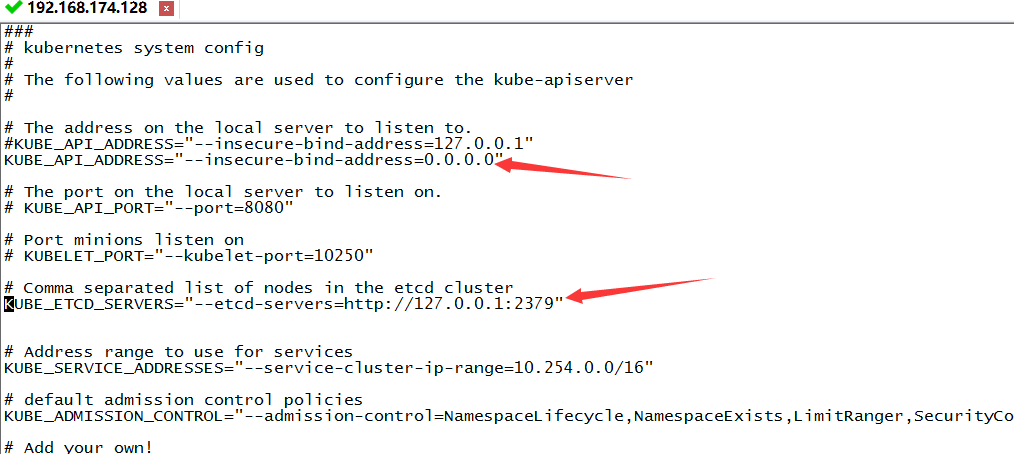
3.修改kube-master配置文件
[root@localhost kubernetes]# vi /etc/kubernetes/apiserver
[root@localhost /]# vi /etc/kubernetes/controller-manager
# Add your own!
#KUBE_CONTROLLER_MANAGER_ARGS=""
KUBE_CONTROLLER_MANAGER_ARGS="--node-monitor-grace-period=10s --pod-eviction-timeout=10s"
~
KUBE_LOGTOSTDERR="--logtostderr=true"
KUBE_LOG_LEVEL="--v=0"
KUBE_ALLOW_PRIV="--allow_privileged=false"
KUBE_MASTER="--master=http://192.168.174.128:8080"
4.启动服务
让 etcd kube-apiserver kube-scheduler kube-controller-manager 随开机启动
[root@localhost /]# systemctl enable etcd kube-apiserver kube-scheduler kube-controller-manager启动
[root@localhost /]# systemctl start etcd kube-apiserver kube-scheduler kube-controller-manager5.配置etcd中的网络
定义etcd中的网络配置,nodeN中的flannel service会拉取此配置
[root@localhost /]# etcdctl mk /coreos.com/network/config '{"Network":"172.17.0.0/16"}'
3.部署minions(node节点)
1安装kubernetes-node和 flannel(会自动安装docker)
[root@localhost ~]# yum -y install kubernetes-node flannel2修改kube-node
[root@localhost ~]# vi /etc/kubernetes/config
KUBE_LOGTOSTDERR="--logtostderr=true"

# journal message level, 0 is debug
KUBE_LOG_LEVEL="--v=0"

# Should this cluster be allowed to run privileged docker containers
KUBE_ALLOW_PRIV="--allow-privileged=false"

# How the controller-manager, scheduler, and proxy find the apiserver
#KUBE_MASTER="--master=http://127.0.0.1:8080"
KUBE_MASTER="--master=http://192.168.174.128:8080"
hostname改为node自己的ip或名称
[root@localhost ~]# vi /etc/kubernetes/kubelet
###
# kubernetes kubelet (minion) config

# The address for the info server to serve on (set to 0.0.0.0 or "" for all interfaces)
KUBELET_ADDRESS="--address=127.0.0.1"

# The port for the info server to serve on
# KUBELET_PORT="--port=10250"

# You may leave this blank to use the actual hostname
KUBELET_HOSTNAME="--hostname-override=192.168.174.130"

# location of the api-server
KUBELET_API_SERVER="--api-servers=http://192.168.174.128:8080"

# pod infrastructure container
KUBELET_POD_INFRA_CONTAINER="--pod-infra-container-image=registry.access.redhat.com/rhel7/pod-infrastructure:latest"

# Add your own!
#KUBELET_ARGS=""
KUBELET_ARGS="--pod-infra-container-image=kubernetes/pause"
[root@localhost ~]#
3修改flannel
为etcd服务配置flannel,修改配置文件 /etc/sysconfig/flanneld
[root@localhost ~]# vi /etc/sysconfig/flanneld
# etcd url location.  Point this to the server where etcd runs
#FLANNEL_ETCD="http://127.0.0.1:2379"
FLANNEL_ETCD="http://192.168.174.128:2379"


# etcd config key.  This is the configuration key that flannel queries
# For address range assignment
#FLANNEL_ETCD_KEY="/atomic.io/network"
FLANNEL_ETCD_KEY="/coreos.com/network"


# Any additional options that you want to pass
FLANNEL_OPTIONS=" -iface=eth0"
FLANNEL_OPTIONS=" -iface=eth0" 其中的eth0是网卡名称(用ifconfig可查询出来,centos7如果你没有改网卡名,那可以是enoXXXXX)
4.启动服务
[root@localhost ~]# systemctl restart flanneld docker
[root@localhost ~]# systemctl start kubelet kube-proxy
[root@localhost ~]# systemctl enable flanneld kubelet kube-proxy
ifconfig下,看到每个minions(node)会有docker0和flannel0这2个网卡。这2个网卡在不同的minons都是不同的.
4.验证
在master上执行
[root@localhost /]# kubectl get nodes
NAME              STATUS    AGE
192.168.174.130   Ready     3m
192.168.174.131   Ready     20m
[root@localhost /]#
这样etcd+flannel + kubernetes在centOS7上就搭建起来了.
5.安装docker仓库
选择其中一台服务器安装docker仓库。参考docker学习11--私有仓库registry设置


 5264
5264


 被折叠的 条评论
为什么被折叠?


