


 本文详细介绍如何使用RIA Services进行数据新增及验证操作,并通过自定义DataForm实现数据验证功能。此外,还介绍了如何利用Silverlight Control Toolkit更换应用程序皮肤。
part1: 如何使用RIA Services
part2: RIA Services更新和验证
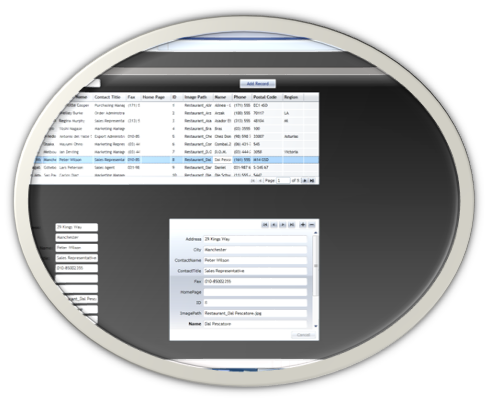
part3:RIA Services数据新增
part4:皮肤的更改
part5:报表的展示
part6:Endpoint的设置
part7:如何使用RIA Service Class Library
part8:url重写和界面友好
1. Custom Dataform用来新增一条记录。
前面那篇文章已经提到使用自定义DataForm来新增记录。可能你会觉得自定义DataForm干嘛,直接使用TextBlock和TextBox就行。
自定义一个Dataform可以让数据的验证更容易的实现。
A. 先定义一个CustomRestaurant类,它继承了那面这两个接口。

下面那么多属性就是我们需要填写的所有字段。
然后我们添加一个验证规则是Name字段必须不为空且大于4个字符串。
public string this[string columnName]
{
get
{
string result = null;
if (columnName == "Name")
{
if (String.IsNullOrEmpty(Name))
result = "Firstname has to be set!";
else if (Name.Length < 3)
result = "Firstname's length has to be at least 5 characters!";
}
return result;
B. 创建一个自定义控件,它的结构如下:

这里使用了两个DependencyProperty,第一个是是否编辑,第二个是让TheRestaurant作为它的一个属性。
我们这里使用Resource Dictionary来存放模板信息:

定义DataForm的模板如下:
<Style TargetType="local:CusRestuarantDataForm">
<Setter Property="Template">
<Setter.Value>
<ControlTemplate TargetType="local:CusRestuarantDataForm">
<Border Background="{TemplateBinding Background}"
BorderBrush="{TemplateBinding BorderBrush}"
BorderThickness="{TemplateBinding BorderThickness}"
CornerRadius="3" Width="{TemplateBinding Width}">
<Grid>
<Grid.RowDefinitions>
<RowDefinition Height="Auto"/>
<RowDefinition Height="Auto"/>
<RowDefinition Height="Auto"/>
<RowDefinition Height="Auto"/>
<RowDefinition Height="Auto"/>
<RowDefinition Height="Auto"/>
<RowDefinition Height="Auto"/>
<RowDefinition Height="Auto"/>
<RowDefinition Height="Auto"/>
</Grid.RowDefinitions>
<Grid.ColumnDefinitions>
<ColumnDefinition Width="150"/>
<ColumnDefinition Width="*"/>
</Grid.ColumnDefinitions>
<TextBlock Grid.Column="0" Grid.Row="0"
Text="Address:" Style="{StaticResource tb}" />
<TextBox Grid.Column="1" Grid.Row="0" x:Name="tAddress" Style="{StaticResource tx}"
Text="{Binding Path=TheRestaurant.Address, Mode=TwoWay, ValidatesOnDataErrors=True}" IsReadOnly="{Binding IsLocked}"/>
<TextBlock Grid.Column="0" Grid.Row="1"
Text="Code:" Style="{StaticResource tb}"/>
<TextBox Grid.Column="1" Grid.Row="1" x:Name="tCode" Style="{StaticResource tx}"
Text="{Binding Path=TheRestaurant.Code, Mode=TwoWay, ValidatesOnDataErrors=True}" IsReadOnly="{Binding IsLocked}"/>
<TextBlock Grid.Column="0" Grid.Row="2" Text="ContactName:" Style="{StaticResource tb}"/>
<TextBox Grid.Column="1" Grid.Row="2" x:Name="tContactName" Style="{StaticResource tx}"
Text="{Binding Path=TheRestaurant.ContactName, Mode=TwoWay}" IsReadOnly="{Binding IsLocked}" />
<TextBlock Grid.Column="0" Grid.Row="3" Text="ContactTitle:" Style="{StaticResource tb}"/>
<TextBox Grid.Column="1" Grid.Row="3" x:Name="tContactTitle" Style="{StaticResource tx}"
Text="{Binding Path=TheRestaurant.ContactTitle, Mode=TwoWay, TargetNullValue=Doctor}" IsReadOnly="{Binding IsLocked}"/>
<TextBlock Grid.Column="0" Grid.Row="4"
Text="Fax:" Style="{StaticResource tb}"/>
<TextBox Grid.Column="1" Grid.Row="4" x:Name="tFax" Style="{StaticResource tx}"
Text="{Binding Path=TheRestaurant.Fax, Mode=TwoWay}" IsReadOnly="{Binding IsLocked}"/>
<TextBlock Grid.Column="0" Grid.Row="5" Text="ID:" Style="{StaticResource tb}"/>
<TextBox Grid.Column="1" Grid.Row="5" x:Name="tID" Style="{StaticResource tx}"
Text="{Binding Path=TheRestaurant.ID, Mode=TwoWay}"
AcceptsReturn="True" TextWrapping="Wrap" IsReadOnly="{Binding IsLocked}"/>
<TextBlock Grid.Column="0" Grid.Row="6" Text="Name:" Style="{StaticResource tb}"/>
<TextBox Grid.Column="1" Grid.Row="6" x:Name="tName" Style="{StaticResource tx}"
Text="{Binding Path=TheRestaurant.Name, Mode=TwoWay, ValidatesOnDataErrors=True}" IsReadOnly="{Binding IsLocked}"/>
<TextBlock Grid.Column="0" Grid.Row="7" Text="Phone:" Style="{StaticResource tb}"/>
<TextBox Grid.Column="1" Grid.Row="7" x:Name="tPhone" Style="{StaticResource tx}"
Text="{Binding Path=TheRestaurant.Phone, Mode=TwoWay, ValidatesOnDataErrors=True}" IsReadOnly="{Binding IsLocked}"/>
<TextBlock Grid.Column="0" Grid.Row="8" Text="Region:"
Style="{StaticResource tb}"/>
<TextBox Grid.Column="1" Grid.Row="8" x:Name="tRegion" Style="{StaticResource tx}"
Text="{Binding Path=TheRestaurant.Region, Mode=TwoWay, TargetNullValue=Beijing, ValidatesOnDataErrors=True}" IsReadOnly="{Binding IsLocked}"/>
</Grid>
</Border>
</ControlTemplate>
</Setter.Value>
</Setter>
</Style>
因为这个是自定义Dataform我们还可以使用数据绑定功能来让此DataForm作为查看每条记录的容器,只需要绑定RIA Service的数据源。
先说如何新增记录吧
需要创建一个子窗体。

在Home.xaml页面添加一个Add Record按钮:

Click事件如下:
NewRestuarant cw = new NewRestuarant();
CusRestuarantDataForm custDataform = new CusRestuarantDataForm();
custDataform.Margin = new Thickness(3);
custDataform.Width = 450;
custDataform.TheRestaurant = new CustomRstaurant();
custDataform.IsLocked = false;
cw.LayoutRoot.Children.Add(custDataform);
cw.HasCloseButton = false;
cw.Title = "New Restuarant Detail";
cw.Closed += (s, args) =>
{
if (cw.DialogResult.Value && custDataform.IsValid)
{
}
};
cw.Closing += (s, args) =>
{
if (!custDataform.IsValid && cw.DialogResult.Value)
{
MessageBox.Show("Some of field values are not valid.");
args.Cancel = true;
}
};
cw.Show();
运行一下,

最后一步是如何使用RIA Service更新数据源了。
在Closed事件发生后加入如下代码:

2. 使用SilverlightControlToolkit中的皮肤。
这里需要使用到ICommand方法。
先创建一个Class:
public class ThemeChangeCommand :ICommand
{
public bool CanExecute(object parameter)
{
return true;
}
public event EventHandler CanExecuteChanged;
public void Execute(object parameter)
{
Theme themeContainer = (Theme)((FrameworkElement)((ContentControl)Application.Current.RootVisual).Content).FindName("ThemeContainer");
string themeName = parameter as string;
if (themeName == null)
{
themeContainer.ThemeUri = null;
}
else
{
themeContainer.ThemeUri =new Uri("/System.Windows.Controls.Theming." + themeName + ";component/Theme.xaml", UriKind.RelativeOrAbsolute);
}
if (CanExecuteChanged != null)
CanExecuteChanged(this, new EventArgs());
}
}
第二步我们需要在APP.xaml中添加如下一句话:
<helper:ThemeChangeCommand x:Key="themeCommand" />
最后就是修改MainPage.xaml中的Contentborder部分。

运行一下:

右键鼠标就能看到不同的皮肤了。选择个黑色的试试:
前提是你安装了最新的Silverlight Toolkit。


 被折叠的 条评论
为什么被折叠?
被折叠的 条评论
为什么被折叠?
 到【灌水乐园】发言


