


逛eoe发现这样的UI效果,感觉很不错,后来知道github上有这么个开源项目~~~~当然本篇不是教你如何使用这个开源项目,而是教你如何自己通过自定义ViewGroup写这样的效果,自定义ViewGroup也是我的痛楚,嘿嘿,希望以此可以抛砖引玉~~
效果图:
1、实现思路
通过效果图,会有几个问题:
a、动画效果如何实现
可以看出动画是从顶点外外发射的,可能有人说,那还不简单,默认元素都在定点位置,然后TraslateAnimation就好了;这样忽略了一点,就是TraslateAnimation虽然有动画效果,但是本质是不会改变按钮的位置,我们的按钮动画结束是要点击的;有人可能会说那使用属性动画,或者改变leftMagin,rightMagin;这样可能比较麻烦,其实我们可以默认让子菜单就已经在目标位置,然后GONE,当点击时还是用TraslateAnimation,把起始位置设为定点,终点位置就是我们隐藏的区域,动画结束VISIBLE.
b、如何确定位置呢?
这可能需要一点数学上的知识,我画了一张草图(冰天雪地,跪玻璃碴子求画下面这些图的工具):
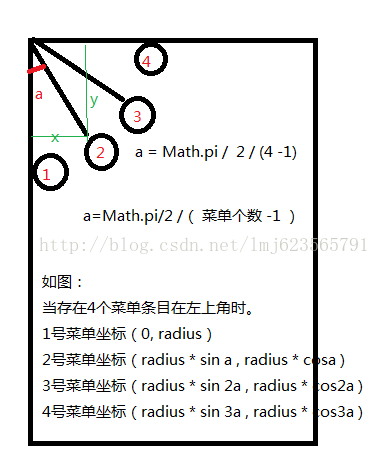
每次会根据子菜单数量,算出a这个角度,然后通过sin , cos 分别算出每个子菜单的left , top ;
当然这是在左上的情况,如果在右上,则top还是和左上一致的,left则为 (屏幕宽度-左上算出的left) ;其他两个方位同理~
整体我通过自定义一个ViewGroup,这个ViewGroup中第一个子元素为点击的按钮(你可以随便布局,随便用什么控件),接下来的子元素我认为是菜单项。根据效果图,决定展开半径和显示的位置,让用户自己去定制。下面看具体实现:
2、自定义View的属性:
- <?xml version="1.0" encoding="utf-8"?>
- <resources>
- <attr name="position">
- <enum name="left_top" value="0" />
- <enum name="right_top" value="1" />
- <enum name="right_bottom" value="2" />
- <enum name="left_bottom" value="3" />
- </attr>
- <attr name="radius" format="dimension"></attr>
- <declare-styleable name="ArcMenu">
- <attr name="position" />
- <attr name="radius"/>
- </declare-styleable>
- </resources>
3、在自定义的ViewGroup中获取这些属性
Arcmenu.java
- /**
- * @author zhy
- */
- public class ArcMenu extends ViewGroup implements OnClickListener
- {
- private static final String TAG = "ArcMenu";
- /**
- * 菜单的显示位置
- */
- private Position mPosition = Position.LEFT_TOP;
- /**
- * 菜单显示的半径,默认100dp
- */
- private int mRadius = 100;
- /**
- * 用户点击的按钮
- */
- private View mButton;
- /**
- * 当前ArcMenu的状态
- */
- private Status mCurrentStatus = Status.CLOSE;
- /**
- * 回调接口
- */
- private OnMenuItemClickListener onMenuItemClickListener;
- /**
- * 状态的枚举类
- *
- * @author zhy
- *
- */
- public enum Status
- {
- OPEN, CLOSE
- }
- /**
- * 设置菜单现实的位置,四选1,默认右下
- *
- * @author zhy
- */
- public enum Position
- {
- LEFT_TOP, RIGHT_TOP, RIGHT_BOTTOM, LEFT_BOTTOM;
- }
- public interface OnMenuItemClickListener
- {
- void onClick(View view, int pos);
- }
- public ArcMenu(Context context)
- {
- this(context, null);
- }
- public ArcMenu(Context context, AttributeSet attrs)
- {
- this(context, attrs, 0);
- }
- /**
- * 初始化属性
- *
- * @param context
- * @param attrs
- * @param defStyle
- */
- public ArcMenu(Context context, AttributeSet attrs, int defStyle)
- {
- super(context, attrs, defStyle);
- // dp convert to px
- mRadius = (int) TypedValue.applyDimension(TypedValue.COMPLEX_UNIT_DIP,
- mRadius, getResources().getDisplayMetrics());
- TypedArray a = context.getTheme().obtainStyledAttributes(attrs,
- R.styleable.ArcMenu, defStyle, 0);
- int n = a.getIndexCount();
- for (int i = 0; i < n; i++)
- {
- int attr = a.getIndex(i);
- switch (attr)
- {
- case R.styleable.ArcMenu_position:
- int val = a.getInt(attr, 0);
- switch (val)
- {
- case 0:
- mPosition = Position.LEFT_TOP;
- break;
- case 1:
- mPosition = Position.RIGHT_TOP;
- break;
- case 2:
- mPosition = Position.RIGHT_BOTTOM;
- break;
- case 3:
- mPosition = Position.LEFT_BOTTOM;
- break;
- }
- break;
- case R.styleable.ArcMenu_radius:
- // dp convert to px
- mRadius = a.getDimensionPixelSize(attr, (int) TypedValue
- .applyDimension(TypedValue.COMPLEX_UNIT_DIP, 100f,
- getResources().getDisplayMetrics()));
- break;
- }
- }
- a.recycle();
- }
4、计算子元素的大小:
- @Override
- protected void onMeasure(int widthMeasureSpec, int heightMeasureSpec)
- {
- int count = getChildCount();
- for (int i = 0; i < count; i++)
- {
- // mesure child
- getChildAt(i).measure(MeasureSpec.UNSPECIFIED,
- MeasureSpec.UNSPECIFIED);
- }
- super.onMeasure(widthMeasureSpec, heightMeasureSpec);
- }
5、确定子元素的位置:
- @Override
- protected void onLayout(boolean changed, int l, int t, int r, int b)
- {
- if (changed)
- {
- layoutButton();
- int count = getChildCount();
- /**
- * 设置所有孩子的位置 例如(第一个为按钮): 左上时,从左到右 ] 第2个:mRadius(sin0 , cos0)
- * 第3个:mRadius(sina ,cosa) 注:[a = Math.PI / 2 * (cCount - 1)]
- * 第4个:mRadius(sin2a ,cos2a) 第5个:mRadius(sin3a , cos3a) ...
- */
- for (int i = 0; i < count - 1; i++)
- {
- View child = getChildAt(i + 1);
- child.setVisibility(View.GONE);
- int cl = (int) (mRadius * Math.sin(Math.PI / 2 / (count - 2)
- * i));
- int ct = (int) (mRadius * Math.cos(Math.PI / 2 / (count - 2)
- * i));
- // childview width
- int cWidth = child.getMeasuredWidth();
- // childview height
- int cHeight = child.getMeasuredHeight();
- // 右上,右下
- if (mPosition == Position.LEFT_BOTTOM
- || mPosition == Position.RIGHT_BOTTOM)
- {
- ct = getMeasuredHeight() - cHeight - ct;
- }
- // 右上,右下
- if (mPosition == Position.RIGHT_TOP
- || mPosition == Position.RIGHT_BOTTOM)
- {
- cl = getMeasuredWidth() - cWidth - cl;
- }
- Log.e(TAG, cl + " , " + ct);
- child.layout(cl, ct, cl + cWidth, ct + cHeight);
- }
- }
- }
首先在layoutButton中对按钮位置就行设置,以及初始化点击事件;然后从第二个子元素开始为菜单项,分别设置其位置,计算的原理就是上面我画的草图,可以再去仔细看看,动手在纸上画一画。
- /**
- * 第一个子元素为按钮,为按钮布局且初始化点击事件
- */
- private void layoutButton()
- {
- View cButton = getChildAt(0);
- cButton.setOnClickListener(this);
- int l = 0;
- int t = 0;
- int width = cButton.getMeasuredWidth();
- int height = cButton.getMeasuredHeight();
- switch (mPosition)
- {
- case LEFT_TOP:
- l = 0;
- t = 0;
- break;
- case LEFT_BOTTOM:
- l = 0;
- t = getMeasuredHeight() - height;
- break;
- case RIGHT_TOP:
- l = getMeasuredWidth() - width;
- t = 0;
- break;
- case RIGHT_BOTTOM:
- l = getMeasuredWidth() - width;
- t = getMeasuredHeight() - height;
- break;
- }
- Log.e(TAG, l + " , " + t + " , " + (l + width) + " , " + (t + height));
- cButton.layout(l, t, l + width, t + height);
- }
这是定位Button的代码,此时的代码已经实现了定位,如果你把onLayout中childView.setVisibility(VISIBLE)。ArcMenu的整个控件的样子已经实现了,接下来就是点击事件,已经效果动画的实现了。
6、设置按钮点击事件
- /**
- * 为按钮添加点击事件
- */
- @Override
- public void onClick(View v)
- {
- mButton = findViewById(R.id.id_button);
- if (mButton == null)
- {
- mButton = getChildAt(0);
- }
- rotateView(mButton, 0f, 270f, 300);
- toggleMenu(300);
- }
- /**
- * 按钮的旋转动画
- *
- * @param view
- * @param fromDegrees
- * @param toDegrees
- * @param durationMillis
- */
- public static void rotateView(View view, float fromDegrees,
- float toDegrees, int durationMillis)
- {
- RotateAnimation rotate = new RotateAnimation(fromDegrees, toDegrees,
- Animation.RELATIVE_TO_SELF, 0.5f, Animation.RELATIVE_TO_SELF,
- 0.5f);
- rotate.setDuration(durationMillis);
- rotate.setFillAfter(true);
- view.startAnimation(rotate);
- }
- public void toggleMenu(int durationMillis)
- {
- int count = getChildCount();
- for (int i = 0; i < count - 1; i++)
- {
- final View childView = getChildAt(i + 1);
- childView.setVisibility(View.VISIBLE);
- int xflag = 1;
- int yflag = 1;
- if (mPosition == Position.LEFT_TOP
- || mPosition == Position.LEFT_BOTTOM)
- xflag = -1;
- if (mPosition == Position.LEFT_TOP
- || mPosition == Position.RIGHT_TOP)
- yflag = -1;
- // child left
- int cl = (int) (mRadius * Math.sin(Math.PI / 2 / (count - 2) * i));
- // child top
- int ct = (int) (mRadius * Math.cos(Math.PI / 2 / (count - 2) * i));
- AnimationSet animset = new AnimationSet(true);
- Animation animation = null;
- if (mCurrentStatus == Status.CLOSE)
- {// to open
- animset.setInterpolator(new OvershootInterpolator(2F));
- animation = new TranslateAnimation(xflag * cl, 0, yflag * ct, 0);
- childView.setClickable(true);
- childView.setFocusable(true);
- } else
- {// to close
- animation = new TranslateAnimation(0f, xflag * cl, 0f, yflag
- * ct);
- childView.setClickable(false);
- childView.setFocusable(false);
- }
- animation.setAnimationListener(new AnimationListener()
- {
- public void onAnimationStart(Animation animation)
- {
- }
- public void onAnimationRepeat(Animation animation)
- {
- }
- public void onAnimationEnd(Animation animation)
- {
- if (mCurrentStatus == Status.CLOSE)
- childView.setVisibility(View.GONE);
- }
- });
- animation.setFillAfter(true);
- animation.setDuration(durationMillis);
- // 为动画设置一个开始延迟时间,纯属好看,可以不设
- animation.setStartOffset((i * 100) / (count - 1));
- RotateAnimation rotate = new RotateAnimation(0, 720,
- Animation.RELATIVE_TO_SELF, 0.5f,
- Animation.RELATIVE_TO_SELF, 0.5f);
- rotate.setDuration(durationMillis);
- rotate.setFillAfter(true);
- animset.addAnimation(rotate);
- animset.addAnimation(animation);
- childView.startAnimation(animset);
- final int index = i + 1;
- childView.setOnClickListener(new View.OnClickListener()
- {
- @Override
- public void onClick(View v)
- {
- if (onMenuItemClickListener != null)
- onMenuItemClickListener.onClick(childView, index - 1);
- menuItemAnin(index - 1);
- changeStatus();
- }
- });
- }
- changeStatus();
- Log.e(TAG, mCurrentStatus.name() +"");
- }
点击时,触发TanslateAnimation动画,从定点向外扩展,也给点击按钮添加了一个旋转动画,每个子菜单项同样添加了旋转动画,且如果用户设置回调,调用回调接口;设置子菜单的点击事件。整体就是点击然后动画效果~~
7、设置子菜单的点击事件
- /**
- * 开始菜单动画,点击的MenuItem放大消失,其他的缩小消失
- * @param item
- */
- private void menuItemAnin(int item)
- {
- for (int i = 0; i < getChildCount() - 1; i++)
- {
- View childView = getChildAt(i + 1);
- if (i == item)
- {
- childView.startAnimation(scaleBigAnim(300));
- } else
- {
- childView.startAnimation(scaleSmallAnim(300));
- }
- childView.setClickable(false);
- childView.setFocusable(false);
- }
- }
- /**
- * 缩小消失
- * @param durationMillis
- * @return
- */
- private Animation scaleSmallAnim(int durationMillis)
- {
- Animation anim = new ScaleAnimation(1.0f, 0f, 1.0f, 0f,
- Animation.RELATIVE_TO_SELF, 0.5f, Animation.RELATIVE_TO_SELF,
- 0.5f);
- anim.setDuration(durationMillis);
- anim.setFillAfter(true);
- return anim;
- }
- /**
- * 放大,透明度降低
- * @param durationMillis
- * @return
- */
- private Animation scaleBigAnim(int durationMillis)
- {
- AnimationSet animationset = new AnimationSet(true);
- Animation anim = new ScaleAnimation(1.0f, 4.0f, 1.0f, 4.0f,
- Animation.RELATIVE_TO_SELF, 0.5f, Animation.RELATIVE_TO_SELF,
- 0.5f);
- Animation alphaAnimation = new AlphaAnimation(1, 0);
- animationset.addAnimation(anim);
- animationset.addAnimation(alphaAnimation);
- animationset.setDuration(durationMillis);
- animationset.setFillAfter(true);
- return animationset;
- }
点击的菜单项变大且慢慢透明消失,未点击的菜单项缩小消失~有兴趣的可以改成自己喜欢的动画~
注:动画效果很多借鉴了eoe上那位仁兄的代码,这类动画也比较简单,就不多说了~
好了,剩下就是些getter,setter了~
8、布局文件:
- <RelativeLayout xmlns:android="http://schemas.android.com/apk/res/android"
- xmlns:tools="http://schemas.android.com/tools"
- xmlns:zhy="http://schemas.android.com/apk/res/com.example.zhy_arcmenu"
- android:layout_width="match_parent"
- android:layout_height="match_parent" >
- <com.example.zhy_arcmenu.ArcMenu
- android:id="@+id/id_arcmenu1"
- android:layout_width="fill_parent"
- android:layout_height="fill_parent"
- zhy:position="left_top"
- zhy:radius="130dp" >
- <RelativeLayout
- android:layout_width="wrap_content"
- android:layout_height="wrap_content"
- android:background="@drawable/composer_button" >
- <ImageView
- android:id="@+id/id_button"
- android:layout_width="wrap_content"
- android:layout_height="wrap_content"
- android:layout_centerInParent="true"
- android:src="@drawable/composer_icn_plus" />
- </RelativeLayout>
- <ImageView
- android:layout_width="wrap_content"
- android:layout_height="wrap_content"
- android:layout_centerInParent="true"
- android:src="@drawable/composer_camera"
- android:tag="Camera" />
- <ImageView
- android:layout_width="wrap_content"
- android:layout_height="wrap_content"
- android:layout_centerInParent="true"
- android:src="@drawable/composer_sun"
- android:tag="Sun" />
- <ImageView
- android:layout_width="wrap_content"
- android:layout_height="wrap_content"
- android:layout_centerInParent="true"
- android:src="@drawable/composer_place"
- android:tag="Place" />
- <ImageView
- android:layout_width="wrap_content"
- android:layout_height="wrap_content"
- android:layout_centerInParent="true"
- android:src="@drawable/composer_sleep"
- android:tag="Sleep" />
- </com.example.zhy_arcmenu.ArcMenu>
嗯,第一个元素为按钮,其他的都是菜单项了~~喜欢用代码的,也可以代码生成,我是比较喜欢布局文件中写这些玩意~
9、MainActivity
- package com.example.zhy_arcmenu;
- import android.app.Activity;
- import android.os.Bundle;
- import android.view.View;
- import android.view.Window;
- import android.widget.ImageView;
- import android.widget.Toast;
- import com.example.zhy_arcmenu.ArcMenu.OnMenuItemClickListener;
- public class MainActivity extends Activity
- {
- private ArcMenu mArcMenuLeftTop;
- @Override
- protected void onCreate(Bundle savedInstanceState)
- {
- super.onCreate(savedInstanceState);
- setContentView(R.layout.activity_main);
- mArcMenuLeftTop = (ArcMenu) findViewById(R.id.id_arcmenu1);
- //动态添加一个MenuItem
- ImageView people = new ImageView(this);
- people.setImageResource(R.drawable.composer_with);
- people.setTag("People");
- mArcMenuLeftTop.addView(people);
- mArcMenuLeftTop
- .setOnMenuItemClickListener(new OnMenuItemClickListener()
- {
- @Override
- public void onClick(View view, int pos)
- {
- Toast.makeText(MainActivity.this,
- pos + ":" + view.getTag(), Toast.LENGTH_SHORT)
- .show();
- }
- });
- }
- }
结束~~有任何意见欢迎指出~~
转载请标明出处:http://blog.csdn.net/lmj623565791/article/details/37567907


 1203
1203


 被折叠的 条评论
为什么被折叠?
被折叠的 条评论
为什么被折叠?
 到【灌水乐园】发言


