


中文版:
日期:2016、11、5—>注意时间,版本升级很快,可能新的内容本文章就落后了!
Coco2d官方给出的HelloWorld其实涉及了很多的知识。首先我们新建一个自己的工程,有
两种方法,一是在vs205上直接创建win-32 project,(注意这里不是win32 console application),
不过如果你已经在vs2015 上可以看到cocos2d的创建图标,可以直接在上面新建一个项目。
然后将其他相关文件拷贝到该工程下。我自己是喜欢用控制台命令创建。下面是我的具体方
法(注意:我的cocos2d源文件放在了F盘下);
cmd;-> F:
->cd cocos2d-x-3.131;->cd tools; cdcocos2d-console;-> cd bin;-> cocos new –p “你的包名” –l
cpp –d “你想放置的路径”;等待一会,就可以看到自己的项目了。然后找到刚才建立后文件,
找到项目下win-32字眼的文件夹,找到一个“.sln”打开即可。编译一下,既可以看到上讲
中的效果。
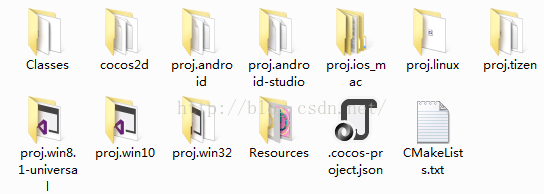
学习一:
Class 文件:放置你的c++文件,vs下可以建立新的子项但是不会生成新的路径。Cocos2d文件:很重要,里面有大量的cocos2d类库。Resources:资源文件,图片声音等。
学习二:AppDelegate
| AppDelegate(); virtual ~AppDelegate(); | 没啥好讲的 | ||||
| initGLContextAttrs() | 设置openGL的属性 | ||||
| applicationDidFinishLaunching() |
| ||||
| applicationDidEnterBackground() | App失去活跃 | ||||
| applicationWillEnterForeground() | App被激活 |
学习三: HelloWorld
| createScene() | 创建一个场景 | ||||||
| init() | 在场景里加入元素
| ||||||
| menuCloseCallback(cocos2d::Ref*pSender) | closeItem调用的退出函数 | ||||||
| CREATE_FUNC(HelloWorld) 宏命令,创建实例对象,并设置自动释放 | #define CREATE_FUNC(__TYPE__) \ static __TYPE__* create() \ { \ __TYPE__ *pRet = new(std::nothrow) __TYPE__(); \ if (pRet && pRet->init()) \ { \ pRet->autorelease(); \ return pRet; \ } \ else \ { \ delete pRet; \ pRet = nullptr; \ return nullptr; \ } \ }
|
English version:
The date is due to 2016/11/5, please payattention to the version of cocos2d to avoid the out of date of the knowledge.
There are many things we canlearn from the project named “HelloWorld” provided by cocos.org. At first, weneed build a new project and there are two ways. One is you can create a
new win-32 project(alert: not the win32console application). If you can see the logo of cocos2d
in your visual studio 2015, you candirectly create a new project.(usually, just give a new name)
Then you should copy some files to the pathof your works. The second is using the command
of operation system. Here is my style,(take care of the path of my cocos2d original codes)
cmd;-> F:
->cd cocos2d-x-3.131;->cd tools; cdcocos2d-console;-> cd bin;-> cocos new –p “package name”
-l cpp –d “project path <-you assign”;wait a minute, you can see your project in the path that you
assigned before. Find the win32-project,and the file with the suffix:”.sln” and open it. Compile it
And you will the result which was showed inlast blog.
Lesson 1:
Class file: place your c++ file, if you usevisual studio, you can create some folders without worrying about can`t findthe path of the file. Cocos2d file: key file , many class libs are in thisfile. Resources: you can put your resources in this file, like img or audios;
Lesson2:AppDelegate
| AppDelegate(); virtual ~AppDelegate(); | Nothing to say | ||||
| initGLContextAttrs() | Setup openGL attributes | ||||
| applicationDidFinishLaunching() |
| ||||
| applicationDidEnterBackground() | App inactive | ||||
| applicationWillEnterForeground() | App active |
Lesson 3: HelloWorld
| createScene() | Create a scene | ||||||
| init() | Add elements
| ||||||
| menuCloseCallback(cocos2d::Ref*pSender) | closeItem callback function | ||||||
| CREATE_FUNC(HelloWorld) macro, instantiate a class and setup the autorelease。 | #define CREATE_FUNC(__TYPE__) \ static __TYPE__* create() \ { \ __TYPE__ *pRet = new(std::nothrow) __TYPE__(); \ if (pRet && pRet->init()) \ { \ pRet->autorelease(); \ return pRet; \ } \ else \ { \ delete pRet; \ pRet = nullptr; \ return nullptr; \ } \ }
|


 885
885


 被折叠的 条评论
为什么被折叠?
被折叠的 条评论
为什么被折叠?
 到【灌水乐园】发言


