1. 概述
上一篇讲解了RecyclerView的基本用法,回顾下上一篇文章讲解内容。
- 水平列表展示,设置LayoutManager的方向性
- 竖直列表展示,设置LayoutManager的方向性
- 自定义间隔,RecyclerView.addItemDecoration()
- Item添加和删除动画,RecyclerView.setItemAnimator()
关于网格样式和瀑布流样式在本篇会仔细的介绍,细心的同学会发现,自定义间隔在上一篇文章中并没有太过深入,只是介绍了方法的调用时机,但是关于更换间隔样式没有太详细的介绍,是因为列表样式的RecyclerView自定义间隔比较简单,统一放到复杂一点的网格中来讲解。直接进入主题,看看期待已久的网格模式和瀑布流模式的使用吧。
2. 网格样式
上篇文章中已经了解到,RecyclerView展示的样式是有布局管理器LayoutManager来控制。网格样式的管理器是GridLayoutManager,看一下它最常用的两个构造函数以及参数含义。
- GridLayoutManager(Context context, int spanCount)
- spanCount,每列或者每行的item个数,设置为1,就是列表样式
- 该构造函数默认是竖直方向的网格样式
- GridLayoutManager(Context context, int spanCount, int orientation,boolean reverseLayout)
- spanCount,每列或者每行的item个数,设置为1,就是列表样式
- 网格样式的方向,水平(OrientationHelper.HORIZONTAL)或者竖直(OrientationHelper.VERTICAL)
- reverseLayout,是否逆向,true:布局逆向展示,false:布局正向显示
看一下使用。
mLayoutManager = new GridLayoutManager(this, 4, OrientationHelper.VERTICAL, false);
mRecyclerView.setLayoutManager(mLayoutManager);
看一下运行效果。

图-1 RecyclerView网格无间隔
网格样式已经显示出来了,和之前遇见的问题一样,没有间隔线,非常丑,间隔线必须加,而且要使用自定义,不使用系统自带的。
新建文件md_divider.xml,是一个灰色的矩形。
<?xml version="1.0" encoding="utf-8"?>
<shape xmlns:android="http://schemas.android.com/apk/res/android"
       android:shape="rectangle" >
    <solid android:color="@android:color/darker_gray"/>
    <size android:height="4dp" android:width="4dp"/>
</shape>
在styles.xml中的自定义的应用主题里替换掉listdivider属性。
<style name="AppTheme" parent="Theme.AppCompat.Light.DarkActionBar">
    <item name="colorPrimary">@color/colorPrimary</item>
    <item name="colorPrimaryDark">@color/colorPrimaryDark</item>
    <item name="colorAccent">@color/colorAccent</item>
    <item name="android:listDivider">@drawable/md_divider</item>
</style>
然后继承RecyclerView.ItemDecoration类,在构造函数里获取自定义的间隔线,复写绘制间隔线的方法。
public class MDGridRvDividerDecoration extends RecyclerView.ItemDecoration {
private static final int[] ATTRS = new int[]{
android.R.attr.listDivider
};
/**
* 用于绘制间隔样式
*/
private Drawable mDivider;
public MDGridRvDividerDecoration(Context context) {
final TypedArray a = context.obtainStyledAttributes(ATTRS);
mDivider = a.getDrawable(0);
a.recycle();
}
@Override
public void onDraw(Canvas c, RecyclerView parent, RecyclerView.State state) {
int childCount = parent.getChildCount();
int spanCount = ((GridLayoutManager)parent.getLayoutManager()).getSpanCount();
int orientation = ((GridLayoutManager)parent.getLayoutManager()).getOrientation();
boolean isDrawHorizontalDivider = true;
boolean isDrawVerticalDivider = true;
int extra = childCount % spanCount;
extra = extra == 0 ? spanCount : extra;
for(int i = 0; i < childCount; i++) {
isDrawVerticalDivider = true;
isDrawHorizontalDivider = true;
if(orientation == OrientationHelper.VERTICAL && (i + 1) % spanCount == 0) {
isDrawVerticalDivider = false;
}
if(orientation == OrientationHelper.VERTICAL && i >= childCount - extra) {
isDrawHorizontalDivider = false;
}
if(orientation == OrientationHelper.HORIZONTAL && (i + 1) % spanCount == 0) {
isDrawHorizontalDivider = false;
}
if(orientation == OrientationHelper.HORIZONTAL && i >= childCount - extra) {
isDrawVerticalDivider = false;
}
if(isDrawHorizontalDivider) {
drawHorizontalDivider(c, parent, i);
}
if(isDrawVerticalDivider) {
drawVerticalDivider(c, parent, i);
}
}
}
@Override
public void getItemOffsets(Rect outRect, View view, RecyclerView parent, RecyclerView.State state) {
int spanCount = ((GridLayoutManager) parent.getLayoutManager()).getSpanCount();
int orientation = ((GridLayoutManager)parent.getLayoutManager()).getOrientation();
int position = parent.getChildLayoutPosition(view);
if(orientation == OrientationHelper.VERTICAL && (position + 1) % spanCount == 0) {
outRect.set(0, 0, 0, mDivider.getIntrinsicHeight());
return;
}
if(orientation == OrientationHelper.HORIZONTAL && (position + 1) % spanCount == 0) {
outRect.set(0, 0, mDivider.getIntrinsicWidth(), 0);
return;
}
outRect.set(0, 0, mDivider.getIntrinsicWidth(), mDivider.getIntrinsicHeight());
}
/**
* 绘制竖直间隔线
*
* @param canvas
* @param parent
* 父布局,RecyclerView
* @param position
* irem在父布局中所在的位置
*/
private void drawVerticalDivider(Canvas canvas, RecyclerView parent, int position) {
final View child = parent.getChildAt(position);
final RecyclerView.LayoutParams params = (RecyclerView.LayoutParams) child
.getLayoutParams();
final int top = child.getTop() - params.topMargin;
final int bottom = child.getBottom() + params.bottomMargin + mDivider.getIntrinsicHeight();
final int left = child.getRight() + params.rightMargin;
final int right = left + mDivider.getIntrinsicWidth();
mDivider.setBounds(left, top, right, bottom);
mDivider.draw(canvas);
}
/**
* 绘制水平间隔线
*
* @param canvas
* @param parent
* 父布局,RecyclerView
* @param position
* item在父布局中所在的位置
*/
private void drawHorizontalDivider(Canvas canvas, RecyclerView parent, int position) {
final View child = parent.getChildAt(position);
final RecyclerView.LayoutParams params = (RecyclerView.LayoutParams) child
.getLayoutParams();
final int top = child.getBottom() + params.bottomMargin;
final int bottom = top + mDivider.getIntrinsicHeight();
final int left = child.getLeft() - params.leftMargin;
final int right = child.getRight() + params.rightMargin + mDivider.getIntrinsicWidth();
mDivider.setBounds(left, top, right, bottom);
mDivider.draw(canvas);
}
}
- 1
- 2
- 3
- 4
- 5
- 6
- 7
- 8
- 9
- 10
- 11
- 12
- 13
- 14
- 15
- 16
- 17
- 18
- 19
- 20
- 21
- 22
- 23
- 24
- 25
- 26
- 27
- 28
- 29
- 30
- 31
- 32
- 33
- 34
- 35
- 36
- 37
- 38
- 39
- 40
- 41
- 42
- 43
- 44
- 45
- 46
- 47
- 48
- 49
- 50
- 51
- 52
- 53
- 54
- 55
- 56
- 57
- 58
- 59
- 60
- 61
- 62
- 63
- 64
- 65
- 66
- 67
- 68
- 69
- 70
- 71
- 72
- 73
- 74
- 75
- 76
- 77
- 78
- 79
- 80
- 81
- 82
- 83
- 84
- 85
- 86
- 87
- 88
- 89
- 90
- 91
- 92
- 93
- 94
- 95
- 96
- 97
- 98
- 99
- 100
- 101
- 102
- 103
- 104
- 105
- 106
- 107
- 108
- 109
- 110
- 111
- 112
- 113
- 114
- 115
- 116
- 117
- 118
- 119
- 120
- 121
- 122
设置RecyclerView的间隔线。
mRecyclerView.addItemDecoration(new MDGridRvDividerDecoration(this));
运行效果如下图。
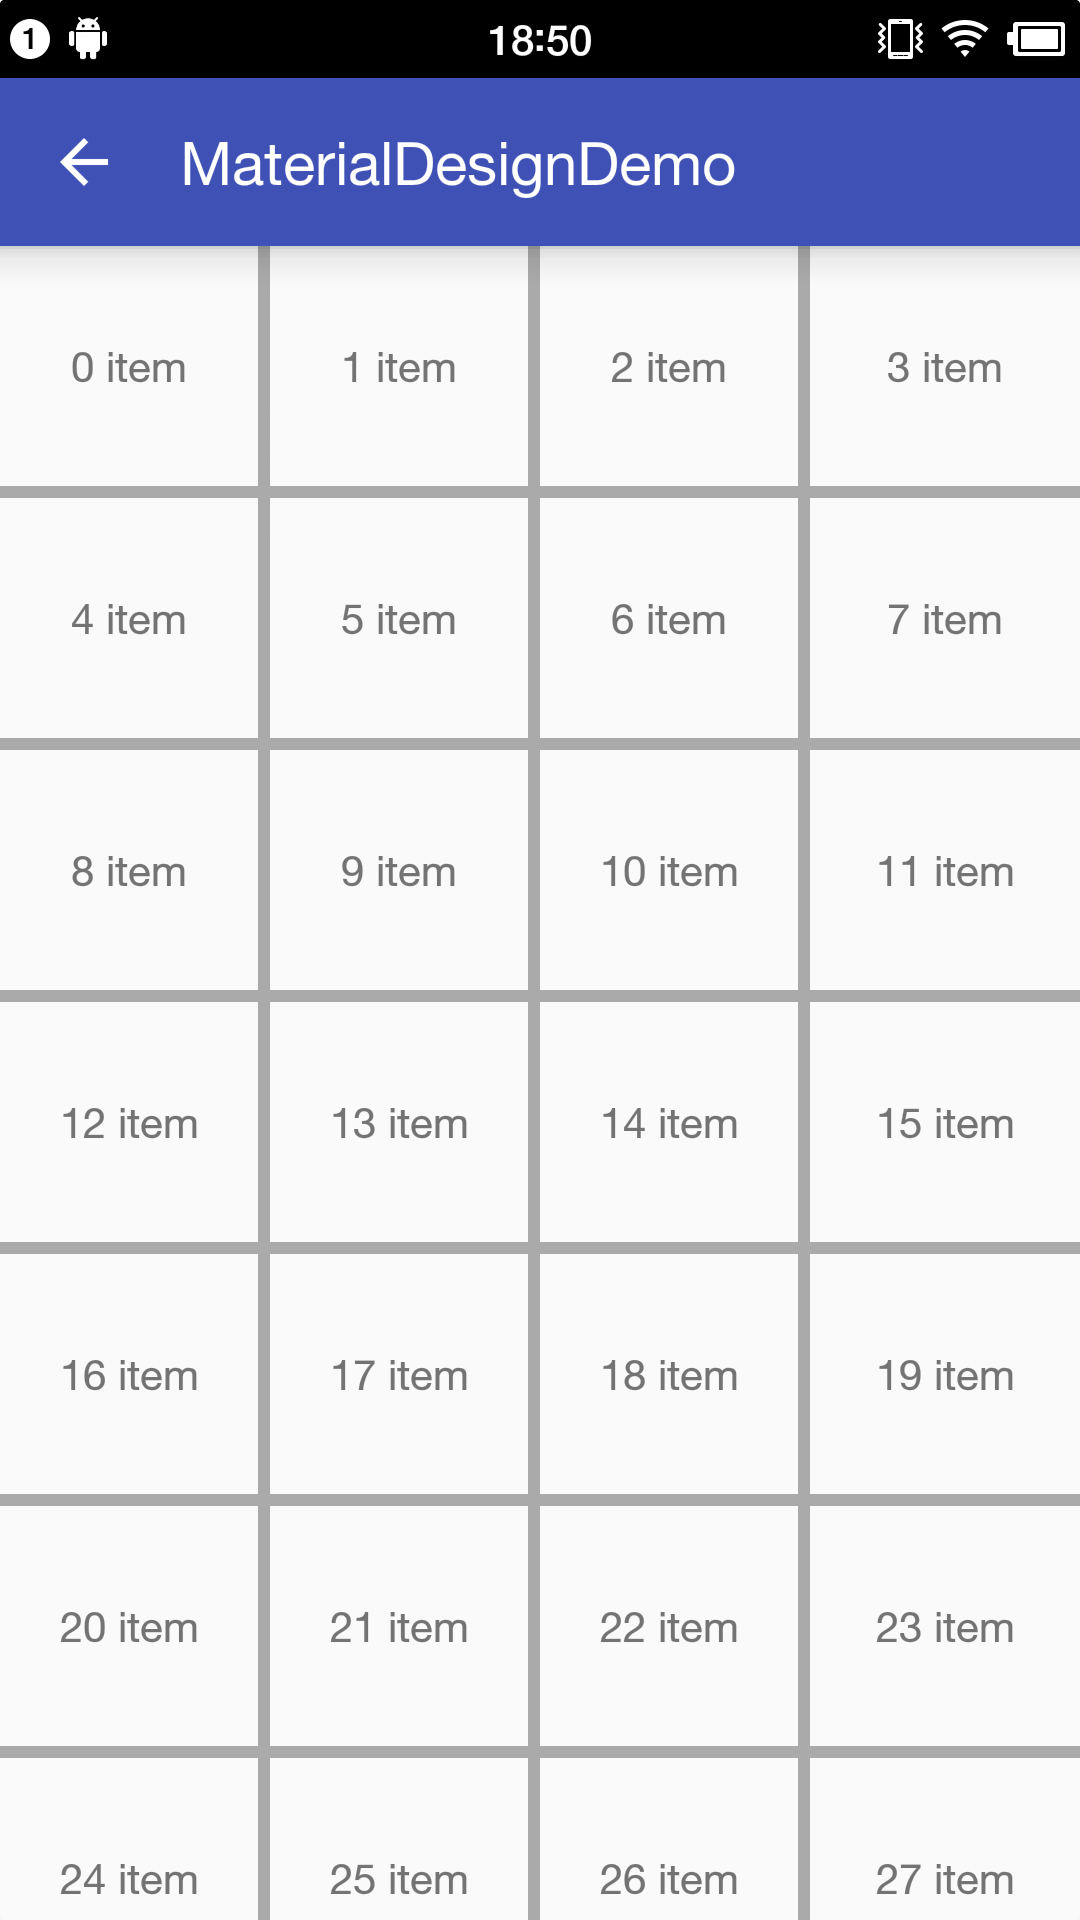
图-2 RecyclerView网格有间隔
关于网格样式的RecyclerView使用大体和列表样式相同,主要在于间隔线的实现上有些不同,来看一下如果真正的使用自定义的间隔线需要做些什么。
- 实现间隔线样式,可以是xml文件也可以是图片
- 覆盖应用主题的listdivider属性,使用自定义的间隔线样式
- 继承
RecyclerView.ItemDecoration类,并实现其中的绘制间隔线方法 - 设置RecyclerView间隔线样式
关于第三步,实现绘制线的方法,上面的代码提供了一种大体的思路,可以供大家借鉴,下面就让我们看看期待已久的瀑布流样式的列表。
3. 瀑布流样式
RecyclerView的瀑布流布局管理器是taggeredGridLayoutManager,它最常用的构造函数就一个,StaggeredGridLayoutManager(int spanCount, int orientation),spanCount代表每行或每列的Item个数,orientation代表列表的方向,竖直或者水平。
看在代码中的使用。
mLayoutManager = new StaggeredGridLayoutManager(2, OrientationHelper.VERTICAL);
mRecyclerView.setLayoutManager(mLayoutManager);
mRecyclerView.setAdapter(mAdapter);
mRecyclerView.addItemDecoration(new MDStaggeredRvDividerDecotation(this));
要实现瀑布流效果(仅讨论竖直方向的瀑布流样式),每一个Item的高度要有所差别,如果所有的item的高度相同,就和网格样式是一样的展示效果。示例中就实现两中不同高度的Item,一个高度为80dp,一个高度为100dp。
view_rv_staggered_item.xml布局:
<?xml version="1.0" encoding="utf-8"?>
<LinearLayout xmlns:android="http://schemas.android.com/apk/res/android"
              xmlns:tools="http://schemas.android.com/tools"
              android:orientation="vertical"
              android:layout_width="match_parent"
              android:layout_height="80dp">
    <TextView
        android:id="@+id/item_tv"
        android:layout_width="match_parent"
        android:layout_height="match_parent"
        android:gravity="center"
        tools:text="item"/>
</LinearLayout>
view_rv_staggered_item_two.xml布局:
<?xml version="1.0" encoding="utf-8"?>
<LinearLayout xmlns:android="http://schemas.android.com/apk/res/android"
              xmlns:tools="http://schemas.android.com/tools"
              android:orientation="vertical"
              android:layout_width="match_parent"
              android:layout_height="100dp">
    <TextView
        android:id="@+id/item_tv"
        android:layout_width="match_parent"
        android:layout_height="match_parent"
        android:gravity="center"
        tools:text="item"/>
</LinearLayout>
Item不同的布局是在Adapter里面绑定的,看一下Adapter的实现。
public class MDStaggeredRvAdapter extends RecyclerView.Adapter<MDStaggeredRvAdapter.ViewHolder> {
/**
* 展示数据
*/
private ArrayList<String> mData;
public MDStaggeredRvAdapter(ArrayList<String> data) {
this.mData = data;
}
public void updateData(ArrayList<String> data) {
this.mData = data;
notifyDataSetChanged();
}
@Override
public int getItemViewType(int position) {
return position % 2;
}
@Override
public MDStaggeredRvAdapter.ViewHolder onCreateViewHolder(ViewGroup parent, int viewType) {
View v;
if(viewType == 1) {
v = LayoutInflater.from(parent.getContext()).inflate(R.layout.view_rv_staggered_item, parent, false);
} else {
v = LayoutInflater.from(parent.getContext()).inflate(R.layout.view_rv_staggered_item_two, parent, false);
}
ViewHolder viewHolder = new ViewHolder(v);
return viewHolder;
}
@Override
public void onBindViewHolder(MDStaggeredRvAdapter.ViewHolder holder, int position) {
holder.mTv.setText(mData.get(position));
}
@Override
public int getItemCount() {
return mData == null ? 0 : mData.size();
}
public static class ViewHolder extends RecyclerView.ViewHolder {
TextView mTv;
public ViewHolder(View itemView) {
super(itemView);
mTv = (TextView) itemView.findViewById(R.id.item_tv);
}
}
}
- 1
- 2
- 3
- 4
- 5
- 6
- 7
- 8
- 9
- 10
- 11
- 12
- 13
- 14
- 15
- 16
- 17
- 18
- 19
- 20
- 21
- 22
- 23
- 24
- 25
- 26
- 27
- 28
- 29
- 30
- 31
- 32
- 33
- 34
- 35
- 36
- 37
- 38
- 39
- 40
- 41
- 42
- 43
- 44
- 45
- 46
- 47
- 48
- 49
- 50
- 51
- 52
- 53
- 54
- 55
- 56
- 57
- 1
- 2
- 3
- 4
- 5
- 6
- 7
- 8
- 9
- 10
- 11
- 12
- 13
- 14
- 15
- 16
- 17
- 18
- 19
- 20
- 21
- 22
- 23
- 24
- 25
- 26
- 27
- 28
- 29
- 30
- 31
- 32
- 33
- 34
- 35
- 36
- 37
- 38
- 39
- 40
- 41
- 42
- 43
- 44
- 45
- 46
- 47
- 48
- 49
- 50
- 51
- 52
- 53
- 54
- 55
- 56
- 57
接下来是设置瀑布流样式的间隔线样式的,上面代码中使用的是MDStaggeredRvDividerDecotation类,其实是直接拷贝的网格样式的间隔线绘制类。看一下运行效果。
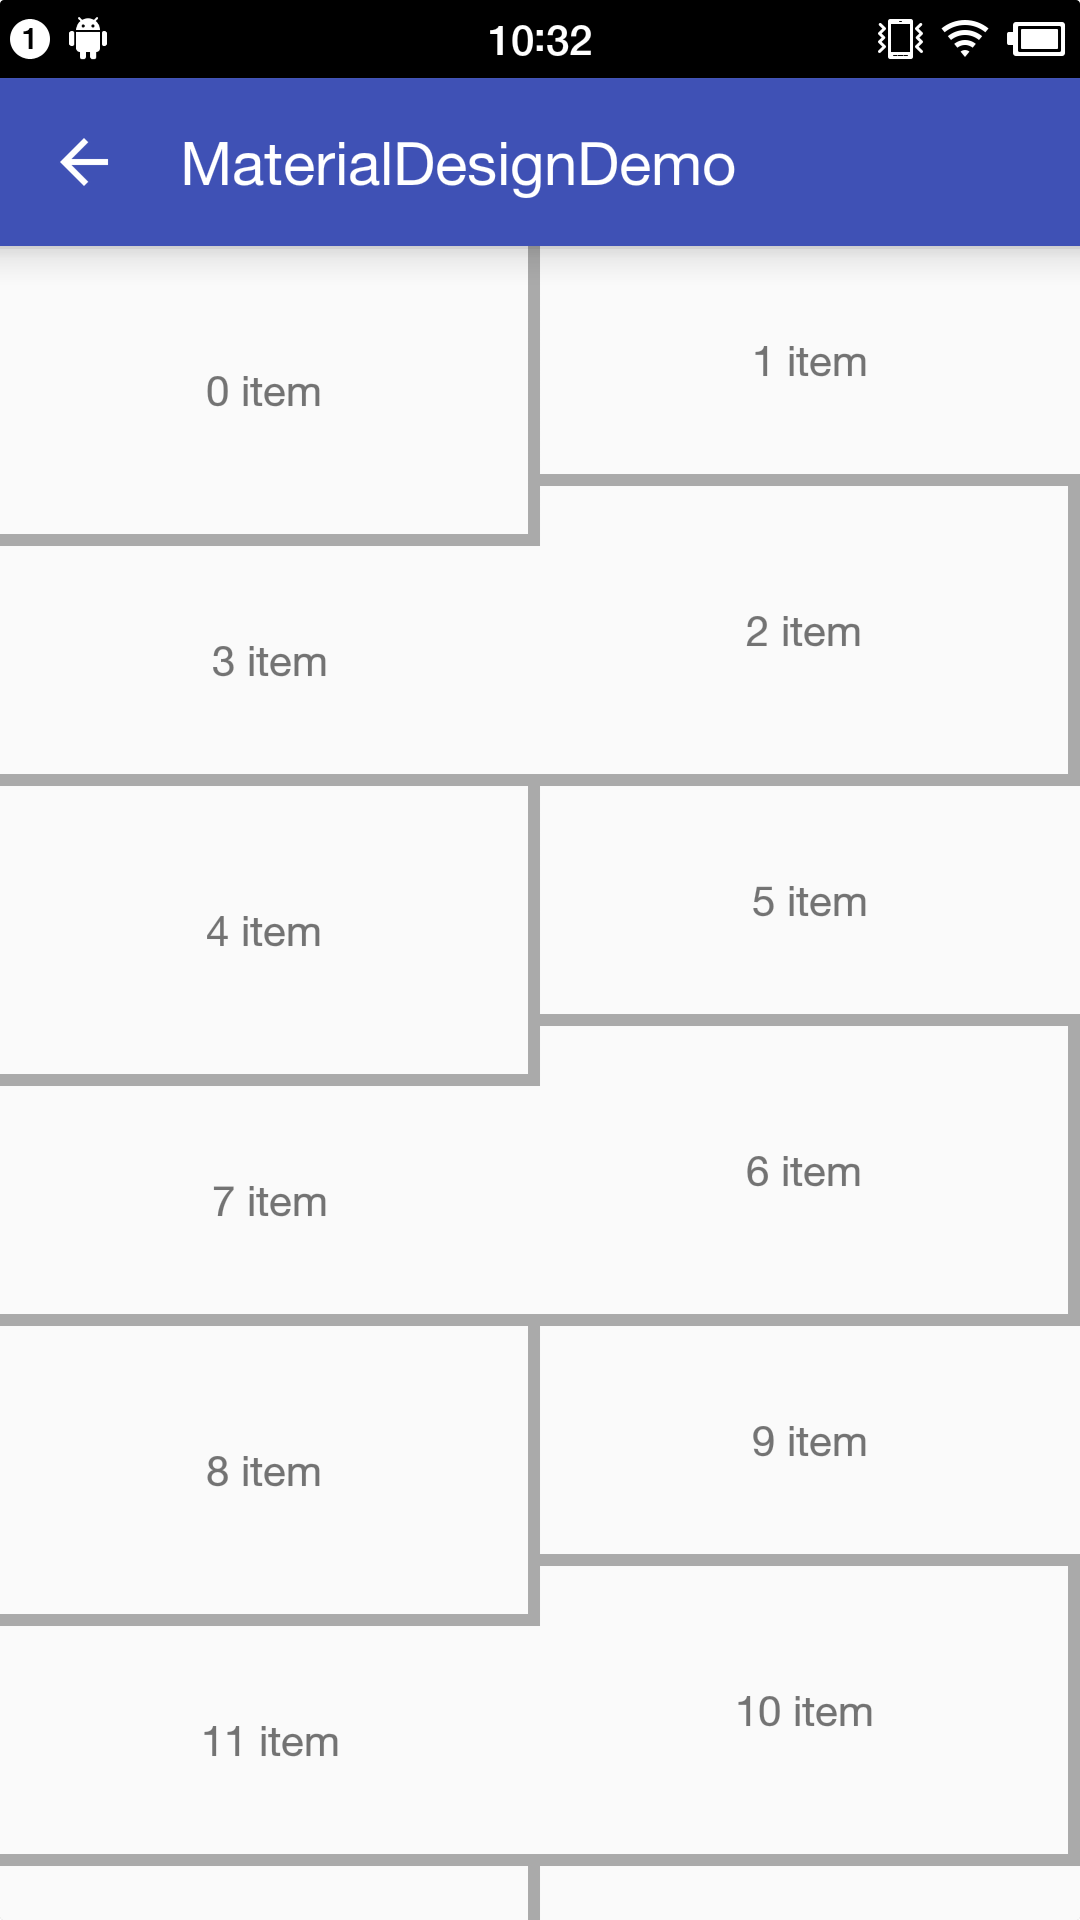
图-3 RecyclerView瀑布流2列
很奇怪,间隔线并没有按照我们想象中的方式绘制,仔细看瀑布流中Item的分布,发现瀑布流样式的Item分布和网格样式的Item分布有些不同。对比一下两者Item的分布,如下图。
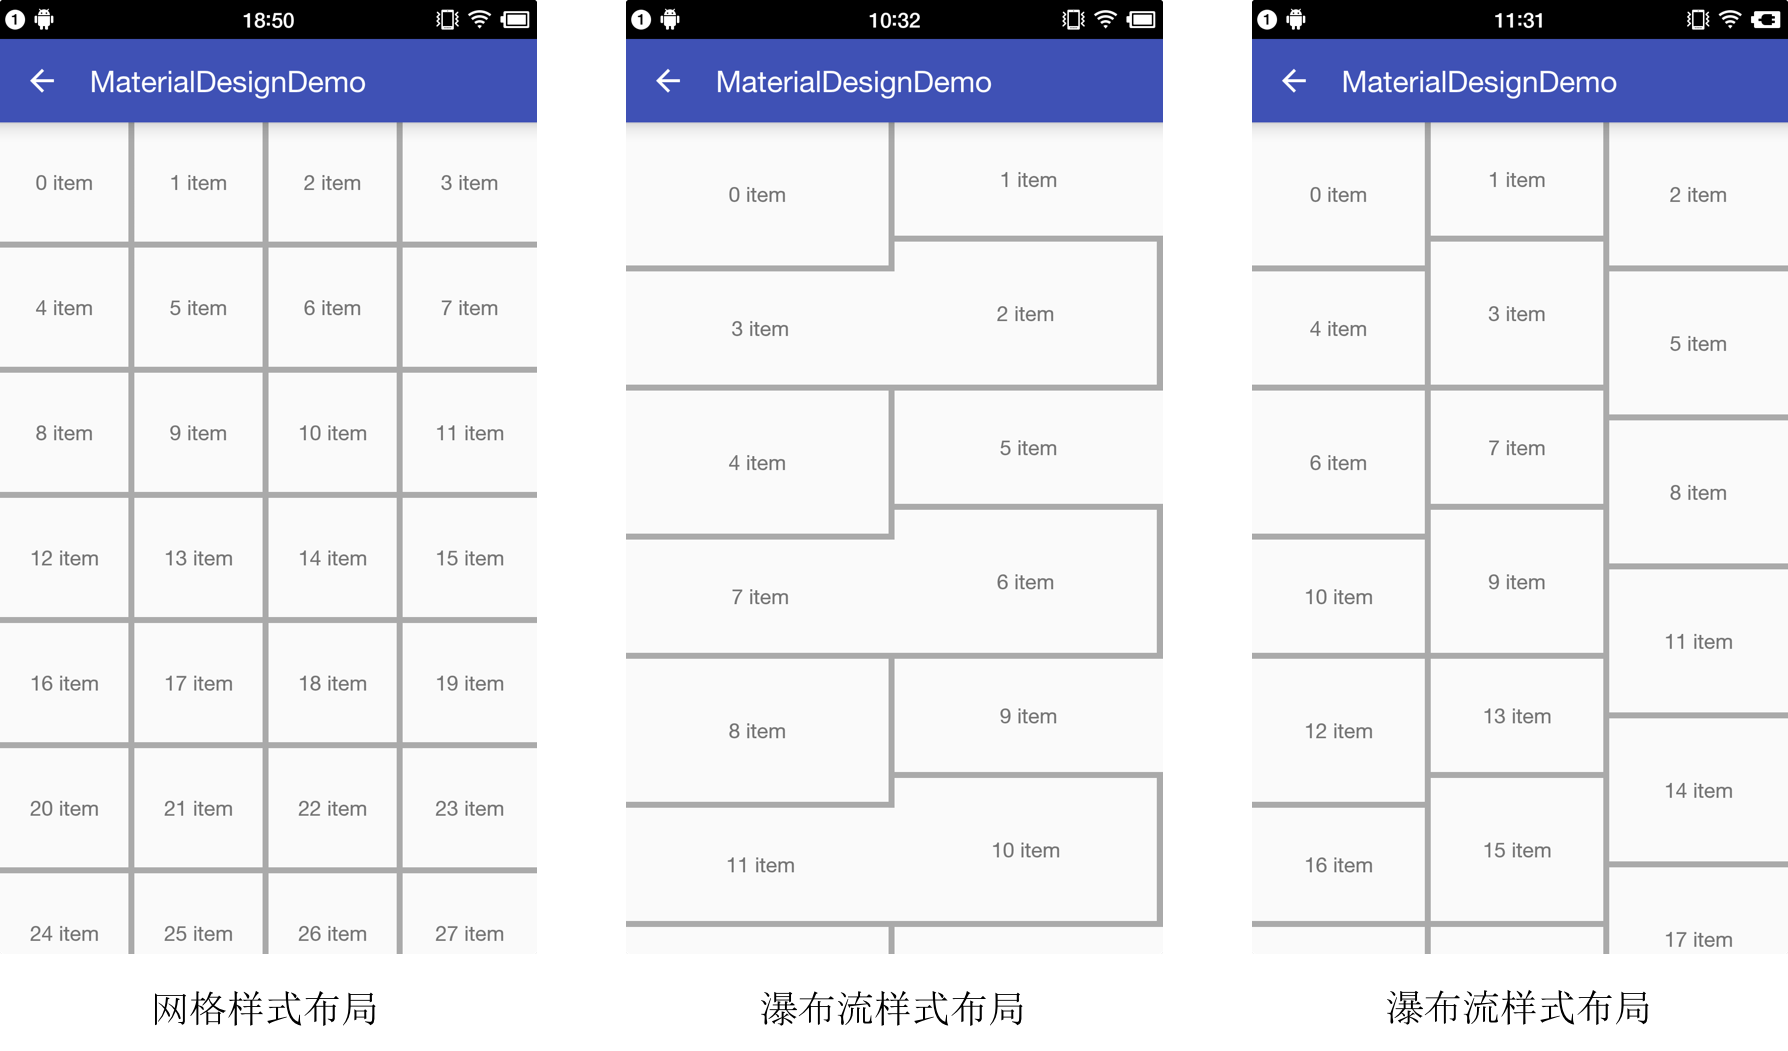
图-4 RecyclerView对比
网格样式的Item分布规律很明显,竖直方向的网格,Item是从左向右从上到下依次按顺序排列分布。
瀑布流样式的Item分布也是从上到下,从左到右的顺序排列,但是有一个高度的优先级,如果某一列中有一个高度最低的位置为空,最优先在此处添加Item。看第三张图的3 item,因为该位置最低,优先在此处添加Item。
分析出了瀑布流样式的Item的分布规律,就会发现,按照以往列表样式或者网格样式去设置间隔线是有问题的,因为不知道Item具体的位置,上下左右间隔线是否需要绘制不确定,参考第二张图,其实第三张图的间隔线也有问题,向上滑动就会展示出来。
目前能考虑到的瀑布流添加间隔线的思路:
- Item布局中设置四周间隔padding/margin
- 代码中动态修改ItemView的间隔padding/margin
设置间隔有两个方法:
- 上下左右都设置间隔
- 相邻两边设置间隔(左上/左下/右上/右下)
第一种设置间隔的方法会导致相邻的Item间距是间隔的两倍,第二种设置间隔的方法会导致Item某一个方向上的与父布局边缘无间隔,但是另一个方向与父布局边缘有间隔,例如左上相邻两边设置了间隔,最左边一列的Item左边与父布局边缘有间隔,但是最右边一列Item右边与父布局无间隔,第一行和最后一行的Item也会出现这种情况。
要解决上面的问题,父布局RecyclerView也需要根据相应的情况设置padding让整个布局的间隔都一致。下面的例子是选择在Item布局中设置间隔,因为可以自己在布局文件中控制颜色比较方便,选择右下两边设置间隔。
首先修改两个Item的布局文件。
view_rv_staggered_item.xml修改背景色和外层间距背景色。
<?xml version="1.0" encoding="utf-8"?>
<LinearLayout xmlns:android="http://schemas.android.com/apk/res/android"
              xmlns:tools="http://schemas.android.com/tools"
              android:orientation="vertical"
              android:layout_width="match_parent"
              android:layout_height="@dimen/md_common_view_height"
              android:background="@color/md_divider"
              android:paddingBottom="5dp"
              android:paddingRight="5dp">
    <TextView
        android:id="@+id/item_tv"
        android:layout_width="match_parent"
        android:layout_height="match_parent"
        android:gravity="center"
        android:background="@color/md_white"
        tools:text="item"/>
</LinearLayout>
- 1
- 2
- 3
- 4
- 5
- 6
- 7
- 8
- 9
- 10
- 11
- 12
- 13
- 14
- 15
- 16
- 17
- 1
- 2
- 3
- 4
- 5
- 6
- 7
- 8
- 9
- 10
- 11
- 12
- 13
- 14
- 15
- 16
- 17
同样修改view_rv_staggered_item_two.xml。
<?xml version="1.0" encoding="utf-8"?>
<LinearLayout xmlns:android="http://schemas.android.com/apk/res/android"
              xmlns:tools="http://schemas.android.com/tools"
              android:orientation="vertical"
              android:layout_width="match_parent"
              android:layout_height="100dp"
              android:paddingBottom="5dp"
              android:paddingRight="5dp"
              android:background="@color/md_divider">
    <TextView
        android:id="@+id/item_tv"
        android:layout_width="match_parent"
        android:layout_height="match_parent"
        android:gravity="center"
        android:background="@color/md_white"
        tools:text="item"/>
</LinearLayout>
- 1
- 2
- 3
- 4
- 5
- 6
- 7
- 8
- 9
- 10
- 11
- 12
- 13
- 14
- 15
- 16
- 17
- 1
- 2
- 3
- 4
- 5
- 6
- 7
- 8
- 9
- 10
- 11
- 12
- 13
- 14
- 15
- 16
- 17
最后修改RecyclerView的一些属性。
<android.support.v7.widget.RecyclerView
        android:id="@+id/my_recycler_view"
        android:layout_width="match_parent"
        android:layout_height="match_parent"
        android:background="@color/md_divider"
        android:paddingLeft="5dp"
        android:paddingTop="5dp"
        android:fadeScrollbars="true"/>
运行一下,看看最后的效果。
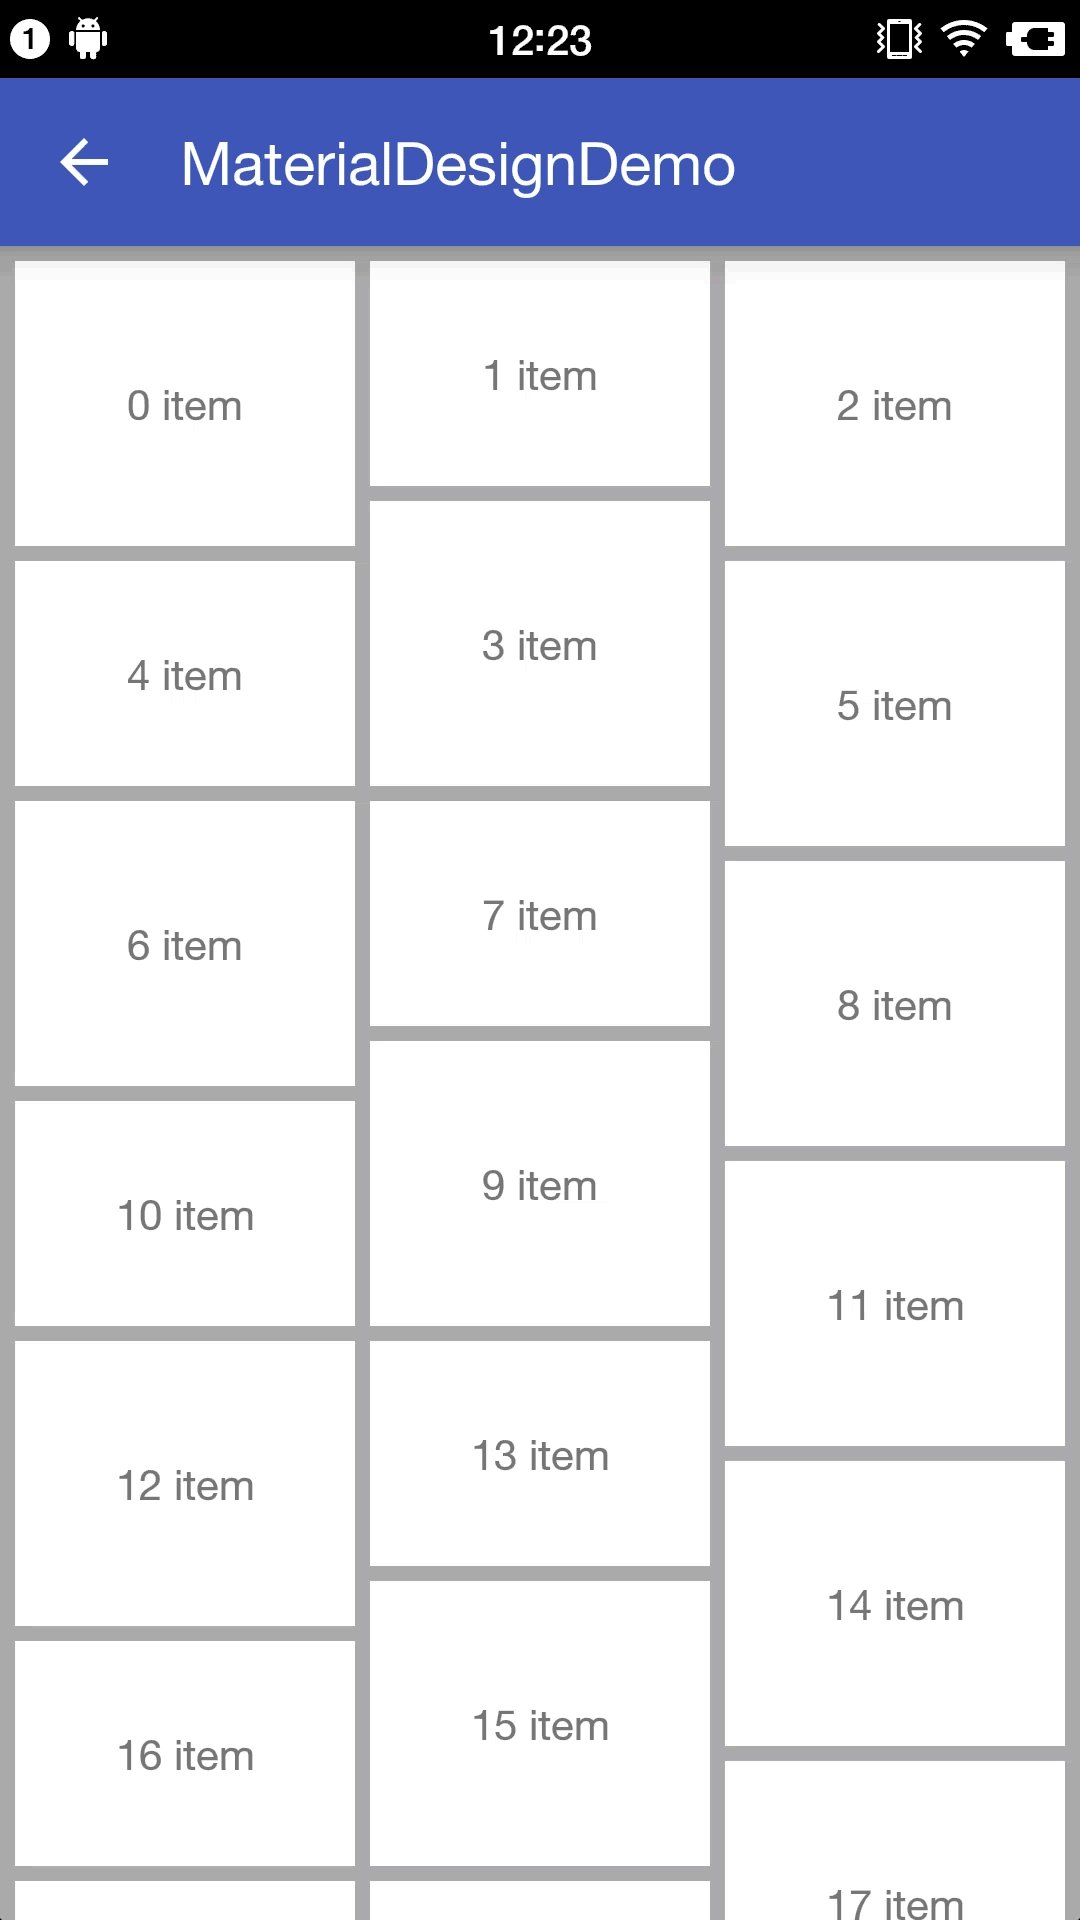
图-5 RecyclerView瀑布流
差不多完美的解决了间隔线的问题,有细心的同学可能发现,在RecyclerView滑动的时候上面一直有一条灰色的间隔线,这个可以通过取消xml布局文件中RecyclerView的paddingTop属性去掉顶部灰色的间隔线。
4. 总结
本篇文章主要介绍网格样式和瀑布流样式的RecyclerView,列表样式、网格样式和瀑布流样式在某种程度上是可以转换的。
- 网格样式的布局管理器的spanCount设置为1,就是列表样式
- 瀑布流样式如果Item的布局文件是等高,竖直方向,就是竖直方向的网格样式;如果Item是等宽,水平方向,那就是水平方向的网络样式
- 如果瀑布流样式的布局管理器spanCount设置为1,竖直方向,是竖直方向的列表;水平方向,就是水平方向的列表
Demo工程地址:https://github.com/Kyogirante/MaterialDesignDemo
目前为止关于RecyclerView的基本使用的介绍可以告一段落了,但其实关于RecyclerView深入使用可不止着一些,比如说单个Item横滑,拖动Item之间转换位置等等,官方都有提供,当然这些使用会在后面依次介绍。
原文出处:http://blog.csdn.net/xiaohanluo/article/details/52251509


 6228
6228

 被折叠的 条评论
为什么被折叠?
被折叠的 条评论
为什么被折叠?
 到【灌水乐园】发言


