


利用业余时间画得板,绝对的用心之作,所感所学以记下.......
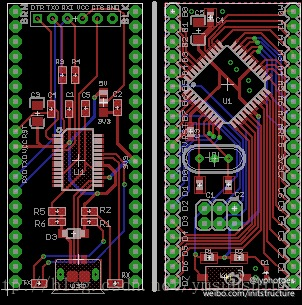
【画板及布线过程】
【画板及布线过程】
- 画板layout首先走信号线,将电源及地隐藏。
- 信号线走线不走直角。
- 布线能走短线不走远。
- 可以边走线边布局。
- 一般网格设置成20mil。线宽12mil,密集时可以走10mil(一般厂家都能做到6mil)电源线尽量走宽,24mil,32mil都行,实在不行就走16mil。
- 最后覆铜时一定要检查各覆铜面有没有连成一个GND,没有连成一片时务必过孔,而且多打几个过孔。
- 过孔直接选择20mil最好,最小12mil,太小怕厂家做不好。
- 滤波电容一定要离芯片近点,以免影响芯片起振。
【拼板——最简单方法(手动拼板)】
- 打开第一个PCB文件,此时可以关闭原理图。
- 运行 panelize.ulp 用户语言
- 执行“group”命令,选择整个PCB。
- 执行“Cut”命令,并在图上右击,选择"cut group",最后别忘记单击原点。
- 再打开第二个PCB文件,另存。
- 运行“panelize.ulp”用户语言。
- 再粘帖刚才的第一个图,the end.....
- SeeedStudio 要求在拼板的文件用丝印层一条直线分开就行(在tPlace和bPlace层分别画一条直线)。
- 【很重要】:板子今天被要求修改,主要原因是没有将两个单独的PCB的外框删除,要求将整个拼板用一个外框框起来,而不是每一个拼板有一个单独的外形框。
【拼板——程序自动拼板】
这个自动拼板方法借鉴一个国外牛人,试了一下,很好很强大,软件用Python实现,貌似也是针对SeeedStudio准备的,,原文请看
Panelizing PCBs for Seeed Using Eagle Free / Light。
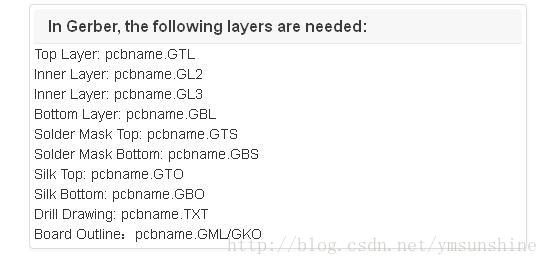
- 首先将要拼的板子设计好,并将所有PCB文件转换成Gerber文件。按照SeeedStudio提供的Gerber生成器,最后需要提供给SeeedStudio以下图层文件。
- 安装Gerbmerge和专门针对SeeedStudio的补丁文件。Gerbmerge是一个叫Rugged Circuits的家伙开发的,主要用于拼Gerber文件,而补丁文件是专门针对SeeedStudio要求在拼板文件中加一条丝印层直线这一点进行的补充。[以下文字整理自老外]:
- 拼板很简单,所有要做的就是提供Gerber文件,然后,设置一下Gerbmerge软件的配置文件和Gerbmerge文件所需的layout文件。
- 配置文件 panel.cfg 书写设置详解:
projdir = .
# 设置输出的Gerber文件的前缀
MergeOut = merge2
# 定义CutlineLayers图层,就是定义需要切割辅助线。CutlineLayers will determine where the subboard markings are, which will help in separating them. These are the accentuated lines between the two instances of the board in the image below.
CutLineLayers = *topsilkscreen,*bottomsilkscreen
# OutlineLayers图层主要被补丁文件使用,他定义了哪个图层被用于绘出电路板边框。 OutlineLayers is used by the patched gerbmerge, it defines which layers the entire panel outline will be drawn on. Seeed requires this on all layers.
OutlineLayers = *toplayer,*bottomlayer,*topsilkscreen,*bottomsilkscreen,*topsoldermask,*bottomsoldermask
# 就接下来就是定义拼板的最大尺寸,以inches为单位。如果最后的板子超出这个范围程序将在最后面给出警告。
PanelWidth = 3.93
PanelHeight = 3.93
# 底下被注释的是边距设置选项,如果不设置或者注释掉等于将边距设成无。
#LeftMargin = 0.1
#RightMargin = 0.1
#TopMargin = 0.1
#BottomMargin = 0.1
# 设置两个子板之间的空白。貌似老外说0.0625是最适合手锯切割的间距。
XSpacing = 0.0625
YSpacing = 0.0625
# if you define the merge output files to be in the filename scheme that Seeed requires, you won't have to rename them by hand later.
[MergeOutputFiles]
Prefix = %(mergeout)s
*TopLayer=%(prefix)s.GTL
*BottomLayer=%(prefix)s.GBL
*TopSilkscreen=%(prefix)s.GTO
*BottomSilkscreen=%(prefix)s.GBO
*TopSoldermask=%(prefix)s.GTS
*BottomSoldermask=%(prefix)s.GBS
Drills=%(prefix)s.TXT
BoardOutline=%(prefix)s.bor
ToolList = toollist.%(prefix)s.drl
Placement = placement.%(prefix)s.txt
# Job configuration - for each different sub-board, define a section like follows with the subboard name (used in the layout file) and the gerbers comprising that job.
[SARduino_644]
Prefix=%(projdir)s/SARduino_644
# List all the layers that participate in this job. Required layers are Drills
# and BoardOutline and have no '*' at the beginning. Optional layers have
# names chosen by you and begin with '*'. You should choose consistent layer
# names across all jobs.
*TopLayer=%(prefix)s.GTL
*BottomLayer=%(prefix)s.GBL
*TopSilkscreen=%(prefix)s.GTO
*BottomSilkscreen=%(prefix)s.GBO
*TopSoldermask=%(prefix)s.GTS
*BottomSoldermask=%(prefix)s.GBS
Drills=%(prefix)s.TXT
BoardOutline=%(prefix)s.BOR
5.拼板布局文件panel.layout书写设置详解:
6.运行Gerbmerge.py :语法为“ gerbmerge.py panel.cfg panel.layout”。正常的出现一个警告,按照提示输入“y”,就会生成一个最后的Gerber拼板文件,用免费开源的Gerbv检查,提交将所得文件zip打包提交给SeeedStudio就ok了。


 698
698


 被折叠的 条评论
为什么被折叠?
被折叠的 条评论
为什么被折叠?
 到【灌水乐园】发言


