


Android的UI框架要求用户将他们的app分为activity,通过itent来进行调度,其中有一个main activity由Android的launcher在桌面中调用。例如一个日历的应用,需要查看日历的activity,查看单个事件的activity,编辑事件的activity等等。在查看日历的activity中,如果用户选择的某个事件,需要通过查看事件的activity来处理。这就是最近本的app UI框架,本次,我们将学习如何通过intent来完成。
Activity之间的关系
某种业务逻辑下,activity1需要知道被调起的activity2是否结束,activity2就是activity1的subactivity。
另一些业务逻辑下,activity1并不需要了解被它调起的activity2的运行情况,例如在邮件中打开一个附件,邮件activity1并不需要了解查看附件activity2是否结束。这种情况下,两个activity不是主从关系,而是peer关系,activity2是一个常规的activity。
步骤1:Make the Intent
intent会封装一个请求给Android,使得其他activity或者intent receiver知道如何处理。如果intent要launch的activity是我们自己编写的,可以很容易通过一个精确指定的intent来实现,例如:
new Intent(this, HelpActivity.class);
其中HelpActivity.class就是我们需要launch的component。这个activity只需要在AndroidManifest.xml文件中定义,但是不需要任何的inter filter,因为是通过直接请求的方式。如果我们需要打上一些data,即Uri,请求一个通用的activity,如下:
Uri uri=Uri.parse("geo:"+lat.toString()+","+lon.toString());
Intent i=new Intent(Intent.ACTION_VIEW, uri);
步骤2:Make the Call
根据activity之间的关系,通过intent的方法startActivity()或者startActivityForResult()来launch另一个activity。后者是需要知道activity2是否运行结束,以及运行的结果。
startActivityForResult()会向intent传递一个数字,这个数字对于calling activity来讲是唯一的。用于区分哪个activity。被调起的activity运行完,会在calling activity中触发onActivityResult(),我们可以通过这个唯一的数字来区分到底是哪个被调起的activity运行结束。我们还会得到下面的信息:
- result code,通过被调起的activity用setResult()来设置,一般是RESULT_OK和RESULT_CANCELLED,当然我们也可以定义我们自己的返回值,(从RESULT_FIRST_USER开始定义)
- 可选的String,用于传递某些返回信息,例如是一个URL来表述某个资源,有例如在ACTION_PICK中返回用户选取内容的数据。
- 可选的Bundle,用于返回所需的信息
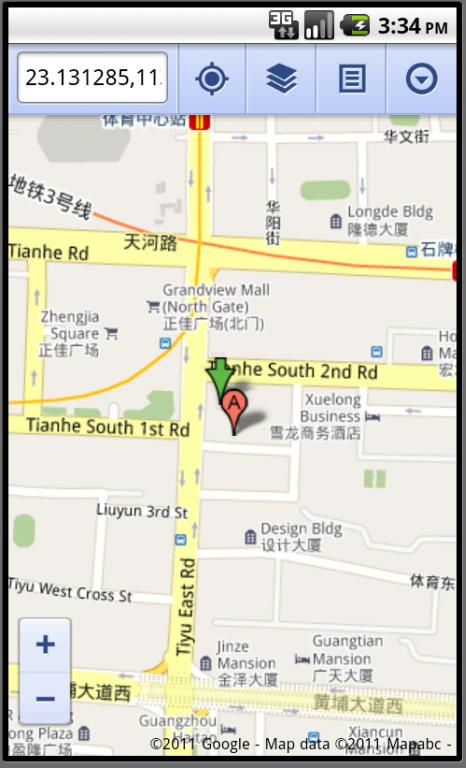
例子一:一个简单的调用
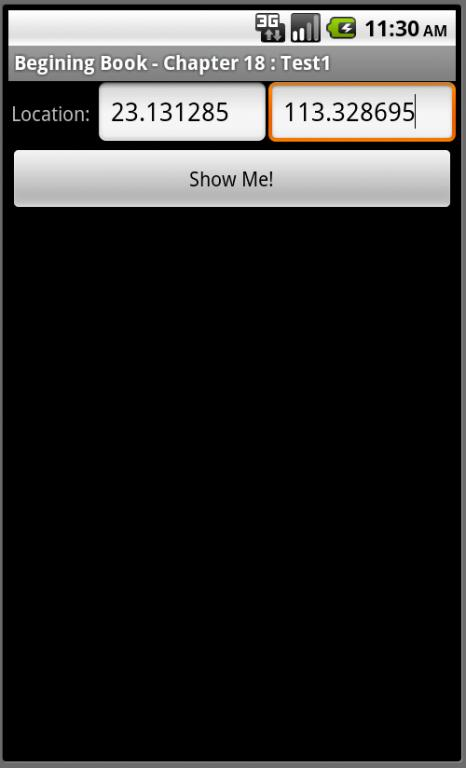
例子通过输入经纬度,然后通过intent去launch地图应用。布局文件如下,顺带复习一下TableLayout的布局:
<?xml version="1.0" encoding="utf-8"?>
<LinearLayout ...... >
<TableLayout android:layout_width="fill_parent" android:layout_height="wrap_content"
android:stretchColumns="1,2">
<TableRow>
<TextView android:layout_width="wrap_content" android:layout_height="wrap_content"
android:paddingLeft="2dip" android:paddingRight="4dip"
android:text="Location:" />
<EditText android:id="@+id/c18_lat"
android:layout_width="fill_parent" android:layout_height="wrap_content"
android:cursorVisible="true"
android:editable="true"
android:singleLine="true"
android:layout_weight="1"/>
<EditText android:id="@+id/c18_lon"
android:layout_width="fill_parent" android:layout_height="wrap_content"
android:cursorVisible="true"
android:editable="true"
android:singleLine="true"
android:layout_weight="1" />
</TableRow>
</TableLayout>
<Button android:id="@+id/c18_map" android:layout_width="fill_parent" android:layout_height="wrap_content"
android:text="Show Me!" />
</LinearLayout>
源代码如下:
public class Chapter18Test1 extends Activity{
private EditText latitude = null;
private EditText longtitude =null;
protected void onCreate(Bundle savedInstanceState) {
super.onCreate(savedInstanceState);
setContentView(R.layout.chapter_18_test1);latitude = (EditText)findViewById(R.id.c18_lat);
longtitude = (EditText)findViewById(R.id.c18_lon);
Button button = (Button)findViewById(R.id.c18_map);
button.setOnClickListener(new View.OnClickListener() {
public void onClick(View v) {
String _lat = latitude.getText().toString();
String _lon = longtitude.getText().toString();
//由于AVD缺乏地图应用,所以在模拟器中,会无法触发geo:作为URI的应用,会出现报错,如果仍然使用模拟器,可通过Web浏览的方式。例子采用模拟器。
//Uri uri=Uri.parse("geo:" + _lat + _lon);
Uri uri=Uri.parse("http://maps.google.com/?q=" +_lat + "," + _lon);
startActivity(new Intent(Intent.ACTION_VIEW,uri));
}
});
}
}
例子二:Tab Browser
我们可以回顾一下Android学习笔记(二二): 多页显示-Tag的使用中最后一个例子,在Tab中显示Acitvity。如果我们需要将Activity作为content在tab中显示,我们提供一个Intent来launch所需的activity。在这个例子中,我们将在Tab的内容中通过intent调起网页浏览。
如果我们直接使用
Intent intent=new Intent(Intent.ACTION_VIEW);
i.setData(Uri.parse(http://commonsware.com));
然后在tab中setContent(intent);我们会发现不能争取工作,因为在Android中,基于安全考虑,不能在tab中加载其他app的activity。因此我们需要自己来写。我们先写两个嵌入webkit browser的浏览器。
| public class Chapter18Test2_1 extends Activity{ private WebView browser = null; protected void onCreate(Bundle savedInstanceState) { super.onCreate(savedInstanceState); browser = new WebView(this); setContentView(browser); browser.loadUrl("http://commonsware.com"); } } | public class Chapter18Test2_2 extends Activity{ private WebView browser = null; protected void onCreate(Bundle savedInstanceState) { super.onCreate(savedInstanceState); browser = new WebView(this); setContentView(browser); browser.loadUrl("http://www.android.com"); } } |
calling activity的源代码如下,很简单

public class Chapter18Test2 extends TabActivity{ //使用TabActivity,已经有Tab的布局,因此我们不再需要布局xml文件。
private TabHost host = null;
protected void onCreate(Bundle savedInstanceState) {
super.onCreate(savedInstanceState);
host=getTabHost();
host.addTab(host.newTabSpec("one").setIndicator("CW").
setContent(new Intent(this,Chapter18Test2_1.class)));
host.addTab(host.newTabSpec("Two").setIndicator("Android").
setContent(new Intent(this,Chapter18Test2_2.class)));
}
}
我们回头在来看看这个例子的代码,同样的打开某个webkit browser的URL使用了两个activity,两个class,这是相当浪费的。我们可以将URL作为Intent的extra的信息传递。我们将上面的例子修改一下,通过Bundle来传递extra信息,并在calling activity中,可以很方便地增加tab。
被调用的activity:
public class Chapter18Test2_0 extends Activity{
private WebView browser = null;
protected void onCreate(Bundle savedInstanceState) {
super.onCreate(savedInstanceState);
browser = new WebView(this);
setContentView(browser);
Bundle bundle = getIntent().getExtras();
browser.loadUrl(bundle.getString("http_uri"));
}
}

calling的activity:
public class Chapter18Test2 extends TabActivity{
private TabHost host = null;
protected void onCreate(Bundle savedInstanceState) {
super.onCreate(savedInstanceState);
host=getTabHost();
addTab("one","CW","http://commonsware.com");
addTab("Two","Android","http://www.android.com");
addTab("Three","Blog","http://blog.csdn.net/flowingflying/");
}
//增加一个方法,用于添加tab
private void addTab(String tag, String indicator, String uri){
Bundle bundle = new Bundle();
bundle.putString("http_uri",uri);
Intent intent = new Intent(this,Chapter18Test2_0.class);
intent.putExtras(bundle);
host.addTab(host.newTabSpec(tag).setIndicator(indicator).setContent(intent));
}
}
相关链接: 我的Android开发相关文章


 2790
2790


 被折叠的 条评论
为什么被折叠?
被折叠的 条评论
为什么被折叠?
 到【灌水乐园】发言


