


上文讲到消息获取过程,本文来详细看代码。
我们说窗口创建时会创建本地的ViewRoot,然后调用WmS的addWindow方法,所以我们首先来看看WmS的代码。
你会看到frameworks/base/services/java/com/android/server/WindowManagerService.java中,没有公开的构造子,但有一个main方法,我们推测main方法即是此类的入口(当然,网络上很多资料表明,main方法就是WmS的入口)。
main方法代码如下所示:
public static WindowManagerService main(Context context,
    PowerManagerService pm, boolean haveInputMethods) {
	WMThread thr = new WMThread(context, pm, haveInputMethods);
	thr.start();

	synchronized (thr) {
		while (thr.mService == null) {
		try {
			thr.wait();
		} catch (InterruptedException e) {
		}
		}
	}

	return thr.mService;
}
创建一个WMThread,然后启动它,WMThread定义在WindowManagerService.java里面,它的run方法如下所示:
public void run() {
	Looper.prepare();
	WindowManagerService s = new WindowManagerService(mContext, mPM,
			mHaveInputMethods);
	android.os.Process.setThreadPriority(
			android.os.Process.THREAD_PRIORITY_DISPLAY);
	android.os.Process.setCanSelfBackground(false);

	synchronized (this) {
		mService = s;
		notifyAll();
	}

	Looper.loop();
}主体部分是创建一个WindowManagerService,后面是设置线程优先级等,所以有必要看看WindowManagerService的构造方法做了什么:
private WindowManagerService(Context context, PowerManagerService pm,
		boolean haveInputMethods) {
	mContext = context;
	mHaveInputMethods = haveInputMethods;
	mLimitedAlphaCompositing = context.getResources().getBoolean(
			com.android.internal.R.bool.config_sf_limitedAlpha);

	mPowerManager = pm;
	mPowerManager.setPolicy(mPolicy);
	PowerManager pmc = (PowerManager)context.getSystemService(Context.POWER_SERVICE);
	mScreenFrozenLock = pmc.newWakeLock(PowerManager.PARTIAL_WAKE_LOCK,
			"SCREEN_FROZEN");
	mScreenFrozenLock.setReferenceCounted(false);

	mActivityManager = ActivityManagerNative.getDefault();
	mBatteryStats = BatteryStatsService.getService();

	// Get persisted window scale setting
	mWindowAnimationScale = Settings.System.getFloat(context.getContentResolver(),
			Settings.System.WINDOW_ANIMATION_SCALE, mWindowAnimationScale);
	mTransitionAnimationScale = Settings.System.getFloat(context.getContentResolver(),
			Settings.System.TRANSITION_ANIMATION_SCALE, mTransitionAnimationScale);

	// Track changes to DevicePolicyManager state so we can enable/disable keyguard.
	IntentFilter filter = new IntentFilter();
	filter.addAction(DevicePolicyManager.ACTION_DEVICE_POLICY_MANAGER_STATE_CHANGED);
	mContext.registerReceiver(mBroadcastReceiver, filter);

	mHoldingScreenWakeLock = pmc.newWakeLock(PowerManager.SCREEN_BRIGHT_WAKE_LOCK,
			"KEEP_SCREEN_ON_FLAG");
	mHoldingScreenWakeLock.setReferenceCounted(false);

	mInputManager = new InputManager(context, this);

	PolicyThread thr = new PolicyThread(mPolicy, this, context, pm);
	thr.start();

	synchronized (thr) {
		while (!thr.mRunning) {
			try {
				thr.wait();
			} catch (InterruptedException e) {
			}
		}
	}

	mInputManager.start();

	// Add ourself to the Watchdog monitors.
	Watchdog.getInstance().addMonitor(this);
}
在WindowManagerService的构造子中,创建了一个InputManager对象,并调用它的start()方法,我们可以浅显地判断InputManager是一个线程类,对应的构造子如下:
public InputManager(Context context, WindowManagerService windowManagerService) {
	this.mContext = context;
	this.mWindowManagerService = windowManagerService;

	this.mCallbacks = new Callbacks();

	init();
}
这里有两点需要注意,一是Callbacks方法,进入到Callbacks类里面,可以看到它主要是调用了WindowManagerService的其他方法。另一个是init()方法,init内部调用了initNative()方法,跟踪initNative()方法时你会发现它仅仅是有以下定义:
private static native void nativeInit(Callbacks callbacks);它没有具体的实现方法,我们知道,InputManager是Java类,它会与对应的C函数进行交互,所以我们判断nativeInit实现上是使用JNI调用C函数执行操作,那怎么找到InputManager方法对应的C函数呢?
InputManager类的全路径是frameworks/base/services/java/com/android/server/InputManager.java,所以它对应的JNI一定是在frameworks/base/services/jni下,我们找到这个目录,发现该目录下有个文件名为com_android_server_InputManager.cpp,与Java文件的路径可以找到共同点,于是我们判断,com_android_server_InputManager.cpp即为InputManager.java对应的C函数。
InputManager.cpp中定义了一个NativeInputManager对象,该对象有个构造子:
NativeInputManager::NativeInputManager(jobject callbacksObj) :
    mFilterTouchEvents(-1), mFilterJumpyTouchEvents(-1), mVirtualKeyQuietTime(-1),
    mMaxEventsPerSecond(-1),
    mDisplayWidth(-1), mDisplayHeight(-1), mDisplayOrientation(ROTATION_0) {
    JNIEnv* env = jniEnv();

    mCallbacksObj = env->NewGlobalRef(callbacksObj);

    sp<EventHub> eventHub = new EventHub();
    mInputManager = new InputManager(eventHub, this, this);
}
这个构造子即对应了initNative(Callbacks callbacks)方法。
你会看到在NativeInputManager的构造子中,创建了一个InputManager对象,C代码不能直接调用Java代码,所以这个InputManager当然不是InputManager.java。跟到frameworks/base/libs/ui/InputManager.cpp里面去,找到对应的InputManager对象的构造子,代码如下所示:
InputManager::InputManager(
        const sp<EventHubInterface>& eventHub,
        const sp<InputReaderPolicyInterface>& readerPolicy,
        const sp<InputDispatcherPolicyInterface>& dispatcherPolicy) {
    mDispatcher = new InputDispatcher(dispatcherPolicy);
    mReader = new InputReader(eventHub, readerPolicy, mDispatcher);
    initialize();
}
或以看到,在InputManager.cpp的构造子中,创建了一个InputDispatcher对象和一个InputReader对象。接着看initialize()方法:
void InputManager::initialize() {
    mReaderThread = new InputReaderThread(mReader);
    mDispatcherThread = new InputDispatcherThread(mDispatcher);
}
很明显,在initialize()方法中,分别创建了InputReader线程和InputDispatcher线程。
再返回WindowManagerService的构造子,发现其最后一行代码是:
Watchdog.getInstance().addMonitor(this);再看看WindowManagerService的定义:
public class WindowManagerService extends IWindowManager.Stub
        implements Watchdog.Monitor {
由此我们可以判断,WindowManagerService事实上是一个Monitor,构造子的最后一行,是把WmS本身这个InputMonitor添加到Watchdog里面。
再联系上文的窗口创建过程:
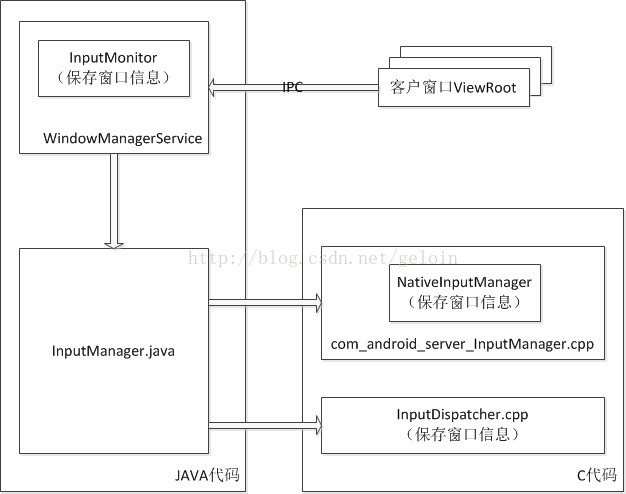
我们很容易地把代码与上图关联起来了。


 1813
1813

 被折叠的 条评论
为什么被折叠?
被折叠的 条评论
为什么被折叠?
 到【灌水乐园】发言


