


 本文以STM32F429Discovery硬件平台为例,通过图表形式详细介绍了LTDC主要参数配置方法,包括时钟配置、信号时序配置、层配置等内容。
本文基于ST官方demo板STM32F429 Discovery硬件平台,以看图说话的形式给大家讲解LTDC的主要参数配置。关于本文提到的代码部分均摘自本人另一片文章《STM32F429之LTDC代码模板》,LCD硬件为240x320,驱动IC为ili9341。本文目的意在让大家通过几张图就能掌握STM32F429 LTDC控制器的配置要领,而从干涩的文字中解脱出来,方便记忆。当然本文只是讲解了LTDC一些常用的设置,关于更多细节的操作还是得参照ST的官方datasheet。
一、关于LTDC外设的时钟配置,只需要记住下面这张图就可以了(图片来源于STM32CubeMX RCC时钟树):
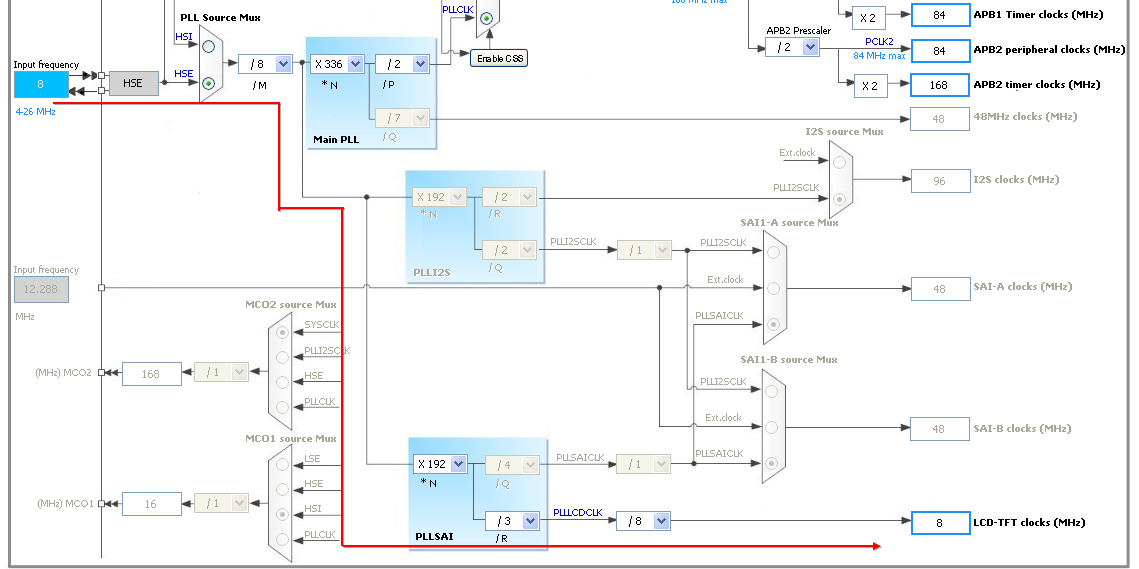
该图所对应的代码如下:
  /* Configure PLLSAI prescalers for LCD */
  /* PLLSAI_VCO Input = HSE_VALUE/PLL_M = 1 Mhz */
  /* PLLSAI_VCO Output = PLLSAI_VCO Input * PLLSAI_N = 192 Mhz */
  /* PLLLCDCLK = PLLSAI_VCO Output/PLLSAI_R = 192/3 = 64 Mhz */
  /* LTDC clock frequency = PLLLCDCLK / RCC_PLLSAIDivR = 64/8 = 8 Mhz */
  RCC_PLLSAIConfig(192, 7, 3);
  RCC_LTDCCLKDivConfig(RCC_PLLSAIDivR_Div8);

  /* Enable PLLSAI Clock */
  RCC_PLLSAICmd(ENABLE);
  /* Wait for PLLSAI activation */
  while(RCC_GetFlagStatus(RCC_FLAG_PLLSAIRDY) == RESET)
  {
  }
二、关于LCD的信号时序配置参数,只需要记住下面这张图就可以了:
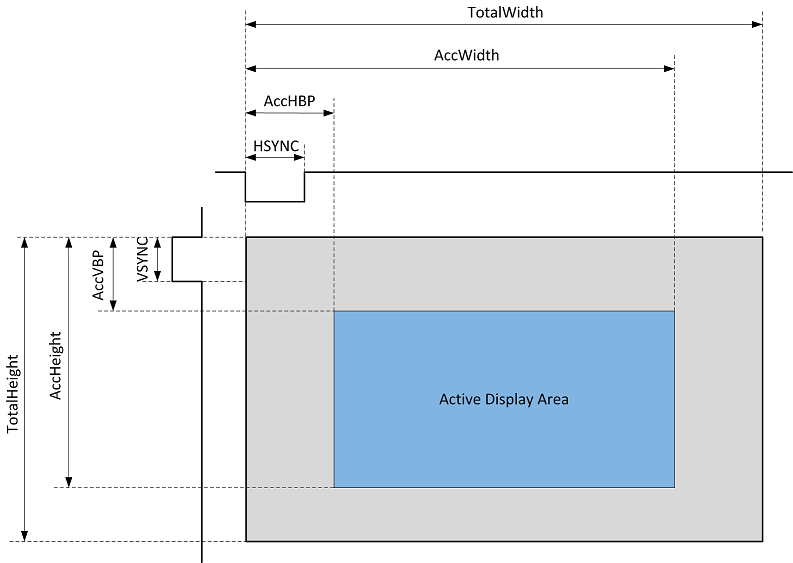
注意:这部分需要根据LCD Datasheet要求严格配置。
改图所对应的代码如下:
  /* Initialize the horizontal synchronization polarity as active low*/
  LTDC_InitStruct.LTDC_HSPolarity = LTDC_HSPolarity_AL;
  /* Initialize the vertical synchronization polarity as active low */
  LTDC_InitStruct.LTDC_VSPolarity = LTDC_VSPolarity_AL;
  /* Initialize the data enable polarity as active low */
  LTDC_InitStruct.LTDC_DEPolarity = LTDC_DEPolarity_AL;
  /* Initialize the pixel clock polarity as input pixel clock */
  LTDC_InitStruct.LTDC_PCPolarity = LTDC_PCPolarity_IPC;

  /* Timing configuration */
  /* Configure horizontal synchronization width */
  LTDC_InitStruct.LTDC_HorizontalSync = 9;
  /* Configure vertical synchronization height */
  LTDC_InitStruct.LTDC_VerticalSync = 1;
  /* Configure accumulated horizontal back porch */
  LTDC_InitStruct.LTDC_AccumulatedHBP = 29;
  /* Configure accumulated vertical back porch */
  LTDC_InitStruct.LTDC_AccumulatedVBP = 3;
  /* Configure accumulated active width */
  LTDC_InitStruct.LTDC_AccumulatedActiveW = 269;
  /* Configure accumulated active height */
  LTDC_InitStruct.LTDC_AccumulatedActiveH = 323;
  /* Configure total width */
  LTDC_InitStruct.LTDC_TotalWidth = 279;
  /* Configure total height */
  LTDC_InitStruct.LTDC_TotalHeigh = 327;
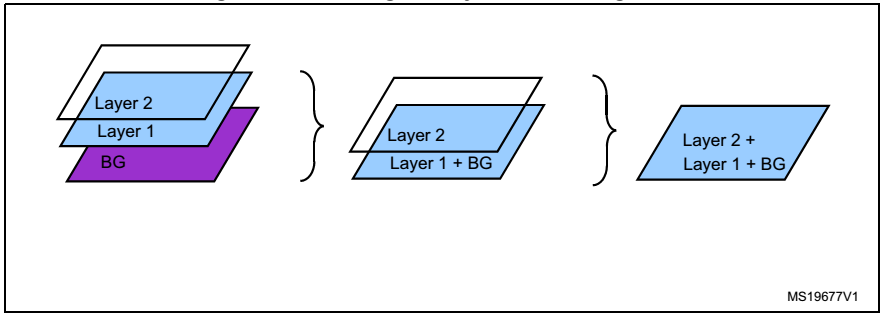
三、LTDC的层——Layer
关于层的概念有以下几点:
1. STM32F429共有3个层,分别为Background、Layer1、Layer2,任何时候LCD显示的图像都是由层叠加后的最终结果;
2. Background层任何时候都有效,而Layer1、Layer2可以通过软件配置使能或禁止;
3. 这3个层的空间顺序,从下往上依次为Background、Layer1、Layer2,所以叠加的顺序如下图:
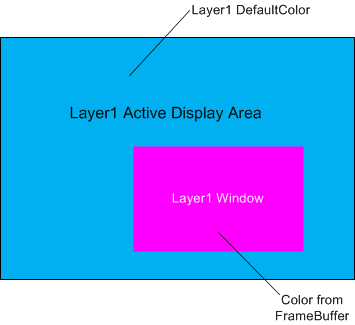
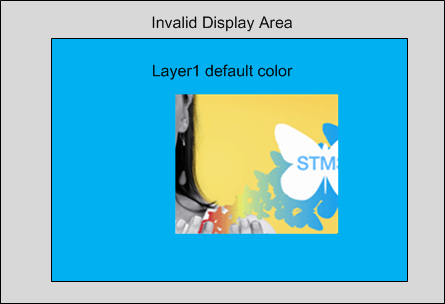
每个Layer支持窗口(Window)操作,所谓Window,就是指该层的图像只有在Window区域内有效,而Window区域外则用该层的DefaultColor填充。如下图:
关于Layer Window显示位置及大小的配置,记住下面这张图就可以了:

该图所对应的代码如下:
  /* Windowing configuration */
  /* In this case all the active display area is used to display a picture then:
  Horizontal start = horizontal synchronization + Horizontal back porch = 30
  Horizontal stop = Horizontal start + window width -1 = 30 + 240 -1
  Vertical start   = vertical synchronization + vertical back porch     = 4
  Vertical stop   = Vertical start + window height -1  = 4 + 320 -1      */
  LTDC_Layer_InitStruct.LTDC_HorizontalStart = 30;
  LTDC_Layer_InitStruct.LTDC_HorizontalStop = (240 + 30 - 1);
  LTDC_Layer_InitStruct.LTDC_VerticalStart = 4;
  LTDC_Layer_InitStruct.LTDC_VerticalStop = 320 + 4 -1;
每个Layer关联了一个显示缓冲区FrameBuffer,由于Background只能使用单色填充,所以它没有FrameBuffer。关于FrameBuffer有几个参数:Pixel Format、Buffer Address、Line Length、Number of lines、Buffer Pitch,这几个参数都是针对于Layer的Window而言的,它们的含义如下:
Pixel Format:不多说,RGB565、ARGB8888、ARGB1555等等;
Buffer Address:显示缓冲区的起始地址;
Line Length:window所对应的缓冲区宽度+3,以字节为单位;
Number of Lines:window所对应的缓冲区高度,以字节为单位;
Buffer Pitch:从这一行起始到下一行起始所经过的字节数,说白了就是换行时的一个行指针增量(也可以理解为整幅图像的宽度,以字节为单位);
假设Layer1的FrameBuffer如下图(RGB565):

设置window要显示的图像为下图粉色部分:
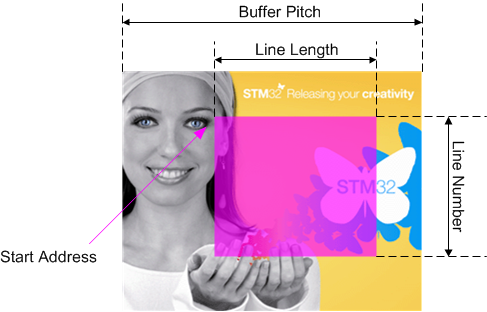
结合之前设置的Window的位置,最终显示的图像如下图(不考虑Layer2及透明色):
由此可以看到:
Start Address、Buffer Pitch决定了window在显存中每行的起始位置;
Line Length、Line Number决定了window在显存中的大小。
该部分所对应的代码如下:
  /* Input Address configuration */
  LTDC_Layer_InitStruct.LTDC_CFBStartAdress = (u32)FrameBuffer;

  /* the length of one line of pixels in bytes + 3 then :
  Line Lenth = Active high width x number of bytes per pixel + 3
  Active high width         = 240
  number of bytes per pixel = 2    (pixel_format : RGB565)
  */
  LTDC_Layer_InitStruct.LTDC_CFBLineLength = ((240 * 2) + 3);

  /*  the pitch is the increment from the start of one line of pixels to the
  start of the next line in bytes, then :
  Pitch = Active high width x number of bytes per pixel
  */
  LTDC_Layer_InitStruct.LTDC_CFBPitch = (240 * 2);

  /* configure the number of lines */
  LTDC_Layer_InitStruct.LTDC_CFBLineNumber = 320;
需要注意的是,为了保证图像能正确显示,请务必确认显存中图像的大小与window显示的大小一致,即Line Length、Line Number要与(HStop-HStart)、(VStop-VStart)相一致,否则显示将不正确。
最后不要忘了设置完所有Layer的寄存器后,光调用LTDC_LayerCmd()还不够,还需要调用LTDC_ReloadConfig(ENABLE)函数才能使所有层的设置生效。


 2850
2850

 被折叠的 条评论
为什么被折叠?
被折叠的 条评论
为什么被折叠?
 到【灌水乐园】发言


