


实现源码下载链接 http://download.csdn.net/detail/hi_zhengjian/8794731
***方法一:直接在app里面通过JNI访问HAL层***
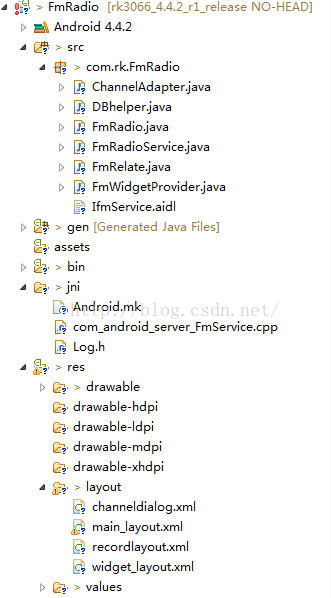
FmRadio应用代码结构如下:
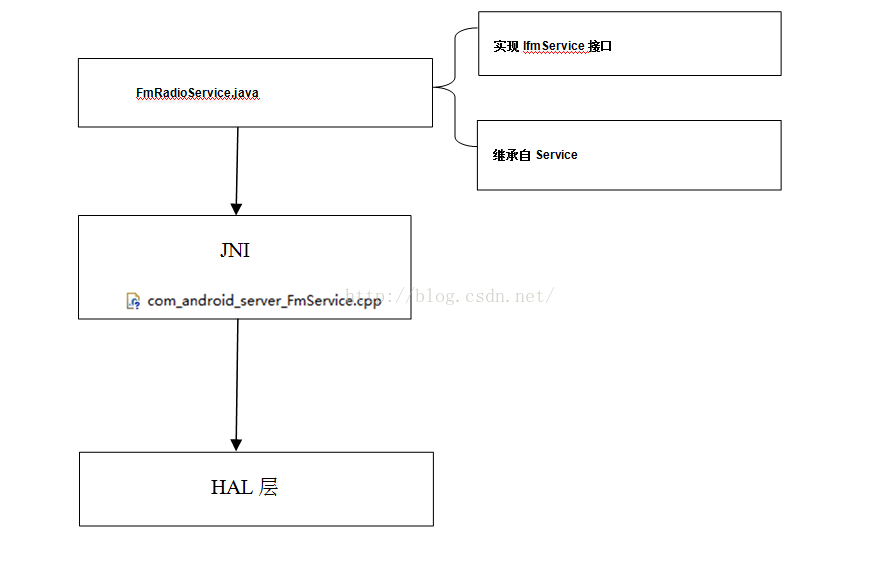
一、FMRadio.java通过FmRadioService提供的服务通过JNI访问到HAL层:
FmRadioService实现IfmService的一些接口,以及提供一些供Client调用的接口,接口里面调用到JNI。
例如:
FmRadioService.java中private voidenableFmFacility(boolean bEnable)调用到
enableFmFacility_native。
enableFmFacility_native在com_android_server_FmService.cpp中实现,在映射表中注册,也就是所谓的JNI. 最终调用com_android_server_FmService.cpp中的android_FmService_enableFmFacility。
二、JNI简介:
传统的JNI需要遵循一定的命名规则,而Android改变了这种方式,可以通过以下两种方法把java层与C++层的代码进行映射,如下:
第一个参数是Java层的函数,第二个参数是函数的参数和返回类型也是属于java层,第三个参数是JNI实现的c++函数
static const JNINativeMethodgMethods[] = {
/* name, signature, funcPtr */
{ "enableFmFacility_native", "(Z)I", (void*)android_FmService_enableFmFacility },
{ "setFmCurrentFreq_native", "(II)I", (void*)android_FmService_setFmCurrentFreq },
{ "stationIsAvailable_native", "()Z", (void*)android_FmService_stationIsAvailable },
{ "fm_mute_native", "(I)I", (void*)android_FmService_fm_mute },
};
下面这个函数是将所有的映射函数进行注册
static int registerMethods(JNIEnv*env) {
static const char* const kClassName =
"com/rk/FmRadio/FmRadioService";
jclass clazz;
/* look up the class */
clazz = env->FindClass(kClassName);
if (clazz == NULL) {
return -1;
}
/* register all the methods */
if(env->RegisterNatives(clazz,gMethods,
sizeof(gMethods) /sizeof(gMethods[0])) != JNI_OK)
{
return -1;
}
/* fill out the rest of the ID cache */// .! :在 FM 实现中, 没有必要 cache Java 类 or field 的 ID.
return cacheIds(env,clazz);
}
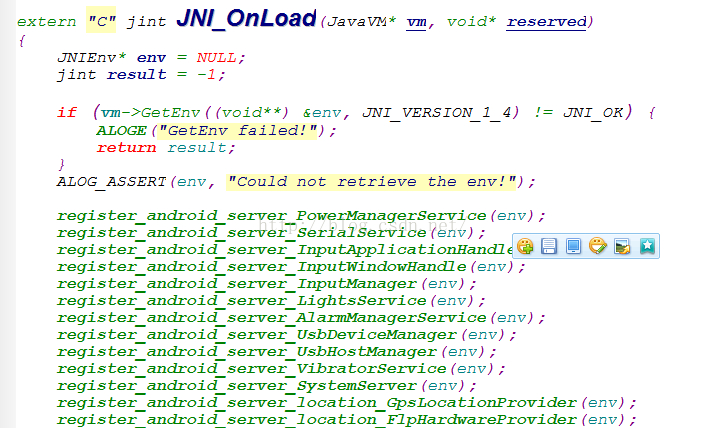
然后需要重写JNI_OnLoad函数,这个函数一定要重载,当调用System.loadLibrary("rockchip_radio_jni");的时候,JVM启动的时候就会自动加载,并将我们的函数注册到系统JNI,以便调用。
jintJNI_OnLoad(JavaVM* vm, void* reserved) {
JNIEnv* env = NULL;
jint result = -1;
if (vm->GetEnv((void**) &env,JNI_VERSION_1_4) != JNI_OK) {
goto bail;
}
assert(env != NULL);
if(registerMethods(env) != 0) {
goto bail;
}
/* success -- return valid version number */
result = JNI_VERSION_1_4;
bail:
return result;
}
或者如果在framework层也可以在framework/base/services/jni/onload.app文件中直接在下面这个方法里面添加我们的注册函数,这样也能将我们自己的函数列表注册到系统JNI里面。
JNI可以参考文档http://blog.csdn.net/zhenyongyuan123/article/details/5862054
最后特别需要注意的是,JNI里面注册的函数列表,在Java除了声明为native函数以外,而且在service里面必须要调用到,否则会出现找不到该函数。
注册好JNI之后,启动service进行访问,要注意的是系统app在Android4.2以后不能直接通过传统的startservice(intent)启动,这样会出现权限问题,因为4.2以后Android引入多用户操作,需要如下方式启动
startServiceAsUser(mServiceIntent,newUserHandle(UserHandle.USER_CURRENT));
参考文档http://xxhalbert.blog.163.com/blog/static/4849663420138127178898/
三、android_FmService_enableFmFacility会调用loadFmHal(&sFmControlDevice)
接口,loadFmHal(&sFmControlDevice)中会调用到\hardware\rk28\fm\fm.c的fm_control_open(&module->common,controlDevice),从而进入HAL层。
fm_control_open(&module->common,controlDevice)定义如下:
inline intfm_control_open(const struct hw_module_t* module, fm_control_device_t** device)
{
return module->methods->open(module,
FM_HARDWARE_CONTROL,
(structhw_device_t**)device);
}
========================================================================================================================================
类似的,其他从上层的调用也会最终调用到fm.c的其他函数,例如:
static boolean control_context__get_fm_stationIsAvailable(fm_control_device_t*dev)
{
int result = 0;
fm_control_context_t* this =(fm_control_context_t*)dev;
/* 若用户已经禁用了 fm 机构. */
if ( !(this->is_fm_facility_enabled ) )
{
E("fm facility is totallydisabled.");
result = -1;
goto EXIT;
}
result =get_fm_stationIsAvailable();
EXIT:
return result;
}
=====================================================================================================================================
int get_fm_stationIsAvailable()
{
int ret;
int state;
if(fm_fd < 0)
{
E("no init \n");
return -1;
}
ret =ioctl(fm_fd,FM_STATION_ISAVAILABLE,&state);//对于Kernel,需实现这一类调用对应的驱动
if(ret < 0)
{
E("FM GET stationIsAvailable err,%s\n", strerror(errno));
return -1;
}
return state;
}
========================================================================================================================================
Android.mk中也要设置相应的值(黑体字):
#
# Copyright (C) 2008 The Android Open Source Project
#
# Licensed under the Apache License, Version 2.0 (the"License");
# you may not use this file except in compliance with the License.
# You may obtain a copy of the License at
#
# http://www.apache.org/licenses/LICENSE-2.0
#
# Unless required by applicable law or agreed to in writing,software
# distributed under the License is distributed on an "ASIS" BASIS,
# WITHOUT WARRANTIES OR CONDITIONS OF ANY KIND, either express orimplied.
# See the License for the specific language governing permissionsand
# limitations under the License.
#
# This makefile supplies the rules for building a library of JNIcode for
# use by our example platform shared library.
LOCAL_PATH:= $(call my-dir)
include $(CLEAR_VARS)
LOCAL_LDLIBS := -llog
LOCAL_MODULE_TAGS := eng
# This is the target being built.
LOCAL_MODULE:=librockchip_radio_jni
# All of the source files that we will compile.
LOCAL_SRC_FILES:= \
com_android_server_FmService.cpp
# All of the shared libraries we link against.
LOCAL_SHARED_LIBRARIES := \
libandroid_runtime \
libnativehelper \
#libdwaharre \
libcutils \
libutils \
liblog \
libhardware
# No static libraries.
LOCAL_STATIC_LIBRARIES :=
# Also need the JNI headers.
LOCAL_C_INCLUDES += \
$(JNI_H_INCLUDE)
# No specia compiler flags.
LOCAL_CFLAGS =
# Don't prelink this library. For more efficient code, you may want
# to add this library to the prelink map and set this to true.
LOCAL_PRELINK_MODULE := false
include $(BUILD_SHARED_LIBRARY)
***方法二,将服务和JNI调用写在framework里面***
一、应用层:
FmRadioService中会有如此调用:
private FmManagermManager;
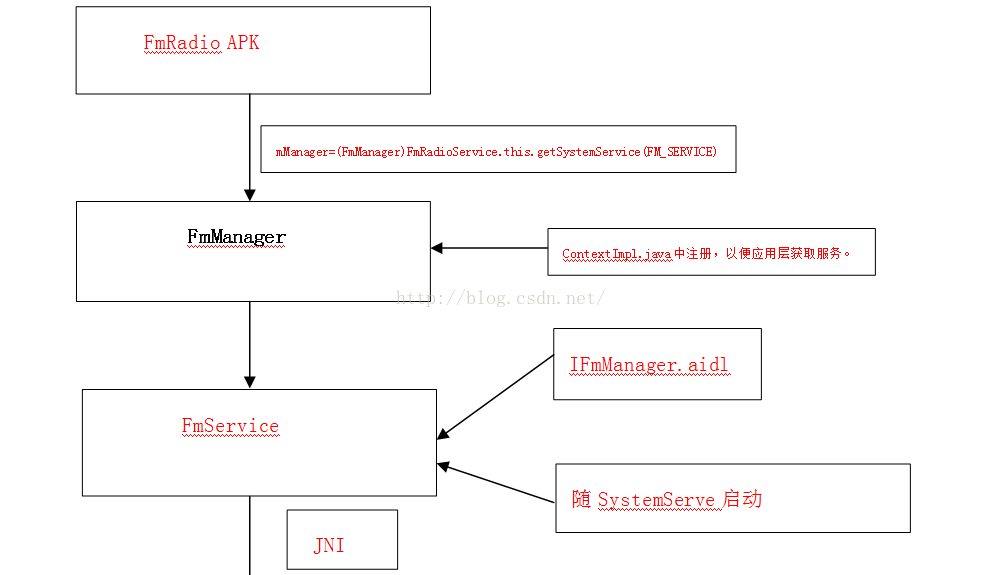
mManager =(FmManager)FmRadioService.this.getSystemService(FM_SERVICE);
mManager.setFmCurrentFreq(currentFreq,direct);
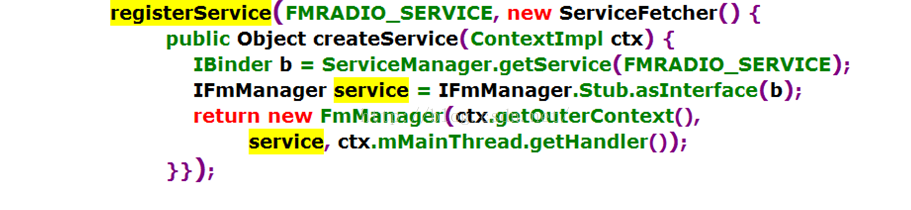
通过FmManager我们可以调用到在Framework中启动的FmService。FmManager我们在framewok层中实现,并且在core/java/android/app/ContextImpl.java中注册,以便应用层可以像上面那样获取服务。
二、Framework层:
代码路径frameworks/base
修改的文件如下:
api/current.txt
core/java/android/app/ContextImpl.java
core/java/android/content/Context.java
core/java/android/view/KeyEvent.java
core/jni/AndroidRuntime.cpp
core/res/res/values/attrs.xml
services/java/com/android/server/SystemServer.java
services/jni/onload.cpp
新增的文件
core/java/android/os/FmManager.java
core/java/android/os/IFmManager.aidl
services/java/com/android/server/fm/FmService.java
services/jni/com_android_server_fm_FmService.cpp
实现开机时启动FmService,FmService随SystemServe启动,
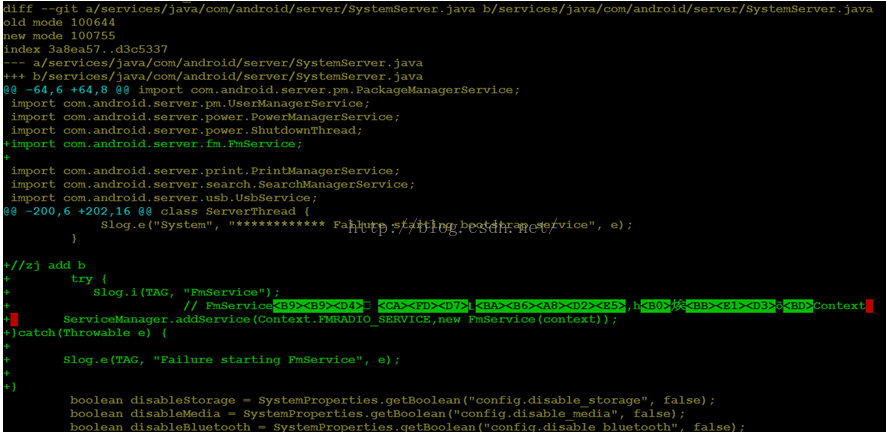
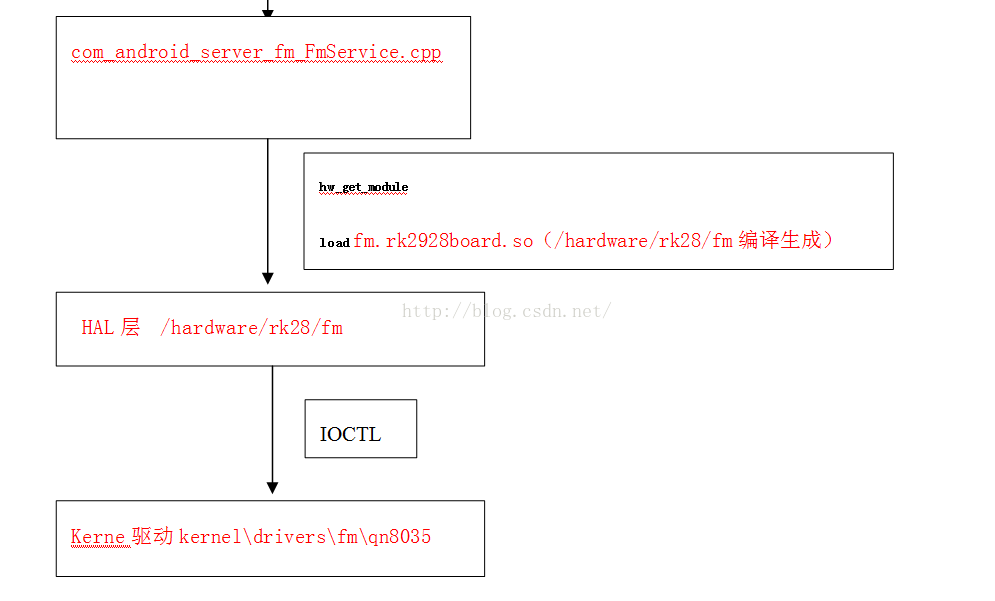
FmService 在 system 进程中, 具体实现 IFmManager 接口,FmServic实现的接口会通过JNI调用到com_android_server_fm_FmService.cpp实现的内容,JNI的内容会编译进system/lib/libandroid_servers.so以供调用。
FmService.java如下:

core/java/android/os/IFmManager.aidl如下
可以参考下面的网站来加,android 平台添系统服务:
http://www.myexception.cn/android/1344211.html
http://www.360doc.com/content/12/0719/19/87000_225297295.shtml
三、HAL层代码如下
/hardware/rk28/fm
Android.mk
fm.c
Log.h
rk28_fm.c
rk28_fm.h
Hal层是编译/hardware/rk29/fm成/system/lib/hw/fm.rk2928board.so,这个命名是有讲究的,随意命名可能会导致加载失败, hardware\rk29\fm\Android.mk中LOCAL_MODULE:= fm.$(TARGET_BOARD_HARDWARE), JNI中的com_android_server_fm_FmService.cpp中会调用hw_get_module来加载fm.rk2928board.so,如下:
static int loadFmHal(fm_control_device_t**controlDevice)
{
int result = 0;
hw_module_t const* module;
D("Load FM HAL module and open controldevice.");
/* 尝试加载 HDMI HAL module的实例数据. */
if ( (result =hw_get_module(FM_HARDWARE_MODULE_ID, &module) ) != 0 )
{
E("Fail to load .so file of FM HALmodule. result = %d", result);
goto EXIT;
}
/* 获取 控制设备的实例. */
{
if ( (result = fm_control_open(module,controlDevice) != 0 ) )
E("Fail to open control device ofFM HAL module. result = %d", result);
goto EXIT;
}
hardware\libhardware\hardware.c中对.so进行筛选,然后调用load来加载
int (const char *id, const struct hw_module_t **module)
{
D("hw_get_module");
return hw_get_module_by_class(id, NULL,module);
}
int hw_get_module_by_class(constchar *class_id, const char *inst,
const structhw_module_t **module)
{
int status;
int i;
const struct hw_module_t *hmi = NULL;
char prop[PATH_MAX];
char path[PATH_MAX];
char name[PATH_MAX];
//D("1111111");
snprintf(name, PATH_MAX,"%s.%s", class_id, inst);
//D("22222222222");
if (inst)
snprintf(name, PATH_MAX,"%s.%s", class_id, inst);
else
strlcpy(name, class_id, PATH_MAX);
//D("44444444");
/*
*Here we rely on the fact that calling dlopen multiple times on
* the same .so will simply increment arefcount (and not load
* a new copy of the library).
* We also assume that dlopen() isthread-safe.
*/
/* Loop through the configuration variantslooking for a module */
for (i=0 ; i<HAL_VARIANT_KEYS_COUNT+1 ;i++) {
//D("55555");
if (i < HAL_VARIANT_KEYS_COUNT) {
//D("66666");
if (property_get(variant_keys[i],prop, NULL) == 0) {
continue;
}
snprintf(path, sizeof(path),"%s/%s.%s.so",
HAL_LIBRARY_PATH2, name,prop);
if (access(path, R_OK) == 0) break;
snprintf(path, sizeof(path),"%s/%s.%s.so",
HAL_LIBRARY_PATH1, name,prop);
if (access(path, R_OK) == 0) break;
} else {
//D("7777");
snprintf(path, sizeof(path),"%s/%s.default.so",
HAL_LIBRARY_PATH2, name);
if (access(path, R_OK) == 0) break;
snprintf(path, sizeof(path),"%s/%s.default.so",
HAL_LIBRARY_PATH1, name);
if (access(path, R_OK) == 0) break;
}
}
//D("8888");
status = -ENOENT;
if (i < HAL_VARIANT_KEYS_COUNT+1) {
//D("9999");
/* load the module, if this fails,we're doomed, and we should not try
* to load a different variant. */
status = load(class_id, path, module);
}
HAL层调试注意点:
(1)Rk28_fm.h (hardware\rk29\fm\primitive) 中定义文件节点路径,和kernel一致, #define FM_DEV"/dev/RADIO_FM8035"
Fm8035.c (kernel\drivers\fm\qn8035) #define DRV_NAME"RADIO_FM8035"//"FM8035"
fm_fd = open(FM_DEV, O_RDWR);
if(fm_fd < 0){
E("open %s err,%s\n", FM_DEV, strerror(errno));
return -1;
}
调用到驱动中的fm8035.c的int fm8035_dev_open(struct inode*inode, struct file *filp)
{
struct fm8035_dev_s *dev =&fm8035_dev;
printk("-----------rtc fm8035_open !");
filp->private_data = dev;
return 0;
(2)
rk28_fm.c中ret = ioctl(fm_fd, FM_TR_FUN_STOP, 1);
调用到fm8035.c的int fm8035_dev_ioctl(struct inode*inode, unsigned int cmd, unsigned long arg)
参数个数要对应,否则会报inalid argument
(3)device\rockchip\rksdk\init.rc中加上权限chmod 0664 /dev/RADIO_FM8035 chown system system /dev/RADIO_FM8035这样rk28_fm.c中int fm_init(sighandler_t fm_sighandler)执行 fm_fd = open(FM_DEV, O_RDWR);的时候才不会报permission denies(权限问题)。
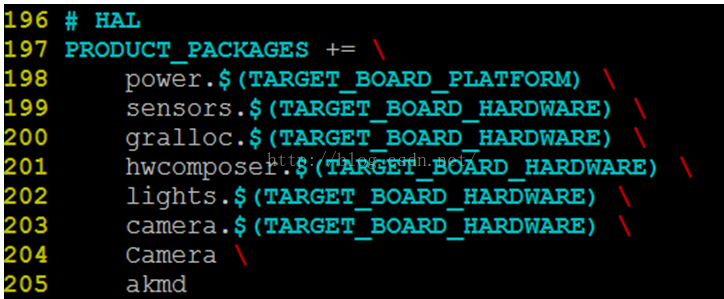
(4) 在device/rockchip/rksdk/device.mk中
这里,加上fm.$(TARGET_BOARD_HARDWARE)
HAL层的了解可以参考文章
http://blog.csdn.net/sfrysh/article/details/7931593


 2179
2179


 被折叠的 条评论
为什么被折叠?
被折叠的 条评论
为什么被折叠?
 到【灌水乐园】发言


