


@1.创建按钮
(+ (id)buttonWithType:(UIButtonType)buttonType;// 创建并返回一个特定风格的按钮)
typedef NS_ENUM(NSInteger, UIButtonType) {
UIButtonTypeCustom = 0, // 自定义风格
UIButtonTypeSystem NS_ENUM_AVAILABLE_IOS(7_0), // standard system button
UIButtonTypeDetailDisclosure, // 蓝色小箭头按钮,主要做详细说明用,push出下一层内容
UIButtonTypeInfoLight, // 亮色感叹号
UIButtonTypeInfoDark, // 暗色感叹号
UIButtonTypeContactAdd, // 十字加号按钮
UIButtonTypeRoundedRect = UIButtonTypeSystem, // Deprecated, use UIButtonTypeSystem instead (iOS7)
};
@2.指定button在View上的位置
button.frame = CGRectMake(30,50,100,150);
@3.给button设置标签,用来辨别点击的是哪个button,常用在委托方法中。
button.tag = 0;
@4.定义按钮标题
[button setTitle:@"zhaohuandeyoutiao"forState:UIControlStateNormal];
forState: 这个参数的作用是定义按钮的文字或图片在何种状态下才会显现*/
//以下是几种状态
enum {
UIControlStateNormal = 0, // 常规状态显现
UIControlStateHighlighted = 1 << 0, // 高亮状态显现
UIControlStateDisabled = 1 << 1, // 禁用的状态才会显现
UIControlStateSelected = 1 << 2, // 选中状态
UIControlStateApplication = 0x00FF0000, // 当应用程序标志时
UIControlStateReserved = 0xFF000000 // 为内部框架预留,可以不管他
};
@5.定义按钮标题字体格式
[button.titleLabel setFont:[UIFont boldSystemFontOfSize:100]];
@6.将button设置为图片
[button setImage:[UIImage imageNamed:@"iPhone.png"] forState:UIControlStateNormal];
@7.给button添加背景图片
[buttonsetBackgroundImage:[UIImageimageNamed:@"login.png"]forState:UIControlStateNormal];
@8.给button添加委托方法(点击触发的事件)
[button addTarget:selfaction:@selector(touchButton:) forControlEvents :UIControlEventTouchUpInside];
forControlEvents:
UIControlEventTouchDown =1 << 0, // 按下
UIControlEventTouchDownRepeat =1 << 1, // 多次按下
UIControlEventTouchDragInside =1 << 2, // 保持按下然后再按钮及一定的外围拖动
UIControlEventTouchDragOutside =1 << 3, // 保持按下,在按钮外面拖动
UIControlEventTouchDragEnter =1 << 4, // DragOutside进入DragInside触发
UIControlEventTouchDragExit =1 << 5, // in到out触发
UIControlEventTouchUpInside =1 << 6, // 在按钮以及一定外围内松开(最常用)
UIControlEventTouchUpOutside =1 << 7, // 按钮外面松开
UIControlEventTouchCancel =1 << 8, // 点击取消
经过上面测试,发现用setImage方法设置的图片,图片不会随着按钮的放大而放大,图片始终是原始图片尺寸,而用setBackgroundImage方法设置的图片,图片会随着按钮的变大而拉伸变大。这里我选择了第一种方法,各位看官,请随意。
那么如何设置按钮Title的位置,让其显示在底部呢,Title默认是居中显示。这就要用到inset属性了,先选中按钮,之后在Edge的选项中选择Title,之后调节Inset的Top和Left等参数,使其Title位置在底部。如下图:
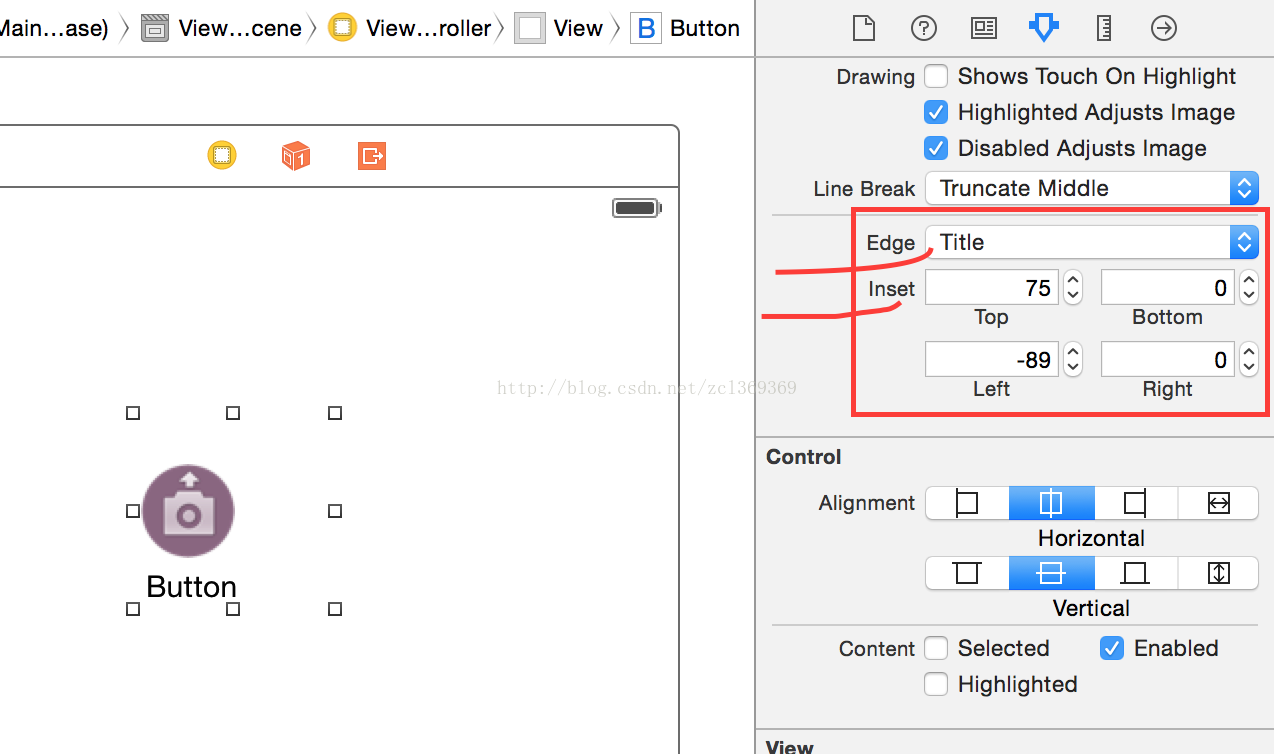
这样就完成了按钮title和按钮图片位置自定义的效果了。
代码实现设置inset:
- UIButton *btn = [[UIButton alloc] initWithFrame:CGRectMake(30, 30, 100, 100)];
- [btn setImage:[UIImage imageNamed:@"add_album"] forState:UIControlStateNormal];
- [btn setTitle:@"Title" forState:UIControlStateNormal];
- //[btn setImageEdgeInsets:(UIEdgeInsets)]
- [btn setTitleEdgeInsets:UIEdgeInsetsMake(75, -19, 0, 0)];
- [self.view addSubview:btn];


 290
290

 被折叠的 条评论
为什么被折叠?
被折叠的 条评论
为什么被折叠?
 到【灌水乐园】发言


