


 本文旨在帮助已有Python基础的读者快速掌握tkinter的基本知识,包括Label、Button、Entry、Checkbutton、Radiobutton、Listbox、Scale和Spinbox等8个组件的使用。通过实例代码和关键属性的解释,读者可以了解如何创建和定制这些组件,实现简单的界面编程。
**1. Label
2. Button
3. Entry
4. Checkbutton
5. Radiobutton
6. Listbox
7. Scale
8. Spinbox**
python tkinter比较容易掌握,所以本博文旨在让已经有python基础的人用最短的时间掌握关于py tkinter的基本知识,从而快速进入自己的界面编程
这一篇主要包括上面8个知识点,当你快速看下来的时候,一定要将这里的所有代码运行一遍,有必要则适当修改,看运行的改变从而更好掌握。代码不长(这里贴的代码基于python3,用python2则把tkinter改成Tkinter)
1.Label:
知识总结:
文本内容
text = label_text
指定内置位图
bitmap = ‘error’
其他内置位图:
* hourglass
* info
* questhead
* question
* warning
* gray12
* gray25
* gray50
* gray75
颜色:
背景色:bg = ‘blue’/’#ff0000’
前景色:fg
Red
Green
Blue
Yellow
LightBlue
规格:
高度:height
宽度:width
边框padding
padx
pady
延展:
fill = BOTH/X/Y/None水平/竖直延展
字体:
Times Courier Helvetica( font family )
normal bold roman italic underline overstrike( or combinations like: bold italic )
文本图像位置
compound: 指定文本(text)与图像(bitmap/image)是如何在 Label 上显示,缺省为 None,
当指定center时,文本(text)将被覆盖,只显示图像了。可以使用的值:
left: 图像居左
right: 图像居右
top: 图像居上
bottom:图像居下
center:文字覆盖在图像上
多行显示控制
wraplength: 指定多少单位后开始换行
justify: 指定多行的对齐方式
ahchor: 指定文本(text)或图像(bitmap/image)在 Label 中的显示位置
e/w/n/s/ne/se/sw/sn/center
布局如下图
nw n ne
w center e
sw s se
代码:
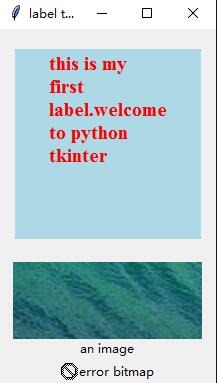
from tkinter import *
root = Tk()
root.title('label test')
label = Label(
    root,
    bg = 'lightblue',
    fg = 'red',
    font = ('times',15,'bold'),
    text = 'this is my first label.welcome to python tkinter',
    width = 15 ,
    height = 8,
    wraplength = 120,
    anchor = 'n',
    justify = 'left')
label.pack(padx = 15,pady = 20,fill = BOTH)
bm = PhotoImage(file = 'G:/file_code/sublime/temp.png')
label2 = Label(
    root,
    text = 'an image',
    compound = 'top',
    image = bm)
label2.pack()
label3 = Label(root,bitmap = 'error',text = 'error bitmap',compound = 'left').pack(fill = X)
root.mainloop()
运行截图:
2.Button:
知识总结:
文本
text = button_name
颜色
bg/fg
外观
flat, groove, raised, ridge, solid, sunken
relief = FLAT
状态
state:指定组件状态:
正常 normal
激活 active
禁用 disabled
绑定变量
textvariable = variable_name
variable_name.get()取text的值
variable_name.set(‘new_text_name’)设置text的值
位图/图像
bitmap = 位图
image = image_object
事件处理函数
command = func_name
或者
button_name.bind(“”,func_name) func_name(event)
 最低0.47元/天 解锁文章


 3855
3855

 被折叠的 条评论
为什么被折叠?
被折叠的 条评论
为什么被折叠?
 到【灌水乐园】发言


