


有了前面两篇的基础之后,我们一起来聊聊更高级的关于Spring Batch的话题。比如Job 配置;自定义各种Listener;控制步骤流程;自定义Reader,Processor,Writer;并行处理。这些东西在Spring Batch的使用中很多可能会需要的,当然还有更多的内容,最好找下文档,这样上手就快很多。
Job 配置
<job id="sampleJob" job-repository="jobRepository">
    <step id="step1">
        <tasklet transaction-manager="transactionManager">
            <chunk reader="itemReader" writer="itemWriter" commit-interval="10"/>
        </tasklet>
    </step>
</job>
这个是一个基本的Job配置。需要注意的是其中的
transaction-manager - 是Spring平台事物管理,指在处理过程中的从开始至提交的事物过程
job-repository - JobRepository用于在处理过程中周期性的存储StepExecution and ExecutionContext
commit-interval - 每次提交的item数量。
job-repository - JobRepository用于在处理过程中周期性的存储StepExecution and ExecutionContext
commit-interval - 每次提交的item数量。
我们还可以指定parent="parentStep"即父类步骤,这样可以继承父类的处理方法。 同样abstract="true"会获得抽象步的特性
<tasklet start-limit="1"> 在Tasklet中的start-limi指定启动次数限制,即该步骤可以运行的次数。配置为1即只能执行一次,再次执行就会抛出异常。skip-limit, retry-limit类似,不多说。
自定义各种Listener
StepExecutionListener
public interface StepExecutionListener extends StepListener { void beforeStep(StepExecution stepExecution); ExitStatus afterStep(StepExecution stepExecution);}
ExitStatus is the return type of afterStep in order to allow listeners the chance to modify the exit code that is returned upon completion of a Step.
ChunkListener
public interface ChunkListener extends StepListener { void beforeChunk(); void afterChunk();}
ItemReadListener
public interface ItemReadListener<T> extends StepListener { void beforeRead(); void afterRead(T item); void onReadError(Exception ex);}
ItemProcessListener
public interface ItemProcessListener<T, S> extends StepListener { void beforeProcess(T item); void afterProcess(T item, S result); void onProcessError(T item, Exception e);}
ItemWriteListener
public interface ItemWriteListener<S> extends StepListener { void beforeWrite(List<? extends S> items); void afterWrite(List<? extends S> items); void onWriteError(Exception exception, List<? extends S> items);}
SkipListener
public interface SkipListener<T,S> extends StepListener { void onSkipInRead(Throwable t); void onSkipInProcess(T item, Throwable t); void onSkipInWrite(S item, Throwable t);}
每个的用法和意义很容易根据名称和接口就可以略知一二了,前面也已经说了些例子,不一一说明。
控制步骤流程
1,序列号流程
<step id="stepA" parent="s1" next="stepB" /> <step id="stepB" parent="s2" next="stepC"/> <step id="stepC" parent="s3" />
2,条件流程
<job id="job">
    <step id="stepA" parent="s1">
        <next on="*" to="stepB" />    <!--  *匹配任意,?匹配单个 -->
        <next on="FAILED" to="stepC" />
    </step>
    <step id="stepB" parent="s2" next="stepC" />
    <step id="stepC" parent="s3" />
</job>
<step id="step1" parent="s1">
<end on="FAILED" />
<next on="COMPLETED WITH SKIPS" to="errorPrint1" />
<next on="*" to="step2" />
</step>
<end on="FAILED" />
<next on="COMPLETED WITH SKIPS" to="errorPrint1" />
<next on="*" to="step2" />
</step>
这里列出了spring batch 的两个示例。当然我们也可以通过实现
JobExecutionDecider 接口来自定义步骤流转方向。
3,Split 流程
<split id="split1" next="step4">
<flow>
<step id="step1" parent="s1" next="step2"/>
<step id="step2" parent="s2"/>
</flow>
<flow>
<step id="step3" parent="s3"/>
</flow>
</split>
<step id="step4" parent="s4"/>
<flow>
<step id="step1" parent="s1" next="step2"/>
<step id="step2" parent="s2"/>
</flow>
<flow>
<step id="step3" parent="s3"/>
</flow>
</split>
<step id="step4" parent="s4"/>
自定义Reader,Processor,Writer
前面已经说过一些例子,这里不在说了。spring batch支持FlatFile,xml ,JDBC(SQL,StoredProcedure,HibernateQL,分页等多种方式)
public class FooProcessor implements ItemProcessor<Foo,Bar>{
public Bar process(Foo foo) throws Exception {
//Perform simple transformation, convert a Foo to a Bar
return new Bar(foo);
}
}
public class BarProcessor implements ItemProcessor<Bar,FooBar>{
public FooBar process(Bar bar) throws Exception {
return new Foobar(bar);
}
}
public class FoobarWriter implements ItemWriter<FooBar>{
public void write(List<? extends FooBar> items) throws Exception {
//write items
}
}
这个是一个链式的Processor,在配置文件中这样使用就可以了
<bean id="compositeItemProcessor"
class="org.springframework.batch.item.support.CompositeItemProcessor">
<property name="delegates">
<list>
<bean class="..FooProcessor" />
<bean class="..BarProcessor" />
</list>
</property>
</bean>
<bean id="compositeItemProcessor"
class="org.springframework.batch.item.support.CompositeItemProcessor">
<property name="delegates">
<list>
<bean class="..FooProcessor" />
<bean class="..BarProcessor" />
</list>
</property>
</bean>
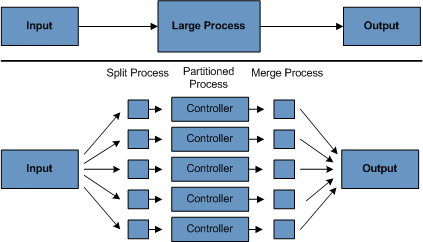
并行处理
当遇到数据量比较大或者每个ITEM处理耗时的时候,能够并行处理是很重要的。并行处理的时候一般经历Split-Partitioned-Merge的过程
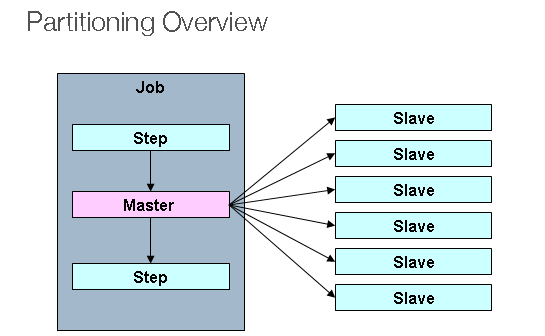

这里直接以一个根据网上例子,在上篇的基础上来说明怎么进行并行处理。
首先自定义一个Partitioner
import org.springframework.batch.core.partition.support.Partitioner;
import org.springframework.batch.item.ExecutionContext;
public class CustomerPartitioner implements Partitioner {
@Override
public Map<String, ExecutionContext> partition(int gridSize) {
Map<String, ExecutionContext> result = new HashMap<String, ExecutionContext>();
int num = 10;
int start = 1;
int end = num;
for (int i = 1; i <= gridSize; i++) {
ExecutionContext value = new ExecutionContext();
System.out.println("\nThread" + i + "[" + start + "-" + end + "]");
value.putInt("start", start);
value.putInt("end", end);
value.putString("name", "Thread" + i);
result.put("partition" + i, value);
start = end + 1;
end += num;
}
return result;
}
}
初始化一个pagingItemReader
<bean id="pagingItemReader"
class="org.springframework.batch.item.database.JdbcPagingItemReader"
scope="step">
<property name="dataSource" ref="dataSource" />
<property name="queryProvider">
<bean
class="org.springframework.batch.item.database.support.SqlPagingQueryProviderFactoryBean">
<property name="dataSource" ref="dataSource" />
<property name="selectClause" value="select ID, NAME, CREDIT " />
<property name="fromClause" value="from CUSTOMER" />
<property name="whereClause" value="where id >= :start and id <= :end" />
<property name="sortKey" value="id" />
</bean>
</property>
<!-- Inject via the ExecutionContext in rangePartitioner -->
<property name="parameterValues">
<map>
<entry key="start" value="#{stepExecutionContext[start]}" />
<entry key="end" value="#{stepExecutionContext[end]}" />
</map>
</property>
<property name="pageSize" value="10" />
<property name="rowMapper">
<bean class="com.test.batch.CustomerCreditRowMapper" />
</property>
</bean>
<bean id="customerPartitioner" class="com.test.batch.CustomerPartitioner" />
<bean id="taskExecutor" class="org.springframework.core.task.SimpleAsyncTaskExecutor" />
<bean id="taskExecutor" class="org.springframework.core.task.SimpleAsyncTaskExecutor" />
修改job配置,让job能够并行处理
<batch:job id="job1">
<batch:step id="masterStep">
<batch:partition step="slaveStep" partitioner="customerPartitioner">
<batch:handler grid-size="10" task-executor="taskExecutor"/>
</batch:partition>
</batch:step>
</batch:job>
<batch:step id="slaveStep">
<batch:tasklet transaction-manager="transactionManager"
start-limit="100000">
<batch:chunk reader="pagingItemReader" writer="itemwriter" processor="customProcessor"
commit-interval="10" />
</batch:tasklet>
</batch:step>
不出意外还是很容易成功的,可以看到启动了10个线程来并行处理数据,每个线程都读取自己的那部分数据来分开处理,这样达到加快处理效率。
还可以通过Spring Batch执行系统命令
<bean class="org.springframework.batch.core.step.tasklet.SystemCommandTasklet">
    <property name="command" value="echo hello" />
    <!-- 5 second timeout for the command to complete -->
    <property name="timeout" value="5000" />
</bean>


 2188
2188


 被折叠的 条评论
为什么被折叠?
被折叠的 条评论
为什么被折叠?
 到【灌水乐园】发言


