


制作圆角button的方法很多这里只介绍采用Layer的方法,随让layer效率上实在是不尽如人意,但是效果上绝对没话说。
下面的代码我是采用imageView加上透明button做的效果。直接修改button的layer我没弄过,不过原理应该差不多。
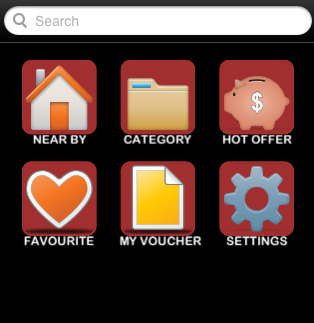
先看看效果图
UIImageView *imageView1 = [[UIImageView alloc] init];
    imageView1.frame = CGRectMake(23.75, 16.6, 75, 75);
    imageView1.image = [UIImage imageNamed:@"menu1.png"];
    imageView1.layer.MasksToBounds = YES;
    imageView1.layer.cornerRadius = 10.0;
    imageView1.layer.borderWidth = 2;
    imageView1.layer.borderColor = [[UIColor colorWithRed:161/255.0 green:47/255.0 blue:47/255.0 alpha:1] CGColor];
    imageView1.backgroundColor = [UIColor colorWithRed:161/255.0 green:47/255.0 blue:47/255.0 alpha:1];


    UIImageView *imageView2 = [[UIImageView alloc] init];
    imageView2.frame = CGRectMake(122.5, 16.6, 75, 75);
    imageView2.image = [UIImage imageNamed:@"menu2.png"];
    imageView2.layer.MasksToBounds = YES;
    imageView2.layer.cornerRadius = 10.0;
    imageView2.layer.borderWidth = 2;
    imageView2.layer.borderColor = [[UIColor colorWithRed:161/255.0 green:47/255.0 blue:47/255.0 alpha:1] CGColor];
    imageView2.backgroundColor = [UIColor colorWithRed:161/255.0 green:47/255.0 blue:47/255.0 alpha:1];

    UIImageView *imageView3 = [[UIImageView alloc] init];
    imageView3.frame = CGRectMake(221.25, 16.6, 75, 75);
    imageView3.image = [UIImage imageNamed:@"menu3.png"];
    imageView3.layer.MasksToBounds = YES;
    imageView3.layer.cornerRadius = 10.0;
    imageView3.layer.borderWidth = 2;
    imageView3.layer.borderColor = [[UIColor colorWithRed:161/255.0 green:47/255.0 blue:47/255.0 alpha:1] CGColor];
    imageView3.backgroundColor = [UIColor colorWithRed:161/255.0 green:47/255.0 blue:47/255.0 alpha:1];

    UIImageView *imageView4 = [[UIImageView alloc] init];
    imageView4.frame = CGRectMake(23.75, 118.2, 75, 75);
    imageView4.image = [UIImage imageNamed:@"menu4.png"];
    imageView4.layer.MasksToBounds = YES;
    imageView4.layer.cornerRadius = 10.0;
    imageView4.layer.borderWidth = 2;
    imageView4.layer.borderColor = [[UIColor colorWithRed:161/255.0 green:47/255.0 blue:47/255.0 alpha:1] CGColor];
    imageView4.backgroundColor = [UIColor colorWithRed:161/255.0 green:47/255.0 blue:47/255.0 alpha:1];

    UIImageView *imageView5 = [[UIImageView alloc] init];
    imageView5.frame = CGRectMake(122.5, 118.2, 75, 75);
    imageView5.image = [UIImage imageNamed:@"menu5.png"];
    imageView5.layer.MasksToBounds = YES;
    imageView5.layer.cornerRadius = 10.0;
    imageView5.layer.borderWidth = 2;
    imageView5.layer.borderColor = [[UIColor colorWithRed:161/255.0 green:47/255.0 blue:47/255.0 alpha:1] CGColor];
    imageView5.backgroundColor = [UIColor colorWithRed:161/255.0 green:47/255.0 blue:47/255.0 alpha:1];

    UIImageView *imageView6 = [[UIImageView alloc] init];
    imageView6.frame = CGRectMake(221.25, 118.2, 75, 75);
    imageView6.image = [UIImage imageNamed:@"menu6.png"];
    imageView6.layer.MasksToBounds = YES;
    imageView6.layer.cornerRadius = 10.0;
    imageView6.layer.borderWidth = 2;
    imageView6.layer.borderColor = [[UIColor colorWithRed:161/255.0 green:47/255.0 blue:47/255.0 alpha:1] CGColor];
    imageView6.backgroundColor = [UIColor colorWithRed:161/255.0 green:47/255.0 blue:47/255.0 alpha:1];


 1万+
1万+


 被折叠的 条评论
为什么被折叠?
被折叠的 条评论
为什么被折叠?
 到【灌水乐园】发言


