


http://www.codeproject.com/Articles/335516/Custom-Action-in-Visual-Studio-setup-projects
Introduction
This article provides detailed description for creating custom action in Visual Studio Setup and Deployment project. I was in need of creating an installer during one of my demo projects. I searched various options for creating an installer and was able to get good payable option like Installshield and Wise. Some free options too were there like orca or Wix. I also found that Visual Studio is capable of creating installers. As my demo project was built in Visual Studio, I finalized Visual Studio for creating my installer. During startup, I found that there are much fewer options available as compared to other installers. In Visual Studio setup project, you have to do most of the work by yourself. It provides very basic GUI options for creating an installer. This was the reason which inspired me to start installer in Visual Studio. It helped me to learn what actually happens inside the installers.
During one phase, I found that there are some installation tasks private to the application. After some searching, I got that this type of private task can be performed by using custom action. Visual Studio too provides this option for creating custom action. I started working on it but found very few samples and mostly built using .NET. I learned a little and found how to perform custom actions in UnManaged code.
Custom action can be performed by an executable, DLL or scripts like VB. The scripts or the function written in DLL is called by the installer. In this article, I will provide information for calling custom functions from DLL. I have created a custom demo installer and DLL attached with this article. I am also providing detail description about the creation of this demo installer along with images.
Creating Setup and Deployment solution
Start Visual Studio and go to "File->Project". A dialog will appear as shown below. In this dialog, we have to select project type. Since our task is to create installer, we have to select "Setup and Deployment" under "Other Project Types". We have to provide installer project name. I had provided project name as "CusomtActionInstaller" as shown below:

After clicking "OK", Installer project will get created. It shows file view of the installer which contains "Application Folder","User's Desktop" and "user's program menu". This application folder is the folder present inside "Program Files\Manufacturer name\Product Name". All the files which are required by the application are added in this folder. Application files can be added by right clicking and selecting "Application Folder->Add->File" as shown below. It will open a browse dialog which can be used for selecting required application files.

Creating Custom Action DLL
We have to create a new win32 project for creating DLL for custom action. DLL can be created by adding a new project. "Add new project" dialog will appear as shown below. Here we have to select "Win32 Console application" for creating a DLL. Now provide the DLL project name and click "OK".

After clicking "OK" next dialog will show "Overview" of Win32 Console application. Click "Next" in this dialog. Now application settings dialog will come as shown below. Here we have to select "DLL" and click "Finish" button.

Now here we can create the custom action functions which will be called by the installer. For this article, I have created 3 custom actions functions. For the first two functions, company name will be passed as a parameter.
-
RegisterCompany -
UnRegisteryCompany -
NoParameter
The prototype for the custom action function are:
extern "C" __declspec(dllexport) UINT __stdcall RegisterCompany(MSIHANDLE hInstall)
extern "C" __declspec(dllexport) UINT __stdcall UnRegisterCompany(MSIHANDLE hInstall)
extern "C" __declspec(dllexport) UINT __stdcall NoParameter(MSIHANDLE hInstall)
Custom action function should have calling convention as __stdcall and it can take only one parameter that is MSI handle. This MSI handle is used by various installer APIs like MsiOpenDatabase, MsiGetProperty,MsiGetTargetPath, etc. In our demo installer, I have used "MsiGetProperty" API for getting parameter passed to custom action function by installer. The code snippet for getting parameter is:
RetCode =  MsiGetProperty(hInstall, L"CustomActionData", L"", &bufSize);
if (RetCode == ERROR_MORE_DATA)
{
    // MsiGetProprty return required size without NULL character.
    // It becomes necessary to add 1 for NULL character.
    bufSize++;
    szBuffer = new TCHAR[bufSize];
    if(szBuffer)
        RetCode = MsiGetProperty(hInstall, L"CustomActionData", szBuffer, &bufSize);
}
In the above code snippets, "MsiGetProperty" is called with an empty buffer string for getting size of parameter passed. The size returned from this API is without "\0" character at the end. Buffer size is increased for accommodating null character and then MsiGetProperty is again called for getting the parameter passed to the custom action. After getting parameter, application specific task can be done. In my demo installer, I have created a registry key with the parameter passed to the custom action function. For the installer to proceed further, custom action function should return "ERROR_SUCCESS" or 0. If return type is other than "ERROR_SUCCESS", then installation is rolled back and installation fails.
For successful compilation of the custom action DLL "Msiquery.h" header file and "Msi.lib" needs to be included in the DLL project. More details about the custom action code is present in the attached source file.
Adding Custom Action DLL in Installer
After successful compilation of custom action DLL, it needs to be added to the installer project. This custom action DLL should be added to the installer project in the same way as application files are added to the project in figure 2.

We have completed the task of creating and adding custom action DLL into the installer project. Now I am going to show steps for adding this custom action function in our installer project. Right click installer project and select "View->Custom Action" as shown in the below figure:

A custom action view is shown which contain "Install", "Commit", "Rollback" and "Uninstall" filters. Custom action function under "Install" filter is called when installer is copying the application files in destination machine. If we want to perform any task after successful completion of installation, then custom action under "Commit" filter is called. If some error comes during installation process, then we have to rollback all the application specific tasks we have performed. In this case, custom action function under "Rollback" filter is called. If we want to remove the changes we have done during the installation process, then custom action function under "Uninstall" filter is called.
In our demo project, I have called custom action "RegisterCompany" during installation, "UnRegisterCompany" during uninstallation and "NoParameter" during commit process. The following step needs to be performed for adding custom action during install. Right click "Install": and select "Add Custom Action.." as shown in the figure below:

It opens a dialog for selecting Items in project. Here, we need to select "InstallerHelper.dll" file. When the custom action DLL is selected, it comes under Install section as shown in the figure below:

Now open properties of InstallerHelper.dll file. This can be done by right clicking the file and selecting "Properties Window" in context menu. We can see from the above figure that there are four options present in custom action properties.
-
Condition: The condition provided under this column specifies the condition that must be satisfied in order to perform the custom action. -
CustomActionData: It specifies the custom data which is passed to the DLL. -
EntryPoint: Specifies the custom action function name which needs to be called. -
InstallerClass: It specifies that the custom action is made from .NETProjectInstallerclass or not. Since our DLL does not use .NET, so it should beFALSE.
Similar steps need to be performed for "UnRegisterCompany" and "NoParameter" custom action as shown in the below images:
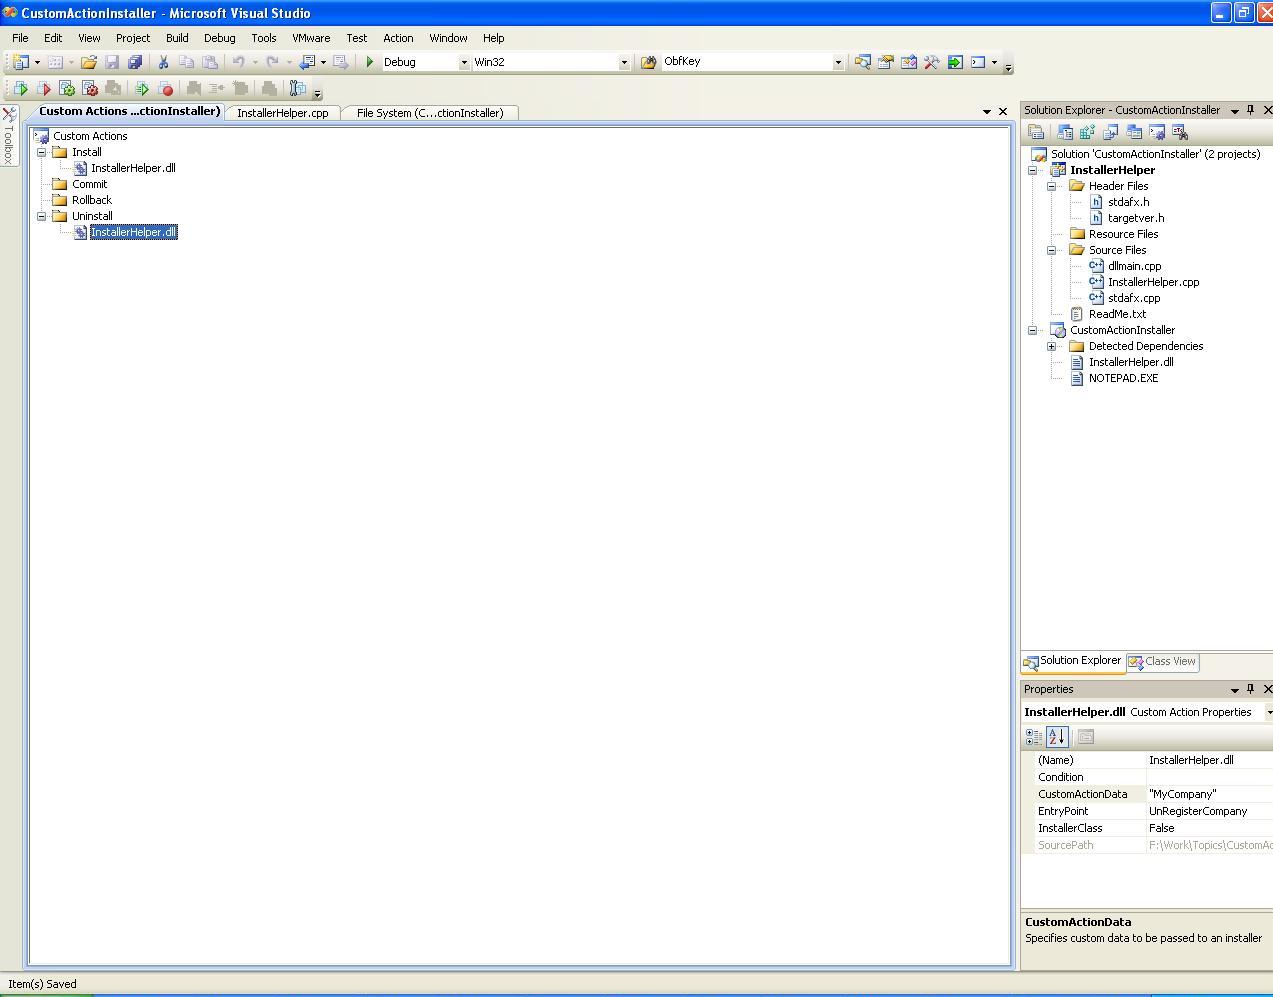
UnRegisterCompany Custom action Image.

NoParameter Custom action Image.
In NoParameter custom action condition "Not Version64" is provided. It means that this custom action should not run in 64 bit Windows machine.
Testing the Installer Custom Action
When CustomActionInstaller.msi is run, RegisterCompany custom action is called and a registry key namedMyCompany is created under HKEY_CURRENT_USER.
When we uninstall this installer, then "UnRegisterCompany" custom action is called and registry key namedMyCompany is deleted under HKEY_CURRENT_USER.
Summary
This article provides information for creating custom action in Win32, passing parameter to custom action functions, extracting parameter passed from installer inside custom action function. I will try to give more information on installer once I come across some more interesting task. Demo source and application can be used for understanding this topic. You can ask any question on this, I will try to answer it as soon as possible. So, enjoy learning. 


 1万+
1万+

 被折叠的 条评论
为什么被折叠?
被折叠的 条评论
为什么被折叠?
 到【灌水乐园】发言


