本系列的全部源代码及二进制文件可以从这里下载:IocInCSharp.rar
你真的了解Ioc与AOP吗?我现在还不是很了解,而且越学习越发现自己了解的很少,Ioc与AOP中蕴涵了大量的能量等待我们去开发。在这个系列中,我仅仅利用Sping.net这个框架向大家展示一下Ioc与AOP的强大功能(呵呵,其实写这段话的目的是因为“文章题目”牛皮吹得有点大了,给自己个台阶下罢了)。
在这个系列中一共包含6个案例,从简单到复杂,也是对问题分解、思考和解决的一个过程,它们分别是:(1)类之间的依赖;(2)接口依赖;(3)基于配置文件和Reflection的工厂模式;(4)使用Spring.net实现Ioc;(5)Romoting;(6)利用Ioc在不动一行代码的情况下实现Remoting。为了更好的理解文中的内容,最好顺序阅读。
作为一个应用系统,代码复用至关重要。如果在你的设计中,类与类存在很强的相互关联,那么你会发现在重用这些组件时就存在很严重的问题。在Step1到Step3-Reflection的例子中,我们试图 利用“针对接口编程”以及自己设计的Ioc对系统进行解耦。在Step3到Step5的例子中,我们将利用Spring.net提供的Ioc框架,轻松完成解耦以及系统改造等工作。
一、类之间的依赖
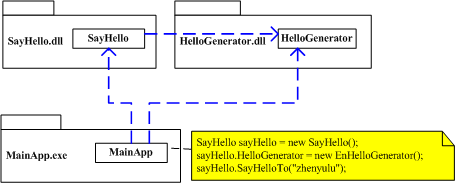
我们的第一个例子主要用于说明程序的基本构造,并且作为一个反面典型,引出为什么要解耦,以及如何下手。在这个例子中,我们将创建三个程序集,分别是MainApp.exe、HelloGenerator.dll以及SayHello.dll。它们之间的关系如下图所示:

HelloGenerator类根据提供的姓名产生一个问候字符串,代码如下:
using System;
namespace IocInCSharp
{
   public class EnHelloGenerator
   {
      public string GetHelloString(string name)
      {
         return String.Format("Hello, {0}", name);
      }
   }
}
SayHello类持有一个对EnHelloGenerator的引用,并负责将生成出来的问候字符串打印出来。
using System;
namespace IocInCSharp
{
   public class SayHello
   {
      private EnHelloGenerator _helloGen;
      public EnHelloGenerator HelloGenerator
      {
         get { return _helloGen; }
         set { _helloGen = value; }
      }
      public void SayHelloTo(string name)
      {
         if(_helloGen != null)
            Console.WriteLine(_helloGen.GetHelloString(name));
         else
            Console.WriteLine("Client.hello is not initialized");
      }
   }
}
MainApp.exe负责完成对象的创建、组装以及调用工作:
using System;
namespace IocInCSharp
{
   public class MainApp
   {
      public static void Main()
      {
         SayHello sayHello = new SayHello();
         sayHello.HelloGenerator = new EnHelloGenerator();
         sayHello.SayHelloTo("zhenyulu");
      }
   }
}
在这个设计中,组件与组件之间、类与类之间存在着紧密的耦合关系。SayHello类中的_helloGen字段类型为EnHelloGenerator,这将导致我们很难给它赋予一个其它的HelloGenerator(例如CnHelloGenerator,用于生成中文问候语)。另外MainApp也严重依赖于SayHello.dll以及HelloGenerator.dll,在程序中我们可以看到类似new SayHello();new EnHelloGenerator();的命令。
这种紧密的耦合关系导致组件的复用性降低。试想,如果想复用SayHello组件,那么我们不得不连同HelloGenerator一同拷贝过去,因为SayHello.dll是依赖与HelloGenerator.dll的。解决这个问题的办法就是“针对抽象(接口)”编程 (依赖倒置原则)。这里的抽象既包括抽象类也包括接口。我不想过多的去谈抽象类和接口的区别,在后续的例子中我们将使用接口。由于接口在进行“动态代理”时仍能保持类型信息,而抽象类可能由于代理的原因导致继承关系的“截断”(如MixIn等)。除此之外,对于单继承的C#语言而言,使用接口可以拥有更大的弹性。
二、接口依赖
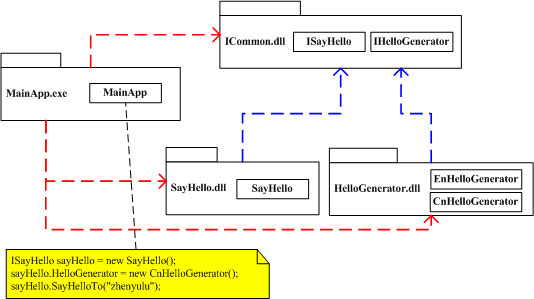
既然类之间的依赖导致耦合过于紧密,按照《设计模式》的理论,我们要依赖于接口。但是人们往往发现,仅仅依赖于接口似乎并不能完全解决问题。我们从上面的例子中抽象出接口后,组件间的依赖关系可能变成如下图所示:

经过改造后,SayHello不再依赖于具体的HelloGenerator,而是依赖于IHelloGenerator接口,如此一来,我们可以动态的将EnHelloGenerator或是CnHelloGenerator赋给SayHello,其打印行为也随之发生改变。接口的定义以及改造后的SayHello代码如下(为了节省空间,将代码合并书写):
using System;
namespace IocInCSharp
{
   public interface IHelloGenerator
   {
      string GetHelloString(string name);
   }
   public interface ISayHello
   {
      IHelloGenerator HelloGenerator{ get; set; }
      void SayHelloTo(string name);
   }
   public class SayHello : ISayHello
   {
      private IHelloGenerator _helloGen;
      public IHelloGenerator HelloGenerator
      {
         get { return _helloGen; }
         set { _helloGen = value; }
      }
      public void SayHelloTo(string name)
      {
         if(_helloGen != null)
            Console.WriteLine(_helloGen.GetHelloString(name));
         else
            Console.WriteLine("Client.hello is not initialized");
      }
   }
}
但是我们的MainApp似乎并没有从接口抽象中得到什么好处,从图中看,MainApp居然依赖于三个组件:ICommon.dll、HelloGenerator.dll以及SayHello.dll。这是由于MainApp在这里负责整体的“装配”工作。如果这三个组件中的任何一个发生变化,都将导致MainApp.exe的重新编译和部署。从这个角度来看,似乎“针对接口编程”并没有为我们带来太多的好处。
如果能够将“组件装配”工作抽象出来,我们就可以将MainApp的复杂依赖关系加以简化,从而 进一步实现解耦。为此,我们引入“工厂”模式,并利用配置文件和反射技术,动态加载和装配相关组件。
三、基于配置文件和Reflection的工厂模式
为了消除MainApp对其它组件的依赖性,我们引入工厂模式,并且根据配置文件指定的装配规程,利用.net提供的反射技术完成对象的组装工作。本部分代码仅仅提供一种功能演示,如果实际应用仍需进一步完善(建议使用一些成型的Ioc框架,例如Spring.net或Castle等)。经过改造后的系统,组件间依赖关系如下图:

可以看出这次实现了真正的“针对接口编程”。所有的组件只依赖于接口。MainApp所需的对象是由工厂根据配置文件动态创建并组装起来的。当系统需求发生变化时,只需要修改一下配置文件就可以了。而且MainApp、SayHello和HelloGenerator之间不存在任何的依赖关系,实现了松耦合。
这是如何实现的呢?我们首先要能够解析配置文件中的信息,然后建立包含相关信息的对象。最后根据这些信息利用反射机制完成对象的创建。首先我们看一下配置文件所包含的内容:
<?xml version="1.0" encoding="utf-8" ?>
<configuration>
   <configSections>
      <sectionGroup name="IocInCSharp">
         <section name="objects" type="IocInCSharp.ConfigHandler, MainApp" />
      </sectionGroup>
   </configSections>
   <IocInCSharp>
      <objects>
         <object name="SayHello" assembly="SayHello.dll" typeName="IocInCSharp.SayHello">
            <property name="HelloGenerator" assembly="HelloGenerator.dll"
                      typeName="IocInCSharp.CnHelloGenerator"></property>
         </object>
      </objects>
   </IocInCSharp>
</configuration>
从中我们可以看出,我们实现了一个IocInCSharp.ConfigHandler类,用来处理配置文件中IocInCSharp/objects结点中的内容。ConfigHandler类将根据该结点下的内容处理并创建一ConfigInfo对象(关于ConfigInfo、ObjectInfo以及PropertyInfo的代码可自行查看源代码,这里就不再赘述)。ConfigHandler类的代码实现如下:
using System;
using System.Configuration;
using System.Xml;
namespace IocInCSharp
{
   public class ConfigHandler:IConfigurationSectionHandler
   {
      public object Create(object parent, object configContext, System.Xml.XmlNode section)
      {
         ObjectInfo info;
         PropertyInfo propInfo;
         ConfigInfo cfgInfo = new ConfigInfo();
         foreach(XmlNode node in section.ChildNodes)
         {
            info = new ObjectInfo();
            info.name = node.Attributes["name"].Value;
            info.assemblyName = node.Attributes["assembly"].Value;
            info.typeName = node.Attributes["typeName"].Value;
            foreach(XmlNode prop in node)
            {
               propInfo = new PropertyInfo();
               propInfo.propertyName = prop.Attributes["name"].Value;
               propInfo.assemblyName = prop.Attributes["assembly"].Value;
               propInfo.typeName = prop.Attributes["typeName"].Value;
               info.properties.Add(propInfo);
            }
            cfgInfo.Objects.Add(info);
         }
         return cfgInfo;
      }
   }
}
通过ConfigHandler的解析,我们最终得到一个ConfigInfo实例,Factory就是根据这个实例中所包含的配置信息,利用反射技术对所需对象生成并组装的。SayHelloFactory的代码如下:
using System;
using System.IO;
using System.Configuration;
using System.Reflection;
namespace IocInCSharp
{
   public class SayHelloFactory
   {
      public static object Create(string name)
      {
         Assembly assembly;
         object o = null;
         object p;
         string rootPath = Path.GetDirectoryName(Assembly.GetEntryAssembly().Location) +
                           Path.DirectorySeparatorChar;
         ConfigInfo cfgInfo = (ConfigInfo)ConfigurationSettings.GetConfig("IocInCSharp/objects");
         ObjectInfo info = cfgInfo.FindByName(name);
         if(info != null)
         {
            assembly = Assembly.LoadFile(rootPath + info.assemblyName);
            o = assembly.CreateInstance(info.typeName);
            Type t = o.GetType();
            for(int i=0; i<info.properties.Count; i++)
            {
               PropertyInfo prop = (PropertyInfo)info.properties[i];

               assembly = Assembly.LoadFile(rootPath + prop.assemblyName);
               p = assembly.CreateInstance(prop.typeName);
               t.InvokeMember(prop.propertyName,
                  BindingFlags.DeclaredOnly |
                  BindingFlags.Public | BindingFlags.NonPublic |
                  BindingFlags.Instance | BindingFlags.SetProperty, null, o, new Object[] {p});
            }
         }
         return o;
      }
   }
}
在上面这段代码中,重点注意三条命令的使用方法:
assembly = Assembly.LoadFile(rootPath + prop.assemblyName);
p = assembly.CreateInstance(prop.typeName);
t.InvokeMember(prop.propertyName,
   BindingFlags.DeclaredOnly |
   BindingFlags.Public | BindingFlags.NonPublic |
   BindingFlags.Instance | BindingFlags.SetProperty, null, o, new Object[] {p});
Assembly.LoadFile()用于将外部文件装载进来;assembly.CreateInstance()根据装载进来的程序集创建一指定类型的对象;t.InvokeMember(prop.propertyName, ........BindingFlags.SetProperty, null, o, new Object[] {p})利用反射机制对创建出来的对象设置属性值。
我们的Factory就是利用这种方式根据配置文件动态加载程序集,动态创建对象并设置属性的。有了这个Factory,MainApp中的内容就很简单了:
using System;
namespace IocInCSharp
{
   public class MainApp
   {
      public static void Main()
      {
         ISayHello sayHello = (ISayHello)SayHelloFactory.Create("SayHello");
         if(sayHello != null)
            sayHello.SayHelloTo("zhenyulu");
         else
            Console.WriteLine("Got an Error!");
      }
   }
}
现在,MainApp只依赖于接口,不再依赖于其它组件,实现了松耦合。在本例子中,大家可以尝试将配置文件中的IocInCSharp.CnHelloGenerator更改为IocInCSharp.EnHelloGenerator,看看是否输出内容由中文变为了英文。这便是“注入”的效果。
从上面这个例子我们可以看出,通过自定义配置文件和.net中的Reflection技术,我们自己就可以开发Ioc应用,根据配置文件的信息自行组装相应的对象。但是Reflection编程的技术门槛还是比较高的,并且在实际应用中配置文件的格式、Handler的设计都不是象上面代码那样的简单。不过幸好我们现在有很多的Ioc容器可供选择,它们都提供了完整的依赖注入方式,并且比自己写代码更加成熟、更加稳定。使用这些框架可以让程序员在三两行代码里完成“注入”工作。在我们下一个案例中,我们将使用Spring.net实现依赖注入。我们会发现仅仅添加几行代码并更改一下配置文件就可轻松实现依赖注入。
四、使用Spring.net实现依赖注入
Spring在Java界可是响当当的名字,现在也有.net平台下的Spring框架了,那就是Spring.net。用户可以从http://www.springframework.net/下载到Spring.net的最新版本。本例子中使用的版本为“Spring Interim Build August 15, 2005 ”,并对Spring.Services组件中的Remoting部分做了微小调整,删除了代码中用于输出的部分命令。
Spring.net为我们提供了一种基于配置文件的注入方式,目前Spring.net允许将值注入到属性,也允许将一个工厂绑定到属性,工厂的产品将注入属性;除此之外,Spring.net还允许将一个方法的返回结果绑定到属性;它还可以在绑定之前强制进行初始化。另外Spring.net还专门针对.net提供了Remoting以及Windows Service的“注入”方式。Spring.AOP允许完成横切(不过目前是调用的是AopAlliance的代码)。
尽管我对基于配置文件的注入方式仍然有些偏见(我认为它很难Debug、难于理解、没有编译时错误校验、编写效率比较低。另外它还存在安全隐患 ,恶意用户可以借助修改配置文件将恶意代码注入系统。因此,Spring.net在Web开发中应当更具优势),但这并不能掩盖Spring.net的光芒(据说Castle比Spring.net要好,但目前我还没有尝试过使用Castle)。使用Spring.net,我们只需修改两三行代码,并提供相应配置文件,就可以轻松实现Ioc。应用Spring.net后,我们的系统依赖关系如下图所示:

从图中可以看出,MainApp、SayHello、HelloGenerator之间并不存在任何依赖关系,它们都依赖于抽象出来的接口文件。除此之外,MainApp还依赖于Spring.net,这使得MainApp可以借助Spring.net实现组件动态创建和组装。
对于原有代码,我们几乎不用作任何调整,唯一需要修改的就是MainApp中的调用方法,代码如下:
using System;
using System.Configuration;
using Spring.Context;
namespace IocInCSharp
{
   public class MainApp
   {
      public static void Main()
      {
         try
         {
            IApplicationContext ctx = ConfigurationSettings.GetConfig("spring/context") as IApplicationContext;
            ISayHello sayHello = (ISayHello)ctx.GetObject("mySayHello");
            sayHello.SayHelloTo("zhenyulu");
         }
         catch (Exception e)
         {
            Console.WriteLine(e);
         }
      }
   }
}
首先我们要添加对Spring.Context命名空间的引用,然后解析配置文件的"spring/context"结点,得到一IApplicationContext对象(就好比在上一个例子中我们得到的ConfigInfo对象一样),剩下的事情就是向该Context索要相关的对象了(ISayHello)ctx.GetObject("mySayHello"),其中"mySayHello"由配置文件指定生成方式和注入方式。
配置文件的内容如下:
<?xml version="1.0" encoding="utf-8" ?>
<configuration>
   <configSections>
      <sectionGroup name="spring">
         <section name="context" type="Spring.Context.Support.ContextHandler, Spring.Core" />
         <section name="objects" type="Spring.Context.Support.DefaultSectionHandler, Spring.Core" />
      </sectionGroup>
   </configSections>
   <spring>
      <context>
         <resource uri="config://spring/objects" />
      </context>
      <objects xmlns="http://www.springframework.net">
         <object id="mySayHello" type="IocInCSharp.SayHello, SayHello">
            <property name="HelloGenerator">
               <ref object="myCnHelloGenerator" />
            </property>
         </object>
         <object id="myEnHelloGenerator" type="IocInCSharp.EnHelloGenerator, HelloGenerator" />
         <object id="myCnHelloGenerator" type="IocInCSharp.CnHelloGenerator, HelloGenerator" />
      </objects>
   </spring>
</configuration>
注意观察<object id="mySayHello".....>结点,就是由这里定义对象间相互依赖关系的。其中的<property name="HelloGenerator">结点定义了对什么属性执行注入,以及注入的内容是什么(<ref object="myCnHelloGenerator" />)。大家可以尝试将<ref object="myCnHelloGenerator" />改为<ref object="myEnHelloGenerator" />,看一看程序执行结果有什么变化来体会Spring.net的Ioc功能。
如果读者读到这里仍然觉得Ioc没有什么的话,那让我们再来看一个更为复杂的例子。在当前例子中,MainApp通过依赖注入调用了HelloGenerator的功能,但所有的调用都发生在本地。当前程序是一个地地道道的本地应用程序。现在如果要求在不更改一行代码的情况下,将HelloGenerator.dll放到另外一台计算机上,MainApp通过远程调用(Remoting)来访问HelloGenerator的功能。这似乎就有一定的难度了。
这么作并不是没有任何依据,其实Ioc除了可以实现依赖注入外,我们还应当看到它可以将我们从复杂的物理架构中解脱出来,专心于业务代码的开发。系统开发中关键是逻辑分层。在一个系统不需要Remoting时,开发的系统就是本地应用程序;当需要Remoting时,不用修改任何代码就可以将系统移植为分布式系统。Ioc使这一切成为可能。Rod Johnson在他的《J2EE without EJB》一书中有着详细的论述,很值得一读。据说该书的中文译本今年九月份出版(呵呵,就是这个月,不过我还没有看到市面上有卖的)。
为了能够更深入的分析在“Remoting”改造过程中我们可能遇到的麻烦,在后续两部分内容中,我们将分别介绍不使用Ioc的Remoting改造以及使用Ioc的改造,并比较两者之间的区别。
五、使用Remoting对原有系统进行改造
如果使用Remoting技术对HelloGenerator进行改造,使其具有分布式远程访问能力,那么在不使用Ioc技术的情况下,我们将会作出如下调整:
(1)让HelloGenerator继承自MarshalByRefObject类
如果要让某个对象具有分布式的功能,必须使其继承自MarshalByRefObject,这样才可以具有远程访问的能力。因此我们需要调整EnHelloGenerator和CnHelloGenerator的代码。这里以EnHelloGenerator为例:
using System;
namespace IocInCSharp
{
   public class EnHelloGenerator : MarshalByRefObject, IHelloGenerator
   {
      public string GetHelloString(string name)
      {
         return String.Format("Hello, {0}", name);
      }
   }
}
(2)将修改后的HelloGenerator发布出去
在这一步中,我们创建了一个新的Console应用程序RemotingServer,并在其中注册了一个Channel,发布服务并进行监听。代码如下:
using System;
using System.Configuration;
using System.Collections;
using System.Runtime.Remoting;
using System.Runtime.Remoting.Channels;
using System.Runtime.Remoting.Channels.Http;
using System.Runtime.Serialization.Formatters;
namespace IocInCSharp
{
   public class Server
   {
      public static void Main()
      {
         int port = Convert.ToInt32(ConfigurationSettings.AppSettings["LocalServerPort"]);
         try
         {
            BinaryServerFormatterSinkProvider serverProvider = new BinaryServerFormatterSinkProvider();
            BinaryClientFormatterSinkProvider clientProvider = new BinaryClientFormatterSinkProvider();
            serverProvider.TypeFilterLevel = TypeFilterLevel.Full;
            IDictionary props = new Hashtable();
            props["port"] = port;
            props["timeout"] = 2000;
            HttpChannel channel = new HttpChannel(props, clientProvider, serverProvider);
            ChannelServices.RegisterChannel(channel);
            RemotingConfiguration.RegisterWellKnownServiceType(
               typeof(EnHelloGenerator),
               "HelloGenerator.soap",
               WellKnownObjectMode.Singleton);
            Console.WriteLine("Server started!/r/nPress ENTER key to stop the server...");
            Console.ReadLine();
         }
         catch
         {
            Console.WriteLine("Server Start Error!");
         }
      }
   }
}
(3)全新的客户端调用代码
为了使得客户端MainApp能够调用到远程的对象,我们需要修改它的代码,注册相应的Channel并进行远程访问。修改后的MainApp代码如下:
using System;
using System.Configuration;
using System.Collections;
using System.Runtime.Remoting;
using System.Runtime.Remoting.Channels;
using System.Runtime.Remoting.Channels.Http;
using System.Runtime.Serialization.Formatters;
namespace IocInCSharp
{
   public class MainApp
   {
      public static void Main()
      {
         //建立连接
         BinaryServerFormatterSinkProvider serverProvider = new BinaryServerFormatterSinkProvider();
         BinaryClientFormatterSinkProvider clientProvider = new BinaryClientFormatterSinkProvider();
         serverProvider.TypeFilterLevel = TypeFilterLevel.Full;
         IDictionary props = new Hashtable();
         props["port"] = System.Convert.ToInt32(ConfigurationSettings.AppSettings["ClientPort"]);
         HttpChannel channel = new HttpChannel(props, clientProvider, serverProvider);
         ChannelServices.RegisterChannel(channel );

         //创建远程对象
         ISayHello sayHello = new SayHello();
         string RemoteServerUrl = ConfigurationSettings.AppSettings["RemoteServerUrl"];
         sayHello.HelloGenerator = (IHelloGenerator)Activator.GetObject(typeof(IHelloGenerator), RemoteServerUrl);
         sayHello.SayHelloTo("zhenyulu");
      }
   }
}
在这段代码中,远程对象的创建是通过(IHelloGenerator)Activator.GetObject(typeof(IHelloGenerator), RemoteServerUrl)实现的。到此为止,我们就完成了对原有系统的Remoting改造。
经过调整后的系统,其组件间相互依赖关系如下图所示:

注意ICommon.dll文件在Client和Server端都有。
在整个调整过程中,我们修改了Server端的EnHelloGenerator以及CnHelloGenerator的代码,Client端的MainApp也 作了修改,以加入了远程访问机制。那么能不能对原有代码不作任何修改就实现远程访问机制呢?当然可以!不过我们还要请出Sping.net帮助我们实现这一切。
六、利用Ioc在不修改任何原有代码的情况下实现Remoting
上文我们提到,为了实现对HelloGenerator.dll的分布式调用,我们不得不修改了原有程序的多处代码。那么有没有可能在不动任何原有代码的情况下,单纯靠添加组件、修改配置文件实现远程访问呢?当然可以。这次我们还是使用Spring.net完成这个工作。 经过调整后的系统组件构成如下图所示:

该方案没有修改“src/Step3”中的任何代码,仅仅通过修改配置文件和添加了若干个组件就实现了远程访问。修改方案如下:
(1)使用Proxy模式代理原有HelloGenerator
如果要让某个对象具有分布式的功能,必须使其继承自MarshalByRefObject。但是由于不能修改任何原有代码,所以这次我们只能绕道而行, 借助Proxy模式代理原有的HelloGenerator。在RemotingServer项目中,我们定义了一个新类HelloGeneratorProxy继承自MarshalByRefObject,通过委派的方式对原有的HelloGenerator进行调用,代码如下:
using System;
namespace IocInCSharp
{
   public class HelloGeneratorProxy : MarshalByRefObject, IHelloGenerator
   {
      private IHelloGenerator _helloGen;
      public IHelloGenerator HelloGenerator
      {
         get { return _helloGen; }
         set { _helloGen = value; }
      }
      public string GetHelloString(string name)
      {
         if(_helloGen != null)
            return _helloGen.GetHelloString(name);
         return null;
      }
   }
}
仔细观察,我们会发现HelloGeneratorProxy持有一个对IHelloGenerator的引用,该属性是可以Set的,因此我们可以借助Ioc的威力,通过调整Sping.net的配置文件动态决定远程服务器究竟发布EnHelloGenerator还是CnHelloGenerator。
(2)发布HelloGeneratorProxy
通过RemotingServer.exe,我们将HelloGeneratorProxy发布出去,客户端实际上调用的是Proxy对象(不用担心,由于“针对接口编程”,客户端只知道它是IHelloGenerator类型对象)。服务器端代码如下:
using System;
using System.Configuration;
using System.Collections;
using System.Runtime.Remoting;
using System.Runtime.Remoting.Channels;
using System.Runtime.Remoting.Channels.Http;
using System.Runtime.Serialization.Formatters;
using Spring.Context;
namespace IocInCSharp
{
   public class Server
   {
      public static void Main()
      {
         int port = Convert.ToInt32(ConfigurationSettings.AppSettings["LocalServerPort"]);
         try
         {
            BinaryServerFormatterSinkProvider serverProvider = new BinaryServerFormatterSinkProvider();
            BinaryClientFormatterSinkProvider clientProvider = new BinaryClientFormatterSinkProvider();
            serverProvider.TypeFilterLevel = TypeFilterLevel.Full;
            IDictionary props = new Hashtable();
            props["port"] = port;
            props["timeout"] = 2000;
            HttpChannel channel = new HttpChannel(props, clientProvider, serverProvider);
            ChannelServices.RegisterChannel(channel);
            IApplicationContext ctx = ConfigurationSettings.GetConfig("spring/context") as IApplicationContext;
            HelloGeneratorProxy proxy = (HelloGeneratorProxy)ctx.GetObject("myHelloGeneratorProxy");
            RemotingServices.Marshal(proxy, "HelloGenerator.soap");
            Console.WriteLine("Server started!/r/nPress ENTER key to stop the server...");
            Console.ReadLine();
         }
         catch
         {
            Console.WriteLine("Server Start Error!");
         }
      }
   }
}
注意其中的几条命令:
IApplicationContext ctx = ConfigurationSettings.GetConfig("spring/context") as IApplicationContext;
HelloGeneratorProxy proxy = (HelloGeneratorProxy)ctx.GetObject("myHelloGeneratorProxy");
RemotingServices.Marshal(proxy, "HelloGenerator.soap");
我们使用Ioc向HelloGeneratorProxy注入具体的HelloGenerator对象,并通过RemotingServices.Marshal(proxy, "HelloGenerator.soap")命令将该实例发布出去。服务器端的配置文件如下:
<?xml version="1.0" encoding="utf-8" ?>
<configuration>
   <configSections>
      <sectionGroup name="spring">
         <section name="context" type="Spring.Context.Support.ContextHandler, Spring.Core" />
         <section name="objects" type="Spring.Context.Support.DefaultSectionHandler, Spring.Core" />
      </sectionGroup>
   </configSections>
   <spring>
      <context>
         <resource uri="config://spring/objects" />
      </context>
      <objects xmlns="http://www.springframework.net">
         <object id="myHelloGeneratorProxy" type="IocInCSharp.HelloGeneratorProxy, RemotingServer">
            <property name="HelloGenerator">
               <ref object="myCnHelloGenerator" />
            </property>
         </object>
         <object id="myEnHelloGenerator" type="IocInCSharp.EnHelloGenerator, HelloGenerator" />
         <object id="myCnHelloGenerator" type="IocInCSharp.CnHelloGenerator, HelloGenerator" />
      </objects>
   </spring>
   <appSettings>
      <add key="LocalServerPort" value="8100" />
   </appSettings>
</configuration>
用户可以尝试将配置文件中<ref object="myCnHelloGenerator" />更改为<ref object="myEnHelloGenerator" />,重新启动服务后看看客户端调用结果是什么?
(3)客户端实现技术-1
客户端实现起来要麻烦一些。由于不允许修改MainApp中的任何代码,我们必须能够在合适的时机拦截代码运行并创建远程连接,同时确保在Ioc注入时注入的是远程对象。所有这些工作Sping.net都考虑的很周到。它提供了depends-on属性,允许在执行某一操作前强制执行某段代码。在客户端的配置文件中,我们可以看到如下的配置选项:
         <object id="mySayHello" type="Spring.Aop.Framework.ProxyFactoryObject" depends-on="force-init">
         .........
         <object id="force-init" type="Spring.Objects.Factory.Config.MethodInvokingFactoryObject, Spring.Core">
            <property name="TargetType" value="IocInCSharp.ForceInit, ForceInit" />
            <property name="TargetMethod" value="Init" />
         </object>
这表示,当我们初始化mySayHello时,要先去调用ForceInit.dll文件中ForceInit类的Init方法。ForceInit是一个新编写的类,其主要目的就是创建并注册一个用于远程通讯的Channel。代码实现如下:
using System;
using System.Collections;
using System.Runtime.Remoting;
using System.Runtime.Remoting.Channels;
using System.Runtime.Remoting.Channels.Http;
using System.Runtime.Serialization.Formatters;
namespace IocInCSharp
{
   public class ForceInit
   {
      public static void Init()
      {
         //建立连接
         BinaryServerFormatterSinkProvider serverProvider = new BinaryServerFormatterSinkProvider();
         BinaryClientFormatterSinkProvider clientProvider = new BinaryClientFormatterSinkProvider();
         serverProvider.TypeFilterLevel = TypeFilterLevel.Full;
         IDictionary props = new Hashtable();
         props["port"] = 8199;
         props["name"] = "myHttp";
         HttpChannel channel = new HttpChannel(props, clientProvider, serverProvider);
         //获得当前已注册的通道;
         IChannel[] channels = ChannelServices.RegisteredChannels;
         //关闭指定名为MyHttp的通道;
         foreach (IChannel eachChannel in channels)
            if (eachChannel.ChannelName == "myHttp")
               ChannelServices.UnregisterChannel(eachChannel);
         ChannelServices.RegisterChannel(channel);
      }
   }
}
(4)客户端实现技术-2
剩下的工作就是为mySayHello的HelloGenerator注入远程对象。通常情况下我们需要使用Activator.GetObject方法调用远程对象,不过Spring.net已经将其封装起来,我们只需修改一下配置文件,就可以确保调用到远程对象。配置文件对应部分如下:
         <object id="mySayHello" type="Spring.Aop.Framework.ProxyFactoryObject" depends-on="force-init">
            <property name="target">
               <object id="myLocalSayHello" type="IocInCSharp.SayHello, SayHello">
                  <property name="HelloGenerator">
                     <ref object="myHelloGenerator" />
                  </property>
               </object>
            </property>
            ......
         </object>
         <object name="myHelloGenerator" type="Spring.Remoting.SaoFactoryObject, Spring.Services">
            <property name="ServiceInterface">
               <value>IocInCSharp.IHelloGenerator, ICommon</value>
            </property>
            <property name="ServiceUrl">
               <value>http://127.0.0.1:8100/HelloGenerator.soap</value>
            </property>
         </object>
借助Spring.Remoting.SaoFactoryObject,我们轻松实现了远程对象访问,不必书写一行代码。(目前SAO在Spring.net的实现尚不完整,按照Spring.net帮助手册上的做法,通过配置文件只能实现客户端访问远程对象,还做不到服务器端发布远程对象)
(5)使用AOP拦截调用
Sping.net目前已经实现AOP功能,我们可以很容易的对方法进行拦截和调用。需要做的工作就是设计相应的Interceptor,然后修改配置文件。目前Sping.net使用的AOP功能是AopAlliance的实现,因此代码编写时命名空间引用让人感觉多少有些别扭,不是以Sping开头。我编写的MethodInterceptor代码如下:
using System;
using AopAlliance.Intercept;
namespace IocInCSharp
{
   class MethodInterceptor : IMethodInterceptor
   {
      public object Invoke(IMethodInvocation invocation)
      {
         Console.WriteLine("Before Method Call...");
         object returnValue = invocation.Proceed();
         Console.WriteLine("After Method Call...");
         return returnValue;
      }
   }
}
在方法调用前打印"Before Method Call...",在方法调用后打印"After Method Call..."。剩下的工作就是修改配置文件,将其应用到相应的方法上。配置文件片断如下:
         <object id="MethodAdvice" type="Spring.Aop.Support.RegexpMethodPointcutAdvisor">
            <property name="pattern" value="SayHelloTo" />
            <property name="advice">
               <object type="IocInCSharp.MethodInterceptor, MethodInterceptor" />
            </property>
         </object>
         <object id="mySayHello" type="Spring.Aop.Framework.ProxyFactoryObject" depends-on="force-init">

                  ......

            <property name="interceptorNames">
               <list>
                  <value>MethodAdvice</value>
               </list>
            </property>
         </object>
通过以上操作,我们在没有修改任何原有代码的情况下,让原有系统实现了远程分布式访问。
请大家访问示例代码的“bin/Step5"目录,下面有3个子目录:Server、Client、WithoutRemoting。首先运行Server目录下的RemotingServer.exe,然后运行Client目录下的MainApp.exe进行远程调用。系统通过Remoting完成远程调用。关闭所有程序后,进入到WithoutRemoting目录,里面有个Readme.txt文件,按照操作步骤将文件:
../Server/HelloGenerator.dll
../Client/MainApp.exe
../Client/ICommon.dll
../Client/SayHello.dll
../Client/Spring.Core.dll
../Client/log4net.dll
拷贝到该目录,再次运行MainApp.exe,你会发现它是一个地地道道的本地应用程序!本地与远程唯一的区别就是配置文件的不同以及增加了几个其它的DLL。这正式我们这个示例的价值体现。
到此为止,我们完成了对Ioc应用的一系列模拟。Ioc写得多一些,AOP写得少了点。欢迎大家批评指正。


 2234
2234


 被折叠的 条评论
为什么被折叠?


