


下面一步一步来实现
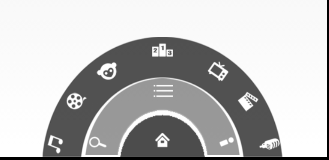
1.实现布局:效果图如下
实现代码如下(relativelayout无法在博客显示,故将此删除,要使用 请自行加上)
需要注意的事:需要在父控件中设置好具体的参数大小,如在最里面控件中我设置了了相对布局 android:id=”@+id/level1”
android:layout_width=”100dp”
android:layout_height=”50dp”
具体数值自己掂量,不设置的话里面控件不好设置,会拉伸
**
android:id="@+id/level1"
android:layout_width="100dp"
android:layout_height="50dp"
android:background="@drawable/level1"
android:layout_alignParentBottom="true"
android:layout_centerHorizontal="true"

<ImageButton
    android:id="@+id/ib_home"
    android:layout_width="wrap_content"
    android:layout_height="wrap_content"
    android:src="@drawable/icon_home"
    android:layout_centerInParent="true"
    android:background="@null"
    />
android:id="@+id/level2"
android:layout_width="180dp"
android:layout_height="90dp"
android:background="@drawable/level2"
android:layout_alignParentBottom="true"
android:layout_margin="2dp"
android:layout_centerHorizontal="true"

<ImageButton
    android:id="@+id/ib_menu"
    android:layout_width="wrap_content"
    android:layout_height="wrap_content"
    android:src="@drawable/icon_menu"
    android:layout_centerHorizontal="true"
    android:background="@null"
    />
    <ImageButton
    android:id="@+id/ib_search"
    android:layout_width="wrap_content"
    android:layout_height="wrap_content"
    android:src="@drawable/icon_search"
    android:layout_alignParentBottom="true"
   android:background="@null"

    />
        <ImageButton
    android:id="@+id/ib_myyouku"
    android:layout_width="wrap_content"
    android:layout_height="wrap_content"
    android:src="@drawable/icon_myyouku"
    android:layout_alignParentRight="true"
    android:layout_alignParentBottom="true"
   android:background="@null"
    />
android:id="@+id/level3"
android:layout_width="280dp"
android:layout_height="140dp"
android:background="@drawable/level3"
android:layout_alignParentBottom="true"
android:layout_centerHorizontal="true"

<ImageButton
    android:id="@+id/ib_channel1"
    android:layout_width="wrap_content"
    android:layout_height="wrap_content"
    android:src="@drawable/channel1"
    android:layout_alignParentBottom="true"
   android:background="@null"
    />
    <ImageButton
    android:id="@+id/ib_channel2"
    android:layout_width="wrap_content"
    android:layout_height="wrap_content"
    android:layout_marginLeft="25dp"
    android:layout_marginTop="60dp"
    android:background="@null"
    android:src="@drawable/channel2"
     />
     <ImageButton
    android:id="@+id/ib_channel3"
    android:layout_width="wrap_content"
    android:layout_height="wrap_content"
    android:layout_marginLeft="60dp"
    android:layout_marginTop="25dp"
    android:background="@null"
    android:src="@drawable/channel3"
     />
    <ImageButton
    android:id="@+id/ib_channel4"
    android:layout_width="wrap_content"
    android:layout_height="wrap_content"
    android:src="@drawable/channel4"
    android:layout_centerHorizontal="true"
   android:background="@null"
    />
      <ImageButton
    android:id="@+id/ib_channel5"
    android:layout_width="wrap_content"
    android:layout_height="wrap_content"
    android:layout_alignParentRight="true"
    android:layout_marginRight="60dp"
    android:layout_marginTop="25dp"
    android:background="@null"
    android:src="@drawable/channel5"
     />
        <ImageButton
    android:id="@+id/ib_channel6"
    android:layout_width="wrap_content"
    android:layout_height="wrap_content"
    android:layout_alignParentRight="true"
    android:layout_marginRight="25dp"
    android:layout_marginTop="60dp"
    android:background="@null"
    android:src="@drawable/channel6"
     />
       <ImageButton
    android:id="@+id/ib_channel7"
    android:layout_width="wrap_content"
    android:layout_height="wrap_content"
    android:src="@drawable/channel7"
    android:layout_alignParentRight="true"
    android:layout_alignParentBottom="true"
   android:background="@null"
    />
**
2.添加事件处理
具体是这样:
(1)点击第一布局的home,一二布局隐藏,再次点击全部出现;
(2)点击第二布局的menu,第三布局隐藏,再次点击布局出现;
步骤如下:
(一)首先初始化布局和两个关键的imagebutton并设置监听,由于需要一个默认状态的显示为3个,再次设置三个布尔值为true默认显示
**
public class MainActivity extends Activity implements OnClickListener{

private RelativeLayout level1;
private RelativeLayout level2;
private RelativeLayout level3;
private ImageButton ib_home;
private ImageButton ib_menu;
private Boolean isLevel3Display=true;
private Boolean isLevel2Display=true;
private Boolean isLevel1Display=true;

@Override
protected void onCreate(Bundle savedInstanceState) {
    super.onCreate(savedInstanceState);
    setContentView(R.layout.activity_main);
    level1 = (RelativeLayout) findViewById(R.id.level1);
    level2 = (RelativeLayout) findViewById(R.id.level2);
    level3 = (RelativeLayout) findViewById(R.id.level3);
    ib_home = (ImageButton) findViewById(R.id.ib_home);
    ib_menu = (ImageButton) findViewById(R.id.ib_menu);
    ib_home.setOnClickListener(this);
    ib_menu.setOnClickListener(this);

}
public void onClick(View v){
    switch (v.getId()) {
    case R.id.ib_home:
        //点击home

        break;
   case R.id.ib_menu:
        //点击menu
        break;

    default:
        break;
    }

}
}
**
(二)实现上述两个imagebutton的点击效果事件
AnimationUtils:
public class AnimationUtils {

/** 旋转出去的动画 */
public static void retateOutAnim(RelativeLayout relativeLayout) {

    RotateAnimation rotateAnimation = new RotateAnimation(0f, -180f, Animation.RELATIVE_TO_SELF, 0.5f,
            Animation.RELATIVE_TO_SELF, 1f);// 0.5f和1f指的是旋转中心
    rotateAnimation.setDuration(500);
    rotateAnimation.setFillAfter(true);
    relativeLayout.startAnimation(rotateAnimation);
}

/** 转进来的动画 */

public static void relateInAnim(RelativeLayout relativeLayout) {
    RotateAnimation rotateAnimation = new RotateAnimation(-180f, -0f, Animation.RELATIVE_TO_SELF, 0.5f,
            Animation.RELATIVE_TO_SELF, 1f);// 0.5f和1f指的是旋转中心
    rotateAnimation.setDuration(500);
    rotateAnimation.setFillAfter(true);
    relativeLayout.startAnimation(rotateAnimation);

}
}
onClick事件:
**
public void onClick(View v){
    switch (v.getId()) {
    case R.id.ib_home:
        //home
        //如果第三布局存在,则第三布局也要转出去
        if (isLevel2Display) {

            if (isLevel3Display) {
                  AnimationUtils.retateOutAnim(level3);
                  isLevel3Display=false;
                    AnimationUtils.retateOutAnim(level2);
                    isLevel2Display=false;

            }else{
                //第二布局转回来
            AnimationUtils.retateOutAnim(level2);
            isLevel2Display=false;
            }
        }
        else {
            AnimationUtils.relateInAnim(level2);
            isLevel2Display=true;
            AnimationUtils.relateInAnim(level3);
            isLevel3Display=true;
        }

        break;
   case R.id.ib_menu:
        //menu

if (isLevel3Display)
       {
     //如果布局3已经显示,则转出去
      AnimationUtils.retateOutAnim(level3);
      isLevel3Display=false;
        }

else   {
    //没有显示,则转出来
    AnimationUtils.relateInAnim(level3);
    isLevel3Display=true;
       }
        break;

    default:
        break;
    }

}
**
运行效果图如下:

欢迎指点.


 678
678

 被折叠的 条评论
为什么被折叠?
被折叠的 条评论
为什么被折叠?
 到【灌水乐园】发言


