


基于Tinker V1.7.5
- Android 热修复方案Tinker(一) Application改造
- Android 热修复方案Tinker(二) 补丁加载流程
- Android 热修复方案Tinker(三) Dex补丁加载
- Android 热修复方案Tinker(四) 资源补丁加载
- Android 热修复方案Tinker(五) SO补丁加载
- Android 热修复方案Tinker(六) Gradle插件实现
- Android 热修复方案Tinker(七) 插桩实现
- 带注释的源码
在做SO补丁更新之前同样先串一遍SO在Android中加载的流程, 再分析如何更新SO文件.涉及到的Android源码皆为Android 6.0版本.
SO文件加载的时机和Dex跟资源的加载有些不一样,像Dex和资源的加载都是系统在特定的时机自动去加载,而SO加载的时机则是让开发者自己控制.开发者可以通过System类对外暴露出来的两个静态方法load和loadLibarary加载SO.这两个方法都拿到ClassLoader再通过Runtime实现的.
- Sytem.loadLibrary 方法是加载app安装过之后自动从apk包中释放到/data/data/packagename/lib下对应的SO文件.
- System.load 方法可以根据开发者指定的路径加载SO文件,例如/data/data/packagename/tinker/patch-xxx/lib/libtest.so.
public final class System {

    ...
    public static void load(String pathName) {
        Runtime.getRuntime().load(pathName, VMStack.getCallingClassLoader());
    }

    public static void loadLibrary(String libName) {
        Runtime.getRuntime().loadLibrary(libName, VMStack.getCallingClassLoader());
    }
    ...
}
通常没有特殊需求下我们都是用第一个方法固定加载APK文件中释放出来的SO, 而有动态化需求的时候可以直接使用第二个方法按需加载就可以达到更新SO的目的.Tinker在目前的版本就是用System.load方法做SO更新的.但是还有一些动态化或插件化方案使用类似Dex补丁更新的方式来更新SO文件, 所以还是要继续往下分析看第二种方案如何做到SO更新的.
继续分析源码,Runtime对象中的load方法很简单,做一下简单的防御就调用doLoad方法加载SO,如果加载失败则抛出UnsatisfiedLinkError错误.后面会一起讲解一下doLoad方法的实现.
public class Runtime {

    public void load(String absolutePath) {
        load(absolutePath, VMStack.getCallingClassLoader());
    }

    void load(String absolutePath, ClassLoader loader) {
        if (absolutePath == null) {
            throw new NullPointerException("absolutePath == null");
        }
        String error = doLoad(absolutePath, loader);
        if (error != null) {
            throw new UnsatisfiedLinkError(error);
        }
    }
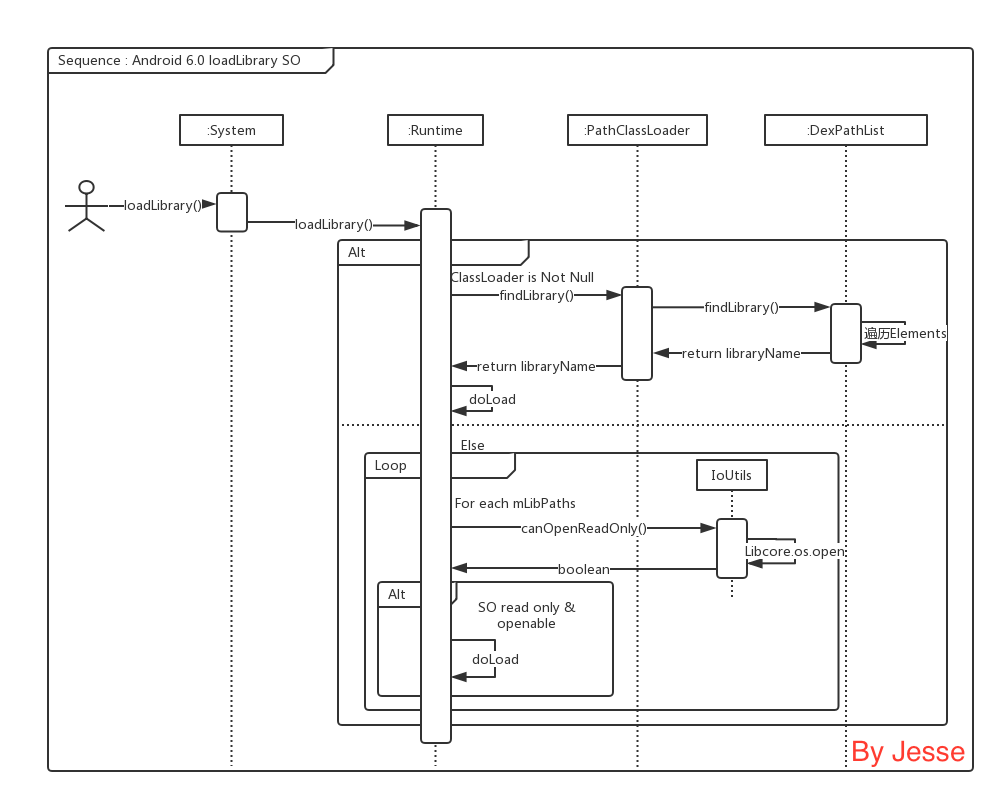
在使用loadLibrary根据名字加载SO文件则相对复杂一些.这里提供一个这种场景下的时序图.
-
ClassLoader 为空时
如果ClassLoader为空的话,就拼装出完整的SO名字(libxxx.so),然后遍历系统和供应商的SO路径(例如/system/lib64和/vendor/lib64)组装出完整的文件路径,并且该文件为只读并且可以打开的话就调用
doLoad记录加载状态.String filename = System.mapLibraryName(libraryName); List<String> candidates = new ArrayList<String>(); String lastError = null; for (String directory : mLibPaths) { String candidate = directory + filename; candidates.add(candidate); if (IoUtils.canOpenReadOnly(candidate)) { String error = doLoad(candidate, loader); if (error == null) { return; // We successfully loaded the library. Job done. } lastError = error; } } if (lastError != null) { throw new UnsatisfiedLinkError(lastError); } -
ClassLoader 不为空时
如果ClassLoader有效,那么直接通过ClassLoader查找ClassLoader中是否有要加载的SO文件,如果有的话就直接
doLoad加载,否则抛出UnsatisfiedLinkError错误.if (loader != null) { String filename = loader.findLibrary(libraryName); if (filename == null) { // It's not necessarily true that the ClassLoader used // System.mapLibraryName, but the default setup does, and it's // misleading to say we didn't find "libMyLibrary.so" when we // actually searched for "liblibMyLibrary.so.so". throw new UnsatisfiedLinkError(loader + " couldn't find \"" + System.mapLibraryName(libraryName) + "\""); } String error = doLoad(filename, loader); if (error != null) { throw new UnsatisfiedLinkError(error); } return; }通过ClassLoader找到SO文件的这个方法
findLibrary()是不是有些眼熟,跟之前分析Dex补丁的时候的切入点findClass()很像并且还都是跟ClassLoader有关.从ApplicationLoaders类的getClassLoader方法中看到他是实例出的PathClassLoader对象,它跟DexClassLoader一样都是BaseDexClassLoader的子类.所以分析的思路跟Dex补丁加载也是一样的.我们就直接进入
findLibrary()最终实现的地方DexPathList类中.可以看到他的实现跟findClass()也是很像的.在将libraryName拼装成libxxx.so的形式之后同样按顺序遍历一个Element数组nativeLibraryPathElements,只有找到有效的SO就return出来,回到Runtime中做doLoad操作.public String findLibrary(String libraryName) { String fileName = System.mapLibraryName(libraryName); for (Element element : nativeLibraryPathElements) { String path = element.findNativeLibrary(fileName); if (path != null) { return path; } } return null; }所以这里我们就可以跟做Dex补丁一样的方式在这个Element数组前面插入补丁SO文件, 这样在findLibrary的时候就会优先返回插入的SO文件, 并执行
doLoad加载插入的SO文件. 那插入的时机是什么时候? findLibrary的动作是在调用了System.loadLibrary后才执行的,所以插入补丁的动作应该是要放在System.loadLibrary之前才能确保加载的时候更新SO文件.
到这里就可以看出不管开发者在外部用了哪种方法加载SO最终都是调用的Runtime.doLoad方法,下面详细看一下doLoad时都干了什么.首先需要拿到SO文件的路径集合,如果ClassLoader为空的话则使用系统默认的路径(例如/vendor/lib:/system/lib).如果ClassLoader有效的话,这个时候通常都是BaseDexClassLoader的实例,直接通过ClassLoader拿到路径集合.最后拿齐参数之后就同步调用native的加载方法.
private String doLoad(String name, ClassLoader loader) {
    String ldLibraryPath = null;
    String dexPath = null;
    if (loader == null) {
        ldLibraryPath = System.getProperty("java.library.path");
    } else if (loader instanceof BaseDexClassLoader) {
        BaseDexClassLoader dexClassLoader = (BaseDexClassLoader) loader;
        ldLibraryPath = dexClassLoader.getLdLibraryPath();
    }

    synchronized (this) {
        return nativeLoad(name, loader, ldLibraryPath);
    }
}

private static native String nativeLoad(String filename, ClassLoader loader,
        String ldLibraryPath);
从ClassLoader中获取libPath集合只是将DexPathList对象中的本地SO路径数组nativeLibraryDirectories遍历以分号区分拼装成字符串.这个数组也是生成nativeLibraryPathElementsElement数组的数据源.
// BaseDexClassLoader.java
public String getLdLibraryPath() {
    StringBuilder result = new StringBuilder();
    for (File directory : pathList.getNativeLibraryDirectories()) {
        if (result.length() > 0) {
            result.append(':');
        }
        result.append(directory);
    }

    return result.toString();
}
而nativeLibraryDirectories的来源可以从DexPathList的构造方法里面看到,是根据构造参数libraryPath分拆而成的.而构造参数libraryPath就要追溯到ClassLoader构造的时候.
// DexPathList.java
public DexPathList(ClassLoader definingContext, String dexPath,
        String libraryPath, File optimizedDirectory) {

    ...
    this.nativeLibraryDirectories = splitPaths(libraryPath, false);
    ...
}

// BaseDexClassLoader.java
public BaseDexClassLoader(String dexPath, File optimizedDirectory,
        String libraryPath, ClassLoader parent) {
    super(parent);
    this.pathList = new DexPathList(this, dexPath, libraryPath, optimizedDirectory);
}
前面分析资源加载过程的时候有涉及到的LoadedApk对象是在ActivityThread类中构建出来的,承载了加载到虚拟机中APK的静态和动态数据.在LoadedApk对象的方法getClassLoader中从ActivityThead对象中拿到装载过的LibDir(通过PackageManagerService获得应用的libraryPath),并转换为String.在使用ApplicationLoaders对象时构造出来PathClassLoader.
// LoadedApk.java 精简
public ClassLoader getClassLoader() {

    String instrumentationLibDir = mActivityThread.mInstrumentationLibDir;
    ...
    String instrumentedLibDir = mActivityThread.mInstrumentedLibDir;
    ...
    libPaths.clear();
    libPaths.add(instrumentationLibDir);
    libPaths.add(instrumentedLibDir);
    ...

    final String lib = TextUtils.join(File.pathSeparator, libPaths);
    ...
    mClassLoader = ApplicationLoaders.getDefault().getClassLoader(zip, lib,
            mBaseClassLoader);

}
做完这些准备工作之后就执行native方法nativeLoad.由于Android 6.0已经使用了ART,所以Runtime的native实现在/art/runtime/native/java_lang_Runtime.cc文件中.这里的native实现比较简单.先转换一下SO名字的格式为ScopedUtfChars,转化过的数据无效的话直接返回;将前面从PackageManagerService获取的libPath跟系统的libPath更新到Runtime的环境中;拿到当前运行的JVM加载SO文件.到这里可以看到真正的加载SO文件是在JavaVMExt对象中进行的.
static jstring Runtime_nativeLoad(JNIEnv* env, jclass, jstring javaFilename, jobject javaLoader,
                                  jstring javaLdLibraryPathJstr) {
  // 将SO文件名从jstring转换成ScopedUtfChars对象 如果fileName为空则直接return null
  ScopedUtfChars filename(env, javaFilename);
  if (filename.c_str() == nullptr) {
    return nullptr;
  }
  // 将SO路径集合更新到当前环境中
  SetLdLibraryPath(env, javaLdLibraryPathJstr);

  std::string error_msg;
  {
    // 获取当前运行时的JVM
    JavaVMExt* vm = Runtime::Current()->GetJavaVM();
    // 加载SO文件
    bool success = vm->LoadNativeLibrary(env, filename.c_str(), javaLoader, &error_msg);
    if (success) {
      return nullptr;
    }
  }

  // Don't let a pending exception from JNI_OnLoad cause a CheckJNI issue with NewStringUTF.
  env->ExceptionClear();
  return env->NewStringUTF(error_msg.c_str());
}
进入/art/runtime/java_vm_ext.cc找到LoadNativeLibrary方法的实现.这里代码较多就挑几个关键环节分析,先贴个流程图.

首先从缓存着已经加载过的library容器中查找当前要加载的SO.
  SharedLibrary* library;
  Thread* self = Thread::Current();
  {
    // TODO: move the locking (and more of this logic) into Libraries.
    MutexLock mu(self, *Locks::jni_libraries_lock_);
    library = libraries_->Get(path);
  }
如果当前路径下的SO已经被加载过了,则校验这次加载和以前加载时用的ClassLoader是否一致.并且校验上次加载的状态是否正常.如果没有异常的话就直接返回成功不做重复的加载.
  if (library != nullptr) {
    if (env->IsSameObject(library->GetClassLoader(), class_loader) == JNI_FALSE) {
      return false;
    }
    if (!library->CheckOnLoadResult()) {
      return false;
    }
    return true;
  }
根据参数传入的全路径SO文件名使用Linux上加载动态链接库的dlopen方法打开,获取到文件的句柄存入空指针中.如果获取句柄失败直接返回,中断整个SO的加载流程.
  const char* path_str = path.empty() ? nullptr : path.c_str();
  void* handle = dlopen(path_str, RTLD_NOW);
  ...
  if (handle == nullptr) {
    *error_msg = dlerror();
    VLOG(jni) << "dlopen(\"" << path << "\", RTLD_NOW) failed: " << *error_msg;
    return false;
  }
接下来同样使用Linux的dlsym方法获取到JNI_OnLoad方法的函数指针存入到空指针中,如果没有找到该方法则记录加载成功并返回.为什么没有找到JNI_OnLoad也算成功?因为有些SO确实没有定义JNI_OnLoad方法,并且系统也是允许的.如果没有该方法虚拟机会自动调用另外一个方法动态解析SO文件中的native方法.
  void* sym;
  ...
  sym = dlsym(handle, "JNI_OnLoad");
  if (sym == nullptr) {
    VLOG(jni) << "[No JNI_OnLoad found in \"" << path << "\"]";
    was_successful = true;
  }
如果可以找到JNI_OnLoad方法,则利用dlsym方法返回的函数指针执行JNI_OnLoad方法注册SO文件中的native方法.并验证执行结果.如果执行的结果不合法(JNI_ERR | BadJniVersion)则记录失败,相反则记录成功.并返回完成SO文件的加载.
    typedef int (*JNI_OnLoadFn)(JavaVM*, void*);
    JNI_OnLoadFn jni_on_load = reinterpret_cast<JNI_OnLoadFn>(sym);
    int version = (*jni_on_load)(this, nullptr);
    ...
    if (version == JNI_ERR) {
      StringAppendF(error_msg, "JNI_ERR returned from JNI_OnLoad in \"%s\"", path.c_str());
    } else if (IsBadJniVersion(version)) {
      StringAppendF(error_msg, "Bad JNI version returned from JNI_OnLoad in \"%s\": %d",
                    path.c_str(), version);
    } else {
      was_successful = true;
    }
    ...
    return was_successful;
把SO的加载流程过完之后简单总结一下,想要做SO的补丁更新有两个方式,一种是使用System.load方法接管SO加载入口,另外一种是hook 插入补丁SO到ClassLoader中SO文件Element数组的前部.
由于在多ABI的情况下,有些设备并不能很准确得获取到ABI信息.这就有可能导致加载错误不兼容版本的SO导致应用加载SO性能降低甚至崩溃.所以上述这两种方式都要面对ABI版本选择的问题.在没有好的区分方法时可以暂时采用只提供基础armeabi架构的.so文件.因为SO的加载都有向前兼容,在64位设备上也有从init进程fork出来32位的Zygote进程来兼容32位的函数库,但是这样会丢失专为64位优化过的性能.
校验SO补丁
回到Tinker, 在Android 热修复方案Tinker(二) 补丁加载流程中的第11个步骤中,如何Tinker开启了SO补丁的加载则需要先快速校验一次.首先从SecurityCheck中拿到补丁包中so_meta.txt的信息,将meta中第一行的数据读取到PatchInfo中用来快速校验.
// 先判断checkComplete时so_meta.txt是否有效
if (meta == null) {
    return true;
}
ArrayList<BsDiffPatchInfo> libraryList = new ArrayList<>();

// 将so_meta.txt中的数据解析到array中
BsDiffPatchInfo.parseDiffPatchInfo(meta, libraryList);

if (libraryList.isEmpty()) {
    return true;
}
接下来遍历PatchInfo数组,筛选出合法的PatchInfo信息的SO补丁.将合法的SO的名字路径和MD5存入HashMap中.
// 遍历SO数组
for (BsDiffPatchInfo info : libraryList) {
    // SO本身文件信息是否合法
    if (!BsDiffPatchInfo.checkDiffPatchInfo(info)) {
        intentResult.putExtra(IntentUtil.INTENT_PATCH_PACKAGE_PATCH_CHECK, Constants.ERROR_PACKAGE_CHECK_LIB_META_CORRUPTED);
        IntentUtil.setIntentReturnCode(intentResult, Constants.ERROR_LOAD_PATCH_PACKAGE_CHECK_FAIL);
        return false;
    }
    String middle = info.path + "/" + info.name;

    //unlike dex, keep the original structure
    // 将合法的SO存入Map中
    libs.put(middle, info.md5);
}
再校验补丁路径 /patcher/patch-xxx/lib是否存在
if (!libraryDir.exists() || !libraryDir.isDirectory()) {
    IntentUtil.setIntentReturnCode(intentResult, Constants.ERROR_LOAD_PATCH_VERSION_LIB_DIRECTORY_NOT_EXIST);
    return false;
}
简单校验补丁信息中记录的SO文件,在补丁路径下是否物理存在.并将PatchInfo合法并且SO文件物理存在的Map存入result中,供加载SO补丁时使用.
for (String relative : libs.keySet()) {
    File libFile = new File(libraryPath + relative);
    if (!libFile.exists()) {
        ShareIntentUtil.setIntentReturnCode(intentResult, ShareConstants.ERROR_LOAD_PATCH_VERSION_LIB_FILE_NOT_EXIST);
        intentResult.putExtra(ShareIntentUtil.INTENT_PATCH_MISSING_LIB_PATH, libFile.getAbsolutePath());
        return false;
    }
}

//if is ok, add to result intent
intentResult.putExtra(ShareIntentUtil.INTENT_PATCH_LIBS_PATH, libs);
加载SO补丁
Tinker目前是没有区分不同ABI,没有像修复Dex补丁那样hook DexPathList对象,而是使用了上述替换使用System.load方法更新SO文件的方式.Tinker在这部分源码中加了TODO,文档中也有提到,后续版本迭代应该会加上对多ABI的支持,应该也会换成hook DexPathList对象的方式实现加载SO补丁.
Tinker加载SO补丁提供了两个入口,分别是TinkerInstaller和TinkerApplicationHelper.他们两个的区别是TinkerInstaller只有在Tinker.install过之后才能使用,否则会抛出异常.除此之外其他部分SO补丁加载的逻辑很类似,所以这里就只撸TinkerInstaller入口.
由于目前Tinker没有做区分ABI版本的逻辑,所以在源码中只提供了armeabi和armeabi-v7a两个版本的加载方法和一个通用的加载方法.先看一下armeabi和armeabi-v7a加载的实现.先对参数做防御性校验,再拿到Tinker对象.如果Tinker还没有做install操作的话,这里会抛出异常终止SO加载的流程.之后如果配置禁止了SO补丁升级,则回退到正常加载SO的方式,使用loadLibrary直接加载系统释放出来的SO文件.如果允许SO补丁升级,则使用loadLibraryFromTinker方法根据path参数加载外部SO文件.和v7a的区别是调用方法时path参数不同,分别是lib/armeabi和lib/armeabi-v7a.
public static void loadArmLibrary(Context context, String libName) {
    if (libName == null || libName.isEmpty() || context == null) {
        throw new TinkerRuntimeException("libName or context is null!");
    }

	// 没有Tinker install 会抛异常.
    Tinker tinker = Tinker.with(context);
    if (tinker.isEnabledForNativeLib()) {
    	// v7a的参数为 armeabi-v7a
        if (TinkerInstaller.loadLibraryFromTinker(context, "lib/armeabi", libName)) {
            return;
        }

    }
    System.loadLibrary(libName);
}
接下来详细看一下从其他路径加载SO的方法loadLibraryFromTinker的实现.首先拿到Tinker对象并且确保转化加载的SO文件命名为libxxx.so的形式.
final Tinker tinker = Tinker.with(context);

libname = libname.startsWith("lib") ? libname : "lib" + libname;
libname = libname.endsWith(".so") ? libname : libname + ".so";
String relativeLibPath = relativePath + "/" + libname;
校验是否配置启用SO补丁加载;Application启动后补丁加载tryLoad是否加载成功;补丁路径下是否有释放出来的SO补丁;遍历SO补丁是否有跟目前要加载的SO相对应的补丁;
if (tinker.isEnabledForNativeLib() && tinker.isTinkerLoaded()) {
    TinkerLoadResult loadResult = tinker.getTinkerLoadResultIfPresent();
    if (loadResult.libs != null) {
        for (String name : loadResult.libs.keySet()) {
            if (name.equals(relativeLibPath)) {
            	...
            }
        }
    }
}
经过上面的系列校验后,再监测该过滤出来的SO文件在/patcher/patch-xxx/lib路径下是否物理存在.如果在ApplicationLike处开启了补丁校验的配置,就在加载SO之前验证SO文件的MD5是否和so_meta中的MD5相匹配.最终调用System.load完成加载.
String patchLibraryPath = loadResult.libraryDirectory + "/" + name;
File library = new File(patchLibraryPath);
if (library.exists()) {
    //whether we check md5 when load
    boolean verifyMd5 = tinker.isTinkerLoadVerify();
    if (verifyMd5 && !SharePatchFileUtil.verifyFileMd5(library, loadResult.libs.get(name))) {
        tinker.getLoadReporter().onLoadFileMd5Mismatch(library, ShareConstants.TYPE_LIBRARY);
    } else {
        System.load(patchLibraryPath);
        TinkerLog.i(TAG, "loadLibraryFromTinker success:" + patchLibraryPath);
        return true;
    }
}
转载请注明出处:http://blog.csdn.net/l2show/article/details/53573945


 408
408

 被折叠的 条评论
为什么被折叠?
被折叠的 条评论
为什么被折叠?
 到【灌水乐园】发言


