探索Android软键盘的疑难杂症
深入探讨Android异步精髓Handler
详解Android主流框架不可或缺的基石
站在源码的肩膀上全解Scroller工作机制
Android多分辨率适配框架(1)— 核心基础
Android多分辨率适配框架(2)— 原理剖析
Android多分辨率适配框架(3)— 使用指南
自定义View系列教程00–推翻自己和过往,重学自定义View
自定义View系列教程01–常用工具介绍
自定义View系列教程02–onMeasure源码详尽分析
自定义View系列教程03–onLayout源码详尽分析
自定义View系列教程04–Draw源码分析及其实践
自定义View系列教程05–示例分析
自定义View系列教程06–详解View的Touch事件处理
自定义View系列教程07–详解ViewGroup分发Touch事件
自定义View系列教程08–滑动冲突的产生及其处理
PS:Android多分辨率适配框架视频教程同步更新啦
在上一篇文章中,我们分析了Android多分辨率适配框架的原理和代码实现。
在此,结合实例展示该框架的使用。
在展示的过程中,为了对照适配的效果,准备两部测试手机:
华为P7,分辨率为19201080,dpi为480
HTC T392,分辨率为800480,dpi为240
嗯哼,开始吧。
##Hello World
我们先通过一个简单的示例来了解该框架的基本使用
第一步:编写布局代码
<?xml version="1.0" encoding="utf-8"?>
<!--原创作者:谷哥的小弟-->
<!--博客地址:http://blog.csdn.net/lfdfhl-->
<RelativeLayout xmlns:android="http://schemas.android.com/apk/res/android"
    xmlns:tools="http://schemas.android.com/tools"
    android:layout_width="match_parent"
    android:layout_height="match_parent"
    tools:context="cc.displayutil2.MainActivity">

    <Button
        android:id="@+id/button"
        android:layout_width="460px"
        android:layout_height="200px"
        android:textSize="50px"
        android:background="@android:color/holo_blue_light"
        android:gravity="center"
        android:textColor="@android:color/holo_red_dark"
        android:text="BUTTON" />

    <LinearLayout
        android:layout_below="@id/button"
        android:layout_marginTop="100px"
        android:background="@android:color/holo_green_dark"
        android:layout_width="match_parent"
        android:orientation="vertical"
        android:layout_height="800px">

        <TextView
            android:id="@+id/textView"
            android:textSize="40px"
            android:layout_width="620px"
            android:layout_height="300px"
            android:layout_marginTop="50px"
            android:layout_marginLeft="50px"
            android:paddingLeft="20px"
            android:paddingRight="20px"
            android:background="@android:color/white"
            android:gravity="left|center_vertical"
            android:text="谷歌和白度,都是做搜索的..."/>

        <ImageView
            android:background="@android:color/white"
            android:layout_width="300px"
            android:layout_height="300px"
            android:layout_marginLeft="150px"
            android:layout_marginTop="140px"
            android:scaleType="centerCrop"
            android:src="@mipmap/ic_launcher"/>
    </LinearLayout>

</RelativeLayout>
该布局文件比较简单,包括了几个常用的控件比如:Button,TextView以及ImageView,并且使用了padding和margin为控件指定位置和尺寸。
第二步:调用框架实现UI的缩放
@Override
protected void onCreate(Bundle savedInstanceState) {
    super.onCreate(savedInstanceState);
    setContentView(R.layout.activity_main);
    View rootView=findViewById(android.R.id.content);
    SupportMultipleScreensUtil.init(getApplication());
    SupportMultipleScreensUtil.scale(rootView);
}
在Activity的onCreate( )中找到该界面的根布局,即id为android.R.id.content的View。
在初始化SupportMultipleScreensUtil后传入rootView,框架就会将该根布局下的所有子View按照比例缩放。
第三步:查看适配的效果
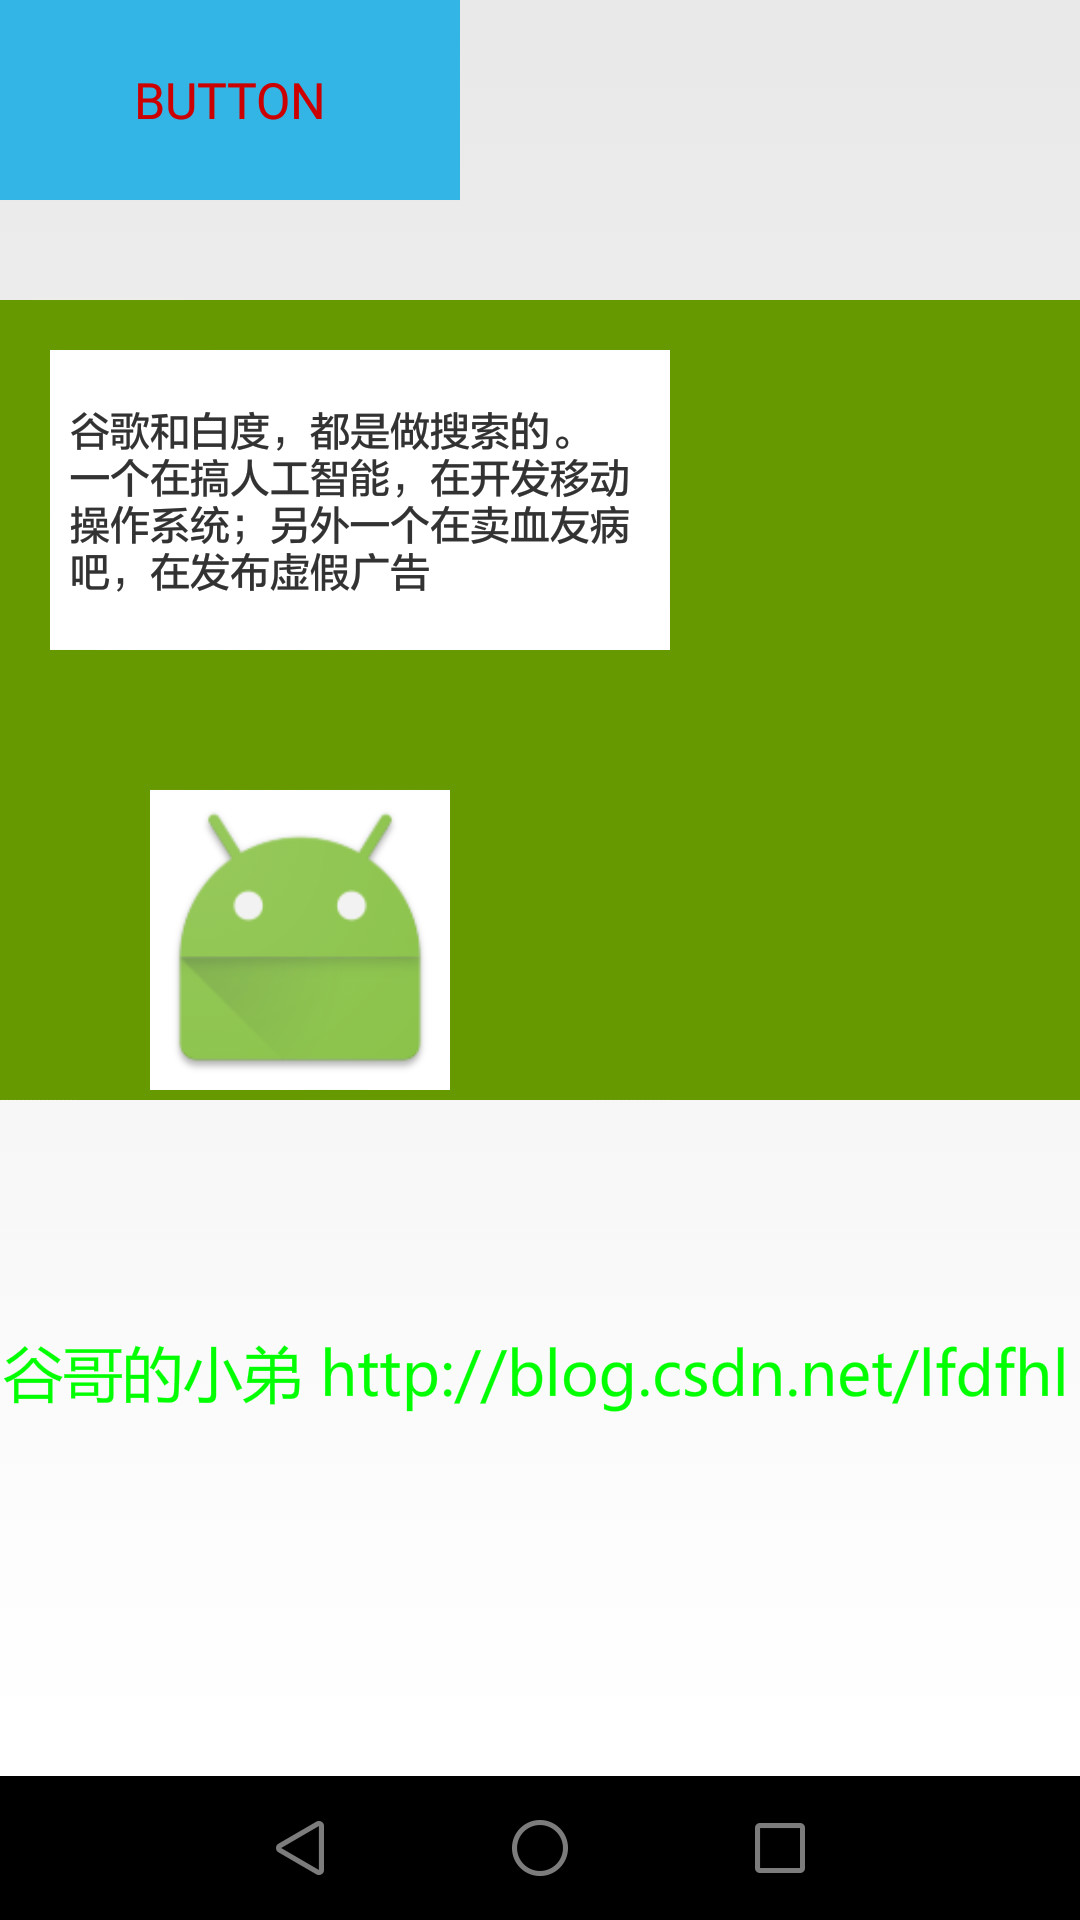
先看该UI在P7上的显示:
再看该UI在T392上的显示:
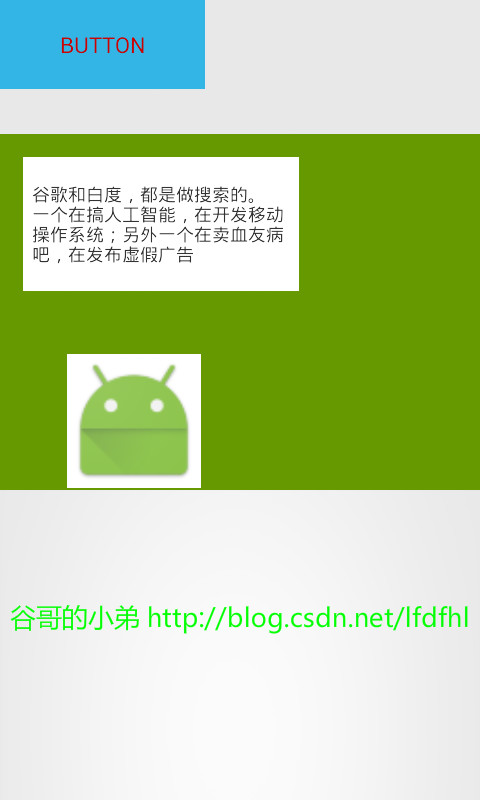
嗯哼,看到了吧:View的大小和字体的大小均按照比例进行了缩放,而且图片没有失真
动态缩放
有时候,我们可能需要利用代码来动态添加一个View,此时又该如何使用SupportMultipleScreensUtil缩放这个新添加的View呢?
请看下面的示例:
利用代码为LinearLayout动态添加TextView和ImageView
/**
 * 原创作者:
 * 谷哥的小弟
 *
 * 博客地址:
 * http://blog.csdn.net/lfdfhl
 */
private void addViewToLinearLayout(){
    mContext=this;
    int match_parent=ViewGroup.LayoutParams.MATCH_PARENT;
    int wrap_content=ViewGroup.LayoutParams.WRAP_CONTENT;
    mLinearLayout = (LinearLayout) findViewById(R.id.linearLayout);
    mLayoutParams=new LinearLayout.LayoutParams(match_parent,wrap_content);
    TextView textView=new TextView(mContext);
    mLayoutParams.width=1000;
    mLayoutParams.height=160;
    textView.setText("女朋友的照片");
    textView.setTextSize(TypedValue.COMPLEX_UNIT_PX,60);
    textView.setTextColor(Color.WHITE);
    textView.setBackgroundColor(Color.BLUE);
    textView.setPadding(10,10,10,10);
    textView.setGravity(Gravity.CENTER);
    mLayoutParams.setMargins(35,35,35,35);
    mLayoutParams.gravity=Gravity.CENTER;
    textView.setLayoutParams(mLayoutParams);
    SupportMultipleScreensUtil.scale(textView);
    mLinearLayout.addView(textView);


    ImageView imageView=new ImageView(mContext);
    mLayoutParams=new LinearLayout.LayoutParams(match_parent,wrap_content);
    mLayoutParams.width=600;
    mLayoutParams.height=600;
    imageView.setScaleType(ImageView.ScaleType.CENTER_CROP);
    Drawable drawable=getResources().getDrawable(R.drawable.girl);
    imageView.setImageDrawable(drawable);
    imageView.setLayoutParams(mLayoutParams);
    SupportMultipleScreensUtil.scale(imageView);
    mLinearLayout.addView(imageView);
}
在这段代码中先完成对于View的宽高,颜色,文本等属性的设置,然后调用SupportMultipleScreensUtil.scale()方法缩放该View再添加进LinearLayout即可。
查看适配的效果
先看该UI在P7上的显示:

再看该UI在T392上的显示:

再次提醒,在此过程中务必使用px作为尺寸单位。
除此以外,有时候还需要利用LayoutInflater生成一个View,对于该View我们同样需要对其进行类似的操作:
View view=LayoutInflater.from(mContext).inflate();
SupportMultipleScreensUtil.scale(view);
综合示例
看了刚才这两个例子,大家可能觉得比较简单,还是不能够领会到利用SupportMultipleScreensUtil实现多分辨率适配的简洁与魅力。好吧,再来看一个熟悉的页面,比如APP的首页,它常常包括一个展示图片的ViewPager、一个包含多个条目的list列表。嗯哼,我们再来瞅瞅它的实现和适配。
第一步:完成UI布局
<RelativeLayout xmlns:android="http://schemas.android.com/apk/res/android"
    xmlns:tools="http://schemas.android.com/tools"
    android:layout_width="match_parent"
    android:layout_height="match_parent">

    <RelativeLayout
        android:id="@+id/viewPagerRelativeLayout"
        android:layout_width="match_parent"
        android:layout_height="600px">

        <android.support.v4.view.ViewPager
            android:id="@+id/guide_viewpager"
            android:layout_width="match_parent"
            android:layout_height="match_parent" />

        <LinearLayout
            android:id="@+id/dotsLinearLayout"
            android:layout_width="wrap_content"
            android:layout_height="wrap_content"
            android:layout_alignParentBottom="true"
            android:layout_centerHorizontal="true"
            android:layout_marginBottom="50px"
            android:orientation="horizontal">
        </LinearLayout>
    </RelativeLayout>

    <TextView
        android:id="@+id/textView"
        android:layout_width="match_parent"
        android:layout_height="wrap_content"
        android:layout_below="@id/viewPagerRelativeLayout"
        android:background="@android:color/holo_green_dark"
        android:gravity="center"
        android:text="新闻概要"
        android:textColor="@android:color/white"
        android:textSize="100px"
        android:textStyle="normal" />

    <ListView
        android:id="@+id/listView"
        android:layout_width="match_parent"
        android:layout_height="match_parent"
        android:layout_below="@id/textView">
    </ListView>

</RelativeLayout>
在该Activity的布局文件中主要包括了:ViewPager,Indicator布局,TextView,以及一个ListView。和之前强调的一样,在布局中使用的尺寸单位均是px,就不再赘述了。
关于ListView的item的布局亦于此类似,故不再提及。
第二步:实现ListView的Adapter
LayoutInflater inflater = LayoutInflater.from(context);
convertView = inflater.inflate(R.layout.item, null);
SupportMultipleScreensUtil.scale(convertView);
在使用LayoutInflater生成item的View之后,利用SupportMultipleScreensUtil.scale( )对其缩放。
第三步:完成Activity代码的编写
private void initDots() {
    dotImageViews = new ImageView[mViewPagerAdapter.getCount()];
    for (int i = 0; i < dotImageViews.length; i++) {
        LinearLayout layout = new LinearLayout(mContext);
        ImageView imageView = new ImageView(mContext);
        imageView.setLayoutParams(new ViewGroup.LayoutParams(20, 20));
        if (i == 0) {
            imageView.setBackgroundResource(white);
        } else {
            layout.setPadding(20, 0, 0, 0);
            imageView.setBackgroundResource(black);
        }
        dotImageViews[i] = imageView;
        layout.addView(imageView);
        SupportMultipleScreensUtil.scale(layout);
        mDotsLinearLayout.addView(layout);
    }
}
一般而言,指示器Indicator的小圆点个数都是根据ViewPager中图片的个数而动态生成的。所以在这个过程中,务必对每个小圆进行缩放。
先看该UI在P7上的显示:

再看该UI在T392上的显示:

总结
通过这几个示例我们可以发现利用SupportMultipleScreensUtil适配多分辨率是完全可行和有效的。在项目中使用该框架可以解放UI设计师的劳力,只需提供一套UI图即可。对于Android工程师而言,则免去了适配的繁琐与痛苦:不用再去写多个dimens文件,不用担心把切图放到了错误的文件夹,不用再看着设计师用px作出的标注去换算在布局中到底该使用多少dp,不用再根据不同的分辨率一套一套地去做适配了。而且,由于只采用了一套切图,所以生成的APK文件的体积较之以前亦大幅减小。
PS:Android多分辨率适配框架视频教程同步更新啦


 本文详细介绍了如何使用SupportMultipleScreensUtil框架进行Android多分辨率适配,通过Hello World示例、动态添加View以及复杂的首页适配案例,展示了该框架的简便与高效。适配过程中强调使用px作为尺寸单位,并通过缩放功能实现不同设备的完美展现,简化了适配过程并减少了APK体积。


 629
629

 被折叠的 条评论
为什么被折叠?


