


上一篇文章主要分析了一下事件的分发流程(view事件分析(上)这里写链接内容),这篇文章主要是通过源码来分析一下onTouchEvent,dispatchTouchEvent源码内部。
还是沿用上一篇文章的demo,采用sdk19的版本查看源码。 从上一篇文章中我们知道分发首先是从父类开始的,如果父类不拦截,然后交给子类自己分发,那我们先从父类的dispatchTouchEvent讲起。
   final int childrenCount = mChildrenCount;
   if (newTouchTarget == null && childrenCount != 0) {
       final float x = ev.getX(actionIndex);
       final float y = ev.getY(actionIndex);
       // Find a child that can receive the event.
       // Scan children from front to back.
       final View[] children = mChildren;

       final boolean customOrder = isChildrenDrawingOrderEnabled();
       for (int i = childrenCount - 1; i >= 0; i--) {
           final int childIndex = customOrder ?
                   getChildDrawingOrder(childrenCount, i) : i;
           final View child = children[childIndex];
           if (!canViewReceivePointerEvents(child)
                   || !isTransformedTouchPointInView(x, y, child, null)) {
               continue;
           }

           newTouchTarget = getTouchTarget(child);
           if (newTouchTarget != null) {
               // Child is already receiving touch within its bounds.
               // Give it the new pointer in addition to the ones it is handling.
               newTouchTarget.pointerIdBits |= idBitsToAssign;
               break;
           }

           resetCancelNextUpFlag(child);
           if (dispatchTransformedTouchEvent(ev, false, child, idBitsToAssign)) {
               // Child wants to receive touch within its bounds.
               mLastTouchDownTime = ev.getDownTime();
               mLastTouchDownIndex = childIndex;
               mLastTouchDownX = ev.getX();
               mLastTouchDownY = ev.getY();
               newTouchTarget = addTouchTarget(child, idBitsToAssign);
               alreadyDispatchedToNewTouchTarget = true;
               break;
           }
       }
}这里挑选了主要代码,第10行开始for循环这里循环了所有的子类,然后寻找目标child(之前有一篇文章对这块做过详细的介绍dispatchTouchEvent小分析这里写链接内容)。这里是在第14行的if语句中进行判断的,如果能接收事件或者在子child的范围内,这里同时取反,如果不满足则直接跳过进行下一个循环,下面我们重点看一下是怎么判断是否在child范围内的。
   protected boolean isTransformedTouchPointInView(float x, float y, View child,
            PointF outLocalPoint) {
        float localX = x + mScrollX - child.mLeft;
        float localY = y + mScrollY - child.mTop;
        if (! child.hasIdentityMatrix() && mAttachInfo != null) {
            final float[] localXY = mAttachInfo.mTmpTransformLocation;
            localXY[0] = localX;
            localXY[1] = localY;
            child.getInverseMatrix().mapPoints(localXY);
            localX = localXY[0];
            localY = localXY[1];
        }
        //这里调用了下面的pointInView的方法来判断是都在其范围内
        final boolean isInView = child.pointInView(localX, localY);
        if (isInView && outLocalPoint != null) {
            outLocalPoint.set(localX, localY);
        }
        return isInView;
    }

    /**
     * Determines whether the given point, in local coordinates is inside the view.
     */
    /*package*/ final boolean pointInView(float localX, float localY) {
        return localX >= 0 && localX < (mRight - mLeft)
                && localY >= 0 && localY < (mBottom - mTop);
ok,这里已经分析了怎么确定了目标child的,确定了child后将自己分发给child,在上面dispatchTouchEvent中的第28行调用了这句话dispatchTransformedTouchEvent(ev, false, child, idBitsToAssign),进入到源码看看,这里仍然展示了部分重要代码:
 private boolean dispatchTransformedTouchEvent(MotionEvent event, boolean cancel,
            View child, int desiredPointerIdBits) {
        final boolean handled;

        // Canceling motions is a special case.  We don't need to perform any transformations
        // or filtering.  The important part is the action, not the contents.
        final int oldAction = event.getAction();
        if (cancel || oldAction == MotionEvent.ACTION_CANCEL) {
            event.setAction(MotionEvent.ACTION_CANCEL);
            //上面已经确定了child,所有直接走了else
            if (child == null) {
                handled = super.dispatchTouchEvent(event);
            } else {
                 //这里handle的值直接取决于child的dispatchTouchEvent返回值
                handled = child.dispatchTouchEvent(event);
            }
            event.setAction(oldAction);
            return handled;
        }
        ........
    }
如果在这里子类的dispatchTouchEvent返回了false,也就是在viewGroup中if (dispatchTransformedTouchEvent(ev, false, child, idBitsToAssign)) 这句,进入不到了if语句,下面的newTouchTarget = addTouchTarget(child, idBitsToAssign);alreadyDispatchedToNewTouchTarget = true;也无法进行赋值,也就是需要重新进行找target。这时候在进行for循环找是否有符合的对应child。下面我们来打log瞅瞅,将之前的代码小改了一下,显示了Btn3。
    <com.example.ontouchtext.MyFrameLayout
        android:id="@+id/framelayout"
        android:layout_width="wrap_content"
        android:layout_height="wrap_content">

        <com.example.ontouchtext.Btn2
            android:id="@+id/btn2"
            android:layout_width="100dp"
            android:layout_height="100dp"
            android:background="#aaaaaa"
            android:text="btn2" />

        <com.example.ontouchtext.Btn3
            android:id="@+id/btn3"
            android:layout_width="100dp"
            android:layout_height="100dp"
            android:layout_marginLeft="50dp"
            android:layout_marginTop="50dp"
            android:background="#1babaa"
            android:text="btn3"
            android:visibility="visible"
            />

    </com.example.ontouchtext.MyFrameLayout>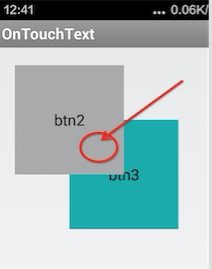
这里点击了btn2和btn3重合的区域,主要是为了btn3也能满足pointInView。然后讲btn2的dispatchTouchEvent返回了false。看看log:
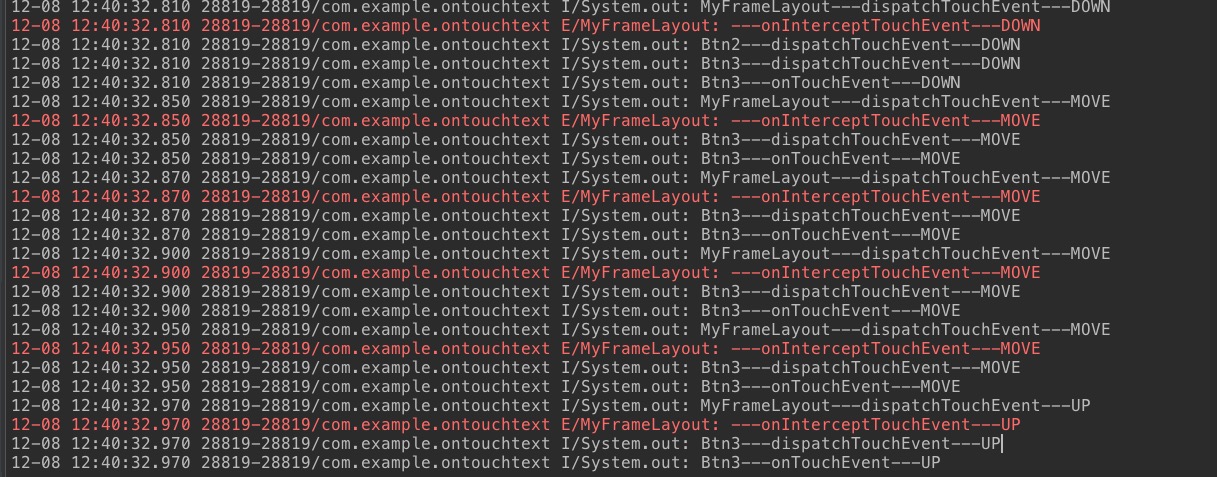
正和我们预期的一样,先走了父类的分发,然后进入到for循环,找到btn2,btn2的dispatchTouchEvent返回了false,并没有给目标child赋值,这时候for循环接着找,然后找到了btn3。所以看到了我们上面的log。
下面我把btn的dispatchTouchEvent的返回值改为true,然后再看看log打印值:
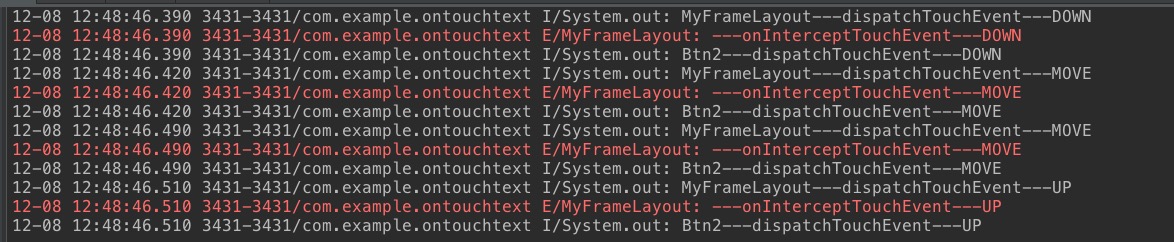
看到的结果也是我们预期的,并没有走btn3,也就是btn2已经成为了目标child。
接着我们来说说onTouchEvent方法,我们常常说onTouchEvent方法返回true是用来消费掉事件的。我们来看看源码研究一下到底这个有啥功效。同样我们来看看dispatchTouchEvent方法,不过这次是看view的方法非viewGroup。
 public boolean dispatchTouchEvent(MotionEvent event) {
        if (mInputEventConsistencyVerifier != null) {
            mInputEventConsistencyVerifier.onTouchEvent(event, 0);
        }

        if (onFilterTouchEventForSecurity(event)) {
            //noinspection SimplifiableIfStatement
            ListenerInfo li = mListenerInfo;
            if (li != null && li.mOnTouchListener != null && (mViewFlags & ENABLED_MASK) == ENABLED
                    && li.mOnTouchListener.onTouch(this, event)) {
                return true;
            }

            if (onTouchEvent(event)) {
                return true;
            }
        }

        if (mInputEventConsistencyVerifier != null) {
            mInputEventConsistencyVerifier.onUnhandledEvent(event, 0);
        }
        return false;
    }
这里是不是有很惊喜的发现,第10行看起,如果onTouch返回了false,那么这里走到了第14行的if判断,这里如果onTouchEvent返回true,那么整个dispatchTouchEvent将返回true,否则第22行直接返回了false,也就是上面刚讲到的,view的dispatchTouchEvent返回false,不能成为目标child。所以该事件分发到btn2时没有进行消费。
这里也可以看到如果onTouch返回了true,也会整个view的dispatchTouchEvent返回true,同样也能消费掉这个事件。
最后如果btn2,btn3,和父类ViewGroup都不消费这个事件,到底事件会怎么处理了。下面接着改了一下demo。
将btn2,btn2,MyFragmentLayout的onTouchEvent全部返回false。
同时在MainActivity加了onTouchEvent方法:
public class MainActivity extends Activity {
    private MyFrameLayout frameLayout;
    private Button btn1;
    private Btn2 btn2;
    private Btn3 btn3;

    @Override
    protected void onCreate(Bundle savedInstanceState) {
        super.onCreate(savedInstanceState);
        setContentView(R.layout.activity_main);
        frameLayout = (MyFrameLayout) findViewById(R.id.framelayout);
        btn1 = (Button) findViewById(R.id.btn1);
        btn2 = (Btn2) findViewById(R.id.btn2);

        btn2.bringToFront();
    }

    @Override
    public boolean onTouchEvent(MotionEvent event) {
        switch (event.getAction()) {
            case MotionEvent.ACTION_DOWN:
                System.out.println("Activity---onTouchEvent---DOWN");
                break;
            case MotionEvent.ACTION_MOVE:
                System.out.println("Activity---onTouchEvent---MOVE");
                break;
            case MotionEvent.ACTION_UP:
                System.out.println("Activity---onTouchEvent---UP");
                break;
            default:
                break;
        }
        return super.onTouchEvent(event);
    }
}
同样点击一下btn2和btn3重合处,打印log
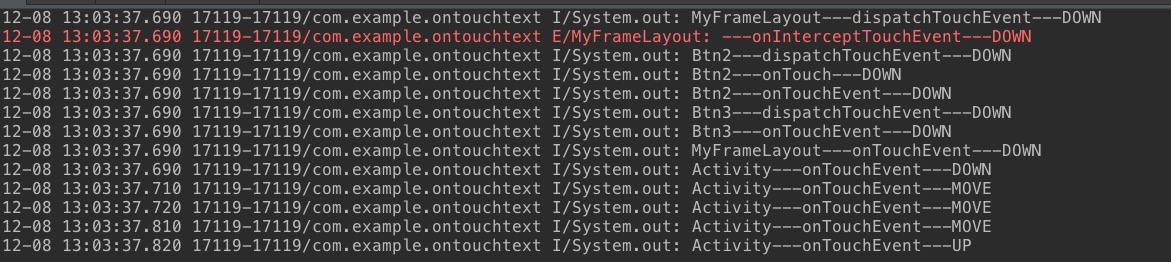
哈哈,最后都不处理,会把事件交给activity进行处理。先交给btn2,btn2的onTouchEvent返回false说我不消费,然后接着到了btn3,btn3也返回false说我也不消费,返回到了MyFrameLayout,结果他也返回了fasle,最后就交给了activity处理了。
嗯,到此结束了,以上是我对view事件理解。(view事件分析(上)这里写链接内容)


 2624
2624

 被折叠的 条评论
为什么被折叠?
被折叠的 条评论
为什么被折叠?
 到【灌水乐园】发言


