


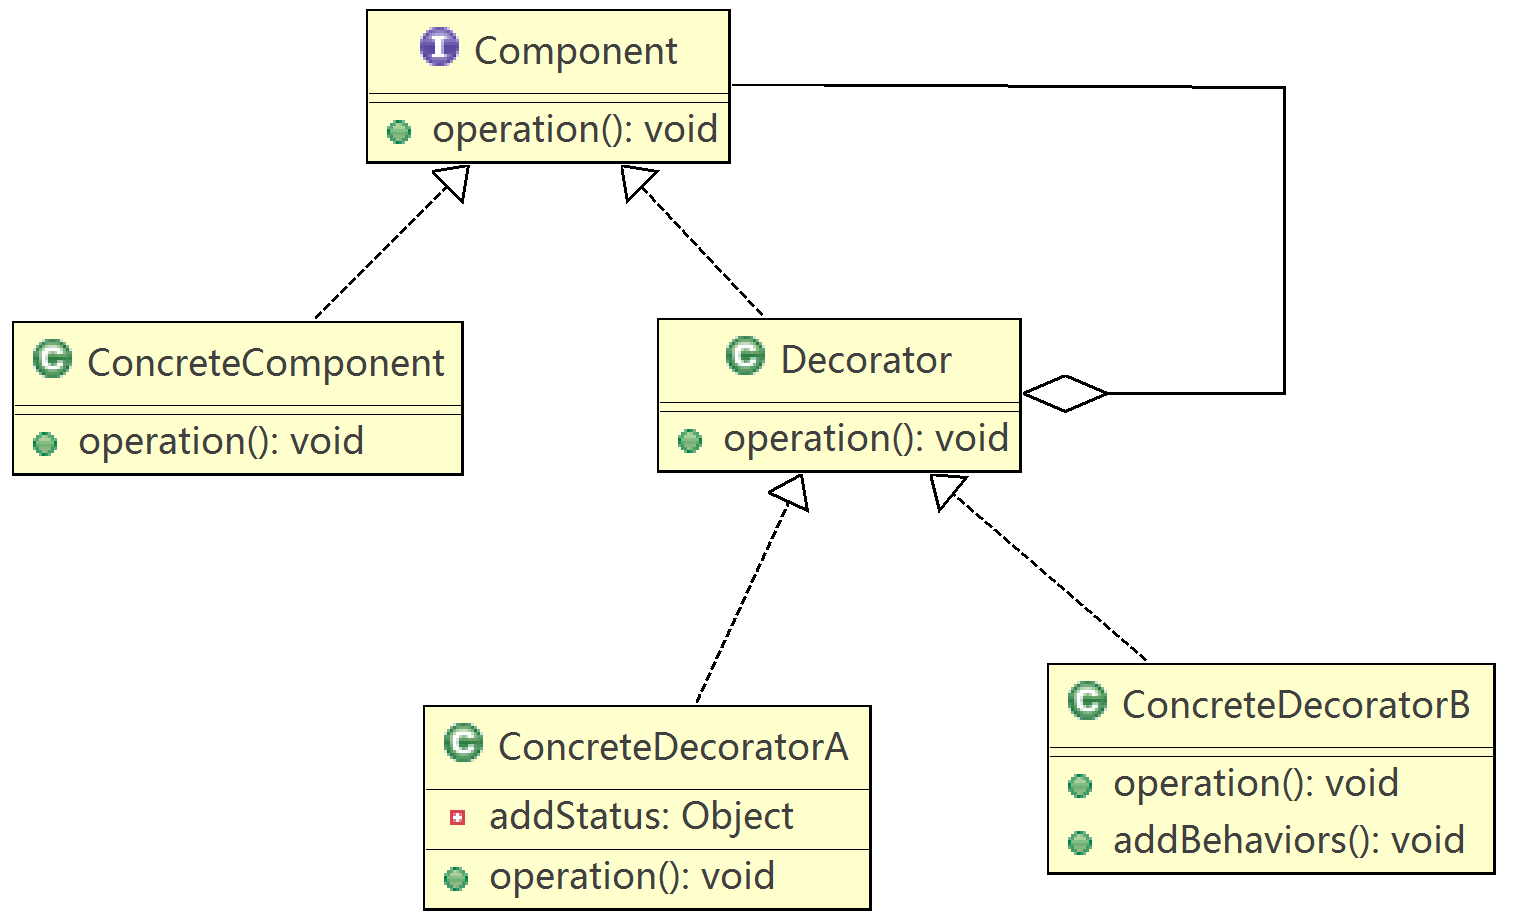
12.装饰模式(Decorator)
在程序开发中,有时候开发人员会使用继承来扩展对象的功能,用户的需求是多变的,也就造成继承会造成代码的大范围改动,其实扩展对象的功能,采用组合比继承要好很多,当用户需求变动时,只需要将对象间的组合发生变化就可以了。
哪里会用到装饰模式
装饰就是物品原来的功能并没有改变,只是在原来的功能上添加了一些新的功能,就好像是进行了装饰一样。其实关键是要理解装饰模式的本质,是为了扩充软件的功能,但又不改变软件原本的功能。
采用装饰模式的主要目的也是为了是两个关联类之间解耦,以方便组合一些新的功能,就好像进行了包装一样。
比如开发超时收银系统时,最主要的是收银功能,但超市经常会遇到打折、赠送等活动,此时收银功能还被别的程序使用,所以不能直接在该方法上修改。这里就用到装饰模式(当然第一想到的是继承)
装饰模式的实现原理
装饰模式在JUnit中的应用
Test
package junit.framework;

public abstract interface Test
{
  public abstract int countTestCases();

  public abstract void run(TestResult paramTestResult);
}
TestDecorator
package decorate;

import junit.framework.Assert;
import junit.framework.Test;
import junit.framework.TestResult;

public class TestDecorator extends Assert implements Test {
    protected Test fTest;

    // 注入要装饰的类
    public TestDecorator(Test test) {
        this.fTest = test;
    }

    // 执行单元测试
    public void basicRun(TestResult result) {
        this.fTest.run(result);
    }

    // 返回将要执行的单元测试的个数
    public int countTestCases() {
        return this.fTest.countTestCases();
    }

    // 执行单元测试
    public void run(TestResult result) {
        basicRun(result);
    }

    // 输出字符串
    public String toString() {
        return this.fTest.toString();
    }

    // 获取要执行的单元测试的对象
    public Test getTest() {
        return this.fTest;
    }
}
RepeatedTest
package junit.extensions;

import junit.framework.Test;
import junit.framework.TestResult;

public class RepeatedTest extends TestDecorator {
    private int fTimesRepeat;

    // 设定需要重复执行的次数
    public RepeatedTest(Test test, int repeat) {
        super(test);
        if (repeat < 0) {
            throw new IllegalArgumentException("Repetition count must be >= 0");
        }
        this.fTimesRepeat = repeat;
    }

    // 返回单元测试执行的次数
    public int countTestCases() {
        return super.countTestCases() * this.fTimesRepeat;
    }

    // 重复执行单元测试
    public void run(TestResult result) {
        for (int i = 0; i < this.fTimesRepeat; i++) {
            if (result.shouldStop()) {
                break;
            }
            super.run(result);
        }
    }

    // 输出字符串
    public String toString() {
        return super.toString() + "(repeated)";
    }
}
TestSetup
package junit.extensions;

import junit.framework.Protectable;
import junit.framework.Test;
import junit.framework.TestResult;

public class TestSetup extends TestDecorator {
    public TestSetup(Test test) {
        super(test);
    }

    // 在执行单元测试前后增加一些初始化和消耗的动作
    public void run(final TestResult result) {
        Protectable p = new Protectable() {
            public void protect() throws Exception {
                TestSetup.this.setUp();
                TestSetup.this.basicRun(result);
                TestSetup.this.tearDown();
            }
        };
        result.runProtected(this, p);
    }

    // 执行单元测试前的初始化
    protected void setUp() throws Exception {
    }

    // 执行单元测试后的消耗
    protected void tearDown() throws Exception {
    }
}
装饰模式在JAVA中的实际应用
java的输入输出流,一般情况下,需要使用FileReader和StringReader,如果要增加缓存功能的类有很多,那么子类也就需要很多,所以java就使用了装饰模式,BufferedReader就是这样的装饰类。
BufferedReader
package java.io;

public class BufferedReader extends Reader {

    private Reader in;

    private char cb[];
    private int nChars, nextChar;

    private static final int INVALIDATED = -2;
    private static final int UNMARKED = -1;
    private int markedChar = UNMARKED;
    private int readAheadLimit = 0; /* Valid only when markedChar > 0 */

    private boolean skipLF = false;

    private boolean markedSkipLF = false;

    private static int defaultCharBufferSize = 8192;
    private static int defaultExpectedLineLength = 80;

    public BufferedReader(Reader in, int sz) {
        super(in);
        if (sz <= 0)
            throw new IllegalArgumentException("Buffer size <= 0");
        this.in = in;
        cb = new char[sz];
        nextChar = nChars = 0;
    }

    public BufferedReader(Reader in) {
        this(in, defaultCharBufferSize);
    }

    private void ensureOpen() throws IOException {
        if (in == null)
            throw new IOException("Stream closed");
    }

    private void fill() throws IOException {
        int dst;
        if (markedChar <= UNMARKED) {
            /* No mark */
            dst = 0;
        } else {
            /* Marked */
            int delta = nextChar - markedChar;
            if (delta >= readAheadLimit) {
                /* Gone past read-ahead limit: Invalidate mark */
                markedChar = INVALIDATED;
                readAheadLimit = 0;
                dst = 0;
            } else {
                if (readAheadLimit <= cb.length) {
                    /* Shuffle in the current buffer */
                    System.arraycopy(cb, markedChar, cb, 0, delta);
                    markedChar = 0;
                    dst = delta;
                } else {
                    /* Reallocate buffer to accommodate read-ahead limit */
                    char ncb[] = new char[readAheadLimit];
                    System.arraycopy(cb, markedChar, ncb, 0, delta);
                    cb = ncb;
                    markedChar = 0;
                    dst = delta;
                }
                nextChar = nChars = delta;
            }
        }

        int n;
        do {
            // 创建一个缓存,缓存的长度可以设定,未设置则采用默认长度
            // 首先从in中获取指定长度的流到缓存中去,加速访问,核心语句只有此条
            n = in.read(cb, dst, cb.length - dst);
        } while (n == 0);
        if (n > 0) {
            nChars = dst + n;
            nextChar = dst;
        }
    }

    public int read() throws IOException {
        synchronized (lock) {
            ensureOpen();
            for (;;) {
                if (nextChar >= nChars) {
                    fill();
                    if (nextChar >= nChars)
                        return -1;
                }
                if (skipLF) {
                    skipLF = false;
                    if (cb[nextChar] == '\n') {
                        nextChar++;
                        continue;
                    }
                }
                return cb[nextChar++];
            }
        }
    }

    private int read1(char[] cbuf, int off, int len) throws IOException {
        if (nextChar >= nChars) {
            //当读取的长度超过缓存长度的时候,直接从in里面读,也就失去了这个装饰类的作用了
            if (len >= cb.length && markedChar <= UNMARKED && !skipLF) {
                return in.read(cbuf, off, len);
            }
            //如果读取的下个字符索引超过了当前的缓存长度,也就是说不再缓存中,那么重新加载下一组缓存
            fill();
        }
        //当加载缓存后发现,读取的下个字符索引仍超过缓存长度,其实就是加载下一组失败,也就是说已经读取完毕了
        if (nextChar >= nChars)
            return -1;
        if (skipLF) {
            skipLF = false;
            if (cb[nextChar] == '\n') {
                nextChar++;
                if (nextChar >= nChars)
                    fill();
                if (nextChar >= nChars)
                    return -1;
            }
        }
        int n = Math.min(len, nChars - nextChar);
        //从缓存中读取字符
        System.arraycopy(cb, nextChar, cbuf, off, n);
        nextChar += n;
        return n;
    }

    public int read(char cbuf[], int off, int len) throws IOException {
        synchronized (lock) {
            ensureOpen();
            if ((off < 0) || (off > cbuf.length) || (len < 0)
                    || ((off + len) > cbuf.length) || ((off + len) < 0)) {
                throw new IndexOutOfBoundsException();
            } else if (len == 0) {
                return 0;
            }

            int n = read1(cbuf, off, len);
            if (n <= 0)
                return n;
            while ((n < len) && in.ready()) {
                int n1 = read1(cbuf, off + n, len - n);
                if (n1 <= 0)
                    break;
                n += n1;
            }
            return n;
        }
    }

    String readLine(boolean ignoreLF) throws IOException {
        StringBuffer s = null;
        int startChar;

        synchronized (lock) {
            ensureOpen();
            boolean omitLF = ignoreLF || skipLF;

            bufferLoop: for (;;) {

                if (nextChar >= nChars)
                    fill();
                if (nextChar >= nChars) { /* EOF */
                    if (s != null && s.length() > 0)
                        return s.toString();
                    else
                        return null;
                }
                boolean eol = false;
                char c = 0;
                int i;

                if (omitLF && (cb[nextChar] == '\n'))
                    nextChar++;
                skipLF = false;
                omitLF = false;

                charLoop: for (i = nextChar; i < nChars; i++) {
                    c = cb[i];
                    if ((c == '\n') || (c == '\r')) {
                        eol = true;
                        break charLoop;
                    }
                }

                startChar = nextChar;
                nextChar = i;

                if (eol) {
                    String str;
                    if (s == null) {
                        str = new String(cb, startChar, i - startChar);
                    } else {
                        s.append(cb, startChar, i - startChar);
                        str = s.toString();
                    }
                    nextChar++;
                    if (c == '\r') {
                        skipLF = true;
                    }
                    return str;
                }

                if (s == null)
                    s = new StringBuffer(defaultExpectedLineLength);
                s.append(cb, startChar, i - startChar);
            }
        }
    }

    public String readLine() throws IOException {
        return readLine(false);
    }

    public long skip(long n) throws IOException {
        if (n < 0L) {
            throw new IllegalArgumentException("skip value is negative");
        }
        synchronized (lock) {
            ensureOpen();
            long r = n;
            while (r > 0) {
                if (nextChar >= nChars)
                    fill();
                if (nextChar >= nChars) /* EOF */
                    break;
                if (skipLF) {
                    skipLF = false;
                    if (cb[nextChar] == '\n') {
                        nextChar++;
                    }
                }
                long d = nChars - nextChar;
                if (r <= d) {
                    nextChar += r;
                    r = 0;
                    break;
                } else {
                    r -= d;
                    nextChar = nChars;
                }
            }
            return n - r;
        }
    }

    public boolean ready() throws IOException {
        synchronized (lock) {
            ensureOpen();


            if (skipLF) {

                if (nextChar >= nChars && in.ready()) {
                    fill();
                }
                if (nextChar < nChars) {
                    if (cb[nextChar] == '\n')
                        nextChar++;
                    skipLF = false;
                }
            }
            return (nextChar < nChars) || in.ready();
        }
    }

    public boolean markSupported() {
        return true;
    }

    public void mark(int readAheadLimit) throws IOException {
        if (readAheadLimit < 0) {
            throw new IllegalArgumentException("Read-ahead limit < 0");
        }
        synchronized (lock) {
            ensureOpen();
            this.readAheadLimit = readAheadLimit;
            markedChar = nextChar;
            markedSkipLF = skipLF;
        }
    }

    public void reset() throws IOException {
        synchronized (lock) {
            ensureOpen();
            if (markedChar < 0)
                throw new IOException(
                        (markedChar == INVALIDATED) ? "Mark invalid"
                                : "Stream not marked");
            nextChar = markedChar;
            skipLF = markedSkipLF;
        }
    }

    public void close() throws IOException {
        synchronized (lock) {
            if (in == null)
                return;
            in.close();
            in = null;
            cb = null;
        }
    }
}
从上面可以看出,BufferedReader类其实就是将Reader类的子类StringReader的数据放入缓存,然后操作read方法时,从缓存中读取,也就是说,BufferedReader对StringReader类的read功能增加了缓存功能。其实Java I/O库中所有输入流、输出流都采用了装饰模式,它们可以无限次地进行装饰转换,转换的目标就是得到自己想要的数据结构类型的流对象。
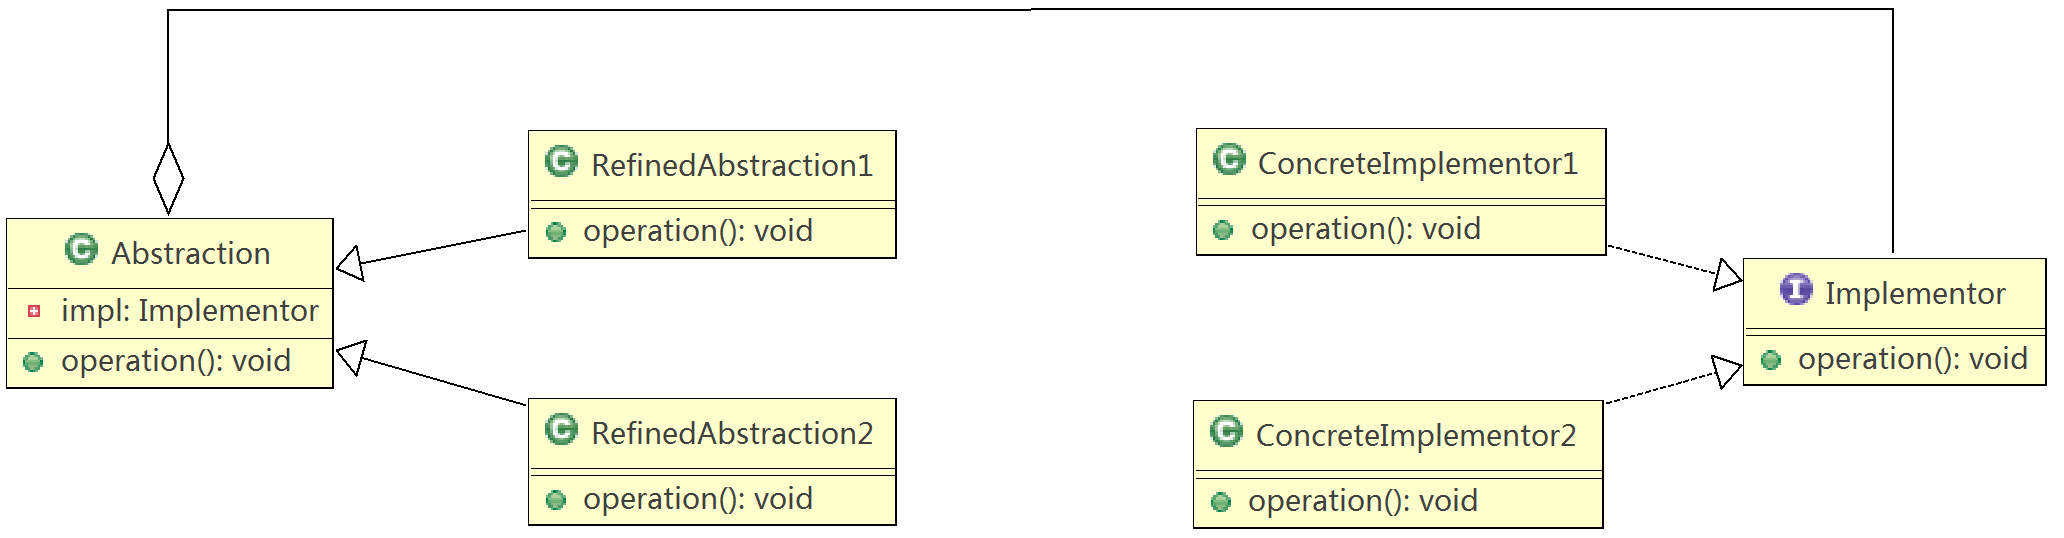
13.桥模式(Bridge)
前面几章讲解的结构型设计模式也都是告诉开发人员如何使用组合来代替继承,桥模式也不例外,桥模式将抽象与其实现解耦,使它们可以分别独立地变化,是继承的一种代替方式。
哪里会使用到桥模式
不管是前面介绍的门面模式、适配器模式还是本章介绍的桥模式,核心思想只有一个,就是软件开发人员在进行代码编写时,对于两个类之间需要进行关联时,不要直接在一个类的代码中调用另一个类的代码,而是通过这些设计模式,在两个类之间建立一个类似缓冲器的类,从而将直接关联的两个类进行解耦。
桥模式的实现原理
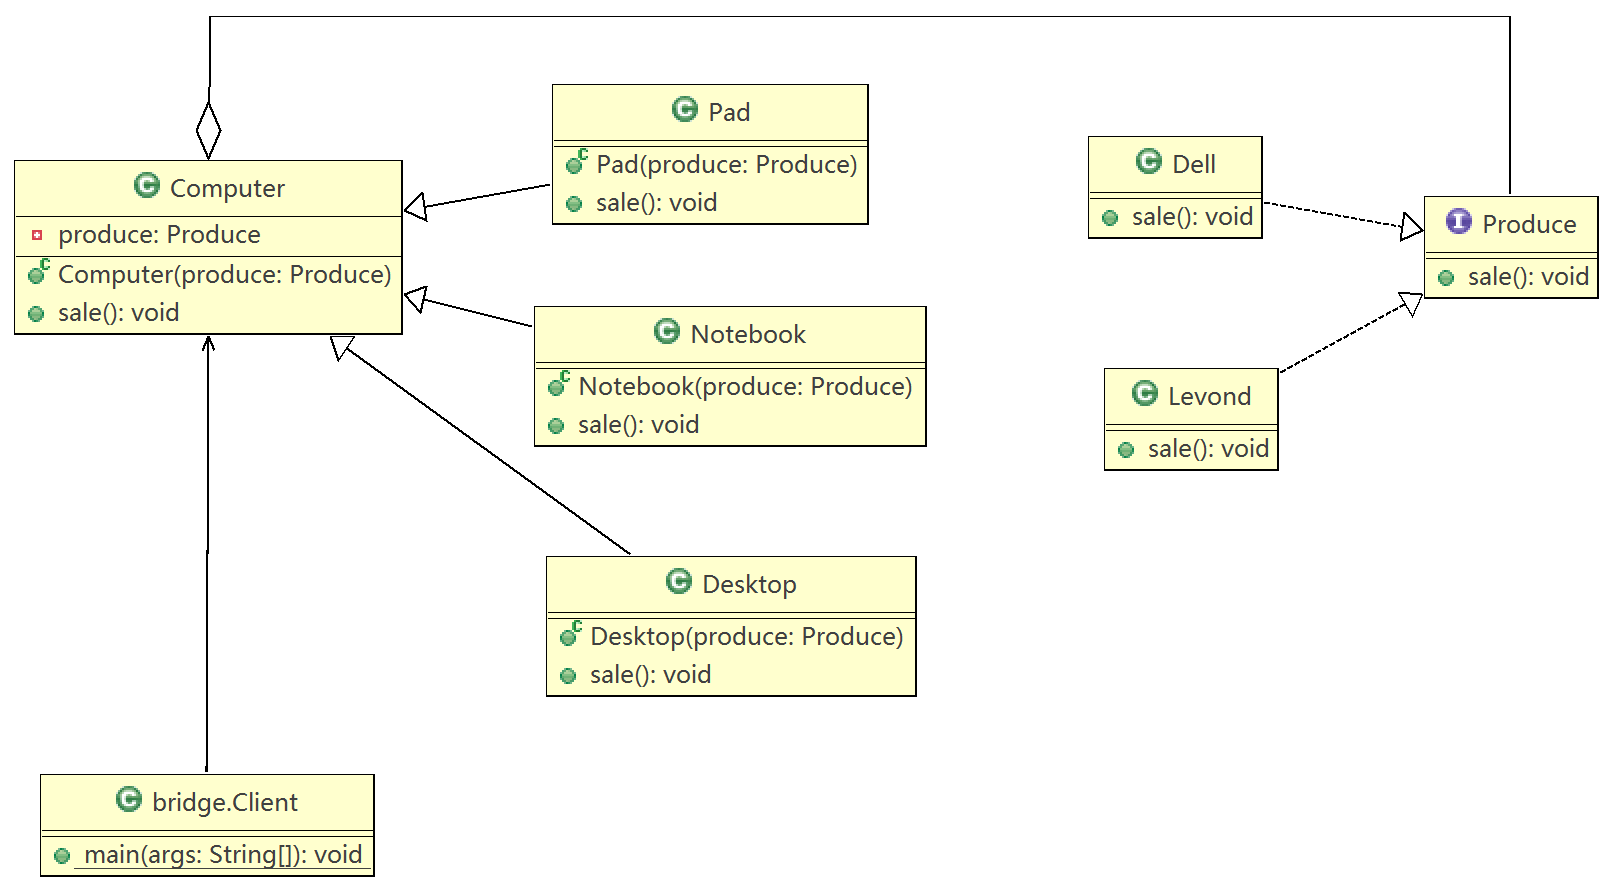
桥模式在网上商城系统的实际应用
假设网上商城系统要销售电脑,电脑既可以分为台式机、笔记本、平板电脑,也可以分为不同的品牌,比如联想、戴尔、苹果等。
Computer
package bridge;

public abstract class Computer {
    public Computer(Produce produce) {
        this.produce = produce;
    }

    private Produce produce;

    public void sale() {
        produce.sale();
    }
}
Produce
package bridge;

public interface Produce {
    public void sale();
}
Desktop
package bridge;

public class Desktop extends Computer {
    public Desktop(Produce produce) {
        super(produce);
    }

    @Override
    public void sale() {
        super.sale();
        System.out.println("台式机");
    }
}
Notebook
package bridge;

public class Notebook extends Computer {
    public Notebook(Produce produce) {
        super(produce);
    }

    @Override
    public void sale() {
        super.sale();
        System.out.println("笔记本电脑");
    }
}
Pad
package bridge;

public class Pad extends Computer {
    public Pad(Produce produce) {
        super(produce);
    }

    @Override
    public void sale() {
        super.sale();
        System.out.println("平板电脑");
    }
}
Levond
package bridge;

public class Levond implements Produce {

    @Override
    public void sale() {
        System.out.print("销售联想");
    }

}
Dell
package bridge;

public class Dell implements Produce {
    @Override
    public void sale() {
        System.out.print("销售戴尔");
    }
}
Client
package bridge;
public class Client {
public static void main(String[] args) {
Computer computer = new Desktop(new Dell());
computer.sale();
computer = new Pad(new Dell());
computer.sale();
computer = new Notebook(new Dell());
computer.sale();
}
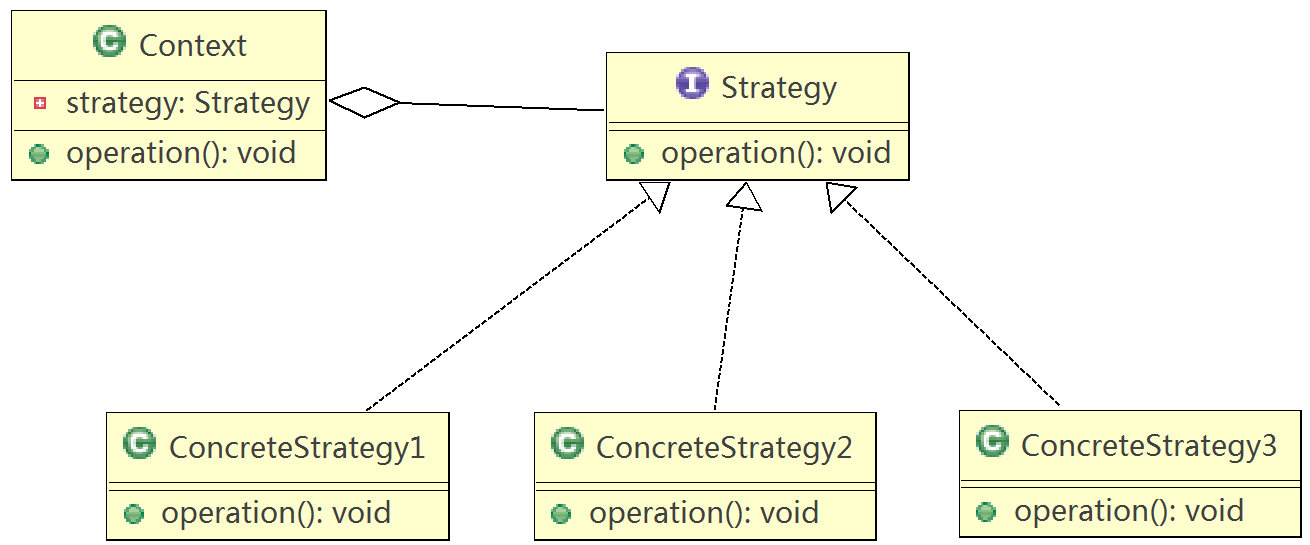
}14.策略模式(Strategy)
策略模式就是定义了一系列的算法,并将每一个算法封装起来,而且使它们还可以相互替换,比如在人力资源系统的薪资计算时,针对不同的人员会有不同的薪资计算方法,将这些算法分离出来,就是策略模式,策略模式让算法独立于使用它的客户而独立变化。
哪里会使用到策略模式
田忌通过安排不同的马来进行比赛,从而将劣势变为优势,并取得了最终的胜利,做一件事情有很多方法,同样都可以完成一件事情,但达到的效果可能不一样,这就是策略模式。
策略模式就是提供相同的接口,开发人员根据响应的接口实现不同的策略,然后根据不同的情况选用不同的策略,从而实现了客户端代码不用修改,只用替换不同的策略实现类即可。
策略模式的实现原理
策略模式在Spring中的实际应用
Spring把所有能记录信息的文件,如各种类型的文件、二进制流等都称为资源,Spring改进了Java资源访问的策略,它为资源访问提供了一个Resource接口,Resource接口是具体资源访问策略的抽象,也是所有资源访问类所实现的接口。
Spring为Resource接口提供了如下实现类:
ClassPathResource:访问类加载路径里资源的实现类
FileSystemResource:访问文件系统里资源的实现类
UrlResource:访问网络资源的实现类
ByteArrayResource:访问字节数组资源的实现类
ServletContextResource:访问相当于ServletContext路径里的资源的实现类
InputStreamResource:访问输入流资源的实现类
Resource
package strategy;

import java.io.File;
import java.io.IOException;
import java.net.URI;
import java.net.URL;

public abstract interface Resource extends InputStreamSource {
    public abstract boolean exists();

    public abstract boolean isReadable();

    //返回资源文件是否打开
    public abstract boolean isOpen();

    //返回资源对应的URL对象
    public abstract URL getURL() throws IOException;

    public abstract URI getURI() throws IOException;

    public abstract File getFile() throws IOException;

    public abstract long contentLength() throws IOException;

    public abstract long lastModified() throws IOException;

    public abstract Resource createRelative(String paramString) throws IOException;

    public abstract String getFilename();

    //返回资源的描述信息
    public abstract String getDescription();
}
ClassPathResource
package org.springframework.core.io;

import java.io.FileNotFoundException;
import java.io.IOException;
import java.io.InputStream;
import java.net.URL;
import org.springframework.util.Assert;
import org.springframework.util.ClassUtils;
import org.springframework.util.ObjectUtils;
import org.springframework.util.StringUtils;

public class ClassPathResource extends AbstractFileResolvingResource {
    // 定义路径
    private final String path;
    // 定义类加载器
    private ClassLoader classLoader;
    private Class<?> clazz;

    public ClassPathResource(String path) {
        this(path, (ClassLoader) null);
    }

    public ClassPathResource(String path, ClassLoader classLoader) {
        Assert.notNull(path, "Path must not be null");
        String pathToUse = StringUtils.cleanPath(path);
        if (pathToUse.startsWith("/")) {
            pathToUse = pathToUse.substring(1);
        }
        this.path = pathToUse;
        this.classLoader = (classLoader != null ? classLoader : ClassUtils
                .getDefaultClassLoader());
    }

    public ClassPathResource(String path, Class<?> clazz) {
        Assert.notNull(path, "Path must not be null");
        this.path = StringUtils.cleanPath(path);
        this.clazz = clazz;
    }

    protected ClassPathResource(String path, ClassLoader classLoader,
            Class<?> clazz) {
        this.path = StringUtils.cleanPath(path);
        this.classLoader = classLoader;
        this.clazz = clazz;
    }

    // 获取资源路径
    public final String getPath() {
        return this.path;
    }

    // 获取类加载器
    public final ClassLoader getClassLoader() {
        return this.classLoader != null ? this.classLoader : this.clazz
                .getClassLoader();
    }

    // 判断资源是否存在
    public boolean exists() {
        URL url;
        URL url;
        if (this.clazz != null) {
            url = this.clazz.getResource(this.path);
        } else {
            url = this.classLoader.getResource(this.path);
        }
        return url != null;
    }

    // 获取输入流
    public InputStream getInputStream() throws IOException {
        InputStream is;
        InputStream is;
        if (this.clazz != null) {
            is = this.clazz.getResourceAsStream(this.path);
        } else {
            is = this.classLoader.getResourceAsStream(this.path);
        }
        if (is == null) {
            throw new FileNotFoundException(getDescription()
                    + " cannot be opened because it does not exist");
        }
        return is;
    }

    // 获取URL
    public URL getURL() throws IOException {
        URL url;
        URL url;
        if (this.clazz != null) {
            url = this.clazz.getResource(this.path);
        } else {
            url = this.classLoader.getResource(this.path);
        }
        if (url == null) {
            throw new FileNotFoundException(getDescription()
                    + " cannot be resolved to URL because it does not exist");
        }
        return url;
    }

    public Resource createRelative(String relativePath) {
        String pathToUse = StringUtils.applyRelativePath(this.path,
                relativePath);
        return new ClassPathResource(pathToUse, this.classLoader, this.clazz);
    }

    // 获取文件名
    public String getFilename() {
        return StringUtils.getFilename(this.path);
    }

    // 获取信息描述
    public String getDescription() {
        StringBuilder builder = new StringBuilder("class path resource [");
        String pathToUse = this.path;
        if ((this.clazz != null) && (!pathToUse.startsWith("/"))) {
            builder.append(ClassUtils.classPackageAsResourcePath(this.clazz));
            builder.append('/');
        }
        if (pathToUse.startsWith("/")) {
            pathToUse = pathToUse.substring(1);
        }
        builder.append(pathToUse);
        builder.append(']');
        return builder.toString();
    }

    public boolean equals(Object obj) {
        if (obj == this) {
            return true;
        }
        if ((obj instanceof ClassPathResource)) {
            ClassPathResource otherRes = (ClassPathResource) obj;

            return (this.path.equals(otherRes.path))
                    && (ObjectUtils.nullSafeEquals(this.classLoader,
                            otherRes.classLoader))
                    && (ObjectUtils.nullSafeEquals(this.clazz, otherRes.clazz));
        }
        return false;
    }

    public int hashCode() {
        return this.path.hashCode();
    }
}
在Spring中,Bean的初始化也用到了策略模式,具体就是
SimpleInstantiationStrategy类,可以去看看源码。


 2425
2425

 被折叠的 条评论
为什么被折叠?
被折叠的 条评论
为什么被折叠?
 到【灌水乐园】发言


