


转载自:http://blog.csdn.net/stickallthetime/article/details/44587413
一、测试环境
1. Tomcat8.0.18
2. JDK1.8
3. Spring4.1
二、新建一个SpringMVC的工程
1. 使用Maven新建一个web工程,添加SpringMVC和spring websocket依赖,pom.xml文件如下
- 1
- 2
- 3
- 4
- 5
- 6
- 7
- 8
- 9
- 10
- 11
- 12
- 13
- 14
- 15
- 16
- 17
- 18
- 19
- 20
- 21
- 22
- 23
- 24
- 25
- 26
- 27
- 28
- 29
- 30
- 31
- 32
- 33
- 34
- 35
- 36
- 37
- 38
- 39
- 40
- 41
- 42
- 43
- 44
- 45
- 46
- 47
- 48
- 49
- 50
- 51
- 52
- 53
- 54
- 55
- 56
- 57
- 58
- 59
- 1
- 2
- 3
- 4
- 5
- 6
- 7
- 8
- 9
- 10
- 11
- 12
- 13
- 14
- 15
- 16
- 17
- 18
- 19
- 20
- 21
- 22
- 23
- 24
- 25
- 26
- 27
- 28
- 29
- 30
- 31
- 32
- 33
- 34
- 35
- 36
- 37
- 38
- 39
- 40
- 41
- 42
- 43
- 44
- 45
- 46
- 47
- 48
- 49
- 50
- 51
- 52
- 53
- 54
- 55
- 56
- 57
- 58
- 59
- 修改web.xml文件如下
- 1
- 2
- 3
- 4
- 5
- 6
- 7
- 8
- 9
- 10
- 11
- 12
- 13
- 14
- 15
- 16
- 17
- 18
- 19
- 20
- 21
- 22
- 23
- 24
- 25
- 26
- 27
- 28
- 29
- 30
- 31
- 1
- 2
- 3
- 4
- 5
- 6
- 7
- 8
- 9
- 10
- 11
- 12
- 13
- 14
- 15
- 16
- 17
- 18
- 19
- 20
- 21
- 22
- 23
- 24
- 25
- 26
- 27
- 28
- 29
- 30
- 31
- 配置springMVC如下applicationContext-servlet.xml
- 1
- 2
- 3
- 4
- 5
- 6
- 7
- 8
- 9
- 10
- 11
- 12
- 13
- 14
- 15
- 16
- 17
- 18
- 19
- 20
- 21
- 22
- 23
- 24
- 25
- 26
- 27
- 28
- 29
- 30
- 31
- 32
- 33
- 34
- 35
- 36
- 37
- 38
- 39
- 1
- 2
- 3
- 4
- 5
- 6
- 7
- 8
- 9
- 10
- 11
- 12
- 13
- 14
- 15
- 16
- 17
- 18
- 19
- 20
- 21
- 22
- 23
- 24
- 25
- 26
- 27
- 28
- 29
- 30
- 31
- 32
- 33
- 34
- 35
- 36
- 37
- 38
- 39
三、配置Spring Websocket
1. 新建一个自己的HandShakeInterceptor类
HandShakeInterceptor是websocket握手拦截器,用于拦截websocket初始化连接的请求
package cn.com.websocket.hello;
import org.springframework.web.socket.CloseStatus;
import org.springframework.web.socket.TextMessage;
import org.springframework.web.socket.WebSocketMessage;
import org.springframework.web.socket.WebSocketSession;
import org.springframework.web.socket.handler.TextWebSocketHandler;
public class HelloHandler extends TextWebSocketHandler{
@Override
public void handleTextMessage(WebSocketSession session, TextMessage message) {
//接收到客户端消息时调用
System.out.println(“text message: ” + session.getId() + “-” + message.getPayload());
}
@Override
public void afterConnectionEstablished(WebSocketSession session)
throws Exception {
// 与客户端完成连接后调用
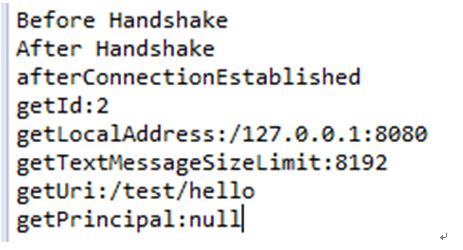
System.out.println(“afterConnectionEstablished”);
System.out.println(“getId:” + session.getId());
System.out.println(“getLocalAddress:” + session.getLocalAddress().toString());
System.out.println(“getTextMessageSizeLimit:” + session.getTextMessageSizeLimit());
System.out.println(“getUri:” + session.getUri().toString());
System.out.println(“getPrincipal:” + session.getPrincipal());
session.sendMessage(new TextMessage(“你好”.getBytes()));
}
@Override
public void handleTransportError(WebSocketSession session,
Throwable exception) throws Exception {
// 消息传输出错时调用
System.out.println(“handleTransportError”);
}
@Override
public void afterConnectionClosed(WebSocketSession session,
CloseStatus closeStatus) throws Exception {
// 一个客户端连接断开时关闭
System.out.println(“afterConnectionClosed”);
}
@Override
public boolean supportsPartialMessages() {
// TODO Auto-generated method stub
return false;
}
}
2. 新建一个自己的WebSocketHandler类
WebSocketHandler接口主要是用来与websocket客户端来进行交互的接口,Spring WebSocket提供了一些实现类,可以根据自己的需求进行选择与重写
- 1
- 2
- 3
- 4
- 5
- 6
- 7
- 8
- 9
- 10
- 11
- 12
- 13
- 14
- 15
- 16
- 17
- 18
- 19
- 20
- 21
- 22
- 23
- 24
- 25
- 26
- 27
- 28
- 29
- 30
- 31
- 32
- 33
- 34
- 35
- 36
- 37
- 38
- 39
- 40
- 41
- 42
- 43
- 44
- 45
- 46
- 47
- 48
- 1
- 2
- 3
- 4
- 5
- 6
- 7
- 8
- 9
- 10
- 11
- 12
- 13
- 14
- 15
- 16
- 17
- 18
- 19
- 20
- 21
- 22
- 23
- 24
- 25
- 26
- 27
- 28
- 29
- 30
- 31
- 32
- 33
- 34
- 35
- 36
- 37
- 38
- 39
- 40
- 41
- 42
- 43
- 44
- 45
- 46
- 47
- 48
- 配置Spring WebSocket
在spring的配置文件 applicationContext-servlet.xml中添加如下配置:
- 1
- 2
- 3
- 4
- 5
- 6
- 7
- 8
- 9
- 10
- 11
- 12
- 13
- 14
- 15
- 16
- 17
- 1
- 2
- 3
- 4
- 5
- 6
- 7
- 8
- 9
- 10
- 11
- 12
- 13
- 14
- 15
- 16
- 17
注意上述配置中sockjs的开启配置,如果去掉这一配置,则表示不开启sockjs,那么JavaScript客户端的调用就要采用标准的HTML的WebSocketAPI。开启了sockjs,则要使用sockjs的javascript接口。
4. 部署启动tomcat
将上述的工程编译好后部署在tomcat中,一个websocket服务端就开始运行了
四、WebSocket的js客户端
1. 非sockjs客户端
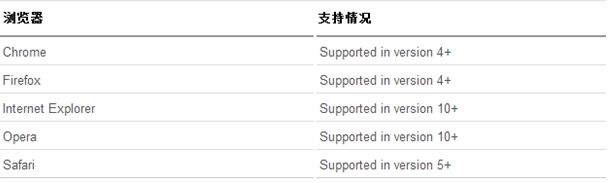
在上述配置websocket中,如果不加入<websocket:sockjs/>这一配置,那么就采用HTML5的WebSocketAPI来进行通信,需要注意的是必须考虑浏览器是否支持,浏览器的支持情况如下:
示例代码如下:
- 1
- 2
- 3
- 4
- 5
- 6
- 7
- 8
- 9
- 10
- 11
- 12
- 13
- 14
- 15
- 16
- 17
- 18
- 19
- 20
- 21
- 22
- 23
- 24
- 25
- 26
- 27
- 28
- 29
- 30
- 31
- 32
- 33
- 34
- 35
- 36
- 37
- 38
- 39
- 40
- 41
- 42
- 43
- 44
- 1
- 2
- 3
- 4
- 5
- 6
- 7
- 8
- 9
- 10
- 11
- 12
- 13
- 14
- 15
- 16
- 17
- 18
- 19
- 20
- 21
- 22
- 23
- 24
- 25
- 26
- 27
- 28
- 29
- 30
- 31
- 32
- 33
- 34
- 35
- 36
- 37
- 38
- 39
- 40
- 41
- 42
- 43
- 44
其中wsServer = ‘ws://127.0.0.1:8080/test/hello’中的地址要根据自己的实际情况来定,一般形式为:ws://域名:端口/应用路径/WebSocket配置的path。“应用路径”是应用部署在tomcat中的文件夹路径,“WebSocket配置的path”是配置文件中<websocket:mapping path="/hello" handler="HelloHandler"/>这条配置项配置的路径。
将这个html页面放入tomcat中运行,在浏览器中访问这个html页面,可以查看浏览器的控制台日志:
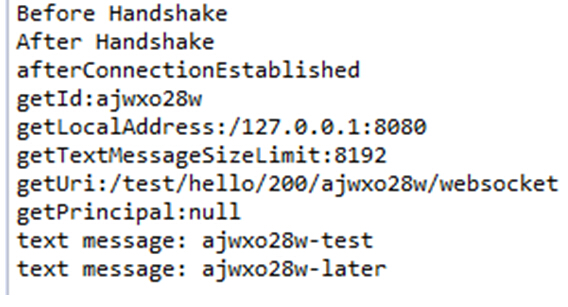
WebSocket服务器后台输出入下图:
2. sockjs客户端
在上述配置websocket中,如果加入这一配置,则表示开启sockjs支持,那么js客户端就必须采用sockjs提供的javascript接口,代码如下:
- 1
- 2
- 3
- 4
- 5
- 6
- 7
- 8
- 9
- 10
- 11
- 12
- 13
- 14
- 15
- 16
- 17
- 18
- 19
- 20
- 21
- 22
- 23
- 24
- 25
- 26
- 27
- 28
- 29
- 30
- 31
- 32
- 33
- 34
- 35
- 36
- 37
- 38
- 39
- 40
- 41
- 42
- 43
- 44
- 1
- 2
- 3
- 4
- 5
- 6
- 7
- 8
- 9
- 10
- 11
- 12
- 13
- 14
- 15
- 16
- 17
- 18
- 19
- 20
- 21
- 22
- 23
- 24
- 25
- 26
- 27
- 28
- 29
- 30
- 31
- 32
- 33
- 34
- 35
- 36
- 37
- 38
- 39
- 40
- 41
- 42
- 43
- 44
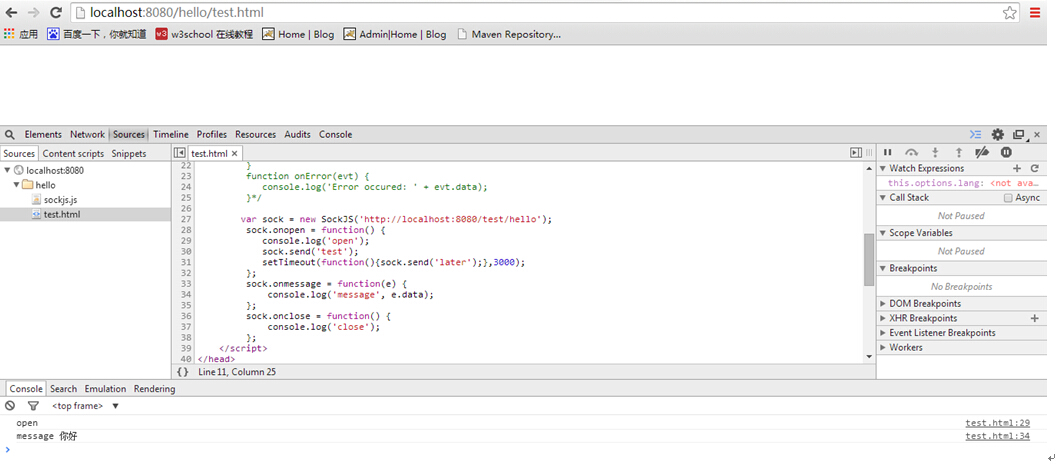
注意var sock = new SockJS(‘http://127.0.0.1:8080/test/hello‘);这里的地址是http地址,与上面的非sockjs不同。
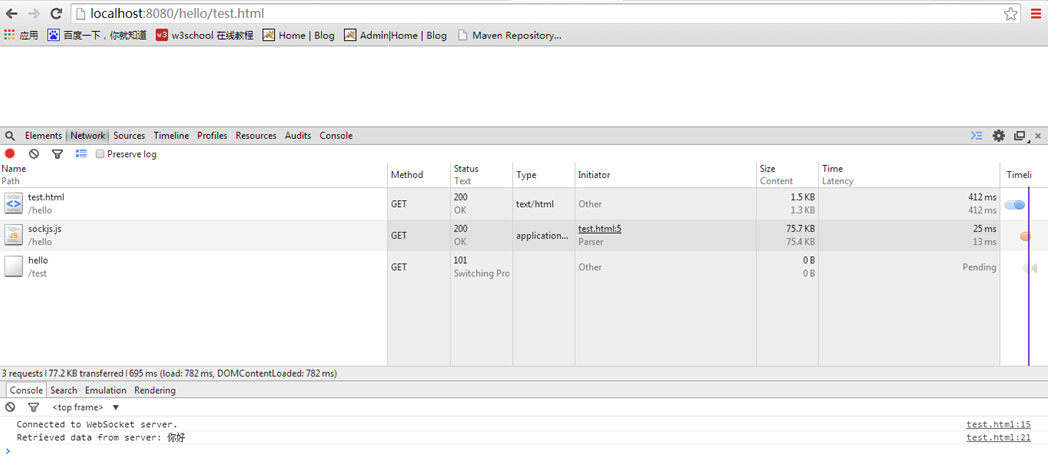
将这个html页面放入tomcat中运行,在浏览器中访问这个html页面,可以查看浏览器的控制台日志:
后台输出为:


 2641
2641

 被折叠的 条评论
为什么被折叠?
被折叠的 条评论
为什么被折叠?
 到【灌水乐园】发言


