


首先了解一些相关知识点:
添加大头针到地图
在iOS开发中经常会标记某个位置,需要使用地图标注,也就是大家俗称的“大头针”。
大头针
(Annotations)
提供了一种方式来突出地图中具体的位置并可以提供相关的信息。我们能够使用大头针标记具体的地址,兴趣点和其他类型的目的地。当显示在地图上的时候,大头针可以使用图片作为标识,也能够点击大头针弹出小弹框提供相应的链接和具体内容。
Figure
6
-
1
显示了系统标准的大头针样式标记具体的位置,并提供了小弹框显示额外的信息,使用箭头提示用户点击获取更多信息。
为了在地图上显示大头针,我们需要提供两个对象:
1)一个大头针对象(annotation object),该对象遵守MKAnnotation协议,并管理大头针所需要的数据。
2
)一个显示大头针视图
(annotation view)
,该视图继承于
MKAnnotationView
类,用于绘制并显示大头针在地图上。
大头针对象是典型的小数据对象,主要是存储地图坐标
(coordinate)
数据和相关的信息,比如:
title
,
subtitle
等字符串信息。因为大头针定义是使用了
MKAnnotation
协议,所以我们可以将
APP
中任意类转换为大头针对象,只要遵守
MKAnnotation
协议。
MapKit为我们提供了标准的大头针视图(annotation view),比如:MKPinAnnotationView,当然我们也可以根据需求进行自定义大头针视图。但是要注意:不管是使用标准的
MKPinAnnotationView还是使用自定义大头针视图,我们都不能够直接添加到地图上,我们应该视图地图代理方法(mapView(mapView: MKMapView, viewForAnnotation annotation: MKAnnotation) -> MKAnnotationView)提供大头针视图。
注意:我们所创建的大头针是单一的地图坐标点是不可改变的,如果需要改变,那么久需要编程改变大头针的坐标
(annotation’s coordinate),
此外,我们可以通过让用户在地图上拖动大头针进行移动的功能,设置属性
draggable为true,在用户拖动地图的过程中,地图将调用
mapView:annotationView:didChangeDragState:fromOldState: 方法,告知拖动的状态,我们可以使用该方法做出相应的反映。
在APP中使用大头针的实现步骤如下:
1 )可以使用下列选择定义合理的大头针对象:
1 )可以使用下列选择定义合理的大头针对象:
使用
MKPointAnnotation
类实现一个简单的大头针对象。这种类型大头针包含了相关属性,比如:
title
,
subtitle
等字符串,用于显示在弹出框上。
自定义大头针对象遵守
MKAnnotation
协议,自定义大头针能够存储我们所需要的任意类型的数据。
2 )定义大头针视图,在屏幕上显示大头针数据。怎样定义大头针视图主要取决于需求,这里有一些情况如下:
如果想使用系统标准的大头针视图
(pin annotation),
我们可以创建
MKPinAnnotationView
实例。
如果大头针需要被显示在自定义静态图上,我们可以创建MKAnnotationView实例,赋值image属性即可。
当大头针显示的时候,将可以看到是我们自己的自定义图片,如果不想图片显示在地图坐标的中心,可以使用centerOffset属性来移动中心点的位置。比如,在mapView:viewForAnnotation:方法中提供实现代码。
如果静态图还不足够显示大头针,我们可以子类化
MKAnnotationView
类,在
drawRect:
方法中
自定义需要现实的视图。
3)实现地图代理方法
mapView:viewForAnnotation:方法,当地图需要大头针视图的时候,会调用mapView(mapView: MKMapView, viewForAnnotation annotation: MKAnnotation) -> MKAnnotationView?方法。相关注意点如下:
1.这个代理方法的调用时机:每当有大头针显示到系统可视界面中时就会调用此方法返回一个大头针视图放到界面中,同时当前系统位置标注(也就是地图中蓝色的位置点)也是一个大头针,也会调用此方法,因此处理大头针视图时需要区别对待。
2.类似于UITableView的代理方法,此方法调用频繁,开发过程中需要利用MapKit的缓存池将大头针视图缓存起来重复利用。
我们可以通过
dequeueReusableAnnotationViewWithIdentifier:
方法获取,如果返回有大头针视图,直接使用,如果返回为
nil
,那么我们在自己创建大头针视图实例。
3.自定义大头针默认情况下不允许交互,如果交互需要设置canShowCallout = true
4.如果代理方法返回nil则会使用默认大头针视图,需要根据情况设置。
4
)添加大头针对象到地图上,使用
addAnnotation: (or addAnnotations:)方法。
当我们添加大头针到地图视图上,地图视图将显示我们的大头针,如果我们想隐藏大头针视图,那么必须手动去除。我们可以在任意时候进行添加和删除大头针。
不管地图当前的显示区域等级,所有的大头针都将被绘制在相同的时刻,如果地图中包含了许多的大头针,那么大头针视图将会重叠,我们可以进行缩放来看的更加清楚。
弹出视图
弹出视图是标准或者自定义视图显示在大头针视图上,标准的弹出视图显示大头针的 title , subtitle,image 等属性。如果想显示一个自定义视图并且行为像原生弹出框一样,可以添加自定义子视图到大头针视图并且更新大头针视图的 hit testing 方法来处理用户与子视图的交互。
弹出视图是标准或者自定义视图显示在大头针视图上,标准的弹出视图显示大头针的 title , subtitle,image 等属性。如果想显示一个自定义视图并且行为像原生弹出框一样,可以添加自定义子视图到大头针视图并且更新大头针视图的 hit testing 方法来处理用户与子视图的交互。
使用标准弹出框是非常容易的,
Figure
6
-2
显示了标准弹出框
在
iOSAPP
中,当用户点击弹出视图的时候,
mapView:annotationView:calloutAccessoryControlTapped:
方法将
被调用,如果我们实现了这个方法,我们能够发现大头针视图的一个特性,知道哪一个大头针被点击。
当我们是使用自定义视图而不是系统标准弹出视图时,我们需要做一些额外的工作来确保弹出视图与用户交互过程中的显示和隐藏,下面是一些相关步骤来创建一个自定义弹出框包含按钮 (button) :
1 :定义一个 UIView 的子类用于显示自定义弹出框 (custom callout), 很有可能子类需要实现 drawRect: 方法来实现绘制自定义内容。
2 :创建一个视图控制器初始化自定义弹出视图 (callout view) ,并且执行与 button 相关的 action 事件。
3 :在大头针视图中,实现 hitTest: 方法来响应点击事件,点击的位子是大头针视图 (annotation view) 的外部而在弹出视图 (callout view) 的内部,具体相关代码为:
Listing 6 - 7 Responding to hits within a custom callout
- (NSView *)hitTest:(NSPoint)point
{
NSView *hitView = [ super hitTest:point];
if (hitView == nil && self .selected) {
NSView *calloutView = self .calloutViewController.view;
NSPoint pointInCalloutView = [ self convertPoint:point toView:calloutView];
hitView = [calloutView hitTest:pointInCalloutView];
}
return hitView;
}
4 :在大头针视图中实现 setSelected:animated: 方法,添加弹出视图到大头针视图上作为子视图,当用户点击大头针的视图的时候,如果弹出视图已经是可见,那么在该方法中需要去除大头针视图中的弹出视图。代码如下:
Listing 6 - 8 Adding and removing a custom callout view
- (void)setSelected:(BOOL)selected
{
[ super setSelected:selected];
// Get the custom callout view.
NSView *calloutView = self .calloutViewController.view;
if (selected) {
NSRect annotationViewBounds = self .bounds;
NSRect calloutViewFrame = calloutView.frame;
// Center the callout view above and to the right of the annotation view.
calloutViewFrame.origin.x = -(NSWidth(calloutViewFrame) - NSWidth(annotationViewBounds)) * 0.5 ;
calloutViewFrame.origin.y = -NSHeight(calloutViewFrame) + 15.0 ;
calloutView.frame = calloutViewFrame;
[ self addSubview:calloutView];
} else {
[calloutView.animator removeFromSuperview];
}
}
5:在大头针视图的initWithAnnotation:方法中,设置
canShowCallout
属性为
NO
来防止,当用户选中大头针的时候显示标准弹出框。
MKAnnotationView常用属性:
annotation大头针模型信息,包括标题、子标题、地理位置。
image 大头针图片
canShowCallout点击大头针是否显示标题、子标题内容等,注意如果在- (MKAnnotationView *)mapView:(MKMapView *)mapView viewForAnnotation:(id<MKAnnotation>)annotation;方法中重新定义大头针默认情况是无法交互的需要设置为true。
calloutOffset点击大头针时弹出详情信息视图的偏移量
selected是否被选中状态
leftCalloutAccessoryView弹出详情左侧视图
rightCalloutAccessoryView弹出详情右侧视图
下面一起来看一些基本功能:
1:使用系统样式大头针视图和系统大头针模型、
2:使用图片显示大头针视图,并使用自定义大头针模型、
3:自定义弹出视图、
4:适用于顶部title,底部自定义视图 ios9之后
代码部分:
class SecondViewController: UIViewController {
lazy var mapView: MKMapView = {
let mapView = MKMapView(frame: UIScreen.mainScreen().bounds)
mapView.mapType = .Standard
mapView.scrollEnabled = true
mapView.zoomEnabled = true
mapView.showsUserLocation = true
mapView.delegate = self
return mapView
}()
override func viewDidLoad() {
super.viewDidLoad()
view.addSubview(self.mapView)
addAnnotations()
}
//MARK: 添加大头针
func addAnnotations(){
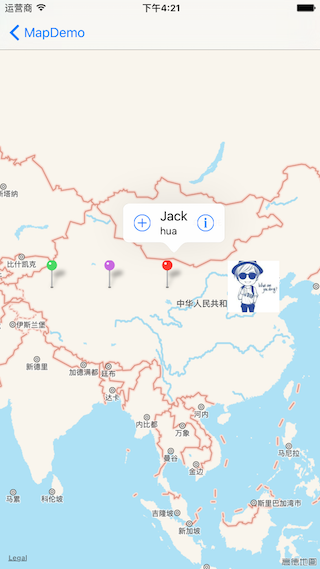
//创建MKPointAnnotation对象
let pointAnnotation = MKPointAnnotation()
pointAnnotation.coordinate = CLLocationCoordinate2DMake(39, 100)
pointAnnotation.title = "Jack"
pointAnnotation.subtitle = "hua"
self.mapView.addAnnotation(pointAnnotation)
//创建自定义大头针并添加到地图上
let annotationOne = FirstAnnotation(coordinate: CLLocationCoordinate2DMake(39, 115),title:"xxx大饭店",subtitle:"全场一律15折,会员20折")
annotationOne.iconImage = UIImage(named: "boy")
self.mapView.addAnnotation(annotationOne)
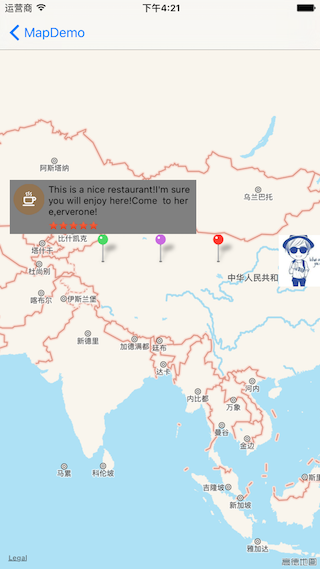
//自定义弹出视图
let calloutAnnotation = <span style="font-family: Menlo; font-variant-ligatures: no-common-ligatures;">SecondAnnotation</span><span style="font-family: 'PingFang SC';">(coordinate: CLLocationCoordinate2DMake(39, 80))</span>
calloutAnnotation.icon = UIImage(named: "icon_classify_cafe")
calloutAnnotation.rate = UIImage(named: "icon_Movie_Star_rating")
calloutAnnotation.descriptionDetail = "This is a nice restaurant!I'm sure you will enjoy here!Come to here,everone!"
self.mapView.addAnnotation(calloutAnnotation)
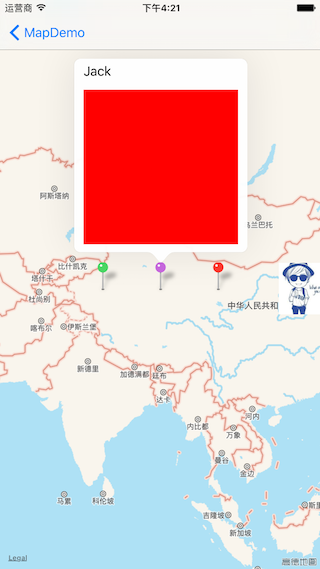
//使用系统自带附属视图
let detailAnnotation = DetailCalloutAccessoryAnnotation(coordinate: CLLocationCoordinate2DMake(39, 90),title:"Jack")
self.mapView.addAnnotation(detailAnnotation)
}
}
代码分析:
上面代码主要是将地图添加到当前视图控制器视图上,并添加4个大头针到地图上,自定义大头针模型对象代码如下:
//自定义大头针模型
class FirstAnnotation: NSObject,MKAnnotation {

    //位置
    var coordinate: CLLocationCoordinate2D
    //主标题
    var title: String?
    //副标题
    var subtitle: String?
    //图片icon
    var iconImage: UIImage?
    init(coordinate: CLLocationCoordinate2D,title: String,subtitle:String) {
        self.coordinate = coordinate
        self.title = title
        self.subtitle = subtitle
        super.init()
    }
}

//用于弹出框类型判断模型
class SecondAnnotation: NSObject,MKAnnotation {

    //位置
    var coordinate: CLLocationCoordinate2D
    //左侧icon
    var icon: UIImage?
    //icon描述
    var descriptionDetail: String?
    //底部评分视图
    var rate: UIImage?
    init(coordinate: CLLocationCoordinate2D) {
        self.coordinate = coordinate
        super.init()
    }
}

//弹出视图模型
class SHCalloutAnnotation: NSObject,MKAnnotation{

    var coordinate: CLLocationCoordinate2D
    init(coordinate: CLLocationCoordinate2D) {
       self.coordinate = coordinate
       super.init()
    }
    //左侧icon
    var icon: UIImage?
    //icon描述
    var descriptionDetail: String?
    //底部评分视图
    var rate: UIImage?
}


//附属视图模型
class DetailCalloutAccessoryAnnotation: NSObject,MKAnnotation {

    //位置
    var coordinate: CLLocationCoordinate2D
    //主标题
    var title: String?
    //副标题
    var subtitle: String?
    init(coordinate: CLLocationCoordinate2D,title: String) {
        self.coordinate = coordinate
        self.title = title
        super.init()
    }

    //官方示例代码使用:在模型中创建大头针视图
    class func createViewAnnotationForMapView(mapView:MKMapView, annotation:MKAnnotation) ->MKAnnotationView{
        let identifier = "DetailCalloutAccessoryAnnotation"
        var annotationView = mapView.dequeueReusableAnnotationViewWithIdentifier(identifier)  as? MKPinAnnotationView
        if  (annotationView == nil){
            annotationView =  MKPinAnnotationView(annotation: annotation, reuseIdentifier: identifier)
            annotationView!.canShowCallout = true
            //设置大头针颜色
            annotationView!.pinColor = MKPinAnnotationColor.Purple

            let backgroundView = UIView(frame:  CGRectZero)
            backgroundView.backgroundColor = UIColor.redColor()
            //添加约束才可以使用自定义视图
            let widthConstraint = NSLayoutConstraint(item: backgroundView, attribute: .Width, relatedBy: .Equal, toItem: nil, attribute: .NotAnAttribute, multiplier: 1, constant: 200)
            backgroundView.addConstraint(widthConstraint)
            let heightConstraint = NSLayoutConstraint(item: backgroundView, attribute: .Height, relatedBy: .Equal, toItem: nil, attribute: .NotAnAttribute, multiplier: 1, constant: 200)
            backgroundView.addConstraint(heightConstraint)

            if #available(iOS 9.0, *) {
                //赋值UIImageView直接可以使用
                //returnAnnotaionView!.detailCalloutAccessoryView = UIImageView(image: UIImage(named: "icon_classify_cafe"))
                //直接赋值UIView,UILabel等视图不行?http://stackoverflow.com/questions/32581049/mapkit-ios-9-detailcalloutaccessoryview-usage 因为我们需要对宽和高做约束
                annotationView!.detailCalloutAccessoryView =  backgroundView
            } else {
                print("iOS9以下系统暂时不能够使用!")
            }
        }
        return annotationView!
    }
}
接下来,继续看一下视图控制器中的代码,我通过extension实现协议内容:
extension SecondViewController:MKMapViewDelegate{

    //显示大头针时调用,注意方法中的annotation参数是即将显示的大头针对象.1)该方法首先显示大头针的时候会调用2)向地图上添加大头针的时候也会调用
    func mapView(mapView: MKMapView, viewForAnnotation annotation: MKAnnotation) -> MKAnnotationView? {

        var returnAnnotaionView:MKAnnotationView?
        if !(annotation.isKindOfClass(MKUserLocation)){//根据模型进行分类
            if annotation.isKindOfClass(MKPointAnnotation.self){
                //MARK:使用系统样式大头针视图和系统大头针模型
                let identifier = "MKPinAnnotationView"
                var returnAnnotaionView = mapView.dequeueReusableAnnotationViewWithIdentifier(identifier)
                if  (returnAnnotaionView == nil){
                    returnAnnotaionView =  MKPinAnnotationView(annotation: annotation, reuseIdentifier: identifier)
                    returnAnnotaionView!.canShowCallout = true
                    returnAnnotaionView!.calloutOffset = CGPoint(x: 0, y: -10)
                    returnAnnotaionView!.leftCalloutAccessoryView = UIButton(type: .ContactAdd)
                    returnAnnotaionView!.rightCalloutAccessoryView = UIButton(type: .DetailDisclosure)
                }else{
                    returnAnnotaionView!.annotation = annotation
                }
                return returnAnnotaionView
            }else if annotation.isKindOfClass(FirstAnnotation.self){
                //MARK:使用图片显示大头针视图,并使用自定义大头针模型
                returnAnnotaionView = SHAnnotationView.annotationViewWith(mapView, reuseIdentifier:"SHAnnotationView")
                returnAnnotaionView!.annotation = annotation
                return returnAnnotaionView
            }else if annotation.isKindOfClass(SecondAnnotation.self){
                let identifier = "Annotation"
                var returnAnnotaionView = mapView.dequeueReusableAnnotationViewWithIdentifier(identifier) as? MKPinAnnotationView
                if  (returnAnnotaionView == nil){
                    returnAnnotaionView =  MKPinAnnotationView(annotation: annotation, reuseIdentifier: identifier)
                    returnAnnotaionView!.pinColor = MKPinAnnotationColor.Green
                }
                 returnAnnotaionView!.annotation = annotation
                return returnAnnotaionView
            }else if annotation.isKindOfClass(SHCalloutAnnotation.self){
                //MARK:自定义弹出视图
                returnAnnotaionView = SHCalloutAnnotationView.calloutAnnotationViewWith(mapView)
                returnAnnotaionView!.annotation = annotation
                return returnAnnotaionView
            }else if annotation.isKindOfClass(DetailCalloutAccessoryAnnotation.self){
                //MARK:适用于顶部title,底部自定义视图 ios9之后
                returnAnnotaionView = DetailCalloutAccessoryAnnotation.createViewAnnotationForMapView(mapView, annotation: annotation)
                returnAnnotaionView!.annotation = annotation
                return  returnAnnotaionView
            }
        }
        return returnAnnotaionView
    }

    //选中大头针时触发
    func mapView(mapView: MKMapView, didSelectAnnotationView view: MKAnnotationView) {
        //点击大头针模型为SecondAnnotation时,添加自定义弹出视图的大头针到地图上。
        if let annotation = view.annotation{
            if(annotation.isKindOfClass(SecondAnnotation.self)){
            let annotation = annotation as! SecondAnnotation
            let calloutAnnotaion = SHCalloutAnnotation(coordinate: annotation.coordinate)
            calloutAnnotaion.icon = annotation.icon
            calloutAnnotaion.rate = annotation.rate
            calloutAnnotaion.descriptionDetail = annotation.descriptionDetail
            mapView.addAnnotation(calloutAnnotaion)
            }
        }
    }

    //反选时触发
    func mapView(mapView: MKMapView, didDeselectAnnotationView view: MKAnnotationView) {
        for annotation in self.mapView.annotations {
            if annotation.isKindOfClass(SHCalloutAnnotation.self){
                dispatch_async(dispatch_get_main_queue(), {
                    mapView.removeAnnotation(annotation)
                })
            }
        }
    }
}
以及自定义视图部分:
//边距
public let CalloutBorderSpace:CGFloat = 5
//MARK:自定义大头针视图
class SHAnnotationView: MKAnnotationView {

    class func annotationViewWith(mapView: MKMapView,reuseIdentifier:String) ->SHAnnotationView{
        //从缓存池中取出可以循环利用的大头针view
        var annotationView = mapView.dequeueReusableAnnotationViewWithIdentifier(reuseIdentifier) as? SHAnnotationView
        if annotationView == nil{
           annotationView = SHAnnotationView(annotation: nil, reuseIdentifier:reuseIdentifier)
           annotationView?.canShowCallout = true
           annotationView?.leftCalloutAccessoryView = UIButton(type: .InfoDark)
           annotationView?.rightCalloutAccessoryView = UIButton(type: .DetailDisclosure)
        }
        return annotationView!
    }

    override var annotation: MKAnnotation?{
        didSet(annotation){
               //显示大头针为图片
            if let annotationOne = annotation as? FirstAnnotation{
               self.image = annotationOne.iconImage
            }
        }
    }
}

//MARK:弹出视图 继承于MKAnnotationView进行显示视图
class SHCalloutAnnotationView: MKAnnotationView{

    //#MARK:使用懒加载声明需要的控件属性
    lazy var leftIcon:UIImageView = {
         let leftIcon = UIImageView()
         self.addSubview(leftIcon)
         return leftIcon
    }()

    lazy var detailLabel:UILabel = {
         let detailLabel = UILabel(frame:  CGRectZero)
         detailLabel.lineBreakMode = .ByCharWrapping
         detailLabel.font = UIFont.systemFontOfSize(12)
         detailLabel.numberOfLines = 0
         self.addSubview(detailLabel)
         return detailLabel
    }()

    lazy var rateIcon:UIImageView = {
         let rateIcon = UIImageView()
         self.addSubview(rateIcon)
         return rateIcon
    }()

    var button:UIButton!

    //#MARK: 创建弹出视图
    class func calloutAnnotationViewWith(mapView: MKMapView)-> SHCalloutAnnotationView{
       let indentifier = "SHCallOutAnnotationView"
       var calloutView = mapView.dequeueReusableAnnotationViewWithIdentifier(indentifier) as? SHCalloutAnnotationView
       if calloutView == nil{
          calloutView = SHCalloutAnnotationView()
          calloutView!.backgroundColor = UIColor.grayColor()
       }
        return calloutView!
    }

    //#MARK:赋值数据模型显示相应的数据
    override var annotation: MKAnnotation?{

        didSet(callOutAnnotation){
            if let callOutAnnotation = callOutAnnotation as? SHCalloutAnnotation{
                self.leftIcon.image = callOutAnnotation.icon
                self.leftIcon.frame = CGRect(x: CalloutBorderSpace, y: CalloutBorderSpace, width: callOutAnnotation.icon!.size.width, height: callOutAnnotation.icon!.size.height)

                self.detailLabel.text = callOutAnnotation.descriptionDetail
                let string:NSString = self.detailLabel.text!
                let detailLabelSize = string.boundingRectWithSize(CGSize(width: 200,height: 200), options:.UsesLineFragmentOrigin, attributes: [NSFontAttributeName: self.detailLabel.font], context: nil)
                self.detailLabel.frame = CGRect(x: CGRectGetMaxX(self.leftIcon.frame) + CalloutBorderSpace, y:CGRectGetMinY(self.leftIcon.frame), width: detailLabelSize.width, height: detailLabelSize.height)

                self.rateIcon.image = callOutAnnotation.rate
                self.rateIcon.frame = CGRect(x: CGRectGetMinX(self.detailLabel.frame), y: CGRectGetMaxY(self.detailLabel.frame) + CalloutBorderSpace, width: callOutAnnotation.rate!.size.width, height: callOutAnnotation.rate!.size.height)

                self.bounds = CGRect(x: 0, y: 0, width: CGRectGetMaxX(self.detailLabel.frame) + CalloutBorderSpace, height: CGRectGetMaxY(self.rateIcon.frame) + CalloutBorderSpace)

                //注意:确定最终的显示位置
                self.centerOffset = CGPointMake(0, -self.bounds.size.height)
            }
        }
    }

    //#MARK:当弹出视图显示的时候添加缩放动画
    override func didMoveToSuperview() {
            let animation = CAKeyframeAnimation(keyPath: "transform.scale")
            animation.values = [0,1.5,1,1.5,1]
            animation.duration = 0.5
            self.layer.addAnimation(animation, forKey: nil)
        }
}
代码分析:
我们之前已经添加了4个大头针到地图,当显示大头针的时候,会触发mapView(mapView:MKMapView, viewForAnnotation annotation:MKAnnotation)方法获取大头针视图,我们根据所添加的大头针模型进行分类返回对应的大头针视图。
对于显示使用系统样式大头针视图和系统大头针模型、使用图片显示大头针视图,并使用自定义大头针模型、ios9之后出现的附属视图的属性等都很简单,直接看代码就好。主要分析一下是如何实现callout视图的:
首先是添加一个大头针到视图上,当该大头针被点击的时候,添加我们自定义的大头针SecondAnnotation对象,所有数据都是源于原大头针模型,然后会触发mapView(mapView: MKMapView, viewForAnnotation annotation: MKAnnotation)方法,进行添加我们自定义的callout视图。并赋值annotation数据,显示整个视图。
实现效果图如下:

推荐文章:


 4483
4483

 被折叠的 条评论
为什么被折叠?
被折叠的 条评论
为什么被折叠?
 到【灌水乐园】发言


