自定义仪表盘控件(源码中已经改成了自己绘制表盘)

新的任务又来了,这次需要实现一个仪表盘的自定义控件,自定义控件一不常写就手生,这次又巩固下,并且学了一些新知识。

https://developer.android.com/training/custom-views/index.html
Android官方文档中关于自定义控件的教程,在大致了解自定义控件相关内容后,看官方的文档,收获更多,能发现许多其他人文章里并没有写的地方。所以有能力的都看看。

美工设计如下:
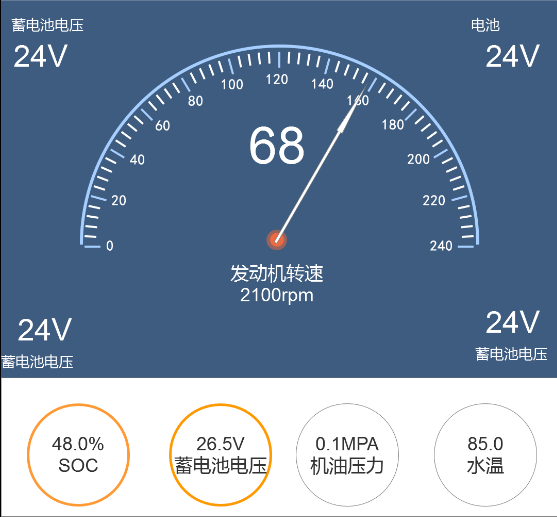
这里写图片描述
主要需要实现中间表盘和下方小表盘两个控件(背景色赞)

在开始前,先整理下自定义控件步骤,

  1. 首先需要想好要自定义的控件应该需要哪几个属性,比如对于大表盘,背景什么的美工都帮我设计好了,所以我只需要一个属性 speed,表示当前速度。对于小表盘的话,需要较多,我需要圆的半径,当前数值,数值最大值,数值名称,圆环颜色这几个属性。

  2. 想好了所需要的属性后,我们需要去定义这些属性,在res/values/attrs.xml里定义,定义好类名和属性名。

  3. 创建对应之前定义的类名,生成构造函数,声明所需要的几个属性与paint,并从xml里提取对应的属性值。

  4. 重写onMeasure方法

  5. 重写onDraw方法,完成控件所需的各种绘制

  6. 提供接口,使得可以在代码中更改属性,改变自定义控件状态。

对于自定义view来说,按以上步骤基本就完成了(viewgroup将onDraw换为OnLayout)。

接下来开始第一个控件:

MyWatch

1.首先自定义属性,如上所说我只需要一个speed属性,于是声明

<?xml version="1.0" encoding="utf-8"?>
<resources>

    <declare-styleable name="MyWatch">
        <attr name="speed" format="integer" />
    </declare-styleable>

</resources>

2.创建对应类,构造函数如下

    public MyWatch(Context context) {
        this(context, null, 0);
    }

    public MyWatch(Context context, AttributeSet attrs) {
        this(context, attrs, 0);
    }

    public MyWatch(Context context, AttributeSet attrs, int defStyleAttr) {
        super(context, attrs, defStyleAttr);
        /**
         * 获得我们所定义的自定义样式属性
         */
        TypedArray a = context.getTheme().obtainStyledAttributes(attrs, R.styleable.MyWatch, defStyleAttr, 0);

        speed = a.getInt(R.styleable.MyWatch_speed, 0);

        paint = new Paint();

        back = BitmapFactory.decodeResource(getResources(), R.drawable.back_watch);
        center = BitmapFactory.decodeResource(getResources(), R.drawable.icon_watch_center);
        arrow = BitmapFactory.decodeResource(getResources(), R.drawable.icon_watch_arrow);


        a.recycle();

    }

把paint的创建,和几个使用到的bitmap的构造都放到构造函数里,而不放在onDraw里,提高每次界面重绘的效率。

3.重写OnMeasure方法
我这没有做太多的计算,由于表盘使用的是一张图片(源码中已经改成了自己绘制),不是手动画的,所以控件大小基本就固定了。
这里具体做法可以看下一个控件。
在这里不做操作的后果是,如果使用wrap_content属性设置长宽,会和使用match_parent一样的效果。参见http://blog.csdn.net/lmj623565791/article/details/24252901/

@Override
protected void onMeasure(int widthMeasureSpec, int heightMeasureSpec) {
    super.onMeasure(widthMeasureSpec, heightMeasureSpec);


    int widthMode = MeasureSpec.getMode(widthMeasureSpec);
    int widthSize = MeasureSpec.getSize(widthMeasureSpec);
    int heightMode = MeasureSpec.getMode(heightMeasureSpec);
    int heightSize = MeasureSpec.getSize(heightMeasureSpec);

    int width;
    int height;

    if (widthMode == MeasureSpec.EXACTLY) {
        width = widthSize;
    } else {
        float needWidth = back.getWidth();
        int desired = (int) (getPaddingLeft() + needWidth + getPaddingRight());
        width = desired;
    }

    if (heightMode == MeasureSpec.EXACTLY) {
        height = heightSize;
    } else {
        float needWidth = back.getHeight();
        int desired = (int) (getPaddingTop() + needWidth + getPaddingBottom());
        height = desired;
    }
    setMeasuredDimension(width, height);
}

4.重写OnDraw方法
这里是最主要的了。

    @Override
    protected void onDraw(Canvas canvas) {

        int backWidth = back.getWidth();
        int backHeight = back.getHeight();
        //绘制表盘
        canvas.drawBitmap(back, 0, 0, paint);


        //绘制指针
        float arc = (speed%240 - 120) * 180 / 240;
        Matrix matrix = new Matrix();
        matrix.postRotate(arc);


        Bitmap dstbmp = Bitmap.createBitmap(arrow, 0, 0, arrow.getWidth(),
                arrow.getHeight(), matrix, true);

        if (arc>=0)
            canvas.drawBitmap(dstbmp, backWidth / 2 - arrow.getWidth() / 2 + (int) (arrow.getWidth() * Math.sin(arc * Math.PI / 180)), (int) (backHeight - center.getWidth() / 2 -arrow.getWidth()/4- arrow.getHeight() * Math.cos(arc * Math.PI / 180)), null);
        else {
            canvas.drawBitmap(dstbmp, backWidth / 2 - arrow.getWidth() / 2 + (int) (arrow.getHeight() * Math.sin(arc * Math.PI / 180)), (int) (backHeight - center.getWidth() / 2 -arrow.getWidth()/4- arrow.getHeight() * Math.cos(arc * Math.PI / 180)), null);

        }


        //绘制圆心
        // 计算左边位置
        left = backWidth / 2 - center.getWidth() / 2;
        // 计算上边位置
        top = backHeight - center.getHeight() ;
        canvas.drawBitmap(center, left, top, paint);


        //中心数字
        paint.setStrokeWidth(4);
        paint.setColor(Color.WHITE);
        paint.setTextSize(100);
        //抗锯齿
        paint.setAntiAlias(true);

        paint.setTextAlign(Paint.Align.CENTER);
        canvas.drawText(speed%240+"",backWidth / 2,backHeight*2 / 3,paint);


    }

首先绘制表盘,我这提供了图片(源码中已经改成了自己绘制),所以我是用drawBitmap方法,参数表示从控件最左上角开始绘制,这个参见API。

表盘绘制成功后,就是最麻烦的指针了,这里采用的方法是将bitmap通过Matrix旋转变换生成新bitmap后,再计算需要绘制到的坐标。这里方法不唯一,应该有更好的方法。
至于具体的坐标计算,就是数学知识了,慢慢算就好了。。
(不过下次还是自己绘制比较好,因为图片毕竟有宽度,在旋转的时候,非常不好调。。会慢慢偏)

然后绘制圆心,同理,计算出坐标后drawBitmap

最后绘制中心的数字显示,这里主要介绍两个方法。

paint.setTextAlign(Paint.Align.CENTER);
paint.setAntiAlias(true);

绘制文字的时候使用的是,drawText,两个参数分别表示文字的起点坐标和baseline文字底线。
但这样的话,我想绘制到中间居中很不容易,因为我的字长可能变动。所以就用到了

paint.setTextAlign(Paint.Align.CENTER);     

方法,使用该方法后,会以坐标为中心,向两边生成文字。之前的话,是一坐标为起点,向右不断生成文字。(大概这么意思)

现在居中完成了,我们可以看下效果
这里写图片描述
基本效果是好了,但是仔细看,文字有毛边,不平滑。

后来查了半天查到了这个方法

   paint.setAntiAlias(true);

其提供的功能是抗锯齿,可以使文字或线条变平滑,看了下,是个native方法,就不管了。
启用这个方法后效果
这里写图片描述
效果不错。

5.现在要提供方法来改变speed这个数值,写个简单的函数

    public void setSpeed(int speed) {
        this.speed = speed;
        invalidate();
    }

然后调用即可。

这个控件基本是完成了,再来做下个控件。

MySmallWatch

1.也是先来确定属性,这个没有提供过多素材,所以需要我自己画。

    <declare-styleable name="MySmallWatch">
        <attr name="val" format="integer" />
        <attr name="total" format="integer" />
        <attr name="name" format="string" />
        <attr name="unit" format="string" />
        <attr name="circle_color" format="color" />
        <attr name="radius" format="dimension" />
    </declare-styleable>

name表示数值名称,val表示当前数值,unit表示数值单位,total表示最大数值,因为每个表盘的上限值不一致,所以我们在属性里设定,然后好计算所占的比例大小。可以看到,半径使用的类型为dimension,也就是dp,在代码中,会根据分辨率大小,自动计算为相应的px。

2.构造函数

    public MySmallWatch(Context context) {
        this(context, null, 0);
    }

    public MySmallWatch(Context context, AttributeSet attrs) {
        this(context, attrs, 0);
    }

    public MySmallWatch(Context context, AttributeSet attrs, int defStyleAttr) {
        super(context, attrs, defStyleAttr);
        /**
         * 获得我们所定义的自定义样式属性
         */
        TypedArray a = context.getTheme().obtainStyledAttributes(attrs, R.styleable.MySmallWatch, defStyleAttr, 0);

        val = a.getInt(R.styleable.MySmallWatch_val, 0);
        total = a.getInt(R.styleable.MySmallWatch_total, 100);
        name = a.getString(R.styleable.MySmallWatch_name);
        unit = a.getString(R.styleable.MySmallWatch_unit);
        color = a.getColor(R.styleable.MySmallWatch_circle_color,getResources().getColor(R.color.colorAccent));
        radius = a.getDimension(R.styleable.MySmallWatch_radius,200);

        paint = new Paint();

        a.recycle();

    }

3.重写OnMeasure,计算长宽
首先获取长宽设定值与长宽的Mode,即在xml文件中,是给长宽指定了具体值还是使用了wrap_content 或 match_parent
MeasureSpec.getMode结果有以下几种:
MeasureSpec.EXACTLY,MeasureSpec.AT_MOST,MeasureSpec.UNSPECIFIED
当指定了长宽具体值时,Mode对应,MeasureSpec.EXACTLY,长宽为设定值
当使用match_parent时,Mode对应,MeasureSpec.EXACTLY,长宽为父容器大小
当使用wrap_content 时,Mode对应MeasureSpec.AT_MOST,长宽尽可能大,这需要我们自己计算。
MeasureSpec.UNSPECIFIED很少遇到

所以我们只需要处理MeasureSpec.AT_MOST情况,计算自己的控件需要多大的长宽。

    @Override
    protected void onMeasure(int widthMeasureSpec, int heightMeasureSpec) {
        super.onMeasure(widthMeasureSpec, heightMeasureSpec);


        int widthMode = MeasureSpec.getMode(widthMeasureSpec);
        int widthSize = MeasureSpec.getSize(widthMeasureSpec);
        int heightMode = MeasureSpec.getMode(heightMeasureSpec);
        int heightSize = MeasureSpec.getSize(heightMeasureSpec);


        if (widthMode == MeasureSpec.EXACTLY)
        {
            mWidth = widthSize;
        } else
        {

            float needWidth =radius*2+24;
            int desired = (int) (getPaddingLeft() + needWidth + getPaddingRight());
            mWidth = desired;
        }

        if (heightMode == MeasureSpec.EXACTLY)
        {
            mHeight = heightSize;
        } else
        {
            paint.setStrokeWidth(6);

            float needWidth =radius*2+24;
            int desired = (int) (getPaddingTop() + needWidth + getPaddingBottom());
            mHeight = desired;
        }


        setMeasuredDimension(mWidth, mHeight);

    }

4.重写onDraw
接下来开始绘制

    @Override
    protected void onDraw(Canvas canvas) {

        paint.setStrokeWidth(6);
        paint.setColor(Color.WHITE);
        //抗锯齿
        paint.setAntiAlias(true);


        //绘制圆圈
        canvas.drawCircle(mWidth/2,mHeight/2,radius,paint);


        //绘制进度
        paint.setStrokeWidth(6);
        paint.setColor(color);
        paint.setStyle(Paint.Style.STROKE);

        int arc=val%total*360/total;

        canvas.drawArc(new RectF(mWidth/2-radius-6,mHeight/2-radius-6, mWidth/2+radius+6, mHeight/2+radius+6), 180, arc, false, paint);

        //中心数字
        paint.setTextAlign(Paint.Align.CENTER);
        paint.setColor(Color.BLACK);
        paint.setStyle(Paint.Style.FILL);
        paint.setTextSize(48);
        canvas.drawText(val+unit,mWidth / 2,mHeight/2,paint);
        canvas.drawText(name,mWidth / 2,mHeight/2+48,paint);


    }

首先创建好paint,
然后drawCircle绘制圆环,需要参数为圆心坐标和半径。

之后绘制外圈的进度表示,使用drawArc方法来绘制圆弧。
这里先需要设置画笔 paint.setStyle(Paint.Style.STROKE);,表示画一个空心的圆弧,即一条弧线。
这个方法需要的参数稍微复杂一点,第一个参数为一个RectF,可以理解为一个与圆弧相切的外接矩形,后两个参数为圆弧的起始度数和扫过度数,起始度数0度即为时钟的3点钟位置。false表示不显示两条弦,这个试验下就明白了。

最后绘制中间的数字,单位,与数值名称即可。

5.最后一样提供一个接口

    public void setVal(int val) {
        this.val = val;
        invalidate();
    }

至此第二个控件也完成了,还算比较容易。

加了个按钮,看下效果
这里写图片描述

源码地址

  • 1
    点赞
  • 22
    收藏
    觉得还不错? 一键收藏
  • 0
    评论

“相关推荐”对你有帮助么?

  • 非常没帮助
  • 没帮助
  • 一般
  • 有帮助
  • 非常有帮助
提交
评论
添加红包

请填写红包祝福语或标题

红包个数最小为10个

红包金额最低5元

当前余额3.43前往充值 >
需支付:10.00
成就一亿技术人!
领取后你会自动成为博主和红包主的粉丝 规则
hope_wisdom
发出的红包
实付
使用余额支付
点击重新获取
扫码支付
钱包余额 0

抵扣说明:

1.余额是钱包充值的虚拟货币,按照1:1的比例进行支付金额的抵扣。
2.余额无法直接购买下载,可以购买VIP、付费专栏及课程。

余额充值