


近期学习了一下swift,对swift做了初步了解,下面将使用swift简单实现一个tableView,如果有什么不全面或者是错误的地方请及时指正,我会及时更正.
通过实现tableView,掌握swift中创建一个工程流程,以及一些和OC不同的地方(Swift很魔性,很多地方要自己手敲,没有代码提示的).
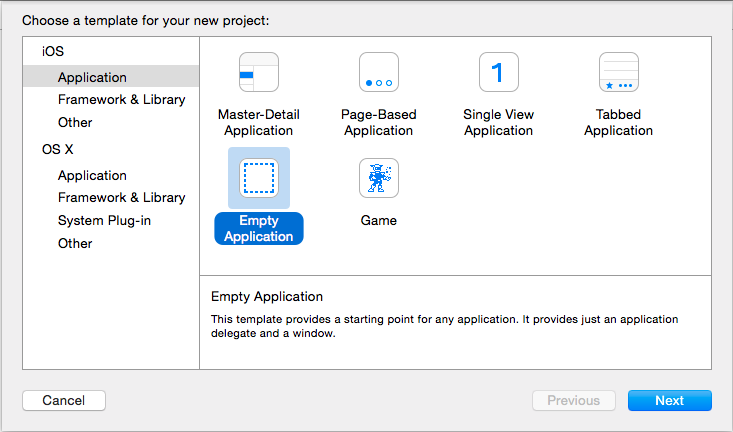
1.创建一个空模板
2.选择语言(Swift)
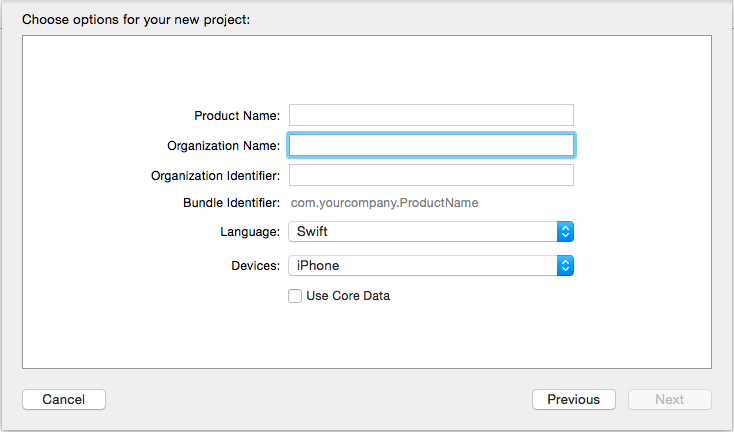
3.指定根视图(Single View Application可以不用,storyBoard指定根视图)
需要注意的是:
1.swift中不再需要引入头文件,有的只是.swift
2.Swift 和 OC的区别是swift主流是点语法,OC是消息语法
        func application(application: UIApplication, didFinishLaunchingWithOptions launchOptions: [NSObject: AnyObject]?) -> Bool {
        self.window = UIWindow(frame: UIScreen.mainScreen().bounds)
        // Override point for customization after application launch.
        self.window!.backgroundColor = UIColor.whiteColor()
        self.window!.makeKeyAndVisible()

        /// 指定根视图
        var main = MainViewController()
        var navi = UINavigationController(rootViewController: main)
        self.window!.rootViewController = navi


        return true
    }
4.VC实现tableView
以下几点需要注意:
1.Swift签协议之后不会像OC那样人性化提示有哪些协议方法没有实现,不会有警告,有的只是报错,让你误以为自己哪里写错了,坚信自己的思路写下去,补充完协议方法.
2.在cell的使用上和OC有一些区别
下面是代码实现:
import UIKit

class MainViewController: UIViewController, UITableViewDelegate, UITableViewDataSource {

    /// 定义tabelView和数组
    var tabel:UITableView!
    var array = ["item1", "item2", "item3", "item4", "item5", "item6", "item7"]

    override func viewDidLoad() {
        super.viewDidLoad()

        /* navi显示标题 */
        title = "Swift tableView"

        /* 定义tableView */
        var rect = self.view.frame
        tabel = UITableView(frame: rect)
        tabel.registerClass(TableViewCell.self, forCellReuseIdentifier: "reuse")
        tabel.delegate = self
        tabel.dataSource = self
        self.view.addSubview(tabel)

        // Do any additional setup after loading the view.
    }

    /**
    section 数量 方法
    */
    func numberOfSectionsInTableView(tableView: UITableView) -> Int {
        return 1
    }


    /**
    row 数量 方法
    */
    func tableView(tableView: UITableView, numberOfRowsInSection section: Int) -> Int {
        return array.count
    }

    /**
    row的高度 方法
    */
    func tableView(tableView: UITableView, heightForRowAtIndexPath indexPath: NSIndexPath) -> CGFloat {
        return 60
    }


    /**
    tableViewCell方法
    */
    func tableView(tableView: UITableView, cellForRowAtIndexPath indexPath: NSIndexPath) -> UITableViewCell {

        /// 定义一个cell
        var str:String = "reuse"
        var cell:TableViewCell = tableView.dequeueReusableCellWithIdentifier(str, forIndexPath: indexPath) as! TableViewCell
        if cell.isEqual(nil){

            cell = TableViewCell(style: UITableViewCellStyle.Default, reuseIdentifier: str)
        }
        /**
        cell赋值
        */
        cell.title.text = array[indexPath.row]
        return cell
    }

    /**
    Memory
    */
    override func didReceiveMemoryWarning() {
        super.didReceiveMemoryWarning()
        // Dispose of any resources that can be recreated.
    }


    /*
    // MARK: - Navigation

    // In a storyboard-based application, you will often want to do a little preparation before navigation
    override func prepareForSegue(segue: UIStoryboardSegue, sender: AnyObject?) {
        // Get the new view controller using segue.destinationViewController.
        // Pass the selected object to the new view controller.
    }
    */

}
5.tableViewCell实现
以下几点需要注意:
1.cell实的时候需要重写初始化问题,初始化方法重写的时候可能会报错,报错原因:指定根视图的时候根视图直接使用的是MainViewController()函数,是不带任何参数的,而且程序运行会经过xib文件,会有遗留问题.此时需要添加一段代码解决遗留问题,点击报错红点,自动补齐要填充的代码.
下面是代码实现:
import UIKit

class TableViewCell: UITableViewCell {

    var title:UILabel!

    override func awakeFromNib() {
        super.awakeFromNib()
        // Initialization code
    }

    /**
    初始化方法
    */
    override init(style: UITableViewCellStyle, reuseIdentifier: String?) {
        super.init(style: style, reuseIdentifier: reuseIdentifier)
        if !self.isEqual(nil){
        title = UILabel(frame: CGRectMake(20, 20, 200, 30))
            self.contentView.addSubview(title)
        }
    }

    /**
    报错修复的  我也不知道是什么鬼
    */
    required init(coder aDecoder: NSCoder) {
        fatalError("init(coder:) has not been implemented")
    }

    override func setSelected(selected: Bool, animated: Bool) {
        super.setSelected(selected, animated: animated)

        // Configure the view for the selected state
    }

}
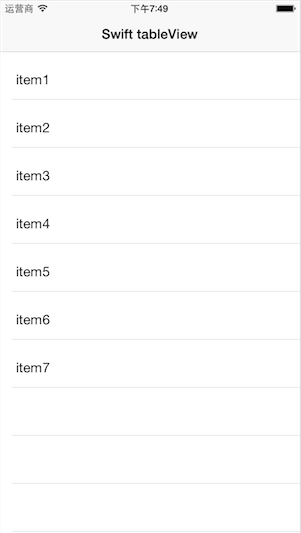
6.运行结果
运行结果截图:


 395
395

 被折叠的 条评论
为什么被折叠?
被折叠的 条评论
为什么被折叠?
 到【灌水乐园】发言


