


环境:
Spring Framework 4.3.7.RELEASE
Servlet 3.1.0
JDK 1.8
创建maven webapp项目:maven-spring-webmvc 项目结构如下:
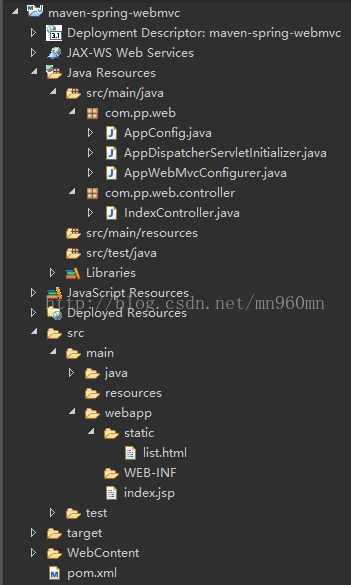
各文件代码如下:
pom.xml
<project xmlns="http://maven.apache.org/POM/4.0.0" xmlns:xsi="http://www.w3.org/2001/XMLSchema-instance"
	xsi:schemaLocation="http://maven.apache.org/POM/4.0.0 http://maven.apache.org/maven-v4_0_0.xsd">
	<modelVersion>4.0.0</modelVersion>
	<groupId>com.pp</groupId>
	<artifactId>maven-spring-webmvc</artifactId>
	<packaging>war</packaging>
	<version>1.0.0</version>

	<name>maven-spring-webmvc</name>
	<url>http://maven.apache.org</url>

	<properties>
		<project.build.sourceEncoding>UTF-8</project.build.sourceEncoding>
		<maven.compiler.source>1.8</maven.compiler.source>
		<maven.compiler.target>1.8</maven.compiler.target>
	</properties>

	<dependencies>
		<dependency>
			<groupId>javax.servlet</groupId>
			<artifactId>javax.servlet-api</artifactId>
			<version>3.1.0</version>
			<scope>provided</scope>
		</dependency>
		<dependency>
			<groupId>org.springframework</groupId>
			<artifactId>spring-webmvc</artifactId>
			<version>4.3.7.RELEASE</version>
		</dependency>
	</dependencies>

	<build>
		<plugins>
			<!--
			    jetty的maven插件,配置这个插件之后,就可以直接在项目的跟目录执行mvn jetty:run来运行项目。
				而无需把项目打成war扔到web容器中
			 -->
			<plugin>
				<groupId>org.eclipse.jetty</groupId>
				<artifactId>jetty-maven-plugin</artifactId>
				<version>9.4.2.v20170220</version>
				<configuration>
					<stopKey>foo</stopKey>
					<stopPort>9999</stopPort>
					<httpConnector>
						<!-- jetty端口 -->
						<port>9090</port>
					</httpConnector>
					<webApp>
						<contextPath>/</contextPath>
					</webApp>
				</configuration>
			</plugin>
			<plugin>
				<groupId>org.apache.maven.plugins</groupId>
				<artifactId>maven-war-plugin</artifactId>
				<version>3.0.0</version>
				<configuration>
					<!--
					            因为本例子没有用到web.xml,也没有创建web.xml,所以这里必须配置这个插件。
						 否则使用maven打包的时候会有问题
					-->
					<failOnMissingWebXml>false</failOnMissingWebXml>
				</configuration>
			</plugin>
		</plugins>
	</build>

</project>
package com.pp.web;

import org.springframework.context.annotation.ComponentScan;
import org.springframework.web.servlet.config.annotation.EnableWebMvc;

/**
 * 启用mvc
 */
@EnableWebMvc
/**
 * 设置componen的扫描包路径
 */
@ComponentScan("com.pp.web")
public class AppConfig {

}
package com.pp.web;
import org.springframework.web.servlet.support.AbstractAnnotationConfigDispatcherServletInitializer;
/**
* 系统初始化入口
*/
public class AppDispatcherServletInitializer extends AbstractAnnotationConfigDispatcherServletInitializer {
/**
* 设置spring容器启动的入口
*/
@Override
protected Class<?>[] getRootConfigClasses() {
return new Class<?>[]{AppConfig.class};
}
@Override
protected Class<?>[] getServletConfigClasses() {
return null;
}
/**
* 设置DispatcherServlet的拦截路径
*/
@Override
protected String[] getServletMappings() {
return new String[]{"/"};
}
}
package com.pp.web;

import org.springframework.context.annotation.Configuration;
import org.springframework.web.servlet.config.annotation.ResourceHandlerRegistry;
import org.springframework.web.servlet.config.annotation.WebMvcConfigurerAdapter;

/**
 *  定制mvc
 */
@Configuration
public class AppWebMvcConfigurer extends WebMvcConfigurerAdapter {

	/**
	 * 配置静态资源的映射
	 */
	public void addResourceHandlers(ResourceHandlerRegistry registry) {
	    registry.addResourceHandler("/static/**").addResourceLocations("/static/");
	}
}
package com.pp.web.controller;
import org.springframework.web.bind.annotation.GetMapping;
import org.springframework.web.bind.annotation.RestController;
@RestController
public class IndexController {
@GetMapping("/index")
public String index(){
return "hello index";
}
}最后,在项目的跟目录执行mvn clean jetty:run 运行项目
访问
http://127.0.0.1:9090/index 访问controller
http://127.0.0.1:9090/static/list.html 访问静态资源


 2万+
2万+


 被折叠的 条评论
为什么被折叠?
被折叠的 条评论
为什么被折叠?
 到【灌水乐园】发言


