


问题?三大框架整合原理及详解
提示:myeclipse环境、工程环境、tomcat环境的jdk保持一致(在这里我所使用的而是jdk1.6版本)
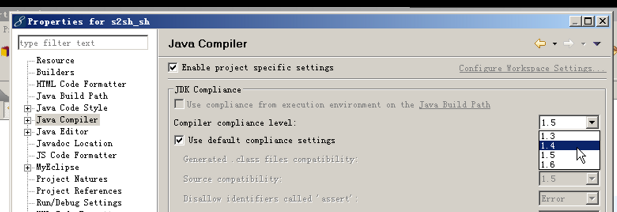
在这里我们调成1.6,并点击确定。
cmd:java -version :查看jdk的版本
1.新建一个工程,把工程的编码为utf-8
2.首先是三大框架所需要的jar包,把jar包放入到工程中的lib下(下载链接:点击下载jar包链接)
注意:MyEclisp可以把jar包放在lib下的文件夹下,但是eclipse就不可以,只能把jar包放在根目录下
3.整体结构图:
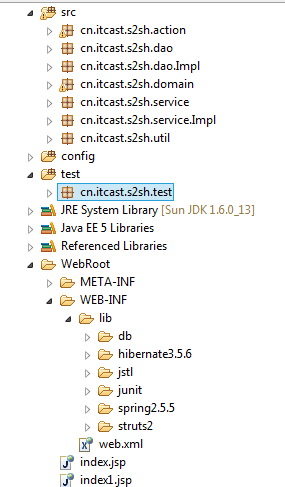
4.建立三个folder:
src 存放源代码
config 存放配置文件
hibernate 存放hibernate的配置文件
spring 存放spring的配置文件(在这里可以写固定不变的配置信息和需要变化的配置信息)
struts 存放struts的配置文件(这些里面的配置文件要引入到struts.xml中)
struts.xml(这个必须要在根目录下)
test 存放单元测试
5、在src下建立包
在实体类bean中写(这里写的 cn.itcast.s2sh.domain)持久化类和映射文件及hibernate配置文件
持久化类:
package cn.itcast.s2sh.domain;

import java.io.Serializable;

public class Person implements Serializable{
	private Long pid;
	private String pname;
	private String psex;

	public Person(){}

	public Person(String pname){
		this.pname = pname;
	}

	public Long getPid() {
		return pid;
	}
	public void setPid(Long pid) {
		this.pid = pid;
	}
	public String getPname() {
		return pname;
	}
	public void setPname(String pname) {
		this.pname = pname;
	}
	public String getPsex() {
		return psex;
	}
	public void setPsex(String psex) {
		this.psex = psex;
	}

}
映射文件:
<?xml version="1.0" encoding="utf-8"?>
<!DOCTYPE hibernate-mapping PUBLIC "-//Hibernate/Hibernate Mapping DTD 3.0//EN"
"http://hibernate.sourceforge.net/hibernate-mapping-3.0.dtd">
<hibernate-mapping>
<!--
用来描述一个持久化类
name 类的全名
table 可以不写 默认值和类名一样
catalog 数据库的名称 一般不写
-->
<class name="cn.itcast.s2sh.domain.Person">
<!--
标示属性 和数据库中的主键对应
name 属性的名称
column 列的名称
-->
<id name="pid" column="pid" length="200" type="java.lang.Long">
<!--
主键的产生器
就该告诉hibernate容器用什么样的方式产生主键
-->
<generator class="increment"></generator>
</id>
<!--
描述一般属性
-->
<property name="pname" column="pname" length="20" type="string">
</property>
<property name="psex" column="psex" length="10" type="java.lang.String"></property>
</class>
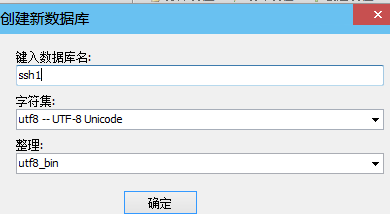
</hibernate-mapping>在这里采用的是有持久化类和映射文件来产生数据库表。前提得把数据库建立起来(要求是编码格式为:)
hibernate.cfg.xml配置文件
<?xml version='1.0' encoding='utf-8'?>
<!DOCTYPE hibernate-configuration PUBLIC
        "-//Hibernate/Hibernate Configuration DTD 3.0//EN"
        "http://hibernate.sourceforge.net/hibernate-configuration-3.0.dtd">
<hibernate-configuration>
	<!--
		一个session-factory只能连接一个数据库
	-->
<session-factory>
	<!--
		数据库的用户名
	-->
	<property name="connection.username">root</property>
	<!--
		密码
	-->
	<property name="connection.password">root</property>
	<!--
		url
	-->
	<property name="connection.url">jdbc:mysql://localhost:3306/ssh1</property>


	<property name="connection.driver_class">
		com.mysql.jdbc.Driver
	</property>

		<!-- 方言
		告诉hibernate链接的mysql数据库 -->

	<property name="hibernate.dialect">
		org.hibernate.dialect.MySQLInnoDBDialect
	</property>
	<!--
		当启动hibernate容器的时候,hibernate对表的处理情况
		validate  验证表的结构,但是不会去创建表  默认值
		update    如果表不存在,则创建,如果存在,则验证更新
		create-drop 启动时创建表,应用程序结束时,销毁表
	-->
	<property name="hbm2ddl.auto">update</property>
	<!--
		显示sql语句
	-->
	<property name="show_sql">true</property>
	<mapping resource="cn/itcast/s2sh/domain/Person.hbm.xml" />

</session-factory>
</hibernate-configuration>
其中;<property name="connection.driver_class">
com.mysql.jdbc.Driver
</property>
如果不写的话,可能会出现这个错误及解决办法:点击打开链接
6、编写dao层和service层
dao接口层和实现层
package cn.itcast.s2sh.dao;

import java.io.Serializable;

import cn.itcast.s2sh.domain.Person;

public interface PersonDao {
	public void savePerson(Person person);
	public Person personById(Serializable id);
}
package cn.itcast.s2sh.dao.Impl;

import java.io.Serializable;

import org.springframework.orm.hibernate3.support.HibernateDaoSupport;

import cn.itcast.s2sh.dao.PersonDao;
import cn.itcast.s2sh.domain.Person;

public class PersonDaoImpl extends HibernateDaoSupport implements PersonDao {

	public void savePerson(Person person) {
		this.getHibernateTemplate().save(person);
	}

	public Person personById(Serializable id) {
		return (Person)this.getHibernateTemplate().load(Person.class, id);
		//this.getHibernateTemplate().get(Person.class, id);
		//这也可以实现,不过上面是采用懒加载的方式,减小内存压力
	}

}
service接口层和实现层
package cn.itcast.s2sh.service;

import java.io.Serializable;

import cn.itcast.s2sh.domain.Person;

public interface PersonService {
	public void savePerson(Person person);
	public Person personById(Serializable id);
}
package cn.itcast.s2sh.service.Impl;

import java.io.Serializable;

import cn.itcast.s2sh.dao.PersonDao;
import cn.itcast.s2sh.domain.Person;
import cn.itcast.s2sh.service.PersonService;

public class PersonServiceImpl implements PersonService {
	private PersonDao personDao;

	public PersonDao getPersonDao() {
		return personDao;
	}

	public void setPersonDao(PersonDao personDao) {
		this.personDao = personDao;
	}


	public void savePerson(Person person) {
		// TODO Auto-generated method stub
		this.personDao.savePerson(person);
	}

	public Person personById(Serializable id) {
		// TODO Auto-generated method stub
		return this.personDao.personById(id);
	}

}
7、写spring的配置文件
(1)、写sessionFactory
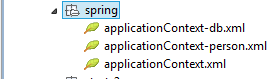
applocation-db.xml
<beans xmlns="http://www.springframework.org/schema/beans"
xmlns:xsi="http://www.w3.org/2001/XMLSchema-instance" xmlns:aop="http://www.springframework.org/schema/aop"
xmlns:tx="http://www.springframework.org/schema/tx"
xsi:schemaLocation="http://www.springframework.org/schema/beans
http://www.springframework.org/schema/beans/spring-beans-2.5.xsd
http://www.springframework.org/schema/aop
http://www.springframework.org/schema/aop/spring-aop-2.5.xsd
http://www.springframework.org/schema/tx
http://www.springframework.org/schema/tx/spring-tx-2.5.xsd">
<!-- 引入sessionfactory数据源 -->
<bean id="sessionFactory" class="org.springframework.orm.hibernate3.LocalSessionFactoryBean">
<property name="configLocation">
<value>classpath:hibernate/hibernate.cfg.xml</value>
</property>
</bean>
<bean id="transactionManager" class="org.springframework.orm.hibernate3.HibernateTransactionManager">
<property name="sessionFactory">
<ref bean="sessionFactory"/>
</property>
</bean>
<tx:advice id="tx" transaction-manager="transactionManager">
<tx:attributes>
<tx:method name="save*" read-only="false"/>
<tx:method name="delete*" read-only="false"/>
<tx:method name="update*" read-only="false"/>
<!--
* 代表了除了上述的三种情况的以外的情况
-->
<tx:method name="*" read-only="true"/>
</tx:attributes>
</tx:advice>
<aop:config>
<aop:pointcut expression="execution(* cn.itcast.s2sh.service.Impl.*.*(..))" id="perform"/>
<aop:advisor advice-ref="tx" pointcut-ref="perform"/>
</aop:config>
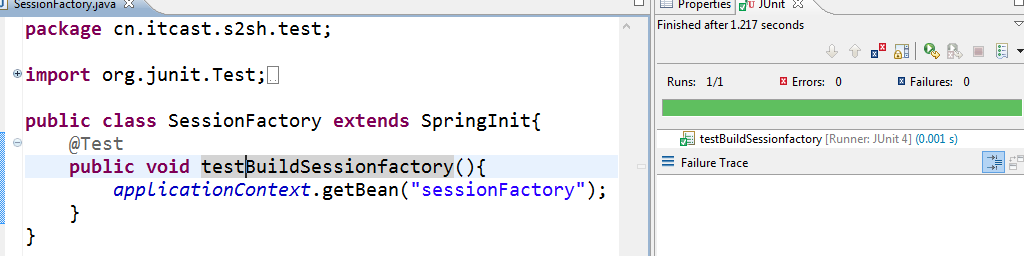
</beans>(2)、测试sessionfactory
工具类读取applicationContext.xml配置文件:
package cn.itcast.s2sh.util;

import org.springframework.context.ApplicationContext;
import org.springframework.context.support.ClassPathXmlApplicationContext;

public class SpringInit {
	public static ApplicationContext applicationContext;
	static{
		applicationContext = new ClassPathXmlApplicationContext("spring/applicationContext.xml");
	}
}
测试类:
package cn.itcast.s2sh.test;

import org.junit.Test;

import cn.itcast.s2sh.util.SpringInit;

public class SessionFactory extends SpringInit{
	@Test
	public void testBuildSessionfactory(){
		applicationContext.getBean("sessionFactory");
	}
}
结果出现这个就意味着,你的seesionfactory成功了,并且查看数据库,可以看见生成数据库表了:
(3)、在application-person.xml中注入dao和service
<beans xmlns="http://www.springframework.org/schema/beans"
xmlns:xsi="http://www.w3.org/2001/XMLSchema-instance" xmlns:aop="http://www.springframework.org/schema/aop"
xmlns:tx="http://www.springframework.org/schema/tx"
xsi:schemaLocation="http://www.springframework.org/schema/beans
http://www.springframework.org/schema/beans/spring-beans-2.5.xsd
http://www.springframework.org/schema/aop
http://www.springframework.org/schema/aop/spring-aop-2.5.xsd
http://www.springframework.org/schema/tx
http://www.springframework.org/schema/tx/spring-tx-2.5.xsd">
<!-- dao层 -->
<bean id="personDao" class="cn.itcast.s2sh.dao.Impl.PersonDaoImpl">
<property name="sessionFactory">
<ref bean="sessionFactory"/>
</property>
</bean>
<!-- service层 -->
<bean id="personService" class="cn.itcast.s2sh.service.Impl.PersonServiceImpl">
<property name="personDao">
<ref bean="personDao"/>
</property>
</bean>
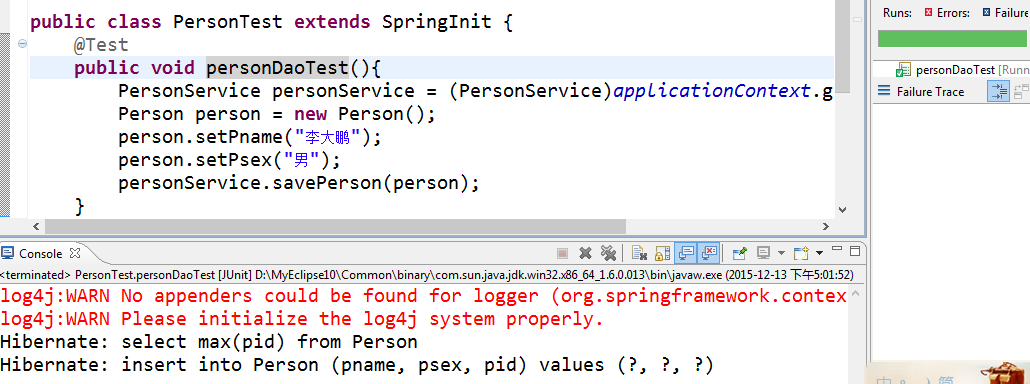
</beans>(4)、测试
package cn.itcast.s2sh.test;

import org.junit.Test;

import cn.itcast.s2sh.action.PersonAction;
import cn.itcast.s2sh.domain.Person;
import cn.itcast.s2sh.service.PersonService;
import cn.itcast.s2sh.util.SpringInit;

public class PersonTest extends SpringInit {
	@Test
	public void personDaoTest(){
		PersonService personService = (PersonService)applicationContext.getBean("personService");
		Person person = new Person();
		person.setPname("李大鹏");
		person.setPsex("男");
		personService.savePerson(person);
	} }
8、写action层
package cn.itcast.s2sh.action;

import java.io.Serializable;

import org.apache.struts2.ServletActionContext;

import com.opensymphony.xwork2.ActionContext;
import com.opensymphony.xwork2.ActionSupport;

import cn.itcast.s2sh.domain.Person;
import cn.itcast.s2sh.service.PersonService;

/**
 * @author ActionSupport
 * 这个就是struts走的方法包
 *
 */
public class PersonAction extends ActionSupport {
	private PersonService personService;

	public PersonService getPersonService() {
		return personService;
	}

	public void setPersonService(PersonService personService) {
		this.personService = personService;
	}

	public String savePerson(){
		Person person = new Person();
		person.setPname("李大鹏3");
		person.setPsex("男");
		this.personService.savePerson(person);
		return SUCCESS;
		//StrutsSpringObjectFactory
	}

	public String showPersonById(){
		Person person = this.personService.personById(1L);
		//ActionContext.getContext().getValueStack().push(person);
		ActionContext.getContext().put("person", person);
		ServletActionContext.getRequest().setAttribute("person", person);
		return "index";
	}
}
9、写spring的配置文件
把action注入到spring容器中application-perosn.xml
<beans xmlns="http://www.springframework.org/schema/beans"
	xmlns:xsi="http://www.w3.org/2001/XMLSchema-instance" xmlns:aop="http://www.springframework.org/schema/aop"
	xmlns:tx="http://www.springframework.org/schema/tx"
	xsi:schemaLocation="http://www.springframework.org/schema/beans
		http://www.springframework.org/schema/beans/spring-beans-2.5.xsd
		http://www.springframework.org/schema/aop
		http://www.springframework.org/schema/aop/spring-aop-2.5.xsd
		http://www.springframework.org/schema/tx
		http://www.springframework.org/schema/tx/spring-tx-2.5.xsd">
	<!-- dao层 -->
	<bean id="personDao" class="cn.itcast.s2sh.dao.Impl.PersonDaoImpl">
		<property name="sessionFactory">
			<ref bean="sessionFactory"/>
		</property>
	</bean>
	<!-- service层 -->
	<bean id="personService" class="cn.itcast.s2sh.service.Impl.PersonServiceImpl">
		<property name="personDao">
			<ref bean="personDao"/>
		</property>
	</bean>
	<!-- action层  这个要写成多例模式(于此同时,spring就不负责该对象产生的方法的生命周期了)-->
	<bean id="personAction" class="cn.itcast.s2sh.action.PersonAction" scope="prototype">
		<property name="personService">
			<ref bean="personService"/>
		</property>
	</bean>
</beans>
scope为"prototype"保证了action的多实例
这个多例很重要,在多用户并发的时候起着很重要的作业,bean默认情况下产生的是单例
写struts.xml配置文件
<?xml version="1.0" encoding="UTF-8"?>
<!DOCTYPE struts PUBLIC
	"-//Apache Software Foundation//DTD Struts Configuration 2.1.7//EN"
	"http://struts.apache.org/dtds/struts-2.1.7.dtd">
<struts>
	<constant name="struts.devMode" value="true"/>
   <package name="person" namespace="/" extends="struts-default">
   <!-- class="personAction" 与spring容器中bean相一致 -->
   		<action name="personAction_*" method="{1}" class="personAction">
   			<result name="success">index.jsp</result>
   			<result name="index">index1.jsp</result>
   		</action>
   </package>
</struts>
10、在web.xml
加入spring的监听器
加入struts2的过滤器
<?xml version="1.0" encoding="UTF-8"?>
<web-app version="2.5"
	xmlns="http://java.sun.com/xml/ns/javaee"
	xmlns:xsi="http://www.w3.org/2001/XMLSchema-instance"
	xsi:schemaLocation="http://java.sun.com/xml/ns/javaee
	http://java.sun.com/xml/ns/javaee/web-app_2_5.xsd">


	<!-- 整合Spring -->
	<listener>
		<listener-class>org.springframework.web.context.ContextLoaderListener</listener-class>
	</listener>
	<context-param>
		<param-name>contextConfigLocation</param-name>
		<param-value>classpath:spring/applicationContext.xml</param-value>
	</context-param>

		<!-- 配置Spring的OpenSessionInViewFilter,以解决懒加载异常
			这个只能放在中间。,它的作用是解决懒加载关闭session的问题,
			session.load()方式是要在得到属性的时候才发出sql语句,然后我们得到sql语句的时候是在jsp页面
			那个时候session已经关闭了,所以需要打开session,在finally的时候关闭session
		-->
	<filter>
		<filter-name>OpenSessionInViewFilter</filter-name>
		<filter-class>org.springframework.orm.hibernate3.support.OpenSessionInViewFilter</filter-class>
	</filter>
	<filter-mapping>
		<filter-name>OpenSessionInViewFilter</filter-name>
		<url-pattern>*.action</url-pattern>
	</filter-mapping>

	<!-- struts2过滤器 -->
	<filter>
		<filter-name>struts2</filter-name>
		<filter-class>org.apache.struts2.dispatcher.ng.filter.StrutsPrepareAndExecuteFilter</filter-class>
	</filter>
	<filter-mapping>
		<filter-name>struts2</filter-name>
		<url-pattern>/*</url-pattern>
	</filter-mapping>

  <display-name></display-name>
  <welcome-file-list>
    <welcome-file>index.jsp</welcome-file>
  </welcome-file-list>
</web-app>
spring监听器:
如果是吧applicationContext.xml文件放在WEB-INF下,就不用管<param-name>名字了,因为默认会在该目录下找到。如果不是就需要默认起这个名字,然后并给它路径。
解释:

其中的OpenSessionInViewFilter,这个要重点讲一下,这个是为了处理懒加载的问题,在前面dao层中得到数据是load方法,这样的话它就会在get属性的时候,才发出sql语句,而得到属性的时候,已经是response到jsp的时候,那个session已经关闭了。我们就需要opensessionInViewFiter来推迟session的关闭时间.而且这个必须加载struts的上面也就是放在中间:
原因如下:
OpenSessionInView模式的运行方向: OpenSessionInView在第一个位置,struts2的过滤器在第二个位置
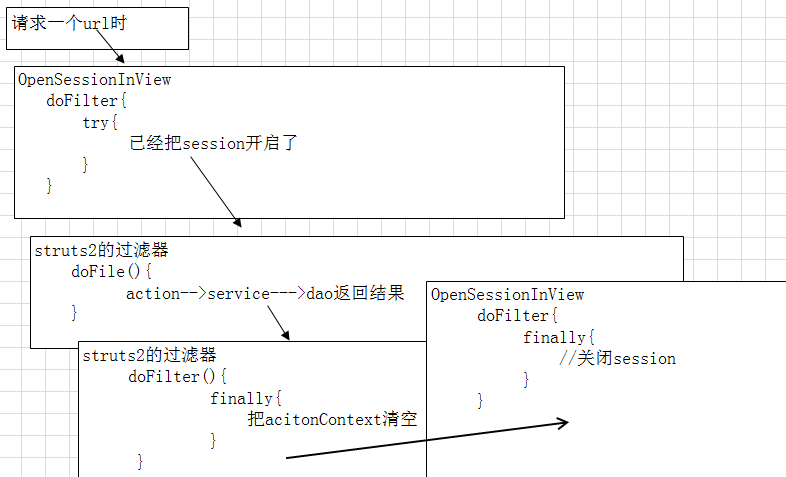
不加出现的错误:
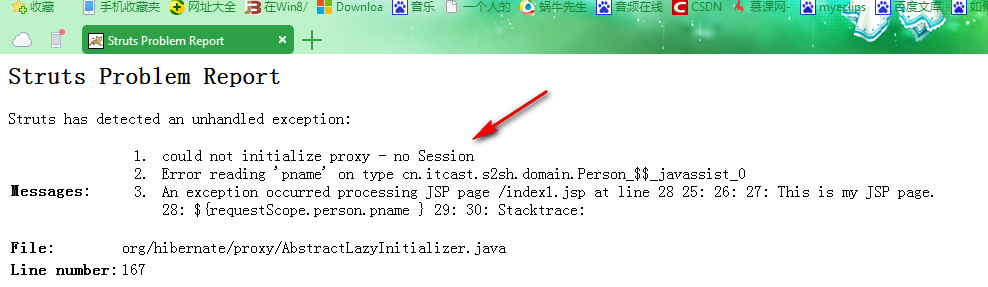
优缺点:OpensessinInview虽然解决了懒加载的问题,但是却造成了session关闭时间推迟了,导致内存中的缓存数据长时间停留。
11、请求
index1.jsp
  <body>
  <%@ taglib uri="/struts-tags" prefix="s" %>
    This is my JSP page. <br>
   ${requestScope.person.pname }<!-- ServletActionContext.getRequest().setAttribute("person", person); -->
   <s:debug></s:debug>
  </body>
测试:
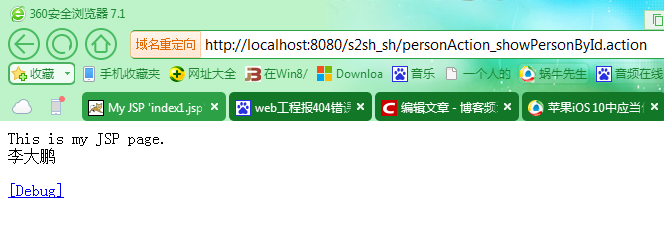
最后三大框架搭建成功。案例下载链接


 509
509


 被折叠的 条评论
为什么被折叠?
被折叠的 条评论
为什么被折叠?
 到【灌水乐园】发言


