


DHT11可以同时测量空气的温度和湿度,精度如下:
| 型号 | 测量范围 | 测湿精度 | 测温精度 | 分辨力 | 封装 |
|---|---|---|---|---|---|
| DHT11 | 20-90%RH0-50℃ | ±5%RH | ±2℃ | 1 | 4针单排直插 |
电压适配:3.3v~5.5V DC,具体参数查看百度百科
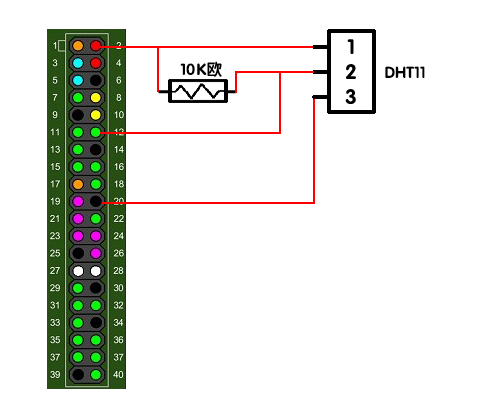
我在淘宝买到的是一个三个引脚的,引脚顺序是:有格子那面为正面,正面对着自己,左边第一个引脚为1号
| 引脚号 | 说明 |
|---|---|
| 1 | 电源电压 |
| 2 | 数据输入输出 |
| 3 | 接地 |
构建这个例子需要下面的零件:
一个树莓派2
一个DHT11温湿度传感器
一个10K欧的电阻
一些安装线
当然得先让树莓派能够正常工作
树莓派2代的引脚有40个:

树莓派关机断电,将DHT11与树莓派连接,这里将数据引脚连接到树莓派的GPIO18上,(如果DHT11有四个引脚的请忽略掉引脚3,引脚4号即为下图的3号)
连接好后开机,DHT11需要程序来读取数据,使用python语言读取,也可以使用C语言读取,另外还可以使用adafruit提供的DHT11库来读取。(都为网络上参考而来,在本文的最后提供了网站链接)
方法一,使用python代码读取
安装Python GPIO:
# 更新源
sudo apt-get update
# 开始安装
sudo apt-get install python-dev
sudo apt-get install python-rpi.gpio
# 创建脚本文件
nano dht11.py
在编辑器中键入下面内容:
#!/usr/bin/python
import RPi.GPIO as GPIO
import time

channel = 18
data = []
j = 0

GPIO.setmode(GPIO.BCM)

time.sleep(1)

GPIO.setup(channel, GPIO.OUT)
GPIO.output(channel, GPIO.LOW)
time.sleep(0.02)
GPIO.output(channel, GPIO.HIGH)
GPIO.setup(channel, GPIO.IN)

while GPIO.input(channel) == GPIO.LOW:
  continue
while GPIO.input(channel) == GPIO.HIGH:
  continue

while j < 40:
  k = 0
  while GPIO.input(channel) == GPIO.LOW:
    continue
  while GPIO.input(channel) == GPIO.HIGH:
    k += 1
    if k > 100:
      break
  if k < 8:
    data.append(0)
  else:
    data.append(1)

  j += 1

print "sensor is working."
print data

humidity_bit = data[0:8]
humidity_point_bit = data[8:16]
temperature_bit = data[16:24]
temperature_point_bit = data[24:32]
check_bit = data[32:40]

humidity = 0
humidity_point = 0
temperature = 0
temperature_point = 0
check = 0

for i in range(8):
  humidity += humidity_bit[i] * 2 ** (7-i)
  humidity_point += humidity_point_bit[i] * 2 ** (7-i)
  temperature += temperature_bit[i] * 2 ** (7-i)
  temperature_point += temperature_point_bit[i] * 2 ** (7-i)
  check += check_bit[i] * 2 ** (7-i)

tmp = humidity + humidity_point + temperature + temperature_point

if check == tmp:
  print "temperature :", temperature, "*C, humidity :", humidity, "%"
else:
  print "wrong"
  print "temperature :", temperature, "*C, humidity :", humidity, "% check :", check, ", tmp :", tmp

GPIO.cleanup()
按ctrl+o保存,回车,ctrl+x退出。
然后,输入命令:
sudo chmod u+x dht11.py
sudo ./dth11.py
如果一切顺利,温度和湿度就显示在屏幕上了。
方法二,C代码读取
# 如果没有更新过源,现在更新一下
sudo apt-get update
# 下载 wiringPi (它是用C语言控制和使用树莓派端口的一个类库)
git clone git://git.drogon.net/wiringPi
# 编译 wiringPi
cd wiringPi
./build
安装好后
# 查看GPIO版本号
gpio -v
# 显示GPIO信息
gpio readall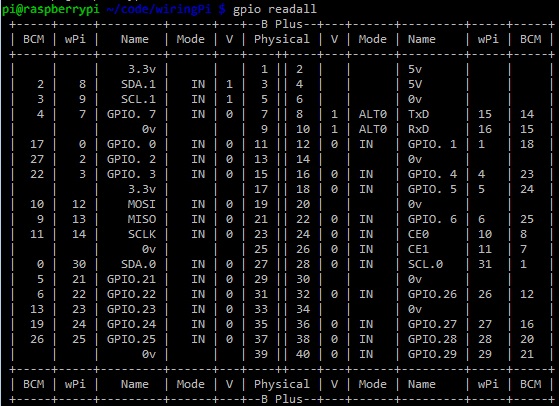
新建dht11.c文件
nano dht11.c键入代码,注意:以上IO的编号方式略有不同,采用wiring编码方式。
/*
 *  dht11.c:
 *  Simple test program to test the wiringPi functions
 *  DHT11 test
 */

#include <wiringPi.h>

#include <stdio.h>
#include <stdlib.h>
#include <stdint.h>
#define MAXTIMINGS  85
#define DHTPIN      1
int dht11_dat[5] = { 0, 0, 0, 0, 0 };

void read_dht11_dat()
{
    uint8_t laststate   = HIGH;
    uint8_t counter     = 0;
    uint8_t j       = 0, i;
    float   f; /* fahrenheit */

    dht11_dat[0] = dht11_dat[1] = dht11_dat[2] = dht11_dat[3] = dht11_dat[4] = 0;

    /* pull pin down for 18 milliseconds */
    pinMode( DHTPIN, OUTPUT );
    digitalWrite( DHTPIN, LOW );
    delay( 18 );
    /* then pull it up for 40 microseconds */
    digitalWrite( DHTPIN, HIGH );
    delayMicroseconds( 40 );
    /* prepare to read the pin */
    pinMode( DHTPIN, INPUT );

    /* detect change and read data */
    for ( i = 0; i < MAXTIMINGS; i++ )
    {
        counter = 0;
        while ( digitalRead( DHTPIN ) == laststate )
        {
            counter++;
            delayMicroseconds( 1 );
            if ( counter == 255 )
            {
                break;
            }
        }
        laststate = digitalRead( DHTPIN );

        if ( counter == 255 )
            break;

        /* ignore first 3 transitions */
        if ( (i >= 4) && (i % 2 == 0) )
        {
            /* shove each bit into the storage bytes */
            dht11_dat[j / 8] <<= 1;
            if ( counter > 16 )
                dht11_dat[j / 8] |= 1;
            j++;
        }
    }

    /*
     * check we read 40 bits (8bit x 5 ) + verify checksum in the last byte
     * print it out if data is good
     */
    if ( (j >= 40) &&
         (dht11_dat[4] == ( (dht11_dat[0] + dht11_dat[1] + dht11_dat[2] + dht11_dat[3]) & 0xFF) ) )
    {
        f = dht11_dat[2] * 9. / 5. + 32;
        printf( "Humidity = %d.%d %% Temperature = %d.%d *C (%.1f *F)\n",
            dht11_dat[0], dht11_dat[1], dht11_dat[2], dht11_dat[3], f );
    }else  {
        printf( "Data not good, skip\n" );
    }
}

int main( void )
{
    printf( "Raspberry Pi wiringPi DHT11 Temperature test program\n" );

    if ( wiringPiSetup() == -1 )
        exit( 1 );

    while ( 1 )
    {
        read_dht11_dat();
        delay( 1000 ); /* wait 1sec to refresh */
    }

    return(0);
}
保存ctrl+o,回车,ctrl+x退出。
然后编译(-lwiringPi 表示动态加载 wiringPi 共享库)、运行
gcc -Wall -o dht11c dht11.c -lwiringPi
sudo ./dht11c
这时,温度和湿度会每隔1秒刷新显示一次。
方法三,使用adafruit提供的库
首先
sudo apt-get update
sudo apt-get install build-essential python-dev python-openssl
然后,下载adafruit提供的库
git clone https://github.com/adafruit/Adafruit_Python_DHT.git
cd Adafruit_Python_DHT
安装
sudo python setup.py install好了,现在可以测试了
cd examples
# 11为传感器型号,18为引脚编号
sudo ./AdafruitDHT.py 11 18
引用参考:
http://www.uugear.com/portfolio/dht11-humidity-temperature-sensor-module/
https://learn.adafruit.com/dht-humidity-sensing-on-raspberry-pi-with-gdocs-logging/software-install-updated
http://shumeipai.nxez.com/2015/03/17/saks-diy-tutorials-gpio-development-environment.html
http://shumeipai.nxez.com/2013/10/03/raspberry-pi-temperature-sensor-monitors.html
http://surenpi.com/2015/03/17/树莓派连接dht11/#codesyntax_1
http://www.tuicool.com/articles/AZfUfy


 7724
7724

 被折叠的 条评论
为什么被折叠?
被折叠的 条评论
为什么被折叠?
 到【灌水乐园】发言


