


设置MKMapView的缩放级别
map.setCenter(new google.maps.LatLng(37.4419, -122.1419), 13);这个setCenter设置中心点的JavaScript方法接受中心坐标和缩放级别连个参数,这个缩放级别参数,如你所想,决定了目前地图要方多大。缩放级别范围从0到一些大一点的值。最大缩放级别取决于特定区域所在的位置(例如,你不能过分放大北朝鲜)和地图类型(默认,卫星,混合,地形等)通常一个地方的最大缩放级别介于15-21;
不幸的是iPhone上的MapKit没有提供一个得到缩放级别的方法,相反的,缩放级别由地图的界面的MKCoordinateRegion隐试定义。 当初始化该地区时,你指定的数量的距离映射显示在水平和垂直方向。缩放级别隐式设置基于这些距离值。
不是为了处理该地区的业务,我写了一个Category,它添加了精确设置MKMapView的缩放级别,在这篇文章,我将给你代码,你可以将它嵌入到你的项目中并立刻使用。我的下一篇文章将详细讲解它是怎么工作的。
代码:
#import <MapKit/MapKit.h>
@interface MKMapView (ZoomLevel)
- (void)setCenterCoordinate:(CLLocationCoordinate2D)centerCoordinate
zoomLevel:(NSUInteger)zoomLevel
animated:(BOOL)animated;
@end
#import "MKMapView+ZoomLevel.h"
#define MERCATOR_OFFSET 268435456
#define MERCATOR_RADIUS 85445659.44705395
@implementation MKMapView (ZoomLevel)
#pragma mark -
#pragma mark Map conversion methods
- (double)longitudeToPixelSpaceX:(double)longitude
{
return round(MERCATOR_OFFSET + MERCATOR_RADIUS * longitude * M_PI / 180.0);
}
- (double)latitudeToPixelSpaceY:(double)latitude
{
return round(MERCATOR_OFFSET - MERCATOR_RADIUS * logf((1 + sinf(latitude * M_PI / 180.0)) / (1 - sinf(latitude * M_PI / 180.0))) / 2.0);
}
- (double)pixelSpaceXToLongitude:(double)pixelX
{
return ((round(pixelX) - MERCATOR_OFFSET) / MERCATOR_RADIUS) * 180.0 / M_PI;
}
- (double)pixelSpaceYToLatitude:(double)pixelY
{
return (M_PI / 2.0 - 2.0 * atan(exp((round(pixelY) - MERCATOR_OFFSET) / MERCATOR_RADIUS))) * 180.0 / M_PI;
}
#pragma mark -
#pragma mark Helper methods
- (MKCoordinateSpan)coordinateSpanWithMapView:(MKMapView *)mapView
centerCoordinate:(CLLocationCoordinate2D)centerCoordinate
andZoomLevel:(NSUInteger)zoomLevel
{
// convert center coordiate to pixel space
double centerPixelX = [self longitudeToPixelSpaceX:centerCoordinate.longitude];
double centerPixelY = [self latitudeToPixelSpaceY:centerCoordinate.latitude];
// determine the scale value from the zoom level
NSInteger zoomExponent = 20 - zoomLevel;
double zoomScale = pow(2, zoomExponent);
// scale the map’s size in pixel space
CGSize mapSizeInPixels = mapView.bounds.size;
double scaledMapWidth = mapSizeInPixels.width * zoomScale;
double scaledMapHeight = mapSizeInPixels.height * zoomScale;
// figure out the position of the top-left pixel
double topLeftPixelX = centerPixelX - (scaledMapWidth / 2);
double topLeftPixelY = centerPixelY - (scaledMapHeight / 2);
// find delta between left and right longitudes
CLLocationDegrees minLng = [self pixelSpaceXToLongitude:topLeftPixelX];
CLLocationDegrees maxLng = [self pixelSpaceXToLongitude:topLeftPixelX + scaledMapWidth];
CLLocationDegrees longitudeDelta = maxLng - minLng;
// find delta between top and bottom latitudes
CLLocationDegrees minLat = [self pixelSpaceYToLatitude:topLeftPixelY];
CLLocationDegrees maxLat = [self pixelSpaceYToLatitude:topLeftPixelY + scaledMapHeight];
CLLocationDegrees latitudeDelta = -1 * (maxLat - minLat);
// create and return the lat/lng span
MKCoordinateSpan span = MKCoordinateSpanMake(latitudeDelta, longitudeDelta);
return span;
}
#pragma mark -
#pragma mark Public methods
- (void)setCenterCoordinate:(CLLocationCoordinate2D)centerCoordinate
zoomLevel:(NSUInteger)zoomLevel
animated:(BOOL)animated
{
// clamp large numbers to 28
zoomLevel = MIN(zoomLevel, 28);
// use the zoom level to compute the region
MKCoordinateSpan span = [self coordinateSpanWithMapView:self centerCoordinate:centerCoordinate andZoomLevel:zoomLevel];
MKCoordinateRegion region = MKCoordinateRegionMake(centerCoordinate, span);
// set the region like normal
[self setRegion:region animated:animated];
}
@end
如果你惊奇它是怎么工作的,看看我的下一篇文章,我在描述可怕的数学之后的代码。
另一方面,如果你不关心它是如何工作的,只是说,它确实有作用,复制粘贴,我的朋友。
Test the Code
要测试这个分类,假设你有一个view controller 有MKMapView实例,你可以使用下面 的代码
#import "MKMapView+ZoomLevel.h"
#define GEORGIA_TECH_LATITUDE 33.777328
#define GEORGIA_TECH_LONGITUDE -84.397348
#define ZOOM_LEVEL 14
- (void)viewDidAppear:(BOOL)animated
{
[super viewDidAppear:animated];
CLLocationCoordinate2D centerCoord = { GEORGIA_TECH_LATITUDE, GEORGIA_TECH_LONGITUDE };
[mapView setCenterCoordinate:centerCoord zoomLevel:ZOOM_LEVEL animated:NO];
}
ok, 你的地图应该放大到你可以看到乔治亚理工大学的校园了。
The Result
为了证实这个缩放级别是设置正确的,我写了一个简单的基于web的google地图应用以确保web和native应用的缩放级别相符合。两个app都以{33.777328, -84.397348} (Georgia Tech)
为中心。在以下图片中,左侧的iPhone运行的是native app,右侧的iPhone运行的是web app。
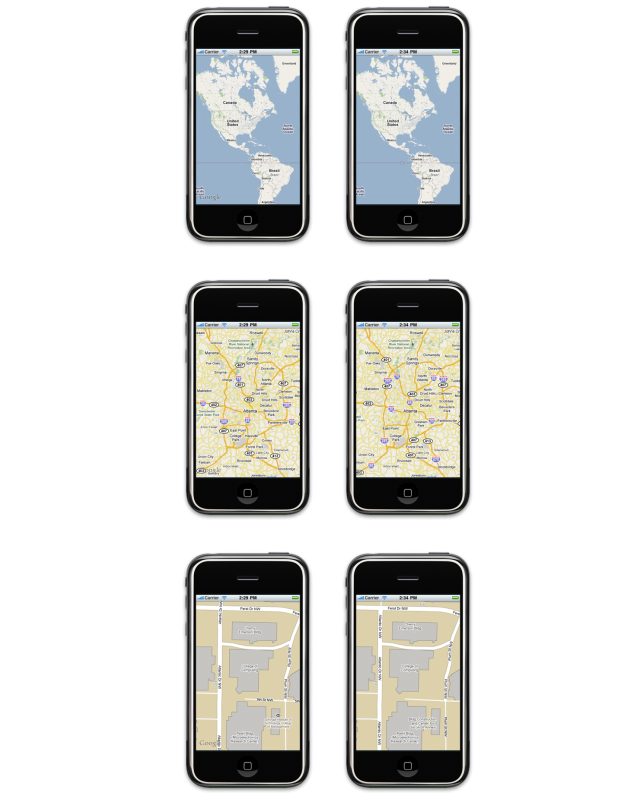
正如你所看到的,他们是相符的。
That's Wrap
通过使用使用MKMapView+ZoomLevel类别,你不会烦恼的设置所有区域。如果你像我一样对如何设置地图区域没有直觉,那么希望这个代码能在设置地图缩放级别时给你更多的控制。
下一次,我将讲解上面的代码是如何工作的,但是现在,让我门享受自由设置缩放级别!
原文链接:http://troybrant.net/blog/2010/01/set-the-zoom-level-of-an-mkmapview/


 69
69

 被折叠的 条评论
为什么被折叠?
被折叠的 条评论
为什么被折叠?
 到【灌水乐园】发言


