


【11.1】泛型和类型安全的容器
(1)ArrayList<Apple> 中尖括号括起来的是: 类型参数,它指定了这个容器实例可以保存的类型;
【荔枝:有泛型和没有泛型的区别】
class Apple {
	private static long counter;
	private final long id = counter++;

	public long id() {
		return id;
	}
}
class Orange {
}
// 没有泛型的 Apples 和 Oranges 类
public class ApplesAndOrangesWithoutGenerics {
	 @SuppressWarnings("unchecked") // 禁止"不受检查的异常"的警告信息
	public static void main(String[] args) {
		ArrayList apples = new ArrayList();
		for (int i = 0; i < 3; i++)
			apples.add(new Apple());
		apples.add(new Orange());
		for (int i = 0; i < apples.size(); i++)
			((Apple) apples.get(i)).id(); // 抛出运行时异常;不能把 Orange 强转为 Apple的。
	}
}
//有泛型的 Apples 和 Oranges 类
public class ApplesAndOrangesWithGenerics {
public static void main(String[] args) {
ArrayList<Apple> apples = new ArrayList<Apple>();
for (int i = 0; i < 3; i++)
apples.add(new Apple());
// apples.add(new Orange());
for (int i = 0; i < apples.size(); i++)
System.out.println(apples.get(i).id());
// Using foreach:
for (Apple c : apples)
System.out.println(c.id());
}
}2)编译器阻止将 Orange 放置到 apples容器中, 它是一个编译器错误,而不是运行时错误;
【(向上转型)泛型参数为 基类,可以添加子类对象。基类指针指向子类对象。】
class GrannySmith extends Apple {}
class Gala extends Apple {}
class Fuji extends Apple {}
class Braeburn extends Apple {}

public class GenericsAndUpcasting {
	public static void main(String[] args) {
		// (向上转型)泛型参数为 基类,可以添加子类对象。基类指针指向子类对象。
		ArrayList<Apple> apples = new ArrayList<Apple>();
		apples.add(new GrannySmith()); // GrannySmith 是 Apple的子类
		apples.add(new Gala()); // Gala 是 Apple的子类
		apples.add(new Fuji()); // Fuji 是 Apple的子类
		apples.add(new Braeburn()); // Braeburn 是 Apple的子类
		for (Apple c : apples)
			System.out.println(c);
	}
}
// 打印结果
chapter11.GrannySmith@2a139a55 // @ 后面的字符串是 对象散列码的无符号16进制字符串;(Object.hashCode() 函数)
chapter11.Gala@15db9742
chapter11.Fuji@6d06d69c
chapter11.Braeburn@7852e922
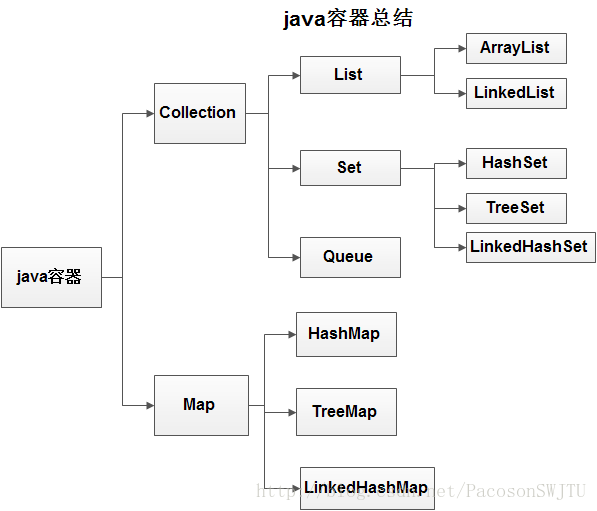
1)java容器类类库的用途是 保存对象,有两种类型的容器;
容器1)Collection:一条记录保存一个值;
List:必须按照插入的顺序保存元素;(ArrayList LinkedList) 不管重复与否;
ArrayList:底层实现是数组,查询速度快;
LinkedList: 底层实现是链表,删除速度快;
Set:不能有重复元素且无序;
HashSet:通过哈希函数获取函数,是最快的获取元素的方式;元素的存储顺序看起来并无实际意义(或不关心元素的存储顺序);无序不重复HashSet,底层用HashMap.key 实现;
TreeSet:如果存储顺序重要;它按照比较结果升序保存对象;无序不重复TreeSet,底层用 TreeMap.key 实现;
LinkedHashSet:它按照元素被添加的顺序保存对象; 底层用 LinkedHashMap.key 实现;
Queue: 只允许在容器的一端插入对象,并从另外一端移除对象;
容器2)Map:一条记录保存两个值,key值和value值,即键值对;
HashMap:没有按照任何明显的顺序保存元素,且通过哈希查找算法保证了查找的快速;
TreeMap:按照比较结果的升序保存键;
LinkedHashMap:按照元素的插入顺序保存键值对,同时还保留了HashMap的查询速度;底层用 HashMap 实现;
2)Collection接口概括了序列的概念。一种存放一组对象的方式;(Collection 就是是一个对象数组);
// 简单的容器操作实例
public class SimpleCollection {
	public static void main(String[] args) {
		//ArrayList间接实现了 Collection 接口
		Collection<Integer> c = new ArrayList<Integer>();
		for (int i = 0; i < 10; i++)
			c.add(i); // 自动装箱
		for (Integer i : c)
			System.out.print(i + ", ");

		System.out.println("\n======");
		//HashSet间接实现了 Collection 接口
		c = new HashSet<Integer>();
		for (int i = 0; i < 10; i++)
			c.add(i); // 自动装箱
		for (Integer i : c)
			System.out.print(i + ", ");
	}
}
// 类继承结构如下:
// ArrayList 的类结构层次
public class ArrayList<E> extends AbstractList<E> implements List<E>, RandomAccess, Cloneable, java.io.Serializable
// AbstractList
public abstract class AbstractList<E> extends AbstractCollection<E> implements List<E>
// List
public interface List<E> extends Collection<E>
// HashSet 的类结构层次
public class HashSet<E> extends AbstractSet<E> implements Set<E>, Cloneable, java.io.Serializable
// AbstractSet
public abstract class AbstractSet<E> extends AbstractCollection<E> implements Set<E>
// Set
public interface Set<E> extends Collection<E>
// AbstractCollection
public abstract class AbstractCollection<E> implements Collection<E>
// 打印结果:
0, 1, 2, 3, 4, 5, 6, 7, 8, 9,
======
0, 1, 2, 3, 4, 5, 6, 7, 8, 9,
【11.3】添加一组元素
// 添加一组元素荔枝
public class AddingGroups {
	public static void main(String[] args) {
		// Arrays.asList() 接受一个数组或用 逗号分隔的元素列表 并转换为一个 List对象.
		Collection<Integer> collection = new ArrayList<Integer>(Arrays.asList(
				1, 2, 3, 4, 5));
		Integer[] moreInts = { 6, 7, 8, 9, 10 };
		collection.addAll(Arrays.asList(moreInts));

		// Collections.addAll() 方法 达到同样的效果.
		Collections.addAll(collection, 11, 12, 13, 14, 15);
		Collections.addAll(collection, moreInts);
		for(Integer i : collection) {
			System.out.print(i + ", ");
		}
		/* Arrays.asList()方法返回的是 ArrayList */
		List<Integer> list = Arrays.asList(16, 17, 18, 19, 20);
		list.set(1, 99); // OK -- modify an element
		list.add(21); // 报错,因为潜在数组不会改变原有大小.
	}
}
// 打印结果: 抛出异常
1, 2, 3, 4, 5, 6, 7, 8, 9, 10, 11, 12, 13, 14, 15, 6, 7, 8, 9, 10, Exception in thread "main" java.lang.UnsupportedOperationException
at java.util.AbstractList.add(AbstractList.java:148)
at java.util.AbstractList.add(AbstractList.java:108)
at chapter11.AddingGroups.main(AddingGroups.java:27)
// Arrays.asList() 方法详情
 @SafeVarargs
    @SuppressWarnings("varargs")
    public static <T> List<T> asList(T... a) {
        return new ArrayList<>(a);
    }
// Arrays$ArrayList 内部类
/**
* @serial include
*/
private static class ArrayList<E> extends AbstractList<E>
implements RandomAccess, java.io.Serializable
{
private static final long serialVersionUID = -2764017481108945198L;
private final E[] a;
ArrayList(E[] array) {
a = Objects.requireNonNull(array);
}
@Override
public int size() {
return a.length;
}
@Override
public Object[] toArray() {
return a.clone();
}
@Override
@SuppressWarnings("unchecked")
public <T> T[] toArray(T[] a) {
int size = size();
if (a.length < size)
return Arrays.copyOf(this.a, size,
(Class<? extends T[]>) a.getClass());
System.arraycopy(this.a, 0, a, 0, size);
if (a.length > size)
a[size] = null;
return a;
}
@Override
public E get(int index) {
return a[index];
}
@Override
public E set(int index, E element) {
E oldValue = a[index];
a[index] = element;
return oldValue;
}
@Override
public int indexOf(Object o) {
E[] a = this.a;
if (o == null) {
for (int i = 0; i < a.length; i++)
if (a[i] == null)
return i;
} else {
for (int i = 0; i < a.length; i++)
if (o.equals(a[i]))
return i;
}
return -1;
}
@Override
public boolean contains(Object o) {
return indexOf(o) != -1;
}
@Override
public Spliterator<E> spliterator() {
return Spliterators.spliterator(a, Spliterator.ORDERED);
}
@Override
public void forEach(Consumer<? super E> action) {
Objects.requireNonNull(action);
for (E e : a) {
action.accept(e);
}
}
@Override
public void replaceAll(UnaryOperator<E> operator) {
Objects.requireNonNull(operator);
E[] a = this.a;
for (int i = 0; i < a.length; i++) {
a[i] = operator.apply(a[i]);
}
}
@Override
public void sort(Comparator<? super E> c) {
Arrays.sort(a, c);
}
}(1)注意区分Collection的成员方法,即addAll() 方法 和 Collections.addAll() 类方法;(干货——Collections.addAll() 类方法是添加元素的首选方式)
(2)Collection.addAll() 成员方法只能接受另一个Collection对象作为参数,没有 Arrays.asList() 和 Collections.addAll() 类方法灵活,后面的两个方法都可以使用 可变参数列表;
(3)可以直接把 Arrays.asList() 的输出作为输入, 但其输出的数组是固定的,不能调整尺寸了;参见 Arrays.asList() 方法的内部调用详情,它实际上实例化了 Arrays的内部类ArrayList 的一个实例并返回的,且ArrayList是基于数组的,该数组的大小是固定的;
【看个荔枝】
class Snow {}
class Powder extends Snow {}
class Light extends Powder {}
class Heavy extends Powder {}
class Crusty extends Snow {}
class Slush extends Snow {}

public class AsListInference {
	public static void main(String[] args) {
		/* Arrays.asList() 方法 产生大小固定的Arrays$ArrayList内部类实例 */
		List<Snow> snow1 = Arrays.asList(new Crusty(), new Slush(), new Powder());
		System.out.println("===snow1===");
		for (int i = 0; i < snow1.size(); i++) {
			System.out.println(snow1.get(i));
		}
		/* Arrays.asList() 方法 产生大小固定的Arrays$ArrayList内部类实例 */
		 List<Snow> snow2 = Arrays.asList(new Light(), new Heavy());
		 System.out.println("===snow2===");
		 for (int i = 0; i < snow2.size(); i++) {
				System.out.println(snow2.get(i));
		 }
		 System.out.println(snow2.getClass().getSimpleName().toLowerCase()); // 输出的是 arraylist

		List<Snow> snow3 = new ArrayList<>();
		/* 推荐用 Collections.addAll() 向 Collection实例中添加元素.( Collections.addAll() 是添加元素的首选方法) */
		Collections.addAll(snow3, new Light(), new Heavy()); // 向snow3容器添加 后面两个元素;(可变参数列表)
		System.out.println("===snow3===");
		for (int i = 0; i < snow3.size(); i++) {
			System.out.println(snow3.get(i));
		}
		/* (插入了一条线索<Snow>) Arrays.asList() 方法  */
		/* 告诉 */
		List<Snow> snow4 = Arrays.<Snow> asList(new Light(), new Heavy());
		System.out.println("===snow4===");
		for (int i = 0; i < snow4.size(); i++) {
			System.out.println(snow4.get(i));
		}
	}
}
// 打印结果:
===snow1===
chapter11.Crusty@2a139a55
chapter11.Slush@15db9742
chapter11.Powder@6d06d69c
===snow2===
chapter11.Light@7852e922
chapter11.Heavy@4e25154f
arraylist
snow2 = [chapter11.Light@7852e922, chapter11.Heavy@4e25154f]
===snow3===
chapter11.Light@70dea4e
chapter11.Heavy@5c647e05
===snow4===
chapter11.Light@33909752
chapter11.Heavy@55f96302
【11.4】容器的打印
// 常用容器打印荔枝
public class PrintingContainers {
	static Collection fill(Collection<String> collection) {
		collection.add("rat1");
		collection.add("cat2");
		collection.add("dog3");
		collection.add("dog3");
		return collection;
	}
	static Map fill(Map<String, String> map) {
		map.put("rat1", "Fuzzy");
		map.put("cat2", "Rags2");
		map.put("dog3", "Bosco3");
		map.put("dog3", "Spot3");
		return map;
	}
	public static void main(String[] args) {
		System.out.println("ArrayList = " + fill(new ArrayList<String>()));
		System.out.println("LinkedList = " + fill(new LinkedList<String>()));
		System.out.println("HashSet = " + fill(new HashSet<String>())); // 无序不重复HashSet,底层用HashMap.key 实现
		System.out.println("TreeSet = " + fill(new TreeSet<String>())); // 无序不重复TreeSet,底层用 TreeMap.key 实现;
		System.out.println("LinkedHashSet = " + fill(new LinkedHashSet<String>())); // 底层用 LinkedHashMap.key 实现;
		System.out.println("HashMap = " + fill(new HashMap<String, String>()));
		System.out.println("TreeMap = " + fill(new TreeMap<String, String>()));
		System.out.println("LinkedHashMap = " + fill(new LinkedHashMap<String, String>())); // 底层用 HashMap 实现
	}
}
// 常用容器的打印荔枝:
ArrayList = [rat1, cat2, dog3, dog3]
LinkedList = [rat1, cat2, dog3, dog3]
HashSet = [cat2, dog3, rat1]
TreeSet = [cat2, dog3, rat1]
LinkedHashSet = [rat1, cat2, dog3]
HashMap = {cat2=Rags2, dog3=Spot3, rat1=Fuzzy}
TreeMap = {cat2=Rags2, dog3=Spot3, rat1=Fuzzy}
LinkedHashMap = {rat1=Fuzzy, cat2=Rags2, dog3=Spot3}
【11.5】 List
1)ArrayList: 擅长于随机访问元素,但在List的中间插入和删除元素时速度较慢;
2)LinkedList:擅长于 插入和删除元素,但随机访问元素时速度较慢;
【荔枝-List方法列表】
// List 方法的荔枝
public class ListFeatures {
	public static void main(String[] args) {
		Random rand = new Random(47);
		List<Pet> pets = Pets.arrayList(7);
		print("1: " + pets);

		Hamster h = new Hamster();
		pets.add(h); // 添加元素,自动调整大小
		print("2: " + pets);

		print("3: " + pets.contains(h)); // 包含某个元素

		pets.remove(h); // 移除某个元素.
		Pet p = pets.get(2);
		print("4: " + p + " " + pets.indexOf(p)); // 元素的序号.

		Pet cymric = new Cymric();
		print("5: " + pets.indexOf(cymric)); // 查找元素的序号,没有的话,返回-1

		print("6: " + pets.remove(cymric)); // 没有该元素,移除的话,返回false

		// Must be the exact object:
		print("7: " + pets.remove(p)); // 移除成功

		print("8: " + pets);

		pets.add(3, new Mouse()); // Insert at an index, 在序列3上插入一个元素
		print("9: " + pets);

		List<Pet> sub = pets.subList(1, 4); // 截取子序列,包括1,不包括4
		print("10: subList = " + sub);
		print("10: " + pets.containsAll(sub)); // 是否包含子序列

		Collections.sort(sub); // In-place sort, 对元素排序
		print("11: sorted subList = " + sub);
		// Order is not important in containsAll():
		print("11: " + pets.containsAll(sub)); // 排序与否 不影响 包含关系

		Collections.shuffle(sub, rand); // 将元素序号打乱-shuffle-存储
		print("12: shuffled subList = " + sub);
		print("12: " + pets.containsAll(sub)); // 打乱之后 还是 不 影响 包含关系

		List<Pet> copy = new ArrayList<Pet>(pets);
		sub = Arrays.asList(pets.get(1), pets.get(4));
		print("13: sub = " + sub);
		print("13: copy = " + copy);
		copy.retainAll(sub); // 求交集
		print("13: copy.retainAll(sub) 方法求交集并赋值给 copy, copy = " + copy);

		copy = new ArrayList<Pet>(pets); // 获得一个全新的 拷贝。注意是全新。
		print("14: befor copy = " + copy);
		copy.remove(2); // Remove by index,移除序号为2上的元素
		print("14: after remove(2), copy =  " + copy);

		print("15: before copy = " + copy);
		print("15: before sub = " + sub);
		copy.removeAll(sub); // 移除 copy中 copy 与 sub 的交集元素
		print("15: after copy.removeAll(sub)-补集: " + copy);

		copy.set(1, new Mouse()); // 修改某个序号上的元素
		print("16: copy.set(1, new Mouse())-修改某序号1上的元素, copy = " + copy);

		copy.addAll(2, sub); // 将子序列中的元素 从 给定序号 插入到 原始序列中
		print("17: copy.addAll(2, sub)-在序号2上插入sub子集 , copy = " + copy);

		print("18: pets.isEmpty() = " + pets.isEmpty());

		pets.clear(); // 删除所有元素
		print("19: pets.clear(), pets = " + pets);

		print("20: pets.isEmpty() = " + pets.isEmpty()); // 序列是否为空

		pets.addAll(Pets.arrayList(4)); // collection实例的 addAll() 方法 添加元素
		print("21: after pets.addAll(Pets.arrayList(4)), pets = " + pets);

		Object[] o = pets.toArray(); // 列表转为 数组
		print("22: after Object[] o = pets.toArray(), p[3] = " + o[3]);

		Pet[] array = new Pet[4];
		// array = (Pet[]) pets.toArray(); //
		pets.toArray(array); //
		print("23: after Pet[] array = new Pet[4], pets.toArray(array), array[3].id() = " + array[3].id());
	}
}
1: [Rat, Manx, Cymric, Mutt, Pug, Cymric, Pug]
2: [Rat, Manx, Cymric, Mutt, Pug, Cymric, Pug, Hamster]
3: true
4: Cymric 2
5: -1
6: false
7: true
8: [Rat, Manx, Mutt, Pug, Cymric, Pug]
9: [Rat, Manx, Mutt, Mouse, Pug, Cymric, Pug]
10: subList = [Manx, Mutt, Mouse]
10: true
11: sorted subList = [Manx, Mouse, Mutt]
11: true
12: shuffled subList = [Mouse, Manx, Mutt]
12: true
13: sub = [Mouse, Pug]
13: copy = [Rat, Mouse, Manx, Mutt, Pug, Cymric, Pug]
13: copy.retainAll(sub) 方法求交集并赋值给 copy, copy = [Mouse, Pug]
14: befor copy = [Rat, Mouse, Manx, Mutt, Pug, Cymric, Pug]
14: after remove(2), copy = [Rat, Mouse, Mutt, Pug, Cymric, Pug]
15: before copy = [Rat, Mouse, Mutt, Pug, Cymric, Pug]
15: before sub = [Mouse, Pug]
15: after copy.removeAll(sub)-补集: [Rat, Mutt, Cymric, Pug]
16: copy.set(1, new Mouse())-修改某序号1上的元素, copy = [Rat, Mouse, Cymric, Pug]
17: copy.addAll(2, sub)-在序号2上插入sub子集 , copy = [Rat, Mouse, Mouse, Pug, Cymric, Pug]
18: pets.isEmpty() = false
19: pets.clear(), pets = []
20: pets.isEmpty() = true
21: after pets.addAll(Pets.arrayList(4)), pets = [Manx, Cymric, Rat, EgyptianMau]
22: after Object[] o = pets.toArray(), p[3] = EgyptianMau
23: after Pet[] array = new Pet[4], pets.toArray(array), array[3].id() = 14
【代码解说】
1)equals 方法的重要性: retainAll() removeAll() 或 contains() 或 indexof() 或 remove() 等方法, 都需要用到 equals() 方法;
2)List 方法列表:
2.1)add方法:add(h) , add(3, new Mouse()), addAll(2, sub),
2.2)contains方法:contains(h), containsAll(sub),
2.3)remove方法: remove(h), remove(2),list.removeAll(sub)-求补集方法=>list,
2.4)get方法: get(2),
2.5)查找序号 indexof方法: indexOf(p),
2.6)求交集方法retainAll:copy.retainAll(sub)-交集,
2.7)修改元素方法set: set(1, new Mouse())
2.8)子集方法subList() : List<Pet> sub = pets.subList(1, 4),
2.9)是否为空 isEmpty() 方法: pets.isEmpty();
2.10)List转数组方法 toArray : pets.toArray();
或 Pet[] array = new Pet[4];
// array = (Pet[]) pets.toArray(); //
pets.toArray(array); //
2.12)清空List所有元素方法 clear:pets.clear(); // 删除所有元素
2.11)其他方法:
Collections的排序方法sort: Collections.sort(sub) ,
Arrays.asList() 数组转List方法: sub = Arrays.asList(pets.get(1), pets.get(4)),
(Attention——List转数组 和 数组转List;交集方法和补集方法)
【11.6】迭代器
1)迭代器的目的: 遍历并选择序列中的对象,而不必关心该序列底层的结构;
2)如何遍历?
iterator() 方法返回一个 Iterator 对象;
next() 方法获的下一个元素;
hasNext() 检查序列中是否还有元素;
remove() 把迭代器返回的元素删除;
【迭代器的荔枝】Iterator 仅能单向移动
// 遍历 List 等容器的 三种方式
public class SimpleIteration {
	public static void main(String[] args) {
		List<Pet> pets = Pets.arrayList(12);
		Iterator<Pet> it = pets.iterator(); // 迭代器对象

		while (it.hasNext()) { // 是否还有元素
			Pet p = it.next(); // 获取下一个元素
			System.out.print(p.id() + ":" + p + " ");
		}
		System.out.println();

		for (Pet p : pets) // foreach 循环
			System.out.print(p.id() + ":" + p + " ");
		System.out.println();

		it = pets.iterator();
		for (int i = 0; i < 6; i++) { // for 循环
			it.next();
			it.remove(); // 调用 remove() 方法前,必须先 调用 next() 元素;
		}
		System.out.println(pets); // 输出 剩下的6个元素,因为当前的游标在 序号6那个位置
	}
}
// 打印结果:
0:Rat 1:Manx 2:Cymric 3:Mutt 4:Pug 5:Cymric 6:Pug 7:Manx 8:Cymric 9:Rat 10:EgyptianMau 11:Hamster
0:Rat 1:Manx 2:Cymric 3:Mutt 4:Pug 5:Cymric 6:Pug 7:Manx 8:Cymric 9:Rat 10:EgyptianMau 11:Hamster
[Pug, Manx, Cymric, Rat, EgyptianMau, Hamster]
/* Iterator的真正威力: 能够将遍历序列的操作 与序列底层的结构相分离。 */
/* 有时会说: 迭代器统一了 对容器的访问方式。 */
public class CrossContainerIteration {
	public static void display(Iterator<Pet> it) {// Iterator 参数
		while (it.hasNext()) {
			Pet p = it.next();
			System.out.print(p.id() + ":" + p + " ");
		}
		System.out.println();
	}

	public static void main(String[] args) {
		ArrayList<Pet> pets = Pets.arrayList(8);
		LinkedList<Pet> petsLL = new LinkedList<Pet>(pets);
		HashSet<Pet> petsHS = new HashSet<Pet>(pets);
		TreeSet<Pet> petsTS = new TreeSet<Pet>(pets);

		display(pets.iterator());
		display(petsLL.iterator());
		display(petsHS.iterator());
		display(petsTS.iterator());
	}
}
// 打印结果:
0:Rat 1:Manx 2:Cymric 3:Mutt 4:Pug 5:Cymric 6:Pug 7:Manx
0:Rat 1:Manx 2:Cymric 3:Mutt 4:Pug 5:Cymric 6:Pug 7:Manx
0:Rat 1:Manx 2:Cymric 3:Mutt 4:Pug 5:Cymric 6:Pug 7:Manx
5:Cymric 2:Cymric 7:Manx 1:Manx 3:Mutt 6:Pug 4:Pug 0:Rat
(干货——Iterator 只能单向移动,ListIterator 能够双向移动)
1)获得ListIterator对象: 调用 List 的 listIterator() 方法产生一个指向 List的 ListIterator ,还可以调用 listIterator(n) 创建一个一开始就指向列表索引为 n 的元素处的 ListIterator;
【ListIterator的荔枝】
public class ListIteration { // ListIterator 迭代器可双向移动.
	public static void main(String[] args) {
		List<Pet> pets = Pets.arrayList(8);
		ListIterator<Pet> it = pets.listIterator();

		while (it.hasNext()) // 前向移动
			System.out.print(it.next() + ", " + it.nextIndex() + ", " + it.previousIndex() + "; ");
		System.out.println();

		while (it.hasPrevious()) // 后向移动 (所以 ListIterator 是双向移动)
			System.out.print(it.previous().id() + " ");
		System.out.println();
		System.out.println(pets);
		// 创建一个 一开始就指向索引 为 3 的元素处的 ListIteraor.
		it = pets.listIterator(3);
		while (it.hasNext()) {
			it.next();  // next()方法是 先加 后 返回 值;
			it.add(Pets.randomPet()); // 从索引==3处开始添加元素
		}
		System.out.println(pets);
	}
}
/* public int nextIndex() {
return cursor;
}
public int previousIndex() {
return cursor - 1;
}
public E next() {
checkForComodification();
int i = cursor;
if (i >= size)
throw new NoSuchElementException();
Object[] elementData = ArrayList.this.elementData;
if (i >= elementData.length)
throw new ConcurrentModificationException();
cursor = i + 1;
return (E) elementData[lastRet = i]; // next()方法是 先加 后 返回 值;
}
*/// 打印结果:
Rat, 1, 0; Manx, 2, 1; Cymric, 3, 2; Mutt, 4, 3; Pug, 5, 4; Cymric, 6, 5; Pug, 7, 6; Manx, 8, 7;
7 6 5 4 3 2 1 0
[Rat, Manx, Cymric, Mutt, Pug, Cymric, Pug, Manx]
[Rat, Manx, Cymric, Mutt, Cymric, Pug, Rat, Cymric, EgyptianMau, Pug, Hamster, Manx, EgyptianMau]
【11.7】LinkedList
1)基本原理: LinkedList 底层用 链表实现,所以它擅长于 元素的移除 和 添加, 但查找元素的速度较慢;
2)LinkedList的特性: 还添加了 可以使其用作栈, 队列或 双端队列的方法;
3)LinkedList 方法列表:
3.1)返回第一个元素: getFirst() 和 element() 方法, peek()方法;如果list 为空,则getFirst() 和 element() 方法抛出异常 NoSuchElementException;peek() 方法不同的是 当列表为空时, 会返回 null;
3.2)移除第一个元素: removeFilrst() 和 remove() 方法, poll() 方法, 如果list 为空, 则 removeFirst() 和 remove() 方法抛出异常 NoSuchElementException;而poll() 不同的是, 当列表为空时 返回 null;
3.3)插入第一个元素: addFirst() 方法;
3.4)插入最后一个元素: offer() 方法 == add()方法 和 addLast() 方法;
3.4)删除最后一个元素并返回删除的元素:removeLast() 方法;若list 为null,则抛出异常NoSuchElementException;
【LinkedList 荔枝】
// LinkedList 的方法列表
// 利用LinkedList可实现 栈,队列,双端队列
public class LinkedListFeatures {
	public static void main(String[] args) {
		LinkedList<Pet> pets = new LinkedList<Pet>(Pets.arrayList(5));
		print("0:pets = " + pets);

		print("1:pets.getFirst() =  " + pets.getFirst()); // 获取 第一个元素,列表为空 抛异常
		print("1:pets.element() = " + pets.element()); // 获取 第一个元素, 列表为空 抛异常

		print("2:pets.peek() = " + pets.peek()); // 获取 第一个元素,列表为空 不抛异常 返回null

		print("3:pets.remove() = " + pets.remove()); // 删除第一个元素并返回删除的元素,为空抛异常
		print("3:pets.removeFirst() = " + pets.removeFirst()); // 删除第一个元素并返回删除的元素,为空抛异常

		print("4:pets.poll() = " + pets.poll()); // 删除第一个元素,为空不抛异常 返回null
		print("4:pets = " + pets);

		pets.addFirst(new Rat()); // 在队首 插入
		print("5:After pets.addFirst(new Rat()), pets = " + pets);

		pets.offer(Pets.randomPet()); // 元素进队, 在队尾插入
		print("6:After pets.offer(Pets.randomPet()), pets = " + pets);

		pets.add(Pets.randomPet()); // 在队尾插入
		print("7:After pets.add(Pets.randomPet()), pets = " + pets);

		pets.addLast(new Hamster()); // 在队尾插入
		print("8:After pets.addLast(new Hamster()), pets = " + pets);

		print("9:pets.removeLast() =  " + pets.removeLast()); // 删除队尾元素
		print("9:pets = " + pets);
	}
}
// 打印结果:
0:pets = [Rat, Manx, Cymric, Mutt, Pug]
1:pets.getFirst() = Rat
1:pets.element() = Rat
2:pets.peek() = Rat
3:pets.remove() = Rat
3:pets.removeFirst() = Manx
4:pets.poll() = Cymric
4:pets = [Mutt, Pug]
5:After pets.addFirst(new Rat()), pets = [Rat, Mutt, Pug]
6:After pets.offer(Pets.randomPet()), pets = [Rat, Mutt, Pug, Cymric]
7:After pets.add(Pets.randomPet()), pets = [Rat, Mutt, Pug, Cymric, Pug]
8:After pets.addLast(new Hamster()), pets = [Rat, Mutt, Pug, Cymric, Pug, Hamster]
9:pets.removeLast() = Hamster
9:pets = [Rat, Mutt, Pug, Cymric, Pug]
【11.8】Stack 栈
1)LinkedList 具有能够直接实现 栈的所有功能的方法,因此可以直接将 LinkedList 作为 栈使用;
2)基于LinkedList 的 Stack实现(强烈推荐)
// Stack 的源码实现, 不过这不是 java api 提供的,是作者自己写的
public class Stack<T> {
	java.util.Stack<Integer> s = null;
	private LinkedList<T> storage = new LinkedList<T>();

	// 入栈
	public void push(T v) {
		// 在链表表头 插入
		storage.addFirst(v);
	}
	// 返回栈顶元素,仅仅是查看,或偷看,嘿嘿
	public T peek() {
		// 获取 第一个元素,列表为空 抛异常
		return storage.getFirst();
	}
	// 出栈,表头出栈;
	public T pop() {
		// 删除第一个元素,为空抛异常
		return storage.removeFirst();
	}

	public boolean empty() {
		return storage.isEmpty();
	}

	public String toString() {
		return storage.toString();
	}
}
/* java.util.Stack 源码实现(不建议用) */
public class Stack<E> extends Vector<E> {
public Stack() {
}
public E push(E item) {
addElement(item);
return item;
}
public synchronized E pop() { // 同步方法,性能较低,已弃用
E obj;
int len = size();
obj = peek();
removeElementAt(len - 1);
return obj;
}
public synchronized E peek() { // 同步方法,性能较低,已弃用
int len = size();
if (len == 0)
throw new EmptyStackException();
return elementAt(len - 1);
}
public boolean empty() {
return size() == 0;
}
public synchronized int search(Object o) { // 同步方法,性能较低,已弃用
int i = lastIndexOf(o);
if (i >= 0) {
return size() - i;
}
return -1;
}
/** use serialVersionUID from JDK 1.0.2 for interoperability */
private static final long serialVersionUID = 1224463164541339165L;
}【代码解说】
1)push方法: 元素进栈;
2)peek 和 pop方法: 都是返回栈顶元素,不过 peek仅仅是返回,而pop方法移除并返回栈顶元素;
【java.util.Stack荔枝】
public class StackTest {
	public static void main(String[] args) {
		Stack<String> stack = new Stack<String>();
		for (String s : "My dog has fleas".split(" "))
			stack.push(s);
		while (!stack.empty())
			System.out.print(stack.pop() + " ");
	}
}
// 打印结果:
fleas has dog My 【11.9】Set 不保存重复元素
1)查找操作: 成了 Set中最重要的操作,因此你通常都会用 HashSet 来实现, 能够快速查找;
2)Set的基本原理: Set 就是 Collection,只是行为不同而已;Set是基于对象的值来确定归属性的;
【Set荔枝】
// HashSet 以最快的查询速度进行 存储 (比较)
public class SetOfInteger {
	public static void main(String[] args) {
		Random rand = new Random(47);
		Set<Integer> intset = new HashSet<Integer>();

		for (int i = 0; i < 10000; i++) // 10000次循环也仅有30个元素
			intset.add(rand.nextInt(30));

		intset.add(100); // 无序不重复
		intset.add(10000); // 无序不重复
		intset.add(1000); // 无序不重复
		System.out.println(intset);
	}
}
// 打印结果:
[0, 1, 2, 3, 4, 5, 6, 7, 8, 9, 10, 11, 12, 13, 14, 15, 16, 10000, 17, 18, 19, 20, 21, 22, 23, 24, 25, 26, 27, 28, 29, 100, 1000]
3)3种Set对比——HashSet, TreeSet 和 LinkedHashSet 比较
3.1)HashSet:使用散列函数来确定元素的存储位置 (无序不重复);底层用 HashMap.key 实现 或 LinkedHashMap.key 实现;
3.2)TreeSet:把元素存储在 红黑树数据结构 中(有序不重复); 底层用 TreeMap.key 实现;
3.3)LinkedHashSet:因为查询速度的原因也使用了散列,但是他也使用了链表来维护元素的插入顺序,且保留了 哈希快速查找的查找速度;(有序不重复);继承了 HashSet, 故底层用 LinkedHashMap.key 实现 而没有用 HashMap.key实现;
【TreeSet荔枝】
// TreeSet 对 输出结果排序  (比较)
public class SortedSetOfInteger {
	public static void main(String[] args) {
		Random rand = new Random(47);
		SortedSet<Integer> intset = new TreeSet<Integer>();
		for (int i = 0; i < 10000; i++)
			intset.add(rand.nextInt(30));

		intset.add(100); // 有序不重复
		intset.add(10000); // 有序不重复
		intset.add(1000); // 有序不重复
		System.out.println(intset);
	}
}
// 打印结果: [0, 1, 2, 3, 4, 5, 6, 7, 8, 9, 10, 11, 12, 13, 14, 15
// , 16, 17, 18, 19, 20, 21, 22, 23, 24, 25, 26, 27, 28, 29, 100, 1000, 10000]
【Set容器的操作荔枝】
public class SetOperations {
	public static void main(String[] args) {
		Set<String> set1 = new HashSet<String>();
		Collections.addAll(set1, "A B C D E F G H I J K L".split(" "));
		print("set1 = " + set1);
		set1.add("M");
		print("H: set1.contains(\"H\") = " + set1.contains("H"));
		print("N: set1.contains(\"N\") = " + set1.contains("N")); // set 是否包含 元素

		Set<String> set2 = new HashSet<String>();
		Collections.addAll(set2, "H I J K L".split(" "));
		print("\nset2 = " + set2);
		print("set2 in set1: set1.containsAll(set2) = " + set1.containsAll(set2)); // set1 是否包含 set2。 。集合的包含。

		set1.remove("H"); // 异常元素 H
		print("\nset1 = " + set1);
		print("set2 in set1: set1.containsAll(set2) = " + set1.containsAll(set2));

		print("\nbefore: set1 = " + set1);
		print("before: set2 = " + set2);
		set1.removeAll(set2); // 移除 set1 和 set2的 交集
		print("after: set2 removed from set1: set1.removeAll(set2), set1 = " + set1);

		Collections.addAll(set1, "X Y Z".split(" ")); // 添加数组元素 到 set1.
		print("\n'X Y Z' added to set1: Collections.addAll(set1, \"X Y Z\".split(\" \")), set1 = " + set1);
	}
}
// 打印结果:
set1 = [A, B, C, D, E, F, G, H, I, J, K, L]
H: set1.contains("H") = true
N: set1.contains("N") = false
set2 = [H, I, J, K, L]
set2 in set1: set1.containsAll(set2) = true
set1 = [A, B, C, D, E, F, G, I, J, K, L, M]
set2 in set1: set1.containsAll(set2) = false
before: set1 = [A, B, C, D, E, F, G, I, J, K, L, M]
before: set2 = [H, I, J, K, L]
after: set2 removed from set1: set1.removeAll(set2), set1 = [A, B, C, D, E, F, G, M]
'X Y Z' added to set1: Collections.addAll(set1, "X Y Z".split(" ")), set1 = [A, B, C, D, E, F, G, M, X, Y, Z]
【TreeSet荔枝】
/* 将读取的文件内容分割为多个不重复单词,并存储到 TreeSet容器中 */
public class UniqueWords {
	public static void main(String[] args) {
		Set<String> words = new TreeSet<String>(new TextFile(
				"src/chapter11/UniqueWords.java", "\\W+"));
		System.out.println(words);
	}
}
// Read a file, split by any regular expression:
public TextFile(String fileName, String splitter) {
super(Arrays.asList(read(fileName).split(splitter)));
// Regular expression split() often leaves an empty
// String at the first position:
if (get(0).equals(""))
remove(0);
}// 打印结果(有序集合):
[Set, String, System, TextFile, TreeSet, UniqueWords, W, args, chapter11, class, import, java, main, mindview, net, new, out, package, println, public, src, static, util, void, words]
【如何让 TreeSet 使用字母序 对 元素进行排序 ?】
向 TreeSet 构造器传入 String.CASE_INSENTIVE_ORDER 比较器;
【把比较器传入 TreeSet构造器的荔枝】
public class UniqueWordsAlphabetic {
	public static void main(String[] args) {
		Set<String> words = new TreeSet<String>(String.CASE_INSENSITIVE_ORDER);
		words.addAll(new TextFile("src/chapter11/SetOperations.java", "\\W+"));
		System.out.println(words);
	}
}
public static final Comparator<String> CASE_INSENSITIVE_ORDER
= new CaseInsensitiveComparator();private static class CaseInsensitiveComparator
implements Comparator<String>, java.io.Serializable { // 这个比较器 是 String$CaseInsensitiveComparator 是 String类的静态内部类
// use serialVersionUID from JDK 1.2.2 for interoperability
private static final long serialVersionUID = 8575799808933029326L;
public int compare(String s1, String s2) {
int n1 = s1.length();
int n2 = s2.length();
int min = Math.min(n1, n2);
for (int i = 0; i < min; i++) {
char c1 = s1.charAt(i);
char c2 = s2.charAt(i);
if (c1 != c2) {
c1 = Character.toUpperCase(c1);
c2 = Character.toUpperCase(c2);
if (c1 != c2) {
c1 = Character.toLowerCase(c1);
c2 = Character.toLowerCase(c2);
if (c1 != c2) {
// No overflow because of numeric promotion
return c1 - c2;
}
}
}
}
return n1 - n2;
}
/** Replaces the de-serialized object. */
private Object readResolve() { return CASE_INSENSITIVE_ORDER; }
}// 打印结果:
[A, add, addAll, added, after, args, B, before, C, chapter11, class, Collections, contains, containsAll, D, E, F, from, G, H, HashSet, I, import, in, J, java, K, L, M, main, mindview, N, nbefore, net, new, nset1, nset2, package, Print, public, remove, removeAll, removed, Set, set1, set2, SetOperations, split, static, String, to, util, void, X, Y, Z]
【总结】字典序和字母序的区别在于: 字典序按照ASCII 码来比较; 字母序在忽略字母大小写的基础上用 ASCII码来比较;
【11.10】Map
//  HashMap(以最快的查找速度进行存储) 的荔枝.
public class Statistics {
	public static void main(String[] args) {
		Random rand = new Random(47);
		Map<Integer, Integer> m = new HashMap<Integer, Integer>();
		for (int i = 0; i < 10000; i++) {
			int r = rand.nextInt(20); // 产生20以内的随机数
			Integer freq = m.get(r); // 若没有key 对应的value 则返回 null
			m.put(r, freq == null ? 1 : freq + 1); // 发生了对 Integer 的装箱和拆箱
		}
		System.out.println(m);
	}
}
// 打印结果:
{0=481, 1=502, 2=489, 3=508, 4=481, 5=503, 6=519, 7=471, 8=468, 9=549, 10=513, 11=531, 12=521, 13=506, 14=477, 15=497, 16=533, 17=509, 18=478, 19=464}
// Map.containsKey() 和 Map.containsValue() 的区别
public class PetMap {
	public static void main(String[] args) {
		Map<String, Pet> petMap = new HashMap<String, Pet>();
		petMap.put("My Cat", new Cat("Molly"));
		petMap.put("My Dog", new Dog("Ginger"));
		petMap.put("My Hamster", new Hamster("Bosco"));
		print(petMap);

		Pet dog = petMap.get("My Dog");
		print(dog);
		print(petMap.containsKey("My Dog")); // 是否包含该key
		print(petMap.containsValue(dog)); // 是否包含该value
	}
}
// 打印结果:
{My Dog=Dog Ginger, My Cat=Cat Molly, My Hamster=Hamster Bosco}
Dog Ginger
true
true
public class MapOfList {
	public static Map<Person, List<? extends Pet>> petPeople = new HashMap<Person, List<? extends Pet>>();
	static {
		petPeople.put(new Person("Dawn-1"),
				Arrays.asList(new Cymric("Molly1-1"), new Mutt("Spot1-2")));

		petPeople.put(new Person("Kate-2"),
				Arrays.asList(new Cat("Shackleton2-1"),
				new Cat("Elsie May2-2"), new Dog("Margrett2-3")));

		petPeople.put(new Person("Marilyn-3"),
				Arrays.asList(new Pug("Louie aka Louis Snorkelstein Dupree3-1"),
						new Cat("Stanford aka Stinky el Negro3-2"), new Cat("Pinkola3-3")));

		petPeople.put(new Person("Luke-4"),
				Arrays.asList(new Rat("Fuzzy4-1"), new Rat("Fizzy4-2")));

		petPeople.put(new Person("Isaac-5"), Arrays.asList(new Rat("Freckly5-1")));
	}
	public static void main(String[] args) {
		print("petPeople.keySet() = " + petPeople.keySet()); // 键set
		print("petPeople.values() = " + petPeople.values()); // 值set
		print("petPeople.entrySet() = " + petPeople.entrySet()); // 键值对set

		for (Person person : petPeople.keySet()) {
			print(person + " has:"); // map.key
			for (Pet pet : petPeople.get(person)) // map.value 是一个 list,遍历整个list
				print("    " + pet);
		}
	}
}
// 打印结果:
petPeople.keySet() = [Person Luke-4, Person Marilyn-3, Person Kate-2, Person Isaac-5, Person Dawn-1]
petPeople.values() = [[Rat Fuzzy4-1, Rat Fizzy4-2], [Pug Louie aka Louis Snorkelstein Dupree3-1, Cat Stanford aka Stinky el Negro3-2, Cat Pinkola3-3], [Cat Shackleton2-1, Cat Elsie May2-2, Dog Margrett2-3], [Rat Freckly5-1], [Cymric Molly1-1, Mutt Spot1-2]]
petPeople.entrySet() = [Person Luke-4=[Rat Fuzzy4-1, Rat Fizzy4-2], Person Marilyn-3=[Pug Louie aka Louis Snorkelstein Dupree3-1, Cat Stanford aka Stinky el Negro3-2, Cat Pinkola3-3], Person Kate-2=[Cat Shackleton2-1, Cat Elsie May2-2, Dog Margrett2-3], Person Isaac-5=[Rat Freckly5-1], Person Dawn-1=[Cymric Molly1-1, Mutt Spot1-2]]
Person Luke-4 has:
Rat Fuzzy4-1
Rat Fizzy4-2
Person Marilyn-3 has:
Pug Louie aka Louis Snorkelstein Dupree3-1
Cat Stanford aka Stinky el Negro3-2
Cat Pinkola3-3
Person Kate-2 has:
Cat Shackleton2-1
Cat Elsie May2-2
Dog Margrett2-3
Person Isaac-5 has:
Rat Freckly5-1
Person Dawn-1 has:
Cymric Molly1-1
Mutt Spot1-2 【代码解说】:map 可以返回她的键set 或 值 set,或键值对set;
【11.11】 Queue 队列
1)队列基础知识:队列是一个容器,从队列的一端插入元素,从另一端取出元素,并且插入顺序和取出顺序是相同的;
2)LinkedList 支持 Queue:LinkedList 提供了方法以支持队列的行为, LinkedList 实现了 Queue 接口,故LinkedList 可以作为 Queue来使用;
【Queue 由 LinkedList 来实现的 荔枝】
/*
public class LinkedList<E>
    extends AbstractSequentialList<E>
    implements List<E>, Deque<E>
*/
// Queue 由 LinkedList 来实现的 荔枝
public class QueueDemo {
	public static void printQ(Queue queue) {
		while (queue.peek() != null) // peek() 获取第一个元素,列表为空,返回null,不会抛异常
			System.out.print(queue.remove() + " ");
		System.out.println();
	}

	public static void main(String[] args) {
		// LinkedList 是 Queue的子类
		// 确切地说, LinkedList 是 Deque 的实现类,而Deque 是 Queue的子类
		Queue<Integer> queue = new LinkedList<Integer>();
		Random rand = new Random(47);
		for (int i = 0; i < 10; i++)
			queue.offer(rand.nextInt(i + 10)); // offer() == add() 方法,元素进队,在队尾插入
		printQ(queue);

		Queue<Character> qc = new LinkedList<Character>();
		for (char c : "Brontosaurus".toCharArray())
			qc.offer(c);
		printQ(qc);

		LinkedList<String> mylist = new LinkedList<>(); // 容器为空,因为没有元素
		mylist.element(); // LinkedList.element() == getFirst() 方法;为空抛异常
	}
}
// 打印结果:
8 1 1 1 5 14 3 1 0 1
B r o n t o s a u r u s
Exception in thread "main" java.util.NoSuchElementException
at java.util.LinkedList.getFirst(LinkedList.java:244)
at java.util.LinkedList.element(LinkedList.java:663)
at chapter11.QueueDemo.main(QueueDemo.java:33)
1)插入尾部:offer() == add() 方法
2)不删除头部并返回头部: peek() 当queue为空返回空, element() ==getFirst() 抛出 NoSuchElementException;
3)删除头部并返回头部: poll() 当queue为空返回空, remove() 抛出NoSuchElementException;
【11.11.1】 PriorityQueue 优先级队列
1)优先级队列: 声明下一个弹出元素是最需要的元素(具有最高的优先级);
【荔枝】优先级队列 PriorityQueue 荔枝(默认优先级排序规则 和 自定义优先级排序规则)
// 优先级队列 PriorityQueue 荔枝(默认优先级排序规则 和 自定义优先级排序规则)
public class PriorityQueueDemo {
	public static void main(String[] args) {
		PriorityQueue<Integer> priorityQueue = new PriorityQueue<Integer>();
		Random rand = new Random(47);
		for (int i = 0; i < 10; i++)
			priorityQueue.offer(rand.nextInt(i + 10)); // 入队,插入队尾
		QueueDemo.printQWithStr("默认是自然排序 == ASCII排序规则, priorityQueue = ", priorityQueue); // 默认是自然排序 == ASCII排序规则

		List<Integer> ints = Arrays.asList(25, 22, 20, 18, 14, 9, 3, 1, 1, 2,
				3, 9, 14, 18, 21, 23, 25); // 不可变的列表
		priorityQueue = new PriorityQueue<Integer>(ints);
		QueueDemo.printQWithStr("默认是自然排序 == ASCII排序规则, priorityQueue = ", priorityQueue);

		// 自定义排序规则
		priorityQueue = new PriorityQueue<Integer>(ints.size(),
				Collections.reverseOrder()); // 优先级逆序队列.
		priorityQueue.addAll(ints); // 添加整个List 元素
		QueueDemo.printQWithStr(" 自定义排序规则 == 优先级逆序队列 Collections.reverseOrder(), priorityQueue = ", priorityQueue);

		String fact = "EDUCATION SHOULD ESCHEW OBFUSCATION";
		List<String> strings = Arrays.asList(fact.split("")); // 注意这种分割方式和分割结果
		PriorityQueue<String> stringPQ = new PriorityQueue<String>(strings);
		QueueDemo.printQWithStr("默认是自然排序 == ASCII排序规则, stringPQ = ", stringPQ);

		// 自定义排序规则
		stringPQ = new PriorityQueue<String>(strings.size(),
				Collections.reverseOrder()); // 优先级逆序队列.
		stringPQ.addAll(strings);
		QueueDemo.printQWithStr(" 自定义排序规则 == 优先级逆序队列 Collections.reverseOrder(), stringPQ = ", stringPQ);

		Set<Character> charSet = new HashSet<Character>();
		for (char c : fact.toCharArray())
			charSet.add(c); // Autoboxing 自动装箱
		PriorityQueue<Character> characterPQ = new PriorityQueue<Character>(charSet);
		QueueDemo.printQWithStr("HashSet构造的PriorityQueue,并ASCII排序规则后, characterPQ = ", characterPQ);
	}
}
// 打印结果;
默认是自然排序 == ASCII排序规则, priorityQueue = 0 1 1 1 1 1 3 5 8 14 (优先级重复)
默认是自然排序 == ASCII排序规则, priorityQueue = 1 1 2 3 3 9 9 14 14 18 18 20 21 22 23 25 25 (优先级重复)
自定义排序规则 == 优先级逆序队列 Collections.reverseOrder(), priorityQueue = 25 25 23 22 21 20 18 18 14 14 9 9 3 3 2 1 1 (同上)
默认是自然排序 == ASCII排序规则, stringPQ = A A B C C C D D E E E F H H I I L N N O O O O S S S T T U U U W (同上)
自定义排序规则 == 优先级逆序队列 Collections.reverseOrder(), stringPQ = W U U U T T S S S O O O O N N L I I H H F E E E D D C C C B A A
HashSet构造的PriorityQueue,并ASCII排序规则后, characterPQ = A B C D E F H I L N O S T U W (优先级不重复)
【11.12】Collection 和 Iterator
1)Collection 是描述所有容器共性的根接口。 容器之间的共性都是通过 迭代器来达成的。
2)要实现 Collection 接口就需要 提供Iterator() 方法;
【荔枝】容器的两种遍历方式
// 容器的两种遍历方式: 接口遍历 和 迭代器遍历(其遍历方式 与 底层容器 解耦合).
public class InterfaceVsIterator {
	public static void display(Iterator<Pet> it) { // 参数是 Iteraotr 迭代器类型
		while (it.hasNext()) {
			Pet p = it.next();
			System.out.print(p.id() + ":" + p + " ");
		}
		System.out.println();
	}
	public static void display(Collection<Pet> pets) { // 参数是 Collection类型
		for (Pet p : pets)
			System.out.print(p.id() + ":" + p + " ");
		System.out.println();
	}
	public static void main(String[] args) {
		List<Pet> petList = Pets.arrayList(8);
		Set<Pet> petSet = new HashSet<Pet>(petList);
		Map<String, Pet> petMap = new LinkedHashMap<String, Pet>();
		String[] names = ("Ralph, Eric, Robin, Lacey, "
				+ "Britney, Sam, Spot, Fluffy").split(", ");
		for (int i = 0; i < names.length; i++)
			petMap.put(names[i], petList.get(i));

		display(petList); // 通过 Collection接口 遍历
		display(petSet); // 通过 Collection接口 遍历
		display(petList.iterator()); // 通过 迭代器 遍历
		display(petSet.iterator()); // 通过 迭代器  遍历

		System.out.println(petMap);
		System.out.println(petMap.keySet());

		display(petMap.values()); // 通过 Collection接口 遍历
		display(petMap.values().iterator()); // 通过 迭代器 遍历
	}
}
// 打印结果 :
0:Rat 1:Manx 2:Cymric 3:Mutt 4:Pug 5:Cymric 6:Pug 7:Manx
0:Rat 1:Manx 2:Cymric 3:Mutt 4:Pug 5:Cymric 6:Pug 7:Manx
0:Rat 1:Manx 2:Cymric 3:Mutt 4:Pug 5:Cymric 6:Pug 7:Manx
0:Rat 1:Manx 2:Cymric 3:Mutt 4:Pug 5:Cymric 6:Pug 7:Manx
{Ralph=Rat, Eric=Manx, Robin=Cymric, Lacey=Mutt, Britney=Pug, Sam=Cymric, Spot=Pug, Fluffy=Manx}
[Ralph, Eric, Robin, Lacey, Britney, Sam, Spot, Fluffy]
0:Rat 1:Manx 2:Cymric 3:Mutt 4:Pug 5:Cymric 6:Pug 7:Manx
0:Rat 1:Manx 2:Cymric 3:Mutt 4:Pug 5:Cymric 6:Pug 7:Manx
当实现一个 Collection时,尽量使用 迭代器的方式去遍历,而不是使用 Colleciton 的 foreach 循环遍历;
【实现Collection的两种方式】
方式1)继承 AbstractCollection;
方式2)实现 Iterable接口;
【方式1:继承AbstractCollection的荔枝(不推荐,因为如果实现类必须继承其他父类的话,那岂不是很难堪吗?)】
// 通过继承 AbstractCollection 的方式实现Collection(1)
public class CollectionSequence extends AbstractCollection<Pet> {
	private Pet[] pets = Pets.createArray(8);

	public int size() {
		return pets.length;
	}

	public Iterator<Pet> iterator() {
		return new Iterator<Pet>() {// 通过匿名内部类实现 迭代器设计模式
			private int index = 0;

			public boolean hasNext() {
				return index < pets.length;
			}

			public Pet next() {
				return pets[index++];
			}

			public void remove() { // Not implemented
				throw new UnsupportedOperationException();
			}
		};
	}

	public static void main(String[] args) {
		CollectionSequence c = new CollectionSequence();
		InterfaceVsIterator.display(c);
		InterfaceVsIterator.display(c.iterator());
	}
}
// 打印结果:
0:Rat 1:Manx 2:Cymric 3:Mutt 4:Pug 5:Cymric 6:Pug 7:Manx
0:Rat 1:Manx 2:Cymric 3:Mutt 4:Pug 5:Cymric 6:Pug 7:Manx
// 容器的两种遍历方式: 接口遍历 和 迭代器遍历(其遍历方式 与 底层容器 解耦合).
public class InterfaceVsIterator {
	 // 参数是 Iteraotr 迭代器类型 (1 首选)
	public static void display(Iterator<Pet> it) {
		while (it.hasNext()) {
			Pet p = it.next();
			System.out.print(p.id() + ":" + p + " ");
		}
		System.out.println();
	}
	// 参数是 Collection类型(不推荐,因为有可能无法通过继承AbstractCollection来实现Collection )
	public static void display(Collection<Pet> pets) {
		for (Pet p : pets)
			System.out.print(p.id() + ":" + p + " ");
		System.out.println();
}【方式2:实现 Iterable接口的荔枝(强力推荐,特别当实现类继承了其他父类而无法继承 AbstractCollection 的时候)】
class PetSequence {
	protected Pet[] pets = Pets.createArray(8);
}

// 实现一个不是 Collection 的外部类. 方式2: 实现 Iterable接口.
// 主要是为了要创建一个 自定义的 迭代器来 遍历 Collection 中的元素.
public class NonCollectionSequence extends PetSequence implements Iterable<Pet>{
	@Override
	public Iterator<Pet> iterator() {
		return new Iterator<Pet>() {
			private int index = 0;

			public boolean hasNext() {
				return index < pets.length;
			}

			public Pet next() {
				return pets[index++];
			}

			public void remove() { // Not implemented
				throw new UnsupportedOperationException();
			}
		};
	}

	public static void main(String[] args) {
		NonCollectionSequence nc = new NonCollectionSequence();
		InterfaceVsIterator.display(nc.iterator());
	}
}
// 打印结果: 0:Rat 1:Manx 2:Cymric 3:Mutt 4:Pug 5:Cymric 6:Pug 7:Manx 方式1)迭代器的方式:参数是 Iteraotr 迭代器类型 (1 首选);
方式2)foreach 循环:参数是 Collection类型(不推荐,因为有可能无法通过继承AbstractCollection来实现Collection );
【Collection实现类的总结】当然了,条件允许的话,你既可以继承 AbstractCollection 也可以 实现 Iterable 接口,以利于代码维护;
【11.13】foreach 与 迭代器
1)foreach 遍历: foreach 不仅用于数组,也可以用于 Collection 的任何容器;
【foreach遍历容器的荔枝】
// foreach 工作的 荔枝.
public class ForEachCollections {
	public static void main(String[] args) {
		Collection<String> cs = new LinkedList<String>();
		Collections.addAll(cs, "Take the long way home".split(" "));
		for (String s : cs)
			System.out.print("'" + s + "' ");
	}
}
// 打印结果: 'Take' 'the' 'long' 'way' 'home'
2)foreach 工作原理: 因为 java se5 引入了 Iterable 接口, 该接口包含一个能够产生 Iterator 的 iterator() 方法, 并且 Iterable 接口被 foreach 用来在 序列中移动。如果实现类实现了 Iterable,则都可以用 foreach 去遍历 该实现类的对象数组, 或以该实现类作为泛型的容器;
【foreach 遍历的荔枝(这个荔枝非常重要)】
// 只要创建了任何实现 Iterable的类,都可以将它用于 foreach 语句中.
public class IterableClass implements Iterable<String> {
	protected String[] words = ("And that is how "
			+ "we know the Earth to be banana-shaped.").split(" ");

	public Iterator<String> iterator() {
		/* 返回一个匿名内部类 */
		return new Iterator<String>() {
			private int index = 0;

			public boolean hasNext() {
				return index < words.length;
			}

			public String next() {
				return words[index++];
			}

			public void remove() { // Not implemented
				/* 注意这里抛出的异常类型UnsupportedOperationException */
				throw new UnsupportedOperationException();
			}
		};
	}

	public static void main(String[] args) {
		for (String s : new IterableClass())
			System.out.print(s + " ");
		System.out.println();
	}
}
//  打印结果: And that is how we know the Earth to be banana-shaped.
【foreach 用于遍历数组】
// foreach 语句也可以 应用于 遍历数组
public class ArrayIsNotIterable {
	static <T> void test(Iterable<T> ib) {
		for (T t : ib)
			System.out.print(t + " ");
	}

	public static void main(String[] args) {
		test(Arrays.asList(1, 2, 3));
		String[] strings = { "A", "B", "C" };
		// An array works in foreach, but it's not Iterable:
		//  test(strings);
		// You must explicitly convert it to an Iterable:
		test(Arrays.asList(strings));
	}
}
//打印结果: 1 2 3 A B C
【foreach荔枝--打印操作系统环境变量】
/* 打印操作系统环境变量  */
public class EnvironmentVariables {
	public static void main(String[] args) {
		for (Map.Entry entry : System.getenv().entrySet()) { // entry 是一个 Set
			System.out.println(entry.getKey() + ": " + entry.getValue());
		}
	}
}
// 打印结果:
LOCALAPPDATA: C:\Users\pacoson\AppData\Local
PROCESSOR_LEVEL: 6
FP_NO_HOST_CHECK: NO
USERDOMAIN: pacoson-PC
LOGONSERVER: \\PACOSON-PC
JAVA_HOME: D:\java\jdk1.8.0_91
SESSIONNAME: Console
ALLUSERSPROFILE: C:\ProgramData
PROCESSOR_ARCHITECTURE: AMD64
PSModulePath: C:\Windows\system32\WindowsPowerShell\v1.0\Modules\
SystemDrive: C:
APPDATA: C:\Users\pacoson\AppData\Roaming
USERNAME: pacoson
windows_tracing_logfile: C:\BVTBin\Tests\installpackage\csilogfile.log
ProgramFiles(x86): C:\Program Files (x86)
CommonProgramFiles: C:\Program Files\Common Files
Path: C:\ProgramData\Oracle\Java\javapath;.;C:\Windows\system32;C:\Windows;C:\Windows\System32\Wbem;C:\Windows\System32\WindowsPowerShell\v1.0\;D:\java\jdk1.8.0_91\bin;D:\Program Files (x86)\MySQL\MySQL Server 5.1\bin;C:\Program Files (x86)\MySQL\MySQL Server 5.1\bin;E:\cmb\elasticsearch\elasticsearch-5.2.0\bin;E:\cmb\elasticsearch\kibana-5.2.0-windows-x86\bin;
PATHEXT: .COM;.EXE;.BAT;.CMD;.VBS;.VBE;.JS;.JSE;.WSF;.WSH;.MSC
OS: Windows_NT
windows_tracing_flags: 3
COMPUTERNAME: PACOSON-PC
PROCESSOR_REVISION: 3c03
CLASSPATH: .;D:\java\jdk1.8.0_91\lib\tools.jar;D:\java\jdk1.8.0_91\lib\dt.jar;
CommonProgramW6432: C:\Program Files\Common Files
ComSpec: C:\Windows\system32\cmd.exe
ProgramData: C:\ProgramData
ProgramW6432: C:\Program Files
HOMEPATH: \Users\pacoson
SystemRoot: C:\Windows
TEMP: C:\Users\pacoson\AppData\Local\Temp
HOMEDRIVE: C:
PROCESSOR_IDENTIFIER: Intel64 Family 6 Model 60 Stepping 3, GenuineIntel
USERPROFILE: C:\Users\pacoson
TMP: C:\Users\pacoson\AppData\Local\Temp
CommonProgramFiles(x86): C:\Program Files (x86)\Common Files
ProgramFiles: C:\Program Files
PUBLIC: C:\Users\Public
NUMBER_OF_PROCESSORS: 4
windir: C:\Windows
=::: ::\
【11.13.1】适配器方法惯用法,适配器设计模式
1)添加一个能够产生 Iterable对象的方法:
【反向迭代器的荔枝】
// ArrayList的子类
class ReversibleArrayList<T> extends ArrayList<T> {
	public ReversibleArrayList(Collection<T> c) {
		super(c);
	}
	/* 添加一个能够产生 Iterable对象的方法  */
	public Iterable<T> reversed() {
		return new Iterable<T>() { // 匿名内部类
			// 这里会产生一个  反向迭代器
			public Iterator<T> iterator() {
				return new Iterator<T>() {
					int current = size() - 1;

					public boolean hasNext() {
						return current > -1;
					}
					public T next() {
						return get(current--);
					}
					public void remove() { // Not implemented
						throw new UnsupportedOperationException();
					}
				};
			}
		};
	}
}
public class AdapterMethodIdiom {
	public static void main(String[] args) {
		ReversibleArrayList<String> ral = new ReversibleArrayList<String>(
				Arrays.asList("To be or not to be".split(" ")));
		for (String s : ral) // foreach 循环遍历
			System.out.print(s + " ");
		System.out.println();

		for (String s : ral.reversed()) // 反向迭代遍历
			System.out.print(s + " ");
	}
}
// 打印结果:
// To be or not to be
// be to not or be To
【多种迭代器方式的荔枝】
// 多种迭代器方式
public class MultiIterableClass extends IterableClass {
	public Iterable<String> reversed() {
		return new Iterable<String>() {
			public Iterator<String> iterator() {
				return new Iterator<String>() { // 返回一个 逆向迭代器
					int current = words.length - 1;

					public boolean hasNext() {
						return current > -1;
					}
					public String next() {
						return words[current--];
					}
					public void remove() { // Not implemented
						throw new UnsupportedOperationException();
					}
				};
			}
		};
	}
	public Iterable<String> randomized() {
		return new Iterable<String>() {
			public Iterator<String> iterator() { // 翻译一个随机混排后的迭代器
				List<String> shuffled = new ArrayList<String>(
						Arrays.asList(words));
				Collections.shuffle(shuffled, new Random(47));
				return shuffled.iterator();
			}
		};
	}
	public static void main(String[] args) {
		MultiIterableClass mic = new MultiIterableClass();
		for (String s : mic.reversed()) // 逆向迭代
			System.out.print(s + " ");
		System.out.println();

		for (String s : mic.randomized()) // 随机迭代
			System.out.print(s + " ");
		System.out.println();

		for (String s : mic) // foreach 循环
			System.out.print(s + " ");
	}
}
// 打印结果:
banana-shaped. be to Earth the know we how is that And
is banana-shaped. Earth that how the be And we know to
And that is how we know the Earth to be banana-shaped. 【荔枝--Arrays.asList()返回的List 是否用 ArrayList 进行包装的 区别】
//  Arrays.asList()返回的List 是否用 ArrayList 进行包装的 区别.
public class ModifyingArraysAsList {
	public static void main(String[] args) {
		Random rand = new Random(47);
		Integer[] ia = { 1, 2, 3, 4, 5, 6, 7, 8, 9, 10 };
		List<Integer> list1 = new ArrayList<Integer>(Arrays.asList(ia));
		/* ArrayList的构造函数首先会拷贝数组,所以List引用的数组与原数组不是同一个数组  */
		System.out.println("Before shuffling: list1 = " + list1);
		Collections.shuffle(list1, rand);
		System.out.println("After shuffling: Collections.shuffle(list1, rand), list1 = " + list1);
		System.out.println("array: Arrays.toString(ia) = " + Arrays.toString(ia));

		System.out.println("\n================================================\n");
		List<Integer> list2 = Arrays.asList(ia);
		/* 没有使用 ArrayList 构造函数,所以 list2 引用的数组 与 原数组 ia 是同一个数组  */
		System.out.println("Before shuffling: " + list2);
		Collections.shuffle(list2, rand);
		System.out.println("After shuffling: " + list2);
		System.out.println("array: " + Arrays.toString(ia));
	}
}
// 打印结果 :
Before shuffling: list1 = [1, 2, 3, 4, 5, 6, 7, 8, 9, 10]
After shuffling: Collections.shuffle(list1, rand), list1 = [4, 6, 3, 1, 8, 7, 2, 5, 10, 9]
array: Arrays.toString(ia) = [1, 2, 3, 4, 5, 6, 7, 8, 9, 10]
================================================
Before shuffling: [1, 2, 3, 4, 5, 6, 7, 8, 9, 10]
After shuffling: [9, 1, 6, 3, 7, 2, 5, 10, 4, 8]
array: [9, 1, 6, 3, 7, 2, 5, 10, 4, 8]
【11.14】总结


 578
578

 被折叠的 条评论
为什么被折叠?
被折叠的 条评论
为什么被折叠?
 到【灌水乐园】发言


