


本文参考并引用了该博文http://blog.csdn.net/qinjuning/article/details/7247126中的一些内容,对原作者表示感谢。
世界本是无边无界的,可是我们的眼睛我们的心约束了我们所看到的“世界”。
在Android中,一个View视图是没有边界的,Canvas是没有边界的,只不过我们绘制某一个View时进行了一定的限制或者操作(例如 : translate(平移)、clipRect(剪切)等)。我们可以将这种无边界的视图称为“视图坐标”,它不受物理屏幕限制。而通常我们所理解的一个Layout布局文件只是父视图为子视图分配的一个可显示区域,超出显示区域的内容将不会被显示,这种有边界的显式区域称为“布局坐标”------即父视图给子视图分配的布局(layout)大小。如下图所示:
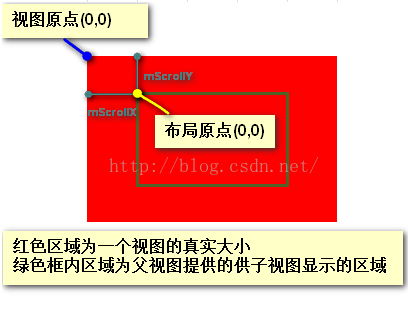
视图坐标位于视图的左上角,绿色框框表示父视图给子视图规定的区域,即子视图的布局坐标,布局坐标的原点在该区域的左上角。超出该区域的内容是不可见的。为了让子视图原先不在显式区域中的内容进入显式区域,就需要对子视图进行移动。移动是通过scrollTo()或者scrollBy()方法进行的。View类还提供了两个属性mScrollX和mScrollY来描述视图坐标原点与布局坐标原点间的距离。mScrollX和mScrollY是在视图坐标系下,以视图坐标原点为基准,以像素为单位来进行测量,其中mScrollX用来描述当前视图坐标原点与布局坐标原点间的水平距离,正值代表布局原点在视图原点的右侧,负值代表布局原点在视图原点的左侧。mScrollY用来描述当前视图坐标原点与布局坐标原点间的水平距离,正值代表布局原点在视图原点的下方,负值代表布局原点在视图原点的上方。
看几个图示:


scrollTo和scrollBy方法就是让视图进行移动,哪个视图调用了scrollTo/scrollBy方法,就意味着哪个视图要开始移动。
看一下scrollTo和scrollBy方法的作用:
public void scrollTo(int x,int y) {
        if (mScrollX != x || mScrollY != y) {
            int oldX =mScrollX;
            int oldY =mScrollY;
            mScrollX = x;
           mScrollY = y;
           invalidateParentCaches();
            onScrollChanged(mScrollX, mScrollY, oldX,oldY);
            if(!awakenScrollBars()) {
               postInvalidateOnAnimation();
            }
        }
}
scrollTo方法的作用其实就是把当前的mScrollX和mScrollY的值改为方法参数传入的x和y值。如图所示:

如果想从左侧显式状况变为右侧的显示状况,就在子视图上调用scrollTo(100,-50)即可。随着方法的返回,mSrollX就从-100变为了100,mScrollY就从50变为了-50。
public void scrollBy(int x,int y) {
        scrollTo(mScrollX+ x, mScrollY + y);
}
scrollBy方法的作用就是把当前的mScrollX和mScrollY的值加上方法参数传入的x和y值。如图所示:

如果想从左侧显式状况变为右侧的显示状况,就在子视图上调用scrollBy(200,-100)即可。随着方法的返回,mSrollX就从-100加上200变为了100,mScrollY就从50加上-100变为了-50。
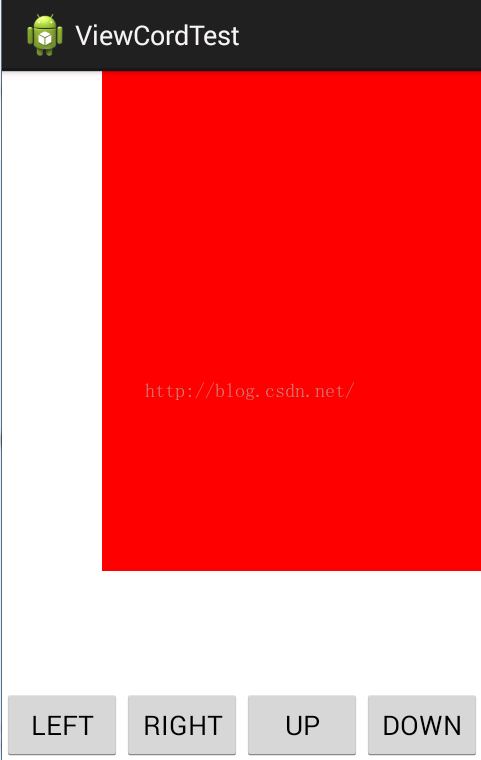
接下来做一个实际的小例子,运行时界面如图所示:
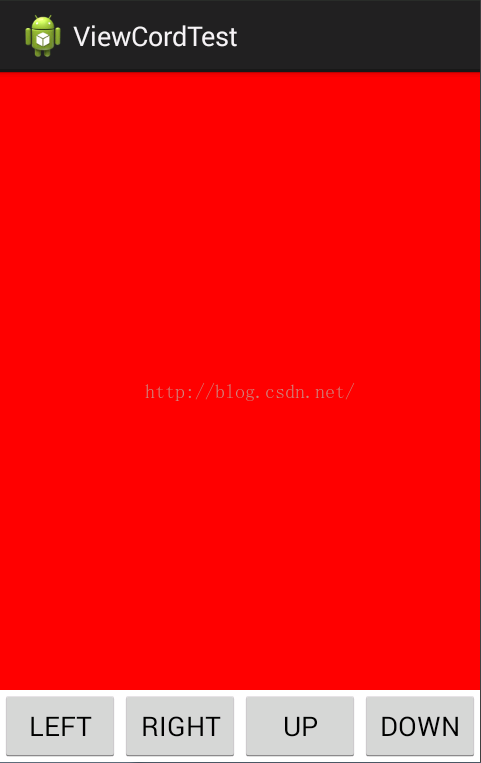
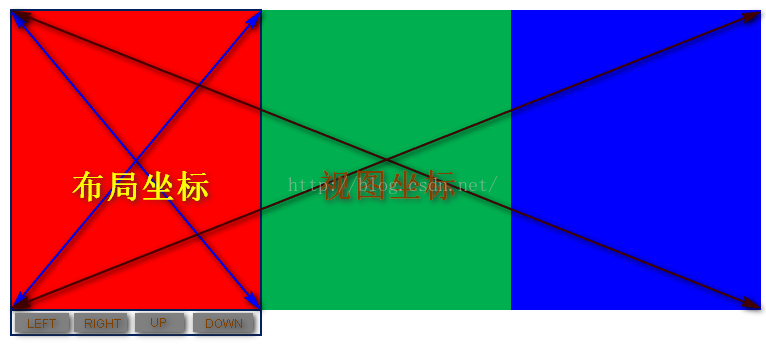
手机界面底部是四个按钮,红色部分是一个3倍屏幕宽的子视图,该子视图是一个LinearLayout,里面水平放置了3个ImageView,每一个ImageView有不同的颜色。初始时,子视图的视图坐标系原点与子视图的布局坐标系原点重合。
所以,该例子的实际的样子如下图所示:
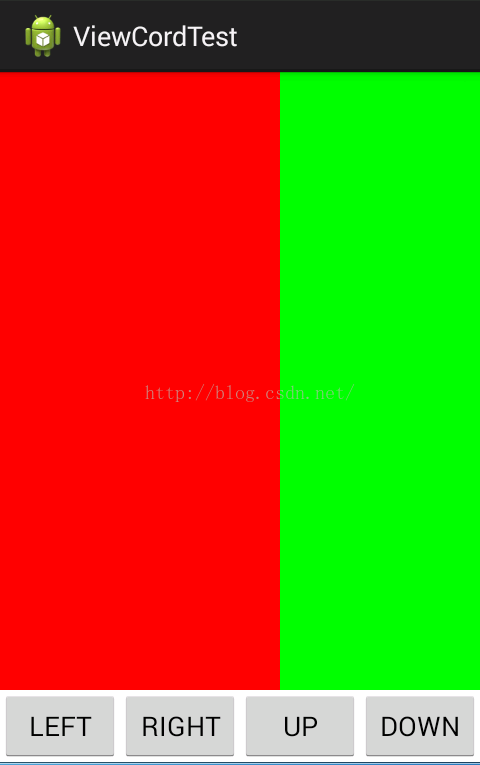
当点击“LEFT”或者“RIGHT”按钮的时候,子视图会在水平方向向左/向右移动100个像素,当点击“UP”或者“DOWN”按钮的时候,子视图会在垂直方向向上/向下移动100个像素。其中,向左和向上平移时,使用scrollBy方法实现,向右和向下平移时,使用scrollTo方法实现。
res/layout/activity_main.xml
<RelativeLayoutxmlns:android="http://schemas.android.com/apk/res/android"
    android:id="@+id/container"
   android:layout_width="match_parent"
   android:layout_height="match_parent" >
    <LinearLayout
       android:id="@+id/iv_container"
       android:layout_width="wrap_content"
       android:layout_height="match_parent"
        android:layout_above="@+id/bottom"
       android:orientation="horizontal" >
    </LinearLayout>
    <LinearLayout
       android:id="@+id/bottom"
       android:layout_width="match_parent"
       android:layout_height="wrap_content"
        android:layout_alignParentBottom="true">
        <Button
           android:id="@+id/btn_left"
           android:layout_width="0dp"
           android:layout_height="wrap_content"
           android:layout_weight="1"
           android:onClick="left"
           android:text="LEFT" />
        <Button
           android:id="@+id/btn_right"
           android:layout_width="0dp"
           android:layout_height="wrap_content"
           android:layout_weight="1"
           android:onClick="right"
            android:text="RIGHT" />
        <Button
           android:id="@+id/btn_up"
           android:layout_width="0dp"
           android:layout_height="wrap_content"
           android:layout_weight="1"
           android:onClick="up"
            android:text="UP" />
        <Button
           android:id="@+id/btn_down"
           android:layout_width="0dp"
           android:layout_height="wrap_content"
           android:layout_weight="1"
           android:onClick="down"
            android:text="DOWN"/>
    </LinearLayout>
</RelativeLayout>
src/MainActivity.java
<pre name="code" class="java">public class MainActivity extends Activity {
	private static final String TAG="MainActivity";
	RelativeLayout container;
	LinearLayout ll;
	int width,height;
	@Override
	protected void onCreate(Bundle savedInstanceState) {
		super.onCreate(savedInstanceState);
		setContentView(R.layout.activity_main);
		container = (RelativeLayout) findViewById(R.id.container);
		ll  =(LinearLayout) findViewById(R.id.iv_container);
		ll.setOrientation(LinearLayout.HORIZONTAL);
		width = getResources().getDisplayMetrics().widthPixels;
		height = getResources().getDisplayMetrics().heightPixels;
		ImageView iv = new ImageView(this);
		LinearLayout.LayoutParams params = new LinearLayout.LayoutParams(width, height);
		iv.setBackgroundColor(Color.RED);
		ll.addView(iv, params);
		iv = new ImageView(this);
		iv.setBackgroundColor(Color.GREEN);
		ll.addView(iv, params);
		iv = new ImageView(this);
		iv.setBackgroundColor(Color.BLUE);
		ll.addView(iv, params);
	}
	public void left(View v){
		ll.scrollBy(-100, 0);
		Log.d(TAG, "mScrollX/mScrollY: "+ll.getScrollX()+"/"+ll.getScrollY());
	}
	public void right(View v){
		ll.scrollTo(ll.getScrollX()+100, ll.getScrollY());
		Log.d(TAG, "mScrollX/mScrollY: "+ll.getScrollX()+"/"+ll.getScrollY());
	}
	public void up(View v){
		ll.scrollBy(0, 100);
		Log.d(TAG, "mScrollX/mScrollY: "+ll.getScrollX()+"/"+ll.getScrollY());
	}
	public void down(View v){
		ll.scrollTo(ll.getScrollX(), ll.getScrollY()-100);
		Log.d(TAG, "mScrollX/mScrollY: "+ll.getScrollX()+"/"+ll.getScrollY());
	}
}
点击两次Right按钮后的屏幕效果和Logcat输出:

点击一次Left按钮三次Up按钮后的屏幕效果和Logcat输出:

如果把移动视图的与手势监听器结合起来,就可以实现子视图随手指滑动的效果。
将上面的代码稍微修改一下,因为要使用手势监听器接受动作事件,因此要用一个自定义View继承LinearLayout重写onTouchEvent转发动作事件给GestureDetector。
public class MyViewGroup extends LinearLayout{
	private int windowHeight,windowWidth;
	int downX,downY;
	int span;
	GestureDetector detector;
	SimpleOnGestureListener listener;

	public MyViewGroup(Context context, AttributeSet attrs, int defStyle) {
		super(context, attrs, defStyle);
		init(context);
	}

	public MyViewGroup(Context context, AttributeSet attrs) {
		this(context, attrs,0);
	}

	public MyViewGroup(Context context) {
		this(context,null);
	}

	private void init(Context context) {
		//获得当前使用设备的屏幕宽度和高度
		windowWidth = context.getResources().getDisplayMetrics().widthPixels;
		windowHeight = context.getResources().getDisplayMetrics().heightPixels;
		//添加3个与当前屏幕大小一致的ImageView,每一个ImageView显示一种颜色
		LinearLayout.LayoutParams params  = new LayoutParams(windowWidth, windowHeight);
		ImageView iv = new ImageView(context);
		iv.setBackgroundColor(Color.RED);
		addView(iv,params);
		iv = new ImageView(context);
		iv.setBackgroundColor(Color.GREEN);
		addView(iv,params);
		iv = new ImageView(context);
		iv.setBackgroundColor(Color.BLUE);
		addView(iv,params);
		//手势监听侦测到动作后,会回调OnGestureListener接口中对应的方法
		//而SimpleOnGestureListener是OnGestureListener接口的骨架实现
		listener = new SimpleOnGestureListener(){
			@Override
			public boolean onDown(MotionEvent e) {
				//Action_Down事件必须要返回true,否则后续事件都不会接收到
				return true;
			}
			@Override
			public boolean onScroll(MotionEvent e1, MotionEvent e2,
					float distanceX, float distanceY) {
				scrollBy((int) distanceX, 0);
				//此时视图最左侧与布局最左侧是重合的,不再让视图向右
				if(getScrollX()<0){
					scrollTo(0, 0);
				}
				//此时视图最右侧与布局最右侧是重合的,不再让视图向左
				if(getScrollX()>windowWidth*2){
					scrollTo(windowWidth*2, 0);
				}
				return true;
			}
			@Override
			public boolean onFling(MotionEvent e1, MotionEvent e2,
					float velocityX, float velocityY) {
				int idx = getScrollX()/windowWidth;
				//检测到快速滑动时,直接滑动到上/下一个ImageView进行显示
				//velocityX < 0,手指向左,显示下一个ImageView
				if(velocityX < 0 && idx < 2){
					scrollTo((idx + 1)*windowWidth, 0);
				}
				//手指向右,显示上一个ImageView
				if(velocityX > 0){
					scrollTo(idx*windowWidth, 0);
				}
				return true;
			}
		};
		//创建手势监听器对象
		detector = new GestureDetector(context,listener);
	}

	@Override
	public boolean onTouchEvent(MotionEvent event) {
		//将检测到的所有动作事件都转发给手势监听器
		//虽然MyViewGroup有三个子控件,但是ImageView的clickable属性默认为false
		//因此事件虽然下发了,但是最终会返回到这里由MyViewGroup自行处理
		//也可以使用onInterceptTouchEvent将事件拦截下来
			return detector.onTouchEvent(event);
	}
}
MainActivity的布局文件可以只保留根RelativeLayout作为容器:
<RelativeLayoutxmlns:android="http://schemas.android.com/apk/res/android"
    android:id="@+id/container"
   android:layout_width="match_parent"
   android:layout_height="match_parent" >
</RelativeLayout>
MainActivity代码:
public class MainActivity extends Activity {
    RelativeLayoutcontainer;
    MyViewGroup mvg;
    @Override
    protected voidonCreate(Bundle savedInstanceState) {
        super.onCreate(savedInstanceState);
        setContentView(R.layout.activity_main);
        setTitle("手势测试");
        container =(RelativeLayout) findViewById(R.id.container);
        mvg = newMyViewGroup(this);
        container.addView(mvg);
    }
}
将MyViewGroup用代码添加到RelativeLayout中,然后就可以开始滑动了。手势监听器可以区分缓慢滑动和快速滑动。缓慢滑动时视图逐渐移动,而快速滑动时直接移动到上/下一个ImageView。


 1378
1378


 被折叠的 条评论
为什么被折叠?
被折叠的 条评论
为什么被折叠?
 到【灌水乐园】发言


