


看了很多关于制作ActiveX的,但是说起用 VS2005制作ActiveX控件的几乎没有, 有也是用VS2003冒充的 ,经过几天的在网上查找和自己的联想,终于算是把它搞定了,原来 用VS2005制作 ActiveX控件也是非常简单的,简单的说也只有 二三步就 OK 了:
在制作之前先展示一张图片显示一下效果:(这是我用ActiveX控件制作上传本地图片的一个简单例子)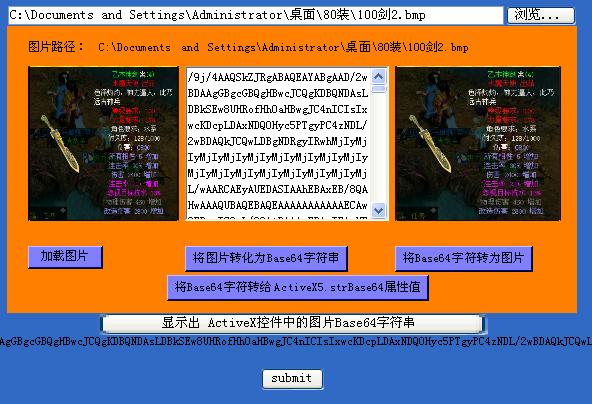
点击submit上传后图片上传到服务器: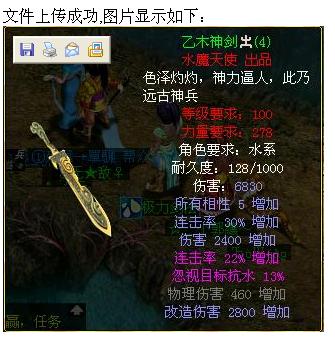
好,现在来说一说如何用 VS2005制作一个 ActiveX:
第一步:打开VS2005,新建项目=>选择windows控件库,并为你的控件取一个名字(我取名ActiveX5)=>确定=>修改你的控件名称(例如:uc1)。
第二步:在菜单上选择 项目=>控件属性(例如:ActiveX5 属性)=>生成=>勾上 "为 COM Interop 注册(P)" 复选框=>关闭。
第三步:在解决方案资源管理器中打开 文件夹Properties下面的文件 AssemblyInfo.cs,然后找到
将其修改为: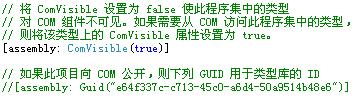
也就是将 ComVisible(false) 改为 Comviesible(true) ,并把
[assembly: Guid("e64f337c-c713-45c0-a6d4-50a9514b48e6")]
这一行进行注释了,当然这个 Guid 是各不一样的,在这里都要将其注释了
第四步:将上述Guid 复制贴粘到 ActiveX控件类的上方指明该类的属性,并添加
using System.Runtime.InteropServices; 引用 , 如下图所示: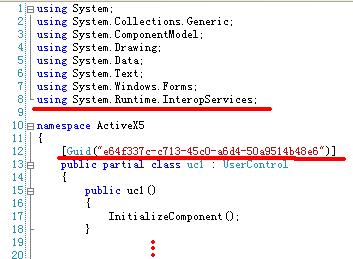
第四步:在你的控件 uc1 界面上随便画几个东西,然后=>在解决方案资源管理器中选中项目点右键=> 生成。
到这里 VS2005 制作 一个ActiveX 就算完成了,简单 吗 ? 呵呵~ 包括创建项目都只有四步,当然这只有第二步和第三步才是最关键的。
然后将你的代码进行一下测试 新建一个htm 页面 写入
<object id="ActiveX5" classid="clsid:e64f337c-c713-45c0-a6d4-50a9514b48e6" >
</object>
将这个htm放到 wwwroot 目录下测试下行不行了:)
为了更好的方便学习我特将我的实例代码贴出来供大家参考,其中包括ActiveX上传图片的方法(因为这篇主要讲的时VS2005制作ActiveX控件,所以没有详细的讲解上传图片的方法)
uc1.cs
 using
System;
using
System.Collections.Generic;
using
System.ComponentModel;
using
System.Drawing;
using
System.Data;
using
System.Text;
using
System.Windows.Forms;
using
System.Runtime.InteropServices;
namespace
ActiveX5
using
System;
using
System.Collections.Generic;
using
System.ComponentModel;
using
System.Drawing;
using
System.Data;
using
System.Text;
using
System.Windows.Forms;
using
System.Runtime.InteropServices;
namespace
ActiveX5
 ...
{
...
{ [Guid("e64f337c-c713-45c0-a6d4-50a9514b48e6")] public partial class uc1 : UserControl
 ...{ public uc1() ...{ InitializeComponent();
 } private string imagePath; private string strBase64; public string ImagePath ...{ set ...{ this.imagePath = value; } get ...{ return this.imagePath; } } public string StrBase64 ...{ get ...{ return this.strBase64; } } private void button1_Click(object sender, EventArgs e) ...{ this.label2.Text = imagePath; this.pictureBox1.ImageLocation = imagePath; } private void button2_Click(object sender, EventArgs e) ...{ Image img = Image.FromFile(imagePath); System.IO.MemoryStream stream = new System.IO.MemoryStream(); img.Save(stream, System.Drawing.Imaging.ImageFormat.Jpeg); byte[] b = stream.GetBuffer(); string s = Convert.ToBase64String(b); this.richTextBox1.Text = s; } private void button3_Click(object sender, EventArgs e) ...{ byte[] b = Convert.FromBase64String(this.richTextBox1.Text); System.IO.MemoryStream stream = new System.IO.MemoryStream(b); Bitmap bitmap = new Bitmap(stream); this.pictureBox2.Image = bitmap; } private void button4_Click(object sender, EventArgs e) ...{ strBase64 = this.richTextBox1.Text; } private void uc1_Load(object sender, EventArgs e) ...{ } }
 }
}
index.htm
<
html
>
<
head
>
<
title
>
ActiveX测试
</
title
>
<
script
type
="text/javascript"
>
...
function ChangePath() ...{ ActiveX5.ImagePath = File1.value; } function OutInfo() ...{ span1.innerHTML=ActiveX5.StrBase64; form1.strBase64.value=ActiveX5.StrBase64; }
</
script
>
</
head
>
<
body
style
="text-align:center; background-color: Highlight; font-size:12px;"
>
<
input
id
="File1"
type
="file"
onpropertychange
="ChangePath()"
style
="width: 568px"
/><
br
/>
<
object
id
="ActiveX5"
classid
="clsid:e64f337c-c713-45c0-a6d4-50a9514b48e6"
style
="font-size:12px;"
>
<
param
name
="ImagePath"
value
="nophoto.gif"
/>
</
object
>
<
br
/>
<
input
type
="button"
value
="显示出 ActiveX控件中的图片Base64字符串 "
onclick
="OutInfo()"
/>
<
br
/>
<
span
id
="span1"
></
span
>
<
form
name
="form1"
ENCTYPE
="multipart/form-data"
ACTION
="showImage.aspx"
METHOD
="POST"
target
="_blank"
>
<
input
id
="strBase64"
name
="strBase64"
type
="hidden"
/>
<
input
id
="Submit1"
type
="submit"
value
="submit"
/>
</
form
>
</
body
>
</
html
>
<%
...
@ Page Language="C#" Debug="true"
%>
<
script
runat
="server"
>
...
protected void Page_Load(object sender, EventArgs e) ...{ //方法一: //string strBase64 = Request["strBase64"]; //byte[] bb = Convert.FromBase64String(strBase64); /**//*在这一步可以将 bb 保存到 服务器的数据库当中去, 但在这里我为了演示,所以将图片显示出来看一下效果*/ //Response.ContentType = "image/Jpeg"; //Response.BinaryWrite(bb); //方法二: //string strBase64 = Request["strBase64"]; //byte[] bb = Convert.FromBase64String(strBase64); ///*在这一步可以将 bb 保存到 服务器的数据库当中去, //但在这里我为了演示,所以将图片显示出来看一下效果*/ //System.IO.MemoryStream stream = new System.IO.MemoryStream(bb); //System.Drawing.Bitmap bitmap = new System.Drawing.Bitmap(stream); //bitmap.Save(Response.OutputStream, System.Drawing.Imaging.ImageFormat.Jpeg); //将文件变为图片保存到服务器文件夹 try ...{ string strBase64 = Request["strBase64"]; byte[] bb = Convert.FromBase64String(strBase64); string filSaveAsPath = Server.MapPath("~/") + "fileName.jpg"; System.IO.FileStream fstream = new System.IO.FileStream(filSaveAsPath, System.IO.FileMode.Create); fstream.Write(bb, 0, bb.Length); fstream.Close(); this.Label1.Text = "文件上传成功,图片显示如下:"; this.Image1.ImageUrl = "fileName.jpg"; } catch (Exception ex) ...{ this.Label1.Text = "对不起!文件上传失败"; } }
</
script
>
<
asp:label
id
="Label1"
runat
="server"
text
="Label"
></
asp:label
>
<
br
/>
<
asp:image
id
="Image1"
runat
="server"
></
asp:image
>


 630
630

 被折叠的 条评论
为什么被折叠?
被折叠的 条评论
为什么被折叠?
 到【灌水乐园】发言


